1994-2004 Ford Mustang Convertible Top Installation Guide
Step
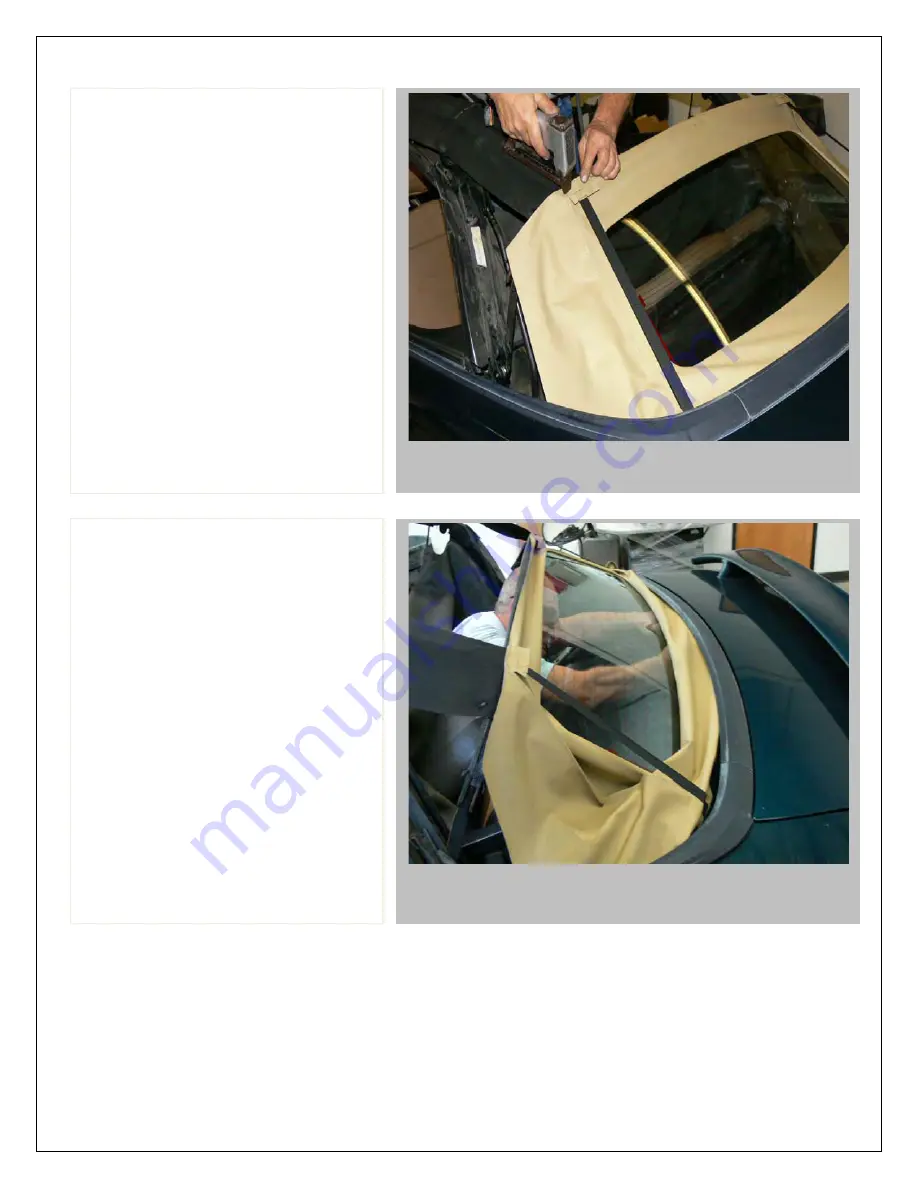
33:
Staple
the
center
and
both
sides.
sides
to
secure
window
bow.
34:
Fasten
bolt
nuts.
Start
fastening
nuts
across
lower
section.
Page 1: ...assist the professional install this product and no representations or warranties are implied as to their completeness and accuracy From time to time modifications to the design of the product may occur and this guide may not reflect all such modifications If you have any questions about the product or this installation guide please contact the reseller from whom you purchased this product WE PROV...
Page 2: ...ed to the following Any part of a SIERRA convertible top that is found to be defective under the terms of this warranty will be repaired or replaced using either new or reconditioned parts at the discretion of SIERRA In determining what constitutes a failure under the terms of this warranty the decision of SIERRA shall be final This warranty is extended to the original purchaser only and is not tr...
Page 3: ...einstalled later in the process The top construction parts on the 1994 1998 Mustangs are the same The tops on 1999 2004 are very similar Open the top as pictured and remove side quarter rubbers Step 2 Remove the header screws Remove the screws across rear header When you take out screws or anything else that will need to be re installed keep those parts together and make good notes as to where the...
Page 4: ...onvertible Top Installation Guide Step 3 Detach metal retainer Detach the metal retainer and side rubbers Step 4 Peel back the front edge of Top Start from either corner peel back the front edge of the existing convertible top ...
Page 5: ...s In the next four steps 5 8 you are going to start peeling off the rest of the existing convertible top Begin by removing screws and detaching retainers Step 6 Peel of the Top from frame Once all of the screws and retainers have been removed start peeling off the existing convertible top ...
Page 6: ...re Once all of the screws and retainers have been removed start peeling off the existing convertible top Step 8 Remove cables from pocketed sleeve Pull out the existing side hold down cables from the old convertible top and set these aside if you are planning to reuse them in your new top ...
Page 7: ...ve front corner screws Next you need to start removing the headliner Carefully remove the headliner by first removing the front corner screws Step 10 Unsnap the upper corner Now unsnap the upper corner and start peeling back the front edge being careful not to damage it ...
Page 8: ...ertible Top Installation Guide Step 11 Complete detaching headliner Complete peeling back the front edge of the headliner Step 12 Remove screws from pocketed sleeves The next step is to remove the screws from the pocketed sleeves ...
Page 9: ...r Drop down the front part of the headliner to access the top Step 14 Remove screws from window area Continue removing screws to around window to detach the headliner The back of the lining is attached by screws below the rear window and are hard to access but there is only two of them ...
Page 10: ...rop down headliner to access Top Once all screws have been removed drop down the headliner to access the top Complete the removal of the headliner lining Step 16 Remove screws from pocket sleeves Now that you have access begin removing screws from the pocketed sleeves ...
Page 11: ...p Installation Guide Step 17 Remove the metal support rail Pull out the metal support rail Step 18 Disconnect defroster wiring connectors Unplug the rear window defroster connection You will reconnect this to the new defroster window later ...
Page 12: ...g Convertible Top Installation Guide Step 19 Detach well lining cover Detach the well lining cover which is in the rear below the window Step 20 Remove bolt nuts Remove bolt nuts to remove the top metal attachment brackets ...
Page 13: ...tep 21 Remove molding screws and clips From the trunk area remove the molding screws and clips You need to do this in order to lift molding out of the way and for the old top to slide out Step 22 Remove clips REMOVE CLIPS You will also need to remove some clips ...
Page 14: ... Step 23 Lift molding without damaging it Once all of the screws and clips have been removed carefully lift molding without damaging it Step 24 Slide the Top side edges out After the molding has been lifting out of the way you can slide the top side edges out ...
Page 15: ...uide Step 25 Using needle nose pliers remove side qtr springs Next remove the window section from the top Start by removing the side quarter springs Step 26 Remove both sides Continue removing side quarter springs A pair of needle point pliers works well ...
Page 16: ...tion Guide Step 27 Separate the glass from the Top The next step is to separate the top section from the glass window section Step 28 Remove staples from rear bow On the rear bow above the glass window you will need to remove all of the staples next ...
Page 17: ...ts being careful not to damage them as you will need to reinstall these on the new top Step 30 Re attach the window Re attach the window attachment bracket by stapling The will be guide lines on the inside of the new convertible top bracket to help you line this up correctly so you do not have too much loose material below the window ...
Page 18: ...ent This is a picture of the fully stapled attachment Notice the installer added red marks dots These are where the holes are in the attachment bracket and will assist when you re attach this later Step 32 Create a V cut mark In the center of the window V cut mark to rear bow center hole ...
Page 19: ...d Mustang Convertible Top Installation Guide Step 33 Staple the center and both sides Staple the center and both sides to secure window to bow Step 34 Fasten bolt nuts Start fastening bolt nuts across lower section ...
Page 20: ... Ford Mustang Convertible Top Installation Guide Step 35 Staple the window section Staple the window section across the rear bow Step 36 Mark the center of the Top Mark the center of the rear section of the top ...
Page 21: ...ing at the center mark staple the top to the rear bow This is where the compressed air stapler comes in handy but if you do not have one a heavy duty manual stapler will work just as well Step 38 Continue stapling the Top Continue moving from the center out to the edges keeping the fabric tight and free of wrinkles ...
Page 22: ...ation Guide Step 39 Apply adhesive Using your spray contact adhesive like the 3M Super Yellow apply 1 8 foam strips on end of rear bow to protect the top from stable cuts Step 40 1 8 foam material To the right is a picture of the 1 8 foam material ...
Page 23: ...le Top Installation Guide Step 41 Foam material applied This is where the foam material is to be applied Step 42 Staple the Top portion to the attachment brackets Next you will need to staple the Top portion to the attachment brackets ...
Page 24: ...1994 2004 Ford Mustang Convertible Top Installation Guide Step 43 Staple the Top to brackets Staple the Top portion to attachment brackets Step 44 Hand cut openings Hand cut out openings for the bolts ...
Page 25: ...1994 2004 Ford Mustang Convertible Top Installation Guide Step 45 Staple the plastic strip supports Re staple the plastic strip supports Step 46 Drop the Top Drop the top into the rear lower section ...
Page 26: ...1994 2004 Ford Mustang Convertible Top Installation Guide Step 47 Re attach qtr springs Re attach the quarter springs Step 48 Re attach bolt nuts Re attach the bolt nuts but do not tighten them yet ...
Page 27: ...994 2004 Ford Mustang Convertible Top Installation Guide Step 49 Apply adhesive Apply adhesive on the front edge and header frame first Step 50 Attach metal support rails Slide in the metal support rails ...
Page 28: ...Mustang Convertible Top Installation Guide Step 51 Insert the cables through the pocket sleeves Fit the side cables through the pocket sleeves Step 52 Make sure the cable is in place Secure the side cables into place ...
Page 29: ...1994 2004 Ford Mustang Convertible Top Installation Guide Step 53 Attach side pocket flaps Attach front side pocket flaps first Step 54 Latch frame Latch frame into position ...
Page 30: ...1994 2004 Ford Mustang Convertible Top Installation Guide Step 55 Attach cross header Continue by attaching across header Step 56 Attach qtr side flaps Then attach the quarter side flaps ...
Page 31: ...4 2004 Ford Mustang Convertible Top Installation Guide Step 57 Tighten rear bolt nuts Now you can tighten the rear bolt nuts Step 58 Line up pocket sleeve with bow Secure the top pockets sleeves to the bow ...
Page 32: ...vertible Top Installation Guide Step 59 Attach screws on pocket sleeves to bow Close showing how pocket sleeves are attached to the bows Step 60 Attach screws to connect headliner rail to bow Secure the Headliner sleeves to bow ...
Page 33: ... 2004 Ford Mustang Convertible Top Installation Guide Step 61 Attach corner snaps to frame Attach front corner snaps to frame Step 62 Attach rails on both sides Attach rear quarter metal rails on both sides ...
Page 34: ...1994 2004 Ford Mustang Convertible Top Installation Guide Step 63 Re attach qtr side rubbers Attach rear quarter side rubbers Step 64 Re attach rails Attach header metal rails ...
Page 35: ...1994 2004 Ford Mustang Convertible Top Installation Guide Step 65 Re attach rubbers Attach header rubbers Step 66 Secure sleeve to bow Secure rear sleeve to bow ...
Page 36: ...1994 2004 Ford Mustang Convertible Top Installation Guide Step 67 Attach well cover Secure lower corners and attach well cover Step 68 Connect defroster wiring Plug in the defroster connections ...
Page 37: ...g Convertible Top Installation Guide Step 69 Double check for any loose areas Check your installation for any loose areas loose bolts rubbers etc and you are done Open and close to make sure everything is working YOURE DONE ...
Page 38: ...ble Distributor Reseller AutoTopsDirect com Los Angeles California Tel 888 254 7679 Email sales autotopsdirect com DISCLAIMER These instructions are provided as a guide to assist the professional install this product and no representations or warranties are implied as to their completeness and accuracy From time to time modifications to the design of the product may occur and this guide may not re...