background image

Cleaning and maintenance NL

15.3 Humidity sensor

The humidity sensor of this appliance 

determines how damp your laundry is 

during drying. The appliance changes 

the duration of the automatic program 

depending on the residual moisture of 

the laundry.

Clean Humidity Sensor

Remains of limescale, detergents and 

care products can build up on the 

humidity sensor over time. Clean the 

humidity sensor regularly.

PAY ATTENTION!

Hard or rough objects can damage 

the humidity sensor.

▶ 

Do not use hard or rough objects, 

abrasives or steel wool for cleaning.

Remark: If you do not clean the 

device as described, the device 

function may be impaired.

1. 

Open the door.

2. 

Clean the humidity sensor with a 

sponge.

37

Summary of Contents for WQ33G2DMFG

Page 1: ...installation instructions Register your product on My Siemens and discover exclusive services and offers siemens home bsh group com welcome The future moving in Siemens Home Appliances Translated from Dutch to English www onlinedoctranslator com ...

Page 2: ... 11 3 3 Energy Saving Mode 12 12 4 Starting the program 28 12 5 Adding laundry 29 12 6 Program cancel 29 12 7 Taking out the laundry 29 12 8 Switching off the device 29 12 9 Fluff filter 29 4 Set up and connection 12 4 1 Unpacking the device 12 4 2 Scope of delivery 12 12 10 Filter system of the bottom unit 31 4 3 Installation site requirements 13 12 11 Condensate tank 32 4 4 Adjusting the device ...

Page 3: ...porting Storing and drain 42 17 1 Preparing the device for transport 42 17 2 Disposal of your old appliance 42 18 Customer Service 43 18 1 Product number E no and production number FD 43 19 Consumption values 44 20 Technical data 45 3 ...

Page 4: ...sed spaces within the sly environment s to an altitude of 4000 m above sea level 1 3 Restriction of users This appliance can be used by children aged from 8 years and above and persons with reduced physical sensory or mental capabilities or lack of experience and or knowledge if they have been given supervision or instruction concerning use of the appliance in a safe way and understand the resulti...

Page 5: ... use a type marked with Never power the device via an external switching device e g a time switch or remote control Never connect the appliance to a circuit that is regularly turned on and off by the utility When the device is installed the mains plug of the mains connection cable must be freely accessible or if free access is not possible an all pole disconnecting device must be installed in the ...

Page 6: ...manufacturer s connection kit Accessories Page 27 Another placement method is not allowed Do not install the appliance in a washer dryer column if the dryer manufacturer does not offer a suitable connection set Do not install appliances from different manufacturers and with different depths and widths in a washer dryer column Do not set up a washer dryer column on a platform the devices can tilt W...

Page 7: ...s Use protective gloves when installing and transporting the device 1 5 Safer use WARNING Risk of electric shock A damaged appliance or power cord is dangerous Never use a damaged device Never pull on the power cord to disconnect the device from the power supply Always pull the plug on the power cord If the appliance or the mains cable is damaged immediately unplug the mains cable from the socket ...

Page 8: ...en can inhale or swallow small parts and choke Keep small parts away from children Do not allow children to play with small parts WARNING Risk of explosion Coal dust or flour in the vicinity of the device can cause explosions Keep the area around the device clean during use WARNING Risk of poisoning The condensed water from this appliance is not drinking water and may be contaminated with fluff Do...

Page 9: ...unwashed laundry has come into contact with solvents oil wax wax remover paint grease or stain remover it can ignite during drying Do not dry unwashed laundry in this appliance Rinse the laundry thoroughly with hot water and detergent before drying Do not use the appliance if the laundry is previously cleaned with industrial chemicals WARNING Risk of fire The laundry was not cooled sufficiently if...

Page 10: ... personnel may carry out repairs on the device Only original spare parts may be used to repair the device If the power cord of this appliance is damaged it must be replaced by the manufacturer its service agent or a similarly qualified person in order to avoid a hazard Penetrating moisture can cause a shock Do not use a steam cleaner pressure washer hoses or nozzles to clean the appliance WARNING ...

Page 11: ...g of the device can affect the operation of the device Keep the air inlet of the device clear during operation Provide adequate ventilation in the room Light objects such as hair and fluff can be drawn into the air inlet of the device during operation and affect the function of the device Keep the environment clean while using the device Keep light objects away from the device Operation with a mis...

Page 12: ...d increases energy consumption Disposal of the packaging Page 11 2 Check the device for visible damage After cleaning the filters in the filter system of the bottom unit Page 31 dry well 3 Open the appliance door The Ministry in essence Page 28 a Wetter filters extend the program duration and increase energy consumption 4 Remove the accessories from the drum 5 Close the appliance door 3 3 Energy S...

Page 13: ...column do not place on a platform 4 3 Installation site requirements PAY ATTENTION If the device is tilted more than 40 residual water can run out of the device and cause material damage Carefully tilt the device Transport the device upright Freezing residual water in the device can damage the device Do not place and use the device in frost sensitive places or outdoors If the device is used immedi...

Page 14: ...justment of the appliance with a spirit level All appliance feet must be firmly planted on the floor 4 5 Connecting the appliance electrically 1 Insert the mains plug of the appliance s connecting cable into a socket in the vicinity of the appliance The connection data of the device can be found in the technical data Page 45 2 Check the mains plug for tightness 14 ...

Page 15: ...evice 5 1 Device Here you will find an overview of the components of your device 6 5 4 3 2 1 Depending on the device type details in the image may differ e g color and shape 1 2 Air intake 4 5 Door Service valve of the bottom unit Page 34 Condensate tank Page 32 3 Fluff filter Page 29 6 Control panel Page 16 15 ...

Page 16: ...ice 5 2 Control panel You can set all functions of your device and obtain information about the operating status via the control panel 2 3 1 1 4 1 2 Programs Page 24 Program selector Page 28 3 4 Display Page 17 Buttons Page 20 16 ...

Page 17: ...e of the program 0 00 Time program Time program is set Time programs page 25 8 0kg1 Recommended load Maximum load for the set program in kg 0 45 1 Ready in time Child lock Buttons Page 22 s lights up the child lock is activated s flashes the child lock is activated and the device was operated Deactivate child lock page 33 Start Pause Start cancel or pauses lights up the program is running and can ...

Page 18: ...ive textiles is activated Buttons Page 22 4 kg half load amount of Half the load quantity is activated Buttons Page 22 Silent drying Silent drying without beeps is activated Buttons Page 22 Condensate tank server Emptying the condensed water container Page 32 Push in the condensed water container Page 33 fluff filter Cleaning the fluff filter Page 29 Filter system from the bottom unit Cleaning the...

Page 19: ...Display NL Indication name Description Program status Drying purpose cabinet dry Anti wrinkle Pause Program end Program status Program status Program status end 1 Example 19 ...

Page 20: ...gainst accidental operation If the childproof lock has been activated and the appliance has been switched off the childproof lock remains activated Child lock Page 33 Cupboard dry plus s Cupboard dry plus 1 2 3 s With the selection Cabinet dry plus the drying target is activated spring Laying the drying target determine how damp or dry the laundry is at the end of the programme is drying target Pa...

Page 21: ...et adjust sen Page 23 Iron dry s Iron dry 1 2 3 s With the Ironing selection dry the drying target is activated Laying the drying target determine how damp or dry the laundry is at the end of the programme is drying target Page 23 s With the selection 1 2 or 3 the drying target is adjusted Dry target adjust sen Page 23 Anti wrinkle s activate s deactivate Activate or deactivate the anti crease fun...

Page 22: ...Ready in s Program end s Program duration s The program end to establish The program duration is already included in the set number of hours After the program starts the program duration weather given s The program duration for time programs Set up time programs Page 25 Signal s activate s deactivate Signal after program end activate or deactivate half load s activate s deactivate Individual piece...

Page 23: ...asing after drying iron or hang the laundry 8 1 Change drying target 2 on Cupboard dry plus Cupboard dryor Iron dry to press For some automatic programmes you can change the drying target to make your laundry even drier or damper 1 Set an automatic program automatic programs Page 24 a The display shows 1 2 or 3 a The display shows the specified drying target 2 on Cupboard dry plus Cupboard dryor I...

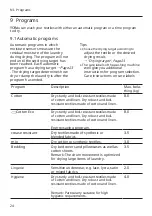
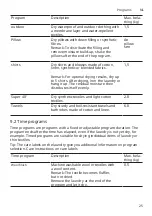
Page 24: ...nstructions on care labels Program Description Max bela thing kg Cotton Dry sturdy and boil resistant textiles made of cotton and linen Dry robust and boil resistant textiles made of cotton and linen 8 0 Cotton Eco Dry sturdy and boil resistant textiles made of cotton and linen Dry robust and boil resistant textiles made of cotton and linen Energy saving program 8 0 crease resistant Dry textiles m...

Page 25: ...ly Super 40 Dry synthetic textiles and light cotton textiles 2 0 Towels Dry sturdy and boil resistant towels and bathrobes made of cotton and linen 6 0 9 2 Time programs Time programs are programs with a fixed or adjustable program duration The program ends after the time has elapsed even if the laundry is not yet dry for example Timed programs are suitable for drying individual items of laundry o...

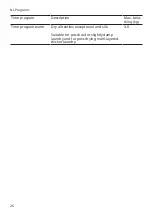
Page 26: ...rams Time program Description Max bela thing kg Time program warm Dry all textiles except wool and silk Suitable for pre dried or slightly damp laundry and for post drying multi layered thicker laundry 3 0 26 ...

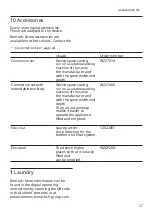
Page 27: ...th extendable worktop Device space saving run on a suitable washing machine of the same the manufacturer and with the same width and depth The pull out worktop makes it easier to operate the appliance filled and emptied WZ27400 filter mat spare part ter Lint protection for the bottom unit filter system 12022801 Elevation The device higher places so that it is easily filled and can be emptied WZDP2...

Page 28: ...aces or use a laundry net use a laundry net for small items of laundry e g children s socks Unfold and loosen the laundry or observe the program description Spin the laundry before drying 2 If necessary adjust the program settings 12 3 Filling the drum with laundry Remark To avoid creasing keep the maximum load of the Programs Page 24 heed Required The laundry is prepared Laundry Page 27 1 Open th...

Page 29: ...ith a rotating drum If you want to avoid or abort the cooling process open the door Display page 18 Remark If you do not clean the device as described the device function may be impaired Requirements s The display shows after drying end s or during use 2 Open the appliance door 3 Reload or remove the laundry 4 Close the appliance door 5 Press Start Pause 1 Open the door 2 Remove the fluff from the...

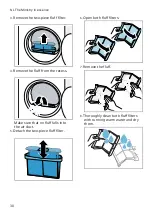
Page 30: ...luff filter 6 Open both fluff filters 7 Remove the fluff 4 Remove the fluff from the recess 8 Thoroughly clean both fluff filters with running warm water and dry them Make sure that no fluff falls into the air duct 5 Detach the two piece fluff filter 30 ...

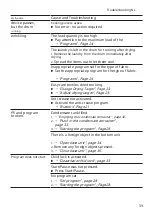
Page 31: ...er Make sure that the filter mat is not deformed or damaged 11 Close the door 4 Clean the heat exchanger cover with a soft brush 12 10 Bottom unit filter system During drying the fluff from the laundry is collected in the filter system of the bottom unit The filter system protects the device against fluff Filter system of the cleaning bottom unit If the display shows an indication during use clean...

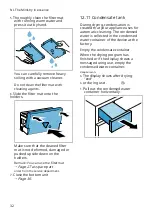
Page 32: ...hed or if the display shows a message during use empty the condensed water container Requirements s The display shows after drying end s or during use You can carefully remove heavy soiling with a vacuum cleaner Do not clean the filter mat with cleaning agents 1 Pull out the condensed water container horizontally 6 Slide the filter mat onto the holders Make sure that the cleaned filter mat is not ...

Page 33: ...Condensate tank in it scroll page 33 Push in the condensation container 13 2 Deactivate child lock Required To deactivate the child lock the appliance must be switched on Required The condensed water container Page 32 has been removed from the appliance widened Press both buttons for about 3 seconds 3s Push in the condensed water container as far as it will go a goes out in the display B 1 asis se...

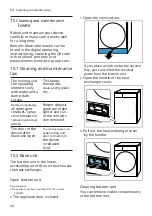
Page 34: ... The housing and the operating elements only with water and a damp cloth to take This keeps these parts clean and hygienic nic Delete immediately all detergent residues spray skin remnants or remaining residual aunts Recent deposit gene can make lighter and sun of the remains den removed The door of the device after leave use open The residual water can evaporating and odor formation in the device...

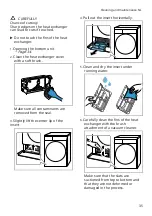
Page 35: ...nit Page 34 2 Clean the heat exchanger cover with a soft brush 5 Clean and dry the insert under running water Make sure all contaminants are removed from the seal 3 Slightly lift the center lip of the insert 6 Carefully clean the fins of the heat exchanger with the brush attachment of a vacuum cleaner Make sure that the slats are suctioned from top to bottom and that they are not deformed or damag...

Page 36: ...nit is open open bottom unit Page 34 1 Insert the heat exchanger cover on the handle Make sure that the grille is not deformed or damaged in the process 8 Clean the opening with a soft damp cloth 2 Close the heat exchanger cover handles 9 Push in the insert horizontally until the lip engages 3 Close the service door 10 Close the bottom unit Page 36 36 ...

Page 37: ...ndry Clean Humidity Sensor Remains of limescale detergents and care products can build up on the humidity sensor over time Clean the humidity sensor regularly PAY ATTENTION Hard or rough objects can damage the humidity sensor Do not use hard or rough objects abrasives or steel wool for cleaning Remark If you do not clean the device as described the device function may be impaired 1 Open the door 2...

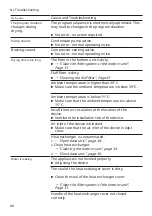
Page 38: ...bleshooting Hot and drum running Cooling process active 1 No malfunction 2 Do not change the program during the cooling process Remark The cooling process takes up to 10 minutes You can continue to operate the device Humping sound Compressor active No error normal operating noise The display is off and Start Pause clipping pert The energy saving mode is active Press any button a The display lights...

Page 39: ...type of fabric Programs Page 24 Easy care textiles dried too long Change Drying Target Page 23 Adjust drying target Page 23 Anti crease not activated Activate the anti crease program Buttons Page 21 and program broken Condensate tank filled 1 Emptying the condensate container page 32 2 Push in the condensate container page 33 3 Starting the program Page 28 There is a foreign object in the bottom u...

Page 40: ...igher than 30 C Make sure the ambient temperature is below 30 C Ambient temperature is below 15 C Make sure that the ambient temperature is above 15 C Insufficient air circulation at the location of the device Ventilate the installation site of the device Air inlet of the device is blocked Make sure that the air inlet of the device is kept clear Heat exchanger is contaminated 1 Open base unit page...

Page 41: ...of the Programs Page 24 Warm laundry feels damper than it actually is after the end of the program 1 Remove the laundry from the drum immediately after drying 2 Spread the items out to let them cool Inappropriate drying target set Change Drying Target Page 23 Drying target not adjusted Adjust drying target Page 23 Loading quantity too little Set a time program for post drying Programs Page 24 Humi...

Page 42: ... door no longer closes PAY ATTENTION If the device is used immediately after transport the refrigerant in the device may cause damage to the device Let the device rest for two hours immediately after transport before using it for the first time Tip The device may contain residual water and drip during transport Transport the device upright Requirements s The condensed water container is emptied Em...

Page 43: ...pending on the model s on the inside of the door s on the inside of the bottom holding valve s on the back of the device honeycomb s 1 service service 8 Customer Service s a service service if you have any questions about the use In order to quickly find your device data and the service telephone numbers you can write down the data If you cannot remedy a malfunction of the device yourself or if th...

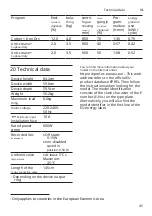
Page 44: ... to a laundry moisture content of 60 The values indicated for other programs are guideline values and have been determined in accordance with the applicable standard EN61121 Program End moisture vigilance bela thing kg centri fugue revving number t min From gangly moisture vigilance Pro gram maduur h min energy gibberish use kWh cycle Cotton Cupboard Dry Cotton Cupboard Dry Cotton Cupboard Dry Cot...

Page 45: ...tions when looking for the model The model identification consists of the slash character of the E number E No on the type plate Alternatively you will also find the model identifier in the first line of the EU energy label 0 Technical data Technical data Device height Device width Device depth Weight 84 2cm 59 8cm 59 9 cm 56 2kg1 8 0kg Maximum load thing mains voltage 220 240V 50 Hz Minimum input...

Page 46: ......

Page 47: ......

Page 48: ...BSH Hausgeräte GmbH Carl Wery Straße 34 81739 Munich GERMANY www siemens home bsh group com Manufactured by BSH Hausgeräte GmbH under the trademark license of Siemens AG 9001625466 9001625466 NL 010917 ...

Reviews: