background image

18

* Dependent on model 

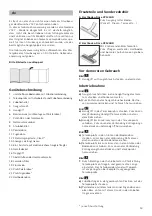
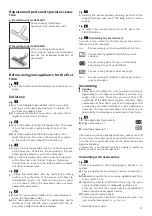
e) 

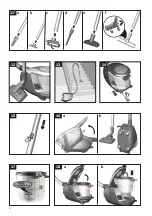
 Professional upholstery nozzle


 For gently and thoroughly cleaning upholstered fur-
niture, curtains, etc.


 For cleaning the professional upholstery nozzle, sim-
ply vacuum it using the handle.

f) 

Hard-floor nozzle


- with clip-in edge cleaning bristles:


For gentle but effective cleaning of hard floor  


  coverings (tiles, parquet, etc.) 


- without edge cleaning bristles:


For cleaning dirt in gaps and cracks 


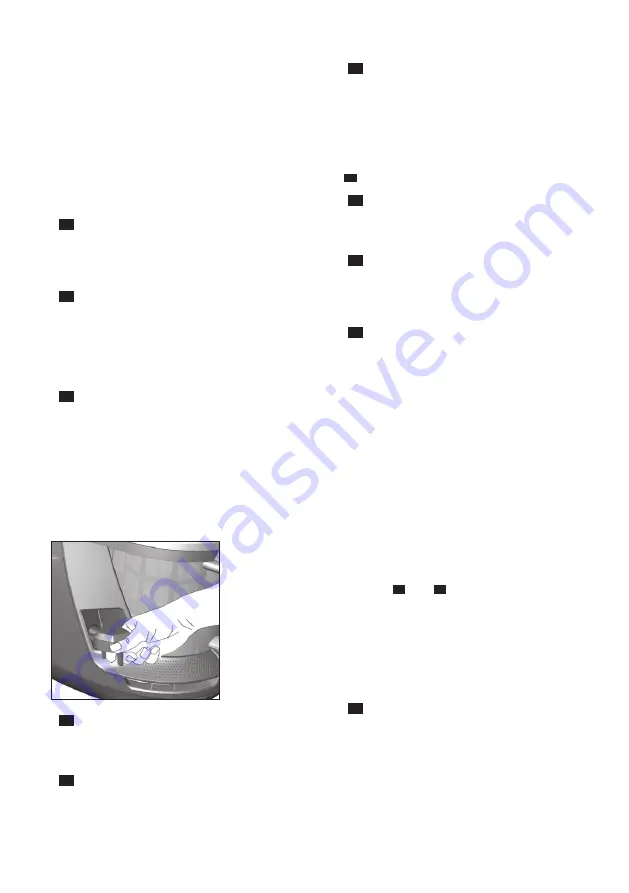
‡

The edge cleaning bristles can be removed by 
pushing the two catches in the direction of the 
arrows.

Fig. 

12


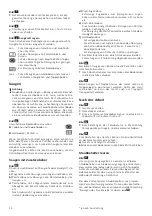
You can use the parking aid on the side of the vacuum 
cleaner if you wish to stop vacuuming for a short time.


‡

 After switching off the appliance, slide the hook on 
the floor tool into the parking aid. 

Fig. 

13*

When vacuuming stairs, the appliance must be positi-
oned at the bottom of the stairs. If it does not reach 
far enough, the appliance can also be carried using the 
carrying handle.

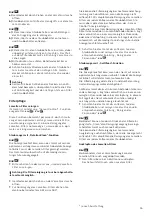
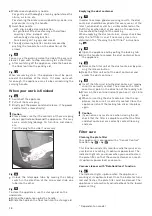
When your work is finished

Fig. 

14


‡

 Switch off the appliance.


‡

 Pull out the mains plug.


‡

 Briefly pull the power cord and release. (The power 
cord retracts automatically).

!


Caution

   Please make sure that the contacts of the mains plug 

do not protrude out beyond the appliance. This may 
cause scratching/damage to furniture and doors, 
etc.


 Turn the plug to the side if necessary. 


Fig. 

15


‡

 Unlock the telescopic tube by moving the sliding 
switch in the direction of the arrow and slide one 
tube into the other.

Fig. 

16

To store the appliance, use the storage aid on the 
underside.

a) 

 Stand the appliance up by the handle.

b) 

 Slide the hook on the floor tool into the storage aid.

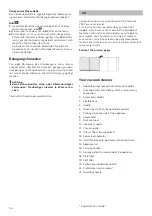
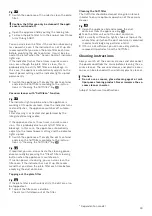
Emptying the dust container

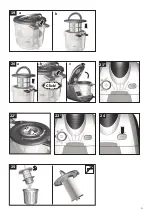
Fig. 

17

In order to achieve good vacuuming results, the dust 
container should be emptied after every use or, at the 
latest, when dust or dirt has visibly collected on the 
fluff filter or when dust at one point in the container 
has reached the height of the marking. 
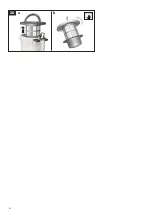
When emptying the dust container, always check how 
dirty the fluff filter is and, if necessary, clean it as 
detailed in the "Cleaning the fluff filter" instructions. 

Fig.


26


Fig. 

18

a) 

 Open the appliance lid by pulling the locking tab.

b) 

 Use the handle to remove the dust container from 
the appliance.

Fig. 

19

a) 

 Release the filter unit of the dust container by pres-
sing the release button. 

b) 

 Take the filter unit out of the dust container and 
empty the dust container.

Fig. 

20

a) 

 Insert the filter unit into the dust container, making 
sure it is correctly seated. The arrow on the filter 
cover must point in the direction of the locking tab. 

b) 

 Press on the container lid until you hear it click into 
place.

c) 

 When reinserting the dust container into the ap-
pliance, make sure it is correctly seated. Close the 
appliance lid until the locking tab clicks into place 
again.

!

 Caution

   If you notice any resistance when closing the lid, 

check that the filter is complete and that the filter 
and dust container are correctly seated.Cleaning 
and care

Filter care

Cleaning the plate filter

Your appliance is equipped with a "Sensor Control" 
Function. 

Fig.


21*

 + 

Fig.


23*


This function constantly monitors whether your vacu-
um cleaner is reaching its optimum power level. The 
indicator light lets you know when you need to clean 
the plate filter, so that the vacuum cleaner can reach 
its optimum power level once more.

Vacuum cleaner with “RotationClean” function

Fig. 

21*

The indicator lights up blue when the appliance is 
working at its optimum level. Once the indicator turns 
red and flashes, the plate filter must be cleaned. The 
appliance is automatically adjusted back to the lowest 
power setting.

Summary of Contents for VSX7

Page 1: ...s vacuum cleaner VSX7 de Gebrauchsanleitung en User manual tr Kullanım kılavuzu Register your product on My Siemens and discover siemens home bsh group com welcome The future moving in Siemens Home Appliances ...

Page 2: ...2 22 7 8 9 5 6 14 15 16 17 18 19 20 21 5 2 1 4 A B 3 11 10 12 13 ...

Page 3: ...3 9 7 4 b a 5 8 6 a b 2 b a 3 b a Click 10 1 2 2 1 1 2 1 1 2 Click Click 1 Click ...

Page 4: ...4 12 16 b a 14 13 11 b a d c e 17 b 18 a 15 2 1 1 2 f 2 1 1 ...

Page 5: ...5 24 b 19 a 21 22 Click 20 a b c 23 25 ...

Page 6: ...6 a b 26 1 2 ...

Page 7: ...7 Sicherheit 8 Gebrauchsanleitung 13 de Safety information 9 Instructions for use 16 en Güvenlik bilgileri 11 Kullanma kılavuzu 20 tr ...

Page 8: ...erade durch die Verwendung derartiger Produkte verursacht wurden Sicherheitshinweise Dieser Staubsauger entspricht den anerkannten Regeln der Technik und den einschlägigen Sicherheitsbestimmungen Das Gerät kann von Kindern ab 8 Jahren und darüber und von Personen mit verringer ten physischen sensorischen oder mentalen Fähigkeiten oder Mangel an Erfahrung und oder Wissen benutzt werden wenn sie bea...

Page 9: ...ät bei Ihrem Händler bzw einem Recyclingcenter zur Wiederverwertung ab Aktuelle Entsorgungswege erfragen Sie bitte bei Ihrem Händler oder Ihrer Ge meindeverwaltung Entsorgung Filter Filter sind aus umweltverträglichen Materialien her gestellt Sofern sie keine Substanzen enthalten die für den Hausmüll verboten sind können sie über den normalen Hausmüll entsorgt werden Please keep this instruction m...

Page 10: ...authorised after sales service personnel are permitted to carry out repairs and fit replacement parts to the vacuum cleaner Protect the vacuum cleaner from the weather moistu re and sources of heat Do not pour flammable substances or substances con taining alcohol onto the filters motor protection filter exhaust filter etc The vacuum cleaner is not suitable for use on con struction sites Vacuuming up b...

Page 11: ... kapsamımıza girmeyecek hasarla ra neden olabilir Güvenlik bilgileri Bu elektrikli süpürge geçerli teknik kurallara ve bilinen gü venlik yönetmeliklerine uygun dur tr Bu cihaz 8 yaşın altındaki çocuklar ve fiziksel algısal veya mental yeteneklerinde eksiklikler olan veya tecrü be ve veya bilgi eksikliği bu lunan kişiler tarafından an cak gözetim altında olmaları veya cihazın güvenli kullanımı hakkı...

Page 12: ...kliyat esnasında za rar görmeye karşı korur Ambalaj çevreye zarar ver meyen malzemelerden ibarettir ve bu nedenle tekrar geri kazanılabilir Almanya da artık kullanılmayan ambalaj malzemelerini Grüner Punkt adını taşıyan yeniden değerlendirme sisteminin toplama merkez lerine gönderiniz Kendi ülkenizde bu cins merkezler varsa ambalaj malzemelerinizi bu merkezlere gön dermenizi tavsiye ederiz Eski ci...

Page 13: ...Saugen glatter Böden Parkett Fliesen Terracotta B Hartboden Düse VZ124HD Mit 2 rotierenden Bürstenrollen Zum Pflegen wertvoller Hartböden und besserer Aufnahme von grobem Schmutz Vor dem ersten Gebrauch Bild 1 Handgriff auf Saugschlauch stecken und verrasten Inbetriebnahme Bild 2 a Saugschlauchstutzen in die Saugöffnung des Gerä tes schieben und hörbar verrasten b Zum Entfernen des Saugschlauches b...

Page 14: ...hränken Profilen etc Nach Gebrauch Fugendüse und Polsterdüse wieder in den Zubehörträger einsetzen d Profi Fugendüse Extralange Fugendüse zum Reinigen von Fugen Ecken und schmalen Zwischenräumen z B im Auto etc e Profi Polsterdüse Zum leichten und gründlichen Reinigen von Polster möbeln Vorhängen etc Zur Reinigung die Profi Polsterdüse einfach mit dem Handgriff absaugen f Hartbodendüse mit aufgeclipst...

Page 15: ...nnen die Filterreinigung bei nachlassender Saug leistung auch durchführen wenn die Anzeige nicht aufleuchtet Wir empfehlen die Reinigung des Lamellen Filters vor jedem Entleeren des Staubbehälters Sie muss aber spätestens bei Aufleuchten der Sensor Control Anzeige erfolgen Sollte die Anzeige trotz Abreinigung des Lamellen Filters 3 Mal hintereinander in kurzen Abständen blinken liegt dies vermutlich...

Page 16: ...chnische Änderungen vorbehalten en Congratulations on your purchase of the Siemens VSX7 vacuum cleaner This instruction manual describes various VSX7 models which means that some of the equipment features and functions described may not apply to your model You should only use original Siemens accessories which have been specially developed for your vacuum cleaner to achieve the best possible vacuu...

Page 17: ...ve or below Fig 7 Holding the power cord by the plug pull out to the required length and insert the plug into the mains socket Fig 8 To switch the vacuum cleaner on or off press the ON OFF button Fig 9 Controlling the suction level Turn the rotary control to infinitely adjust the suction level to the level required min For vacuuming curtains and delicate textiles For vacuuming upholstered furniture...

Page 18: ...tainer should be emptied after every use or at the latest when dust or dirt has visibly collected on the fluff filter or when dust at one point in the container has reached the height of the marking When emptying the dust container always check how dirty the fluff filter is and if necessary clean it as detailed in the Cleaning the fluff filter instructions Fig 26 Fig 18 a Open the appliance lid by pulli...

Page 19: ... lowest power setting and the indicator lights up red Switch the appliance off empty the dust container and clean the fluff filter according to the instruc tions in Cleaning the fluff filter Fig 26 Fig 24 If required you can also activate the cleaning proce dure manually by pressing the Clean filter cleaning button when the appliance is switched on If suction power is reducing you can also clean the fil...

Page 20: ...ar ve özel aksesuarlar A Sert zemin başlığı VZ123HD Düz zeminlerin süpürülmesi için parke fayans terakota B Sert zemin başlığı VZ124HD 2 adet döner fırça rulosu ile Değerli sert zeminlerin bakımı ve kaba kirlerin daha iyi temizlenmesi için İlk kullanımdan önce Resim 1 Tutma kolu emme hortumunun içine takılmalı ve kilitlenmelidir Çalıştırılması Resim 2 a Emme hortumu ağzını toz separatörünün emme b...

Page 21: ... başlığını tekrar aksesuar taşıyıcıya yerleştiriniz d Profesyonel dar aralık süpürme başlığı Örneğin araba vb bir yerdeki olukların köşelerin ve dar ara bölmelerin temizlenmesi için ekstra uzun dar aralık süpürme başlığı e Profesyonel koltuk süpürme başlığı Döşemelik kumaştan mobilyaların perdelerin vb eşyaların kolay ve iyi temizlenmesi için Profesyonel koltuk süpürme başlığı temizlenmesi için ko...

Page 22: ...zleme işlemi en geç Sensor Control göstergesi yandığında gerçekleşmelidir Lamel filtresinin temizlenmesine rağmen gösterge 3 defa arka arkaya kısa aralıklarla yanıp sönüyorsa muhtemelen tiftik filtresinde bir kirlenme durumu veya tıkanıklık mevcuttur Bu durumda cihaz otomatik olarak en düşük performans seviyesine alınır ve gösterge sürek li kırmızı renkte yanar Cihazı kapatınız toz haznesini boşaltı...

Page 23: ...stik akse suar parçaları normal bir plastik temizleme maddesi ile temizlenerek bakımlı olması sağlanabilir Dikkat Aşındırma maddesi cam temizleyicisi veya çok amaçlı temizleyici kullanılmamalıdır Elektrikli süpürge kesinlikle suya sokulmamalıdır Üretici firma ürünün teknik özelliklerinde değişiklik yapma hakkına sahiptir ...

Page 24: ...ailto info ser cen az www ser cen az d7 25x7 M5M 2 d Baku AZ1007 j7 5 5 Q 7 25x7 y y BE Belgique België Belgium d 7 CC 5 x7 d Y 27 7 7 77M Laarbeeklaan 74 1090 Bruxelles Brussel j7 mailto bru repairs bshg com www siemens home bsh group com be BH Bahrain Bahrain Gas WLL X xM d 75M d 5 y Tubli 701 Bahrain j7 mailto info bahraingas bh Sun Thu 8am to 6pm 7qx 7 C 5x 5 y BY Belarus Беларусь OOO БСХ Быто...

Page 25: ... 7 7C 7 7 25x7 C 25 7 for exact charges GE Georgia 5 d7 25x7 M7 d 5 5x 7 7x 5 Q 7 5 27 2 7 d 2 7 Tbilisi j7 mailto info es ge BSH Ikiakes Siskeves A B E Central Branch Service 17 km E O Athinon Lamias L 5 5 j ª j ª mailto nkf CustomerService bshg com www siemens home bsh group com gr HK Hong Kong d 7 CC 5 x7 5 5 7 Вࠑĥʆℽࡗн Ȕɢ ġઍęధ ة 5 5 5 7 L7 M X Tsuen Wan New Territories Hong Kong j7 q j Q 77 x m...

Page 26: ... mailto hotlineru bshg com www siemens home bsh group ru SE Sverige Sweden BSH Home Appliances AB 2 7 d j7 local rate j7 local rate mailto Siemens Service SE bshg com www siemens home bsh group com se SK Slovensko Slovakia 5 x 5 Q x5 C C 57 My C 7 Ë 7 M 5 7 7 7 2 x M x www siemens home bsh group com sk 7 M M 7 d x C 7 5 7 5 M 5 2 j 2 M x7 5 2 j7 5 C 2y x TJ Tadschikistan Ҷ1 1 55 9ҷ565 9 M MM x5 M ...

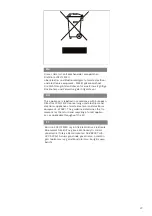
Page 27: ...ropean Directive 2012 19 EU concerning used electrical and electronic appliances waste electrical and electronic equipment WEEE The guideline determines the fra mework for the return and recycling of used applian ces as applicable throughout the EU tr Bu ürün 2012 19 EU sayılı Atık Elektrikli ve Elektronik Ekipmanlar Direktifi ne göre etiketlenmiştir Ulusal yönetmelik Türkiye Resmi Gazetesi No 283...

Page 28: ...arantee conditions as set out by our representatives in the country of sale apply Details regarding same may be obtained from the dealer from whom the appliance was purchased For claims under guarantee the sales receipt must be produced TR Garanti Șartları Bu cihaz için satıșın gerçekleștigi ülkedeki temsil cilig imiz tarafindan berlilenen garanti șartları geçerlidir Garanti șartları ile ilgili de...

Page 29: ...29 ...

Page 30: ...30 ...

Page 31: ...satzteilen Ergänzungs oder J 7 K 75 7 27 7 7 7 7 57 M75 7 5 5 75 7 5 x 75 7Q7M 27 x 5 57 57 75 7 Q 5 7 75 7 7 Q 7 j75 7 x 7 7 7 7 5x 5 7 7 7 x 75 Q 757 j75 7 7 7 7 7 7 7 57 5 L C 57 7 7 MK 7 Q 57 7 7 7 Q 57 7 Garantie eine Garantieleistung beansprucht wird sind unserer nächstgelegenen Kundendienststelle oder 7 7 7 M 7 57 7 7 7 7 7 7 P 7 7 Q 7 MK 7 nur für stationär betriebene feststehende Geräte v...

Page 32: ...32 BSH Hausgeräte GmbH Carl Wery Straße 34 81739 München GERMANY www siemens home bsh group com Hergestellt von BSH Hausgeräte GmbH unter Markenlizenz der Siemens AG 8001184086 000427 ...

Reviews: