background image

Example
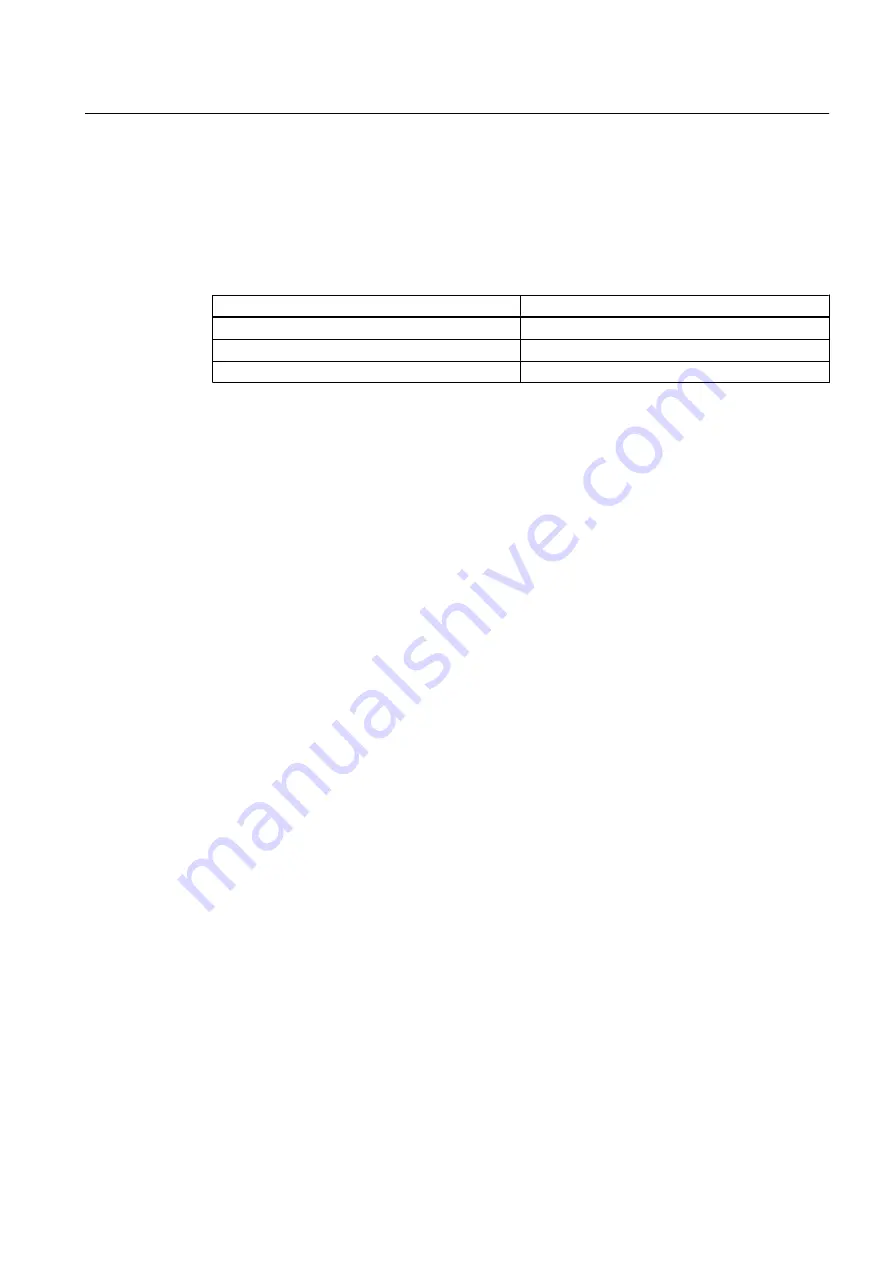
This current limit corresponds to the following upper power limits, depending on the relationship 

between the starting current I

A

 and rated current I

N

 and on the voltage dip (up to approximately 

20%) while the machine is starting up:

Table 4-1

Power limits

Rated voltage V

N

Power limit

3 kV

750 kW

6 kV

1500 kW

10 kV

2500 kW

See also

Prior to commissioning  (Page 71)

4.14

Thermal protection 

The machine is equipped with measuring equipment to directly monitor the motor temperature 

to protect the machine against overheating during operation. Plan a corresponding circuit for 

monitoring. You will find more information in the Technical Data in the "Explanatory text for the 

machine dimension drawing".

4.15

Transport and storage

Observe the following when carrying out any work on the machine:
● Comply with the general safety instructions (Page 13)
● Comply with the applicable national and sector-specific regulations at the place of 

installation

● When using the machine within the European Union, comply with the specifications laid 

down in EN 50110‑1 regarding safe operation of electrical equipment.

4.15.1

Transport markings

The packing differs depending on the transport type and size. If not otherwise contractually 

agreed, the packaging corresponds to the packing guidelines for International Standards for 

Phytosanitary Measures (ISPM).

Preparations for use

4.14 Thermal protection 

SIMOTICS HV M  1RN76308PR900CG0-Z

Operating Instructions 07/2018

27

Summary of Contents for SIMOTICS HV M

Page 1: ...www siemens com drives Electric motor SIMOTICS HV M Type 1RN76308PR900CG0 Z Operating Instructions Installation Instructions Edition 07 2018 ...

Page 2: ...03 07 2018 13 28 V3 00 ...

Page 3: ...uctions Edition 07 2018 Introduction 1 Safety information 2 Description 3 Preparations for use 4 Assembly 5 Electrical connection 6 Commissioning 7 Operation 8 Maintenance 9 Spare parts 10 Disposal 11 Service and Support A Technical data and drawings B Quality documents C Additional documents D ...

Page 4: ...are those who based on their training and experience are capable of identifying risks and avoiding potential hazards when working with these products systems Proper use of Siemens products Note the following WARNING Siemens products may only be used for the applications described in the catalog and in the relevant technical documentation If products and components from other manufacturers are used...

Page 5: ...23 4 3 Cooling water quality 23 4 4 Insufficient cooling water quality 24 4 5 Interlock circuit for the external fan motor 24 4 6 Interlock circuit for anti condensation heating 25 4 7 Space requirements 25 4 8 Noise emission 25 4 9 Voltage and frequency fluctuations during line operation 25 4 10 Phase synchronization during supply system switching 26 4 11 System inherent frequencies 26 4 12 Torsi...

Page 6: ...1 5 2 8 Roughly aligning the machine 51 5 3 Installing the machine 52 5 3 1 Safety instructions for installation 52 5 3 2 Selecting bolts 53 5 3 3 Preconditions for smooth vibration free operation 53 5 3 4 Aligning and attaching the machine to the driven machine 53 5 4 Connecting the supply lines 55 5 4 1 Surfaces for mounted parts or cable fixing elements 55 5 4 2 Connecting the cooling water sup...

Page 7: ...anti condensation heating active 78 8 3 Switching on the machine 79 8 4 Regreasing roller bearings 79 8 5 Switching off 79 8 6 Switching off 79 8 7 Switching on again after an emergency switching off 80 8 8 Stoppages 80 8 8 1 Avoidance of condensation or formation of condensation within the machine 80 8 8 2 Avoidance of frost and corrosion damage to the air to water heat exchanger 80 8 8 3 Avoidan...

Page 8: ... Removing the top enclosure 100 9 2 2 3 Mounting the top enclosure 101 9 2 3 Roller bearings 102 9 2 3 1 Removing roller bearings 102 9 2 3 2 Removing the labyrinth sealing ring 103 9 2 3 3 Remove V ring for roller bearing seal 104 9 2 3 4 Installing the labyrinth sealing ring 105 9 2 3 5 Fitting V ring for roller bearing seal 105 9 2 3 6 Installing felt rings for the inner bearing seal 106 9 2 4 ...

Page 9: ...teria for selecting roller bearing greases 91 Table 9 2 Roller bearing greases for vertical and horizontal types of construction 92 Table 9 3 Alternative greases with NLGI class 2 for motors of horizontal construction 93 Table 10 1 Spare parts for the stator and rotor 111 Table 10 2 Spare parts for the top enclosure 112 Table 10 3 Spare parts for roller bearings DE 113 Table 10 4 Spare parts for r...

Page 10: ...re 9 5 Position the set screws for the labyrinth sealing ring on the outer bearing cover 105 Figure 9 6 Install the V ring 106 Figure 10 1 Stator and rotor 111 Figure 10 2 Top enclosure 112 Figure 10 3 Roller bearings DE 113 Figure 10 4 Roller bearings NDE 114 Figure 10 5 Terminal box 9 103A 732 60 115 Figure 10 6 Auxiliary terminal box 1XB9014 116 Table of contents SIMOTICS HV M 1RN76308PR900CG0 ...

Page 11: ...for verifying the qualitative implementation of the machine and where relevant additional documents on the components are provided in the separate Appendixes to the Operating Instructions Technical data and drawings Quality documents Additional documents Text format features The warning notice system is explained on the rear of the inside front Carefully comply with all of the safety relevant info...

Page 12: ...ction you have the option of creating your own compiled documents in your own structure and managing them You can delete or shift individual chapters or topics Further using the note function you can import your own content The compiled documentation can be exported as PDF for example Using the Documentation function you can efficiently compile your own plant or system documentation The Documentat...

Page 13: ... specific setup and safety regulations as well as regulations on the use of personal protective equipment are observed Note Use the services and support provided by the local service center Page 121 for planning installation commissioning and service work In the individual chapters of this document you will find warning and safety instructions that must be observed without fail for your own safety...

Page 14: ...e machine Always pay attention to your safety Also observe the following to prevent accidents General safety regulations applicable in the country where the machine is deployed Manufacturer specific and application specific regulations Special agreements made with the operator Separate safety instructions supplied with the machine Safety symbols and instructions on the machine and its packaging WA...

Page 15: ... methods described by these operating instructions Operate the machine properly CAUTION Hazardous substances Chemical substances required for the setup operation and maintenance of machines can present a health risk Read the information in these operating instructions and the product information supplied by the manufacturer Observe the relevant safety regulations and wear the personal protective e...

Page 16: ...damage follow the instructions given below Only touch electronic modules if you absolutely have to work on them The body of the person concerned must have been electrostatically discharged and grounded immediately before any electronic modules are touched Electronic modules should not be brought into contact with electrically insulating materials such as Plastic film Plastic parts Insulating table...

Page 17: ...installations Interference to electronic devices caused by electrical power equipment Electrical power equipment generate electric fields during operation Potentially lethal malfunctions can occur in medical implants e g pacemakers in the vicinity of electrical power equipment Data may be lost on magnetic or electronic data carriers It is forbidden for people with pacemakers to enter the vicinity ...

Page 18: ...Safety information 2 7 Electromagnetic fields when operating electrical power engineering installations SIMOTICS HV M 1RN76308PR900CG0 Z 18 Operating Instructions 07 2018 ...

Page 19: ...an result in death serious injury or material damage Never operate this machine in hazardous areas Machine design The regulations and standards used as the basis to design and test this machine are stamped on the rating plate The machine design basically complies with the subsequent standards Please refer to the EU Declaration of Conformity for the versions of the harmonized standards referenced T...

Page 20: ...it The mounted cooler is an air to water heat exchanger with a pipe system The heat lost from the machine is dissipated via the surface of the cooling pipes to the cooling liquid flowing in the pipes External fans facilitate the circulation of the cooling air in the primary circuit External fan The machine is fitted with an external fan For IC 666 there are two external fans The electrical connect...

Page 21: ... anti condensation heating The connection data is listed on an additional plate on the machine Paint finish The machine is painted according to the instructions in your order Description SIMOTICS HV M 1RN76308PR900CG0 Z Operating Instructions 07 2018 21 ...

Page 22: ...Description SIMOTICS HV M 1RN76308PR900CG0 Z 22 Operating Instructions 07 2018 ...

Page 23: ...operating mode Observe the machine s operating mode Use a suitable control system to prevent overspeeds thus protecting the machine from damage 4 3 Cooling water quality The specifications for the cooling water temperatures and cooling water quantities can be found on the rating plate and in the Appendix Technical data In the case of a heat exchanger built for chemical purification closed cooling ...

Page 24: ...bserve the recommended water quality in the operating instructions for the air water cooler NOTICE Overheating of the machine as a result of additives in the cooling water Additives for antifreeze or corrosion protection can have a negative impact on the heat transporting properties The machine can overheat Only operate the machine with the contractually agreed cooling water quality See also Servi...

Page 25: ...otection measures for personnel 4 9 Voltage and frequency fluctuations during line operation If nothing else is stamped on the rating plate the permissible voltage fluctuation is 5 and the permissible frequency fluctuation is 2 corresponding to range A in IEC EN 60034 1 Permissible fluctuations that go beyond this are stamped on the rating plate Under operating conditions a machine may sometimes h...

Page 26: ...the configuration does not correctly recognize the mechanical torsional loadings of the shaft assembly this can lead to serious damage to the machine This can result in death serious injury or material damage When planning the system make due allowance for the maximum air gap torques that can occur This data can be found in the Electrical data The system planner is responsible for the entire drive...

Page 27: ...n the Technical Data in the Explanatory text for the machine dimension drawing 4 15 Transport and storage Observe the following when carrying out any work on the machine Comply with the general safety instructions Page 13 Comply with the applicable national and sector specific regulations at the place of installation When using the machine within the European Union comply with the specifications l...

Page 28: ...be easily accessed 4 15 3 Checking the load handling attachments Inspect the load handling attachments such as the load trestles lifting eyes and ring bolts and also the lifting gear before lifting the machine Inspect the load handling attachments on the machine for possible damage Replace any load suspension equipment that is found to be damaged Before use check that the load suspension equipment...

Page 29: ...achine use only approved and undamaged sling guides and spreaders of sufficient rated capacity Check this equipment before using it The weight of the machine is shown on the rating plate If adapter flange and adapter plates are also supplied then lift them and transport these parts separately The load suspension equipment for the motor is not rated for lifting the motor with mounted adapter flange...

Page 30: ... center of gravity of a load is not located centrally between the attachment points the motor can tip over or slip out of the lifting equipment and fall when it is being transported or lifted This can result in death serious injury or material damage 1 Always take account of the center of gravity when transporting or lifting the motor The center of gravity of the machine is specified in the dimens...

Page 31: ...he rotor is locked in the bearing housing using two M12 screws The maximum tightening torque is 20 Nm If you wish to remove the rotor transport lock rotate the set screws out by about 15 mm and secure using a lock nut Figure 4 1 Rotor transport lock with two screws in the bearing housing Never remain under or in the immediate vicinity of the machine when it is lifted If the lifting gear or load ha...

Page 32: ...0 2 mm s The place of storage must be well ventilated as well as free of dust and frost Provide protection against extreme weather conditions Ensure that the temperature remains stable in the range from 10 C to 50 C or 50 F to 120 F If there is a risk of condensation the room temperature should be approx 10 K above the outside temperature The temperature should not fall below 20 C The relative hum...

Page 33: ...hine air tight Inspect the machine regularly Long term storage If you are storing a machine for more than six months you must check its condition every six months Store the machine in accordance with the specifications in Section Storage Page 32 and if possible packed Check the motor for damage Carry out any necessary maintenance work Make sure that the storage conditions are such that condensatio...

Page 34: ...4 15 6 Protection against corrosion If the machine is stored in dry conditions then apply the subsequently listed anti corrosion measures Storage up to six months Apply a coat of corrosion protective compound to all accessible bare metal parts such as the exposed shaft extension flange or machine feet Storage for longer than six months Apply a coat of long term anti corrosion agent to all accessib...

Page 35: ...ry or material damage The controller must ensure that those speed ranges are blocked when the converter is in operation Refer to the Electrical Data section in the appendix for details of the blocked speed ranges The blocked speed ranges must be run through rapidly Machine damage due to excessively high speeds Excessive rotational speed can lead to serious damage to the machine This can result in ...

Page 36: ...ence of that would be a circulating current through the motor shaft and the surrounding grounding system WARNING Defective shaft grounding If the shaft grounding does not function correctly the shaft can be at a high voltage level that does not decay quickly enough when the machine comes to a standstill This can lead to death or serious injury as a result of electric shock or bearing damage caused...

Page 37: ... when carrying out installation work e g when drilling holes etc Keep the insulation points clean Observe the labels on the machine relating to the bearing insulation Tandem operation If you connect two motors in series in tandem operation fit an insulated coupling between the motor and the driven machine It is not necessary to fit an insulated coupling between the motors acting in tandem operatio...

Page 38: ...e To ensure good discharging of high frequency currents provide contacting over a large surface area with 360 contacting at the converter at the motor for instance with EMC screw fastenings at the cable entries Measures to further reduce bearing currents To specifically reduce and prevent damage caused by bearing currents you must consider the system as a whole which comprises the motor converter ...

Page 39: ...tallation The following requirements must be satisfied prior to starting installation work Staff have access to the relevant installation instructions and operating instructions The machine is unpacked and ready for mounting at the installation location Note Further Information Further machine specific information for installation can be found in Chapter Technical data and drawings Page 123 Note M...

Page 40: ...polarization index Measuring the insulation resistance and polarization index PI provides information on the condition of the machine It is therefore important to check the insulation resistance and the polarization index at the following times Before starting up a machine for the first time After an extended period in storage or downtime Within the scope of maintenance work The following informat...

Page 41: ...asuring the insulation resistance please read the operating manual for the insulation resistance meter you are going to use 2 Short circuit the ends of the temperature sensor cables before applying the test voltage If the test voltage is connected to only one temperature sensor terminal the temperature sensor will be destroyed 3 Make sure that no power cables are connected 4 Measure the winding te...

Page 42: ...an 40 C convert the measuring value to the reference temperature of 40 C according to the following equations from IEEE 43 2000 1 RC KT RT RC Insulation resistance converted to 40 C reference temperature KT Temperature coefficient according to equation 2 RT Measured insulation resistance for measuring winding temperature T in C 2 KT 0 5 40 T 10 40 Reference temperature in C 10 Halving doubling of ...

Page 43: ...table Measuring the polarization index 1 To determine the polarization index measure the insulation resistances after one minute and ten minutes 2 Express the measured values as a ratio PI Rinsul 10 min Rinsul 1 min Many measuring devices display these values automatically following the measurement For insulation resistances 5000 MΩ the measurement of the PI is no longer meaningful and consequentl...

Page 44: ...nd the bearing cartridge are insulated from the bearing shield and the motor enclosure with insulating parts The insulation means that the motor housing stator shaft represents an open conductor loop NOTICE Bridged bearing insulation It is not permissible that the insulation is bridged when instruments are mounted such as vibration measuring systems relubrication equipment etc Circulating currents...

Page 45: ...t in death serious injury or material damage Inspect the load handling attachments and lifting gear before use 5 2 2 Preconditions for correct alignment and secure attachment To align the machine correctly and fasten it securely you require detailed specialist knowledge of the following necessary measures Preparing the foundation Select and mount the coupling Measure the radial and axial eccentric...

Page 46: ...ove the anti corrosion protection as this could damage the surfaces of the machine parts Lightly oil the depreserved surfaces Thread and fastening parts Remove the anti corrosion protection from bolts and tapered pins Use the appropriate tap or cutting die to shave the tapped holes of machine parts and threads of screws etc See the drawings for the relevant male and female thread dimensions Use dr...

Page 47: ...element correctly matches the type of balance of the rotor Use only ready drilled and balanced transmission elements Check the hole diameters and the balancing status before pulling them on Thoroughly clean the shaft extension Pulling on Warm up the transmission elements to expand them before pulling them on Select the temperature difference for the heating process to suit the coupling diameter fi...

Page 48: ...The feather key can fall out The feather keys are only locked against falling out during shipping If a machine with two shaft extensions does not have an output element on one shaft extension the feather key can fall out during operation Death or serious injury can result If the machine is to be operated without output elements secure the feather key on the free shaft extension so that it cannot b...

Page 49: ... find the weight of the motor on the rating plate WARNING Center of gravity is not at the center If the center of gravity of a load is not located centrally between the attachment points the motor can tip over or slip out of the lifting equipment and fall when it is being transported or lifted This can result in death serious injury or material damage 1 Always take account of the center of gravity...

Page 50: ...l the machine could fall This can result in death serious injury or material damage In order to gain easy and safe access to the underside of the machine place it in a secure and raised position 5 2 6 Putting the machine down Requirements The following preconditions must be satisfied before setting down the machine at the installation location The mating faces must be clean The anti corrosion prot...

Page 51: ... can drain away Ensure that condensate can drain away In the bearing shields on the DE and NDE water drainage holes are situated below or opposite the regreasing devices They are sealed with screw plugs Depending on the type of installation the water drainage holes are located at the bottom 1 Regularly remove the screw plugs to allow the condensate to drain away 2 Replace them when you have finish...

Page 52: ...njury and material damage caused by incorrect machine alignment If the machine has not been properly aligned this will mean the fastening parts are subjected to stress distortion Screws may become loose or break the machine will move machine parts could be flung out of place This can result in death serious injury or material damage Carefully align the machine to the driven machine Material damage...

Page 53: ...the vibration velocity according to ISO 10816 3 5 3 4 Aligning and attaching the machine to the driven machine 1 Refer to any instructions for aligning the driven machine and those of the coupling manufacturer 2 Align the machines with coupling output to the driven machine in such a manner that the center lines of the shafts are parallel with no offset This ensures that no additional forces affect...

Page 54: ...s Page 123 Details about the alignment accuracy can be found in the Section Information about the machine dimension drawing NOTICE Axial and radial forces at the second shaft extension Large output masses and their centers of gravity outside the shaft extensions can cause vibration This can result in damage to bearings the shaft or components in the shaft assembly Comply with permissible loads for...

Page 55: ...ng parts Shaft height Height H Panel wall thickness T 800 1065 15 710 910 12 630 760 10 5 4 2 Connecting the cooling water supply Documentation Please refer to the operating instructions provided by the manufacturer of the heat exchanger in Chapter Additional documents Page 129 For the operating data of the air to water heat exchanger refer to the rating plate on the machine or the information abo...

Page 56: ...If there is a possibility of the cooling water containing dirt and foreign bodies install suitable filters in the cooling water feed pipe Filling and venting the cooler 1 After making the flange connections open the vent plug and fill the cooler with water until all the air inside the cooler is expelled 2 Firmly close the venting screw Perform a pressure test to ensure that the cooling water suppl...

Page 57: ...may have accumulated as a result of the installation work 4 Protect all exposed rotating parts against contact by persons Cover any open shaft ends couplings and belt drives etc 5 Make sure that there are no loose parts on or in rotating machine elements Observe any feather keys that may be located in free shaft ends Record all of the installation work that was carried out Assembly 5 5 Complete th...

Page 58: ...Assembly 5 5 Complete the installation work SIMOTICS HV M 1RN76308PR900CG0 Z 58 Operating Instructions 07 2018 ...

Page 59: ...loose This could result in material damage to the machine or even in total failure which could in turn lead indirectly to material damage to the system Tighten the screwed connections to the specified tightening torques Observe any specifications regarding the materials from which fixing elements must be made When performing servicing check the fastenings See also Tightening torques for screw and ...

Page 60: ...signation According to IEC EN 60034 8 the following basic definitions apply to the terminal designations for 3 phase machines Table 6 1 Terminal designations using the 1U1 1 as an example 1 U 1 1 Designation x Index for pole assignment for pole changing machines where applicable A lower index signifies a lower speed Special case for split winding x Phase designation U V W x Index for winding start...

Page 61: ...he installation specifications and to EN 60204 11 Table 6 2 Determining the cross section of the grounding conductor External conductor cross section S Cross section of the grounding conductor mm S 16 mm S 16 mm S 35 mm 16 mm S 35 mm S 2 There is a hexagon bolt with flat and spring washer on the stator frame at the designated connecting point for the grounding conductor This is suitable for connec...

Page 62: ...o frequency grounding for converter operation In converter operation the converter emits RF alternating currents To establish and RF specific optimal connection between motor terminal box and motor enclosure you can use flexible braided copper flat cables with low impedance and a broad frequency range Establish the radio frequency ground connection with flat cables Alternatively you can establish ...

Page 63: ...t DE Machines that must run only in one specific direction of rotation are marked as follows On the rating plate with a direction of rotation arrow With terminal designations in the required phase sequence The machine can malfunction or be damaged if it is operated other than how it was originally ordered or with the incorrect direction of rotation Changing the direction of rotation If you want to...

Page 64: ...ecting cable is limited by the cable entry that is used The data are listed under Technical data Connect only one conductor per cable lug 2 Insulate the conductor ends in such a way that the remaining insulation reaches almost up to the cable lug 3 Fasten the cable lug to the end of the conductor correctly e g by squeezing 4 Insulate the cable lug sleeves where necessary to ensure minimum air clea...

Page 65: ...gized before you tighten the nuts See also The five safety rules Page 13 6 2 6 Internal equipotential bonding The equipotential bonding between the ground terminal in the terminal box and the motor frame is established via the terminal box fixing bolts and via defined equipotential bonding surfaces The contact points for the equipotential bonding connection underneath the bolt heads are bare metal...

Page 66: ...is no longer guaranteed a short circuit can occur which can result in death serious injury or material damage Do not operate the machine with a damaged pressure relief device Any damage may only be repaired after prior discussion with the person responsible for the safety of the plant or system and only using original parts 2 Close the terminal box See section Tightening torques for screw and bolt...

Page 67: ...degree of protection of the auxiliary terminal box Introducing and routing the cables 1 Open the auxiliary terminal box and undo the cable entry plate screws 2 Drill the required number of holes or threads in the required size of the cable gland into the cable entry plate 3 Mark the cables if necessary for subsequent assignment 4 Pull the cables through the cable glands and the entry plate and con...

Page 68: ...tached check whether the pin allocation of the connector matches the pin allocation of the socket 6 Complete the work at the external fan terminal box For this proceed as described in the Completing connection work in the auxiliary terminal box Page 70 section Check direction of rotation The direction of rotation of the external fan must match the arrow indicating the direction of rotation The fan...

Page 69: ...en required apply additional measures to fully comply with the requirements set out in IEC 60664 1 or IEC 61800 5 1 Hazard due to electric shock 6 3 6 Internal equipotential bonding in the auxiliary terminal box The equipotential bonding between the PE terminals in the relevant auxiliary terminal box enclosure and the machine enclosure is established via a fixing bolt in each auxiliary terminal bo...

Page 70: ...ons and regulations The threads in the connection plate are sealed using cable and conductor entries thread adapters or sealing plugs that achieve the respective degree of protection Unused cable entries are sealed The sealing elements are firmly screwed in and can only be released using a tool All of the seals gaskets and sealing surfaces of the terminal box are in good condition The screws of al...

Page 71: ...of checks to be performed prior to commissioning does not claim to be complete It may be necessary to perform further checks and tests in accordance with the specific situation on site See also Testing the insulation resistance and polarization index Page 41 The machine is undamaged The machine has been correctly installed and aligned the transmission elements are correctly balanced and adjusted A...

Page 72: ...le restrikes The peak voltages which arise as a result can damage the winding insulation If you are using vacuum circuit breakers and vacuum contactors use an appropriate surge suppressor such as the Siemens 3EF zinc oxide varistor with spark gap An additional RC arrester resistor and capacitor connected in series makes sense at unfavorable operating points under unfavorable line supply conditions...

Page 73: ...t the following checks The external fan is correctly fitted and aligned The rotor runs freely All of the retaining elements and electrical connections are securely tightened The grounding and equipotential bonding connections to the mains have been correctly made The air flow is not impeded or shut off by flaps covers or similar All protection measures have been taken to prevent accidental contact...

Page 74: ...se 3 Check the bearings before regreasing If necessary install new bearings 4 Lubricate the bearings and reinstall the bearing components See also Regreasing intervals and types of grease for operating roller bearings Page 91 Transport and storage Page 27 Stoppages Page 80 7 4 Overvoltages when switching high voltage motors When commissioning high voltage motors or switchgear for high voltage moto...

Page 75: ...he machine for a while in no load operation 3 If it runs perfectly connect a load NOTICE Thermal overload of motors connected directly to the line supply In addition to the load torque the ramp up accelerating time is essentially influenced by the moment of inertia to be accelerated While ramping up when connected to the line supply the inrush starting current is a multiple of the rated current Th...

Page 76: ...hanical operation improves immediately after the machine is switched off then the cause is magnetic or electrical If the mechanical running does not improve immediately after switching the machine off then the cause is mechanical Imbalance of the electrical machine or the driven machine The machine set has not been adequately aligned The machine is being operated at the system resonance point Syst...

Page 77: ...when coming close to active parts Touching or coming close can result in death serious injury or material damage Carefully ensure that all of the covers are closed while operational First switch off and disconnect the machine if you must remove covers Comply with the Five safety rules When the machine is in operation the terminal boxes must remain closed at all times Terminal boxes may be opened o...

Page 78: ...are in doubt immediately switch off the machine carefully observing the system specific safety conditions Damage caused by condensation Humidity in the air can condense for intermittent duty or load fluctuations Condensate can collect Moisture can have a negative impact on the winding insulation or result in damage such as corrosion Ensure that any condensation can freely flow away 8 2 Switching o...

Page 79: ... conditions specified in the catalog or the order documentation 3 If this is possible using the available measuring equipment check the bearing and stator winding temperatures 8 4 Regreasing roller bearings Refer to the regreasing instructions for the roller bearings on the lubricant plate See also Transport and storage Page 27 8 5 Switching off Do not immediately switch off the separately driven ...

Page 80: ...ance of frost and corrosion damage to the air to water heat exchanger For avoidance of frost and corrosion damage completely drain the water from the air to water cooler Then blow air through it to dry it If the cooler cannot be drained because standby capability is required at short notice protect the cooling circuit against frost and corrosion damage To do this add suitable additives to the cool...

Page 81: ...sioning Page 73 8 8 4 Measuring the insulation resistance after an extended stoppage Measuring the insulation resistance and polarization index PI provides information on the condition of the machine It is therefore important to check the insulation resistance and the polarization index at the following times Before starting up a machine for the first time After an extended period in storage or do...

Page 82: ...as follows Study the record made when the machine was decommissioned and reverse the measures that were taken for conservation and storage Perform the measures listed in the Commissioning section See also Commissioning Page 71 Decommissioning the machine Page 82 8 11 Faults 8 11 1 Inspections in the event of faults Natural disasters or unusual operating conditions such as overloading or short circ...

Page 83: ...er supply conditions X X X X X Stator winding incorrectly connected Check the winding connection in the terminal box X X X X Winding short circuit or phase short cir cuit in stator winding Determine the winding resistances and insulation resistances Carry out repair work after consulta tion with the manufacturer X Incorrect direction of rotation Check the connection 8 11 3 Mechanical faults Table ...

Page 84: ...her bearing designs only after consulting the manufacturer Table 8 3 Rolling bearing faults Bearing overheats Bearing whistles Bearing knocks Possible causes of faults Remedial measures X High coupling pressure Align the machine more accurately X Belt tension too high Reduce the drive belt tension X Bearing contaminated Clean or replace the bearing Check the seals X High ambient temperature Use a ...

Page 85: ...res for faults on water cooled machines Table 8 5 Cooling system faults High temperature rise Water leaking Possible causes of faults Remedial measures X Reduced cooling Check the cooling water flow increase the amount of cooling water if necessary X Cooling water flow rate too low Clean the air to water heat exchanger X Inlet temperature too high Set the correct upstream temperature X Cooling wat...

Page 86: ...Operation 8 11 Faults SIMOTICS HV M 1RN76308PR900CG0 Z 86 Operating Instructions 07 2018 ...

Page 87: ...uropean Union comply with the specifications laid down in EN 50110 1 regarding safe operation of electrical equipment Note Please contact the service center Page 121 if you require support with service maintenance or repair 9 1 Inspection and maintenance 9 1 1 Safety instructions for inspection and maintenance WARNING Rotating and live parts Electric machines contain live and rotating parts Fatal ...

Page 88: ...s adequate extraction NOTICE Machine damage caused by foreign bodies Foreign bodies such as dirt tools or loose components such as screws etc can be left by accident inside the machine after maintenance is performed These can cause short circuits reduce the performance of the cooling system or increase noise in operation They can also damage the machine When carrying out maintenance work make sure...

Page 89: ...achine running noise have not deteriorated X The foundation has no cracks or indentations X X You can perform these checks while the motor is at standstill or if required while running Further checks may be required if so specified in operating instructions of components Page 129 or in accordance with the plant specific conditions If you find any deviations during the inspection you must rectify t...

Page 90: ... is fitted as shown on the plates and labels X The CABLES and insulating parts and components are in good condition and there is no evidence of discoloring X Condensation can freely flow away X This check can be made at standstill or when running If you detect any deviations during the inspection you must rectify them immediately They may otherwise cause damage to the machine Checking the cooling ...

Page 91: ...icating grease according to ISO 6743 9 and K3K 20 lubricating grease according to DIN 51825 with lithium soap as a thickener and an upper service temperature of at least 130 C 266 F are permissible for standard applications without special requirements When selecting the lubricating grease ensure that the technical data of the grease is suitable for the application The lubricating grease must sati...

Page 92: ... conditions differ from those mentioned other greases may only be used after prior consultation with the manufacturer Note Use of other greases If greases other than those named on the lubricant plate are used it cannot be guaranteed that they are compatible with the complete system If you use greases that satisfy only the minimum requirements of DIN 51825 or ISO 6743 9 then reduce the lubrication...

Page 93: ... This can result in material damage Avoid mixing greases Only the manufacturer can provide a guarantee for the miscibility of particular greases Lubrication data Regreasing data are stated on the lubricant plate of the machine Regreasing intervals in operating hours Regreasing amount in grams Grease type Regrease the roller bearing at the latest every 12 months irrespective of the actual number of...

Page 94: ...le before regreasing Gradually press in an appropriate type and amount of grease as stamped on the lubricant plate and specified in these operating instructions The roller bearing temperature rises sharply at first then drops to the normal value again when the excess grease is displaced out of the bearing 3 The used grease collects outside each bearing in a spent grease chamber Lubricating roller ...

Page 95: ...n order that the machine is adequately cooled Regularly clean the grids ducts ribs pipes etc to remove dust and pollution 9 1 10 Cleaning the air to water heat exchanger Clean the air to water heat exchanger in accordance with the operating instructions of the heat exchanger manufacturer These instructions specify the conditions to be complied with and describe the available cleaning methods Instr...

Page 96: ...and check it electrically and mechanically every time the roller bearings are replaced Replace the permanently lubricated rolling bearing on the external fan motor after 40 000 operating hours or five years at the latest 9 1 12 Maintaining the anti condensation heating The anti condensation heating is maintenance free If it is defective it can be replaced In this case please contact the Service Ce...

Page 97: ...is provided regarding the state of the winding insulation Is the winding head insulation conductively contaminated Has the winding insulation absorbed moisture As such you can determine whether the machine needs commissioning or any necessary measures such as cleaning and or drying the winding Can the machine be put into operation Must the windings be cleaned or dried Detailed information on testi...

Page 98: ...ols to disassemble the machine Take measures to prevent parts from dropping down before you dismantle them e g by replacing fastening elements with extra long screws threaded bolts or similar This ensures that the part is supported after it is pulled off The centerings in the shaft extensions have reset threads Use lifting gear which is suitable for the rotor weight and direction of loading Danger...

Page 99: ... spreading devices for this 6 There are two holes on the guide strip of the air to water heat exchanger for points at which to secure it Secure the heat exchanger with an additional sling rope and pull it out as far as the center Suspend the heat exchanger from the attachment point on the guide strip 7 Pull the air to water heat exchanger out beyond the second hole and suspend it from there 8 When...

Page 100: ...eat exchanger via the depressurization device 4 Open the feed and return pipes 9 2 2 2 Removing the top enclosure You will find the weight of the top enclosure in the Technical Specifications and Drawings in the Appendix Page 123 1 Use only the welded lifting eyes to hoist and transport the top enclosure Remove the warning plates on the lifting eyes and put them to one side for later refitting Pre...

Page 101: ... the stator housing Prevent any objects from falling into the open stator housing when the top enclosure has been removed Otherwise the machine could be damaged 9 2 2 3 Mounting the top enclosure Refit the top enclosure and the air intake cowl with the motor in the horizontal position 1 Check that the sealing elements are serviceable and correctly positioned If they are not contact the Service Cen...

Page 102: ...tion and in the original sequence Fix the hexagonal screw with spring washer and spacer Figure 9 2 Mounting the top enclosure 6 Re attach all the built on and connecting parts that you removed previously 7 Replace the warning notices at the lifting eyes See also Service and Support Page 121 9 2 3 Roller bearings 9 2 3 1 Removing roller bearings Preparation The following preparations are required b...

Page 103: ...oval of bearing housing or end shield If necessary remove the bearing housing from the end shield Remove the end shield Depending on the shaft height rolling bearing type and design it is either a bearing head version or a bearing housing version Remove the locking elements from the shaft depending on the version either a locking ring or shaft nut 2 Remove the rolling bearing Depending on the part...

Page 104: ...must be replaced if unusual amounts of grease escape the roller bearing or the V ring is visibly damaged Figure 9 4 Remove the V ring 1 Mark the components so that they can be correctly assembled 2 Remove the V ring with the bearing cap or by using a suitable tool from the shaft Removing the protective ring for IP56 degree of protection The V ring for the outer bearing seal is fitted with a protec...

Page 105: ...byrinth sealing ring Push the labyrinth sealing ring to approx 3 mm before the bearing cover before the paint or adhesive cures on the set screws 3 mm Figure 9 5 Position the set screws for the labyrinth sealing ring on the outer bearing cover 4 Locate the labyrinth sealing ring in position by screwing the set screws in Check that the tips of the set screws engage with the keyway with a short axia...

Page 106: ...nsioned Replace the protective ring if necessary 3 Position the protective ring so that one of the longitudinal grooves meets the corresponding water separation groove at the bottom in the bearing cover flange or end shield 9 2 3 6 Installing felt rings for the inner bearing seal Depending on the particular version the motor is equipped with a felt ring in the inner bearing cover The felt ring pre...

Page 107: ...ar bare joints between parts with non hardening permanently flexible sealant such as Hylomar M Follow the manufacturer s application and safety instructions when doing this Check all sealing elements such as those on the terminal boxes for elasticity aging or damage and renew them if they are no longer effective Maintenance 9 2 Corrective Maintenance SIMOTICS HV M 1RN76308PR900CG0 Z Operating Inst...

Page 108: ...Maintenance 9 2 Corrective Maintenance SIMOTICS HV M 1RN76308PR900CG0 Z 108 Operating Instructions 07 2018 ...

Page 109: ...ese representations You can use commercially available standard components but ensure that they have the same construction type dimensions strength class etc Terminal box If several terminal boxes are mounted on the machine please also indicate the type designation of the terminal box in addition to details of part designation and part number according to the legend as well as type and serial numb...

Page 110: ...use Spares on Web to determine the order numbers for motor spare parts quickly and easily Spares on Web https www sow siemens com See also Guide for Spares on Web http support automation siemens com WW news en 25248626 Anti condensation heating Please contact the Service Center Page 121 for spare parts Spare parts 10 2 Ordering spare parts via the Internet SIMOTICS HV M 1RN76308PR900CG0 Z 110 Oper...

Page 111: ...e insert DE 6 00 End shield NDE 10 41 Air intake insert NDE 7 12 DE fan 10 70 Cover 7 30 Fan hub 10 71 Cover 8 00 Rotor complete 20 04 Auxiliary terminal box 10 00 Stator frame with laminated core and winding 57 00 Anti condensation heating 10 16 Grounding connection Spare parts 10 3 Stator and rotor SIMOTICS HV M 1RN76308PR900CG0 Z Operating Instructions 07 2018 111 ...

Page 112: ... 30 45 Cover 10 37 Spacer tube 31 16 Seal motor side 10 46 Mounting elements 32 50 Fan motor 30 02 Air water cooler assembly with fan unit 32 53 Fan impeller 30 10 Housing 32 61 Adapter flange 30 40 Air to water cooling element 32 62 Seal 30 41 Seal Spare parts 10 4 Top enclosure SIMOTICS HV M 1RN76308PR900CG0 Z 112 Operating Instructions 07 2018 ...

Page 113: ...cover 3 50 Bearing housing 3 25 Seal 3 61 Bearing cap inner 3 26 Screws to lock the bearings 3 86 Spent grease chamber 3 40 Deep groove ball bearing locating bearing 3 94 Mounting parts 3 41 Deep groove ball bearing floating bearing 5 00 End shield DE Spare parts 10 5 Roller bearings DE SIMOTICS HV M 1RN76308PR900CG0 Z Operating Instructions 07 2018 113 ...

Page 114: ... 61 Inner bearing cover 4 25 Seal 4 71 Insulating tube or insulating pipe 4 41 Deep groove ball bearing 4 72 Insulating washer screws 4 50 Bearing housing 4 86 Spent grease chamber 4 52 Bearing enclosure bushing 4 94 Mounting parts 4 56 Insulating washer 6 00 Bearing shield Spare parts 10 6 Roller bearings NDE SIMOTICS HV M 1RN76308PR900CG0 Z 114 Operating Instructions 07 2018 ...

Page 115: ...10 5 Terminal box 9 103A 732 60 You can find information about spare parts in the Appendix See also Technical data and drawings Page 123 Spare parts 10 7 Main terminal box type 9 103A 732 60 SIMOTICS HV M 1RN76308PR900CG0 Z Operating Instructions 07 2018 115 ...

Page 116: ...x 1XB9014 The auxiliary terminal box can only be ordered as one complete part single parts are not available In this case please contact the Service Center Spare parts 10 8 Auxiliary terminal box 1XB9014 SIMOTICS HV M 1RN76308PR900CG0 Z 116 Operating Instructions 07 2018 ...

Page 117: ...ogy In doing so safety in operation and handling will take priority at all times Country specific legislation When disposing of the machine or of waste that is created during the individual phases of its life cycle please observe the statutory requirements applicable in the country of use 11 2 Preparing for disassembly Disassembly of the machine must be carried out and or supervised by qualified p...

Page 118: ...ling according to whether they are Iron and steel Aluminum Non ferrous metal e g windings The winding insulation is incinerated during copper recycling Insulating materials Cables and wires Electronic waste Process materials and chemicals Sort the process materials and chemicals for recycling according to whether they are for example Oil Grease Cleaning substances and solvents Paint residues Anti ...

Page 119: ...consists of impregnated wood Observe the local regulations The foil used for water proof packaging is an aluminum composite foil It can be recycled thermally Dirty foil must be disposed of via waste incineration Disposal 11 4 Disposal of components SIMOTICS HV M 1RN76308PR900CG0 Z Operating Instructions 07 2018 119 ...

Page 120: ...Disposal 11 4 Disposal of components SIMOTICS HV M 1RN76308PR900CG0 Z 120 Operating Instructions 07 2018 ...

Page 121: ...ocal office This office will contact the responsible service center on your behalf You can find your contact person in the relevant contact data base www siemens com your contact See also Technical Support https support industry siemens com cs ww en sc 2090 www siemens com yourcontact www siemens com yourcontact Siemens Support for on the move You can obtain optimum support anywhere you go using t...

Page 122: ...Service and Support SIMOTICS HV M 1RN76308PR900CG0 Z 122 Operating Instructions 07 2018 ...

Page 123: ...ces or removable adhesives e g Loctite 243 when installing fixing bolts with a clamping length of less than 25 mm The clamping length is taken as the distance between the head of the bolt and the point at which the bolt is screwed in Tightening torques The bolted connections with metal contact surfaces such as end shields bearing cartridge parts terminal box parts bolted onto the stator frame shou...

Page 124: ...s e g cast iron steel or cast steel Note Non standard tightening torques Different tightening torques for electrical connections and bolted connections for parts with flat seals or insulating parts are specified in the relevant sections and drawings B 2 Maximum weights of the coupling The motor is designed for flexible coupling If the maximum weight of the coupling is exceeded check the feasibilit...

Page 125: ...30 350 700 235 370 740 240 400 790 245 420 830 250 440 880 255 470 930 260 500 990 265 520 1040 270 550 1100 280 610 1220 290 670 1340 300 740 1480 The number of poles can be found by looking at the eighth digit of the order number on the rating plate See also Mounting the output elements Page 47 Technical data and drawings B 2 Maximum weights of the coupling SIMOTICS HV M 1RN76308PR900CG0 Z Opera...

Page 126: ...Technical data and drawings B 2 Maximum weights of the coupling SIMOTICS HV M 1RN76308PR900CG0 Z 126 Operating Instructions 07 2018 ...

Page 127: ...ons in Appendix Quality documents of the machine manual You should also file the documents that will only be handed over to you at a later time due to the process required You can find general quality documents here https support industry siemens com cs ww de ps 21296 cert https support industry siemens com cs ww en ps 21296 cert SIMOTICS HV M 1RN76308PR900CG0 Z Operating Instructions 07 2018 127 ...

Page 128: ...Quality documents SIMOTICS HV M 1RN76308PR900CG0 Z 128 Operating Instructions 07 2018 ...

Page 129: ... of the machine manual in Additional documents Operating instructions of Siemens components such as temperature transducer SITRANS TR200 TR300 etc can be downloaded from the Siemens Industry Online Support Portal See also Sitrans in the Service Support portal http support automation siemens com WW view en 26102748 SIMOTICS HV M 1RN76308PR900CG0 Z Operating Instructions 07 2018 129 ...

Page 130: ...Additional documents SIMOTICS HV M 1RN76308PR900CG0 Z 130 Operating Instructions 07 2018 ...

Page 131: ...71 Clockwise 63 Condensate 51 Connecting cables Selection of 59 66 with cable lugs 64 Connecting the auxiliary circuit 67 Cooling 20 Cooling system faults 85 Cooling water Connection 56 Filling and venting 56 Cooling water quality 23 24 Cooling water supply 73 Correct usage 20 Corrosion protection 34 35 80 105 Counter clockwise 63 D Damage during transportation 28 Degree of protection Derating 51 ...

Page 132: ... 40 81 97 Anti condensation heating 43 measure 41 Interference immunity 17 Interlocking circuit Anti condensation heating 25 External fan 24 L Labyrinth ring 103 Leakage water 90 Lifting eyebolt 29 30 48 49 Long term storage 33 M Machine Aligning to the driven machine 53 Mounting 53 setting down 50 Machine design IEC 19 Machinery Directive 13 Maintenance Maintenance intervals 87 Mechanical faults ...

Page 133: ...nding 36 Spare parts 121 Anti condensation heating 110 Auxiliary terminal box 1XB9014 116 Roller bearings DE 113 Roller bearings NDE 114 Stator and rotor 111 Terminal box 109 115 Top enclosure 112 Spare parts ordering 109 Spares on Web 110 Spent grease chamber 95 Stator winding Temperature monitoring 68 Stoppages 80 Roller bearings 81 Storage 33 Storage location 33 Supplementary devices 20 Switchi...

Page 134: ...W Water drip loop 60 Weight of the coupling 124 Index SIMOTICS HV M 1RN76308PR900CG0 Z 134 Operating Instructions 07 2018 ...

Page 135: ......

Page 136: ...Further Information www siemens com drives Siemens AG Process Industries and Drives Postfach 48 48 90026 NÜRNBERG GERMANY ...

Reviews: