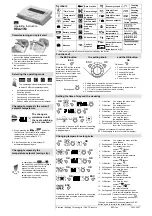


Settings for automatic operation with 2 heating periods
OK
OK
OK
OK
OK
h
OK
h
OK
° C
OK
OK
h
OK
h
OK
° C
ESC
ESC
/
ESC
ESC
If no button is pressed for 20 seconds, the setting
displayed will be accepted and the initial display will
appear again.
1. OK-button:
You access the menu level;
the clock flashes.
2. Setting knob: Clockwise to
menu,
flashes.
3. OK-button:
You accept the menu;
the day selection symbol
flashes.
4. Setting knob: Select the days, the working
days, the weekend or the week.
5. OK-button:
You save the selection made;
heating
period
flashes.
6. Setting knob: Counterclockwise to
7. OK-button:
Accept
;
heating period 1 flashes.
7. OK-button:
You accept heating period 1;
start time of heating period 1
flashes.
9. Setting knob: Set the start time of
comfort period 1.
10. OK-button:
You save the input; end time of
heating period 1 flashes.
11. Setting knob: Set the end time of
comfort period 1.
12. OK-button:
You save the input; setpoint of
heating period 1 flashes.
13. Setting knob: Set the setpoint of
comfort period 1.
14. OK-button:
You save the input;
heating period 2 flashes.
15. OK-button:
You accept heating period 2; start
time of heating period 2 flashes.
16. Setting knob: Set the start time of
comfort period 2.
17. OK-button:
You save the input; end time of
heating period 2 flashes.
18. Setting knob: Set the end time of
comfort period 2.
19. OK-button:
You save the input; setpoint
of heating period 2 flashes.
20. Setting knob: Set the setpoint of
heating period 2.
21. Press the ESC-button to return to the comfort
periods menu: Menu item comfort
periods
flashes.
22. Setting knob: To menu item
or
heating periods
(Change not necessarily required; press the ESC-
button several times to leave the menu level in
several steps, thus returning to the initial display.)
Settings for automatic operation with 1 or 3 heating periods
The procedure to be followed is the same as that for automatic operation with 2 heating periods. The only
difference being that, in addition, a setpoint for heating periods 3 can be entered (standard setting 21 °C)
Absence / holidays
OK
OK
OK
OK
° C
ESC
ESC
If no button is pressed for 20 seconds, the setting
displayed will be accepted and the initial display will
appear again.
1. OK-button:
You access the menu level;
the clock flashes.
2. Setting knob: To
, menu
flashes.
3. OK-button:
Accept
;
symbol
flashes.
4. Setting knob: Set the start (weekday) of your
absence.
5. OK-button:
You save the input; the number of
days
flash.
6. Setting knob: Set the duration of your absence;
number of days (max. 99 days)
7. OK-button:
You save the input;
setpoint flashes.
8. Setting knob: Set the temperature.
9. Press the ESC-button to return to the menu level;
the clock flashes.
(Change not necessarily required; press the
ESC-button again to return to the initial display.)
Siemens / Building Technologies / HVAC Products
B2217en
26.03.2007
24-hour operation
24-hour operation with only one heating period
(the heating period will automatically be
generated from the current 24-hour program).
Start of the first heating period, end of the last
heating period, plus the currently adjusted
comfort temperature setpoint.
Retrieving the default values
Press the button behind the small opening for at
least one second, thus resetting the user-specific
and the “Permanent-self-learning operating mode”
as well as display of flow temperature, outside
temperature and d.h.w. setpoint to their default
values (the heating engineer settings will not be
changed).
The clock starts at 12:00.
When making a reset, all display fields will light up.
Caution:
If the controller is removed from its base
for more than 60 seconds, an error
message will appear on the display.
When sliding the controller back to its
base, the error message must
disappear after 2 minutes at the latest.
Without inserted batteries, reset
functions correctly for a maximum
of 15 seconds only after removing
REA23M from its base.
Default values
Factory settings for heating
Operating mode
Start of continuous operation
00:00 00:00 00:00
End of continuous operations
24:00 24:00 24:00
Setpoint of comfort mode
19 °C
Setpoint of economy mode
16
°C
Setpoint frost protection
5
°C
Setpoint
remote operation
10 °C
Setpoint
absence
12 °C
Operating mode
Selected periods
Start of period 1
07:00 06:00 06:00
End of period 1
23:00 08:00 08:00
Start of period 2
17:00 11:00
End of period 2
22:00 13:00
Start of period 3
17:00
End of period 3
22:00
Setpoint of period 1
19 °C 19 °C 19 °C
Setpoint of period 2
20 °C 20 °C
Setpoint of period 3
21
°C
Setpoints
and
see above
Changing the batteries
2 Alkaline batteries type AA 1.5
V
When this symbol appears, the batteries must
be replaced within 3 months.
1.
Remove controller from its base.
2.
Open battery compartment at the rear and
replace
the
batteries.
3.
Close battery compartment and replace the
controller.
Note:
When changing the batteries, the current data are
maintained for a
maximum of one minute.