background image

Operating the Climatix touch panel

Operate the touch screen

5

19 | 30

Siemens

A6V11348824_en--_a

Smart Infrastructure

2018-04-10

5 Operating the Climatix touch panel

Use the touch screen to operate and use the function keys to trigger associated

configured functions within a project.

Do not use pointed or sharp objects because they can damage the plastic

surface of the touch screen.

Use only your fingers or a touch pen to operate the touch screen.

Do not touch multiple operating elements at the same time to avoid triggering

unexpected actions by accident.

Touch only one operating element on the screen at a time.

5.1 Operate the touch screen

Operating elements are touch-sensitive symbols on the screen of the Climatix

touch panel.
You activate operating elements by touching them with your finger.

The Climatix touch panel provides a visual feedback as soon as it detects that

an operating element has been touched.

The visual feedback is independent of any communication with the controller.

The visual feedback signal therefore does not necessarily indicate whether the

relevant action was actually executed.

5.2 Operate the on-screen keyboard

5.2.1 Customized keyboard

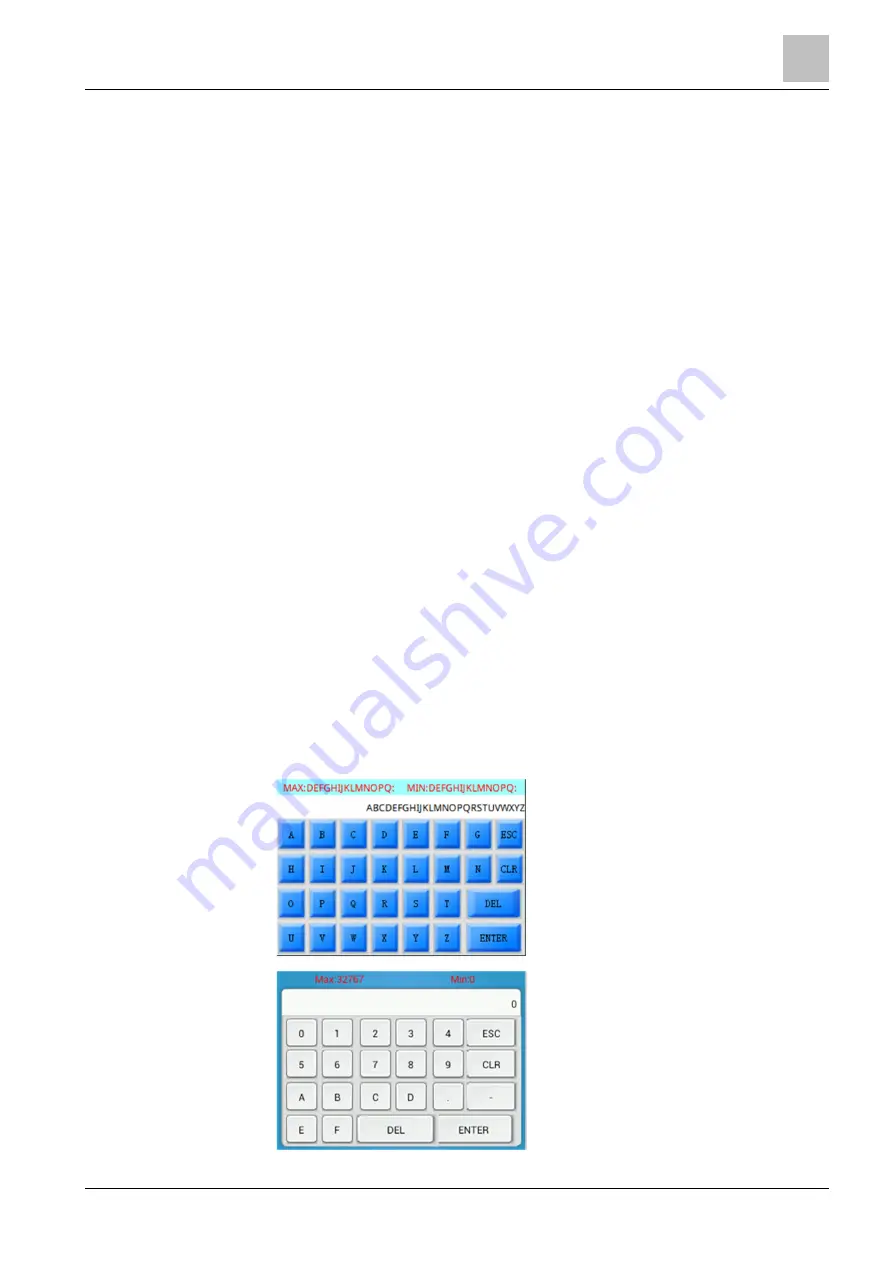
A customized keyboard appears on the Climatix touch panel screen when you

touch an operating element requiring input. The keyboard may be either an ASCII

keyboard or numeric keypad depending on the type of operating element and the

required input.
You can configure the customized keyboard for an operating element in the

configuration software.

Caution:

Note:

ASCII keyboard

Numeric keypad

Summary of Contents for POL8T2.40/STD

Page 1: ...POL8T2 40 STD Climatix Capacitive Touch Panel Basic Documentation A6V11348824_en _a Smart Infrastructure 2018 04 10 ...

Page 2: ...otes about usage 12 3 3 Notes on communication 12 4 Mounting and connecting 13 4 1 Preparations 13 4 2 Mount the Climatix touch panel 14 4 3 Connect the Climatix touch panel 14 4 3 1 Connect power supply 15 4 3 2 Connect configuration PC 16 4 3 3 Connect Climatix controller 17 4 4 Switch on the Climatix touch panel 18 5 Operating the Climatix touch panel 19 5 1 Operate the touch screen 19 5 2 Oper...

Page 3: ... Siemens A6V11348824_en _a Smart Infrastructure 2018 04 10 8 Technical specifications 25 8 1 Technical data 25 8 2 Interface description 27 8 3 LED indicators 28 8 4 DIP switches 29 8 5 Dimensions in mm 29 ...

Page 4: ......

Page 5: ...Mounting instructions A6V11348820 CE declaration of conformity A6V11424415 Environment protection declaration A5W90006122 1 3 Accessories Description Product no ASN Min order quantity Touch panel communication cable for Climatix controller D Sub RJ45 connectors The cable length is 2 5 m POL 0C1 45 STD 10 1 4 Before you start 1 4 1 Symbols and abbreviations This symbol marks texts that contain safe...

Page 6: ...er listed in the table The trademark symbols and are omitted hereafter for easier readability 1 4 3 Copyright This document may be duplicated and distributed only with the expressed permission of Siemens and may be provided only to authorized persons or companies with the requisite technical knowledge Siemens reserves the right to make any modification to this document without prior notice 1 4 4 Q...

Page 7: ...ventilation air conditioning and refrigeration Prerequisites for flawless and safe operation of the Climatix touch panel products are proper transport installation and commissioning as well as correct operation Fuses switches wiring and grounding must comply with local safety regulations for electrical installations The Climatix touch panel products may only be operated by personnel who have been ...

Page 8: ...ta import and export Panel mounted installation with IP65 front protection degree Capacitance touch technology Communication over Modbus protocol Connection with multiple controllers Firmware upgrade using USB stick Graphical User Interface upgrade using PC and USB stick Programmable graphical interface with third party multi language engineering tool Off line user interface simulation Support mul...

Page 9: ... Climatix touch panel the PC and the Climatix controller The application in the Climatix controller must support Modbus communication via RS485 interface and or local service interface T HI Climatix POL6XX communication concept here C600 Climatix POL4XX communication concept here POL42X Precondition With Climatix POL6XX controller With Climatix POL4XX controller ...

Page 10: ...ct design The following is the mechanical design of the Climatix capacitive touch panel POL8T2 40 No Description No Description 1 Display touch screen 6 RS485 communication port 2 LED indicators 7 DIP switches 3 Recesses for a mounting clip 8 Label 4 USB A port 9 Power supply connection 5 USB B port ...

Page 11: ...Overview Delivery scope 2 11 30 Siemens A6V11348824_en _a Smart Infrastructure 2018 04 10 2 4 Delivery scope Name Figure Quantity Touch panel 1 Power supply terminal 1 Mounting clips 4 ...

Page 12: ...ible gas steam or dust Do not use in environments with sharp temperature change or in high humidity Otherwise the Climatix touch panel may be damaged from internal condensation The Climatix touch screen is made of glasses Do not knock at it heavily or with pointed or sharp objects Otherwise you may damage the glasses and injure yourself 3 3 Notes on communication The Climatix touch panel supports ...

Page 13: ...el Climatic ambient conditions Protection classes The following clearances are required around the Climatix touch panel to ensure sufficient self ventilation Avoid mounting the Climatix touch panel near other devices AC power cable controller output module relay or other electrical equipments Keep the Climatix touch panel away from equipments such as frequency converters and power supply units and...

Page 14: ...nsure that Use all provided mounting clips The maximum curvature of the mounting surface is 0 010 4 3 Connect the Climatix touch panel Workflow for connecting the Climatix touch panel 1 Connect the power supply 2 Connect the configuration PC 3 Connect the controller Field Wiring Terminal Markings Field wiring terminals shall be marked to show a range of values or a normal value of tightening torqu...

Page 15: ...imatix touch panel Use only DC 24 V power supplies with sufficient amperage See Technical specifications 25 Take appropriate protective measures such as installing a lighting arrester when placing the power supply cable in an environment subjected to lightning strikes 1 Strip the ends of three power supply cables to a length of 6 mm 2 Attach cable sleeves to the bare cable ends 3 Install the end s...

Page 16: ...onnected to the correct polarities 4 3 2 Connect configuration PC A configuration PC can Transfer a project Reset the Climatix touch panel to factory settings Back up recover or configure recipes Use a USB cable to connect the configuration PC The USB cable has a standard USB Type B male connector on one end 1 Connect the USB cable to the USB A port on the Climatix touch panel 2 Connect the other ...

Page 17: ...le project connect the Climatix touch panel to the controller Use the COM port to connect to a Climatix controller 1 Shut down the Climatix touch panel 2 Connect an RS485 connector on a communication cable to the Climatix touch panel 3 Connect the other RS485 connector on the communication cable to the controller For safety instructions see Notes on communication 12 RS485 Connection ...

Page 18: ...e screen does not light up in two seconds after powering up immediately switch off the power supply You have probably crossed the cables on the power supply terminal Check the connected cables and change them as needed Climatix touch panel has a DEMO application in order to show main functionalities and features Please download your own application developed with HMI TOOL configuration software ...

Page 19: ...tive symbols on the screen of the Climatix touch panel You activate operating elements by touching them with your finger The Climatix touch panel provides a visual feedback as soon as it detects that an operating element has been touched The visual feedback is independent of any communication with the controller The visual feedback signal therefore does not necessarily indicate whether the relevan...

Page 20: ...ters Press 123 to switch to numbers and special characters Press EN to switch input language between English and Chinese Press Done to confirm your entries 5 3 Upgrade firmware Upgrade the firmware of the Climatix touch panel using a USB stick The Climatix touch panel is delivered with the latest firmware version uploaded in the Siemens factory Proceed with the following instructions only if requi...

Page 21: ...s available on the Climatix touch panel The firmware revision displays on the bottom right corner of the screen 5 4 Upgrade GUI application The Climatix touch panel can upgrade Graphical User Interface GUI application directly on field without the configuration PC Users can upgrade it to the latest GUI application created with engineering software directly by using a USB stick Refer to HMI TOOL on...

Page 22: ... and time Network configuration Serial port test Language To access the Settings mode 1 Shut down the Climatix touch panel 2 Manually set the DIP switches to the position 01000 3 Switch on the Climatix touch panel All settings are stored even if the Climatix touch panel is powered off 6 1 Set screen brightness Press Brightness and adjust the screen brightness 6 2 Set the time and date Press Date t...

Page 23: ...s an example of the parameter settings Select serial port COM Baud rate 9600 Data bits 8 Parity None Stop bit 1 4 Press Open in both setting mode and monitor software to open the serial port 5 In the setting mode enter test data for example 1234 in the Send characters textbox and press Senddata 6 If the monitor software receives the same data 1234 in this example the test is successful 7 In the mo...

Page 24: ... wipe from the screen edge inwards Use a cleaning cloth dampened with a cleaning agent to clean the equipment Only use water with a little liquid soap or a screen cleaning sponge When cleaning the touch screen you may inadvertently trigger a response on the controller by touching keys To prevent this switch off the Climatix touch panel prior to cleaning The Climatix touch panel may be damaged if c...

Page 25: ...770 000 Contrast control No Brightness control Yes Contrast TYP 400 1 Brightness TYP 500 cd m2 Active display area 4 3 16 9 Environmental conditions Operation Temperature Humidity Atmospheric pressure 5 50 C 10 90 r h Min 700 hPa equal to max 3000 m above sea level Transport Temperature Humidity Atmospheric pressure 25 70 C 10 90 r h Min 260 hPa equal to max 10 000 m above sea level Protection Deg...

Page 26: ... A5W90006122 contains data on environmentally compatible product design and assessments RoHS compliance materials composition packaging environmental benefit disposal General data Dimensions mm 150 93 38 5 Cut out mm 141 84 Weight kg 0 28 Ordering data Article type ASN POL8T2 40 STD Material SSN S55626 H824 A100 Minimum order quantity 1 Product package Touch panel 1 Mounting clips 4 Power supply t...

Page 27: ...necting to a configuration PC Figure Pin Description 1 DC 5 V out 2 Data 3 Data 4 Ground A standard USB interface Used for exporting data to a USB stick Figure Pin Description 1 DC 5 V out max 500 mA 2 Data 3 Data 4 Ground Figure Pin RS485 Connect to controller port 1 2 3 4 5 REF REF for RS485 6 7 8 Data RS485 B for RS485 connection 9 Data RS485 A for RS485 connection Power interface USB A USB B S...

Page 28: ...S485 port cut off plug and connect three wires If a customized cable is used ensure that the cable length is less than 3 m 8 3 LED indicators The three LED indicators are located on the front of the Climatix touch panel Marking Indicator name Color Mode Description Power supply Green On Powered on Off No power Operation Yellow On No detected fault Off CPU fault detected in the device Communication...

Page 29: ...DIP switches The DIP switches are located on the back of the Climatix touch panel DIP switches1 1 5 Function 00000 Normal operation mode 01000 Setting mode 10000 Calibrate the touch screen 10100 Enter Android system 00100 Firmware upgrade mode 1 DIP switch status ON 1 OFF 0 8 5 Dimensions in mm POL8T2 40 STD ...

Page 30: ...zhi East Road Xibeiwang Haidian District 100094 BEIJING China 86 10 64768806 www siemens com buildingtechnologies Beijing Siemens Cerberus Electronics Ltd 2018 Technical specifications and availability subject to change without notice Document ID A6V11348824_en _a Edition 2018 04 10 ...

Reviews: