

Installation Instructions
The following instructions are for the installation of a Siemens JD main breaker kit in a 400 amp Type P1 panelboard.
The parts provided in this kit connect Type JD main breakers to 1 phase, 2 or 3 wire systems or to 3 phase, 3 or 4 wire
systems. For all 1 phase systems, disregard the B-phase connector instructions. For 1 phase 2 wire and 3 phase 3 wire
systems, disregard the neutral instructions. The breaker is not included in the kit and must be purchased separately. Be
sure to select the appropriate breaker for the voltage, system, and feed location in use.
Bottom-feed mains are reverse fed, and require Type JXD breakers. Top-feed mains may be either Type JD or JXD:
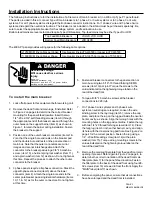
To install the main breaker:
1.
Lock off all power to this equipment before working on it.
2.
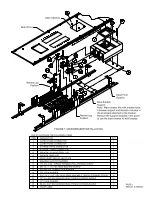
Remove the dead front and main lugs, if installed. Refer
to Figure 2 on page 4 to determine the correct breaker
mounting for the panel's feed location. Insert the two
1/4"-20 x 2-3/4" self threading screws (item 9) through
the appropriate end of the breaker case and through the
outer holes on the support barrier (item 8) as shown in
Figure 1, to retain the barrier during installation. Fasten
the breaker to the support.
3.
Position one of the outer breaker connectors (items 1 &
2) so that the single-hole end rests on the breaker pad
and the double-hole end rests on the panel section or
main bus. Note that the outer conncetors are mirror
images and are not interchangeable. Attach the
conncetor to the breaker pad using a 3/8"-16 machine
screw. (item 10), a helical spring lock washer (item 11),
and a plain washer (item 12) as shown. Do not tighten at
this time. Repeat the process to attach the other outer
connector to the breaker.
4.
3 phase panels require a B-phase connection. Stack the
upper B-phase connector (item 3) above the lower
connector (item 4). Attach the single-hole ends to the
center pole breaker pad using identical hardware (items
10, 11, & 12) as for the outer connectors. Do not tighten
at this time.
5.
Fasten all breaker connectors to the panel section or
main bus using two 5/16"-18 thread forming SEMS
screws (item 13) per joint. Torque the screws to the
value indicated on the tightening torque label on the
rear of the dead front.
6.
Torque all 3/8"-16 machine screws at the breaker
connections to 228 in-lb.
7.
On 1 phase 3 wire systems and 3 phase 4 wire
systems, neutral lugs are required. Loosen the wire
binding screw in the lay-in lug (item 5), remove the cap
plate, and place the lug on the lug pad inside the neutral
barrier cavity, as shown. Align the two lug holes with the
mounting holes on the lug pad centerline. Fasten the lug
with two 1/4"-20 thread forming screws (item 14). Place
the tang lug (item 6) in the other barrier cavity, and align
its hole with the innermost lug pad hole. See Figure 2 on
page 4 for the correct position. Fasten the lug using a
1/4" -20 self threading screw (item 14) with a plain
washer (item 15). Torque all lug mounting screws to the
values indicated on the tightening torque label on the
rear of the dead front.
8.
Remove the main lug filler plate from the dead front main
opening if present. Refer again to Figure 2 on page 4, to
determine the correct orientation of the dead front main
filler plate (item 7) for the panel's feed location. Fasten
the filler plate to the back of the dead front using four #8-
32 screws (item 16) screwed in from the front. Apply the
"MAIN" label (item17) as shown.
9.
Before energizing the panel, ensure that all connections
have been torqued and the dead front is installed.
PAGE 3
MBKJD1 & MBKJD3
Hazardous voltage.
Will cause death or serious
injury.
Keep out.
Qualified personnel only.
Disconnect and lock off all power before
working on this equipment.
Top Feed Main Breakers
Bottom Feed Main Breakers
JD, HJD, JXD, HJXD
JXD, HJXD
The 400A P1 panel provides wiring space for the following cable options:
(2) 250 MCM line cables per phase
(1) 600 MCM line cable per phase
Use breaker line lug TA2J6500 or copper lug TC2J6500
Use breaker line lug TA1L6750 or copper lug TC1J6600
Summary of Contents for P1 400A
Page 2: ......
Page 4: ...PAGE4 MBKJD1 MBKJD3 ...


