background image

Configuring the MT8001 

43 

Building Technologies


 048_DMS_MT8001_ICC_MP4.20_A6V10096181_a_en.doc

Fire Safety & Security Products 


06.2009


5.4.2.4  Intrusion options – Tamper Switch Alarms 


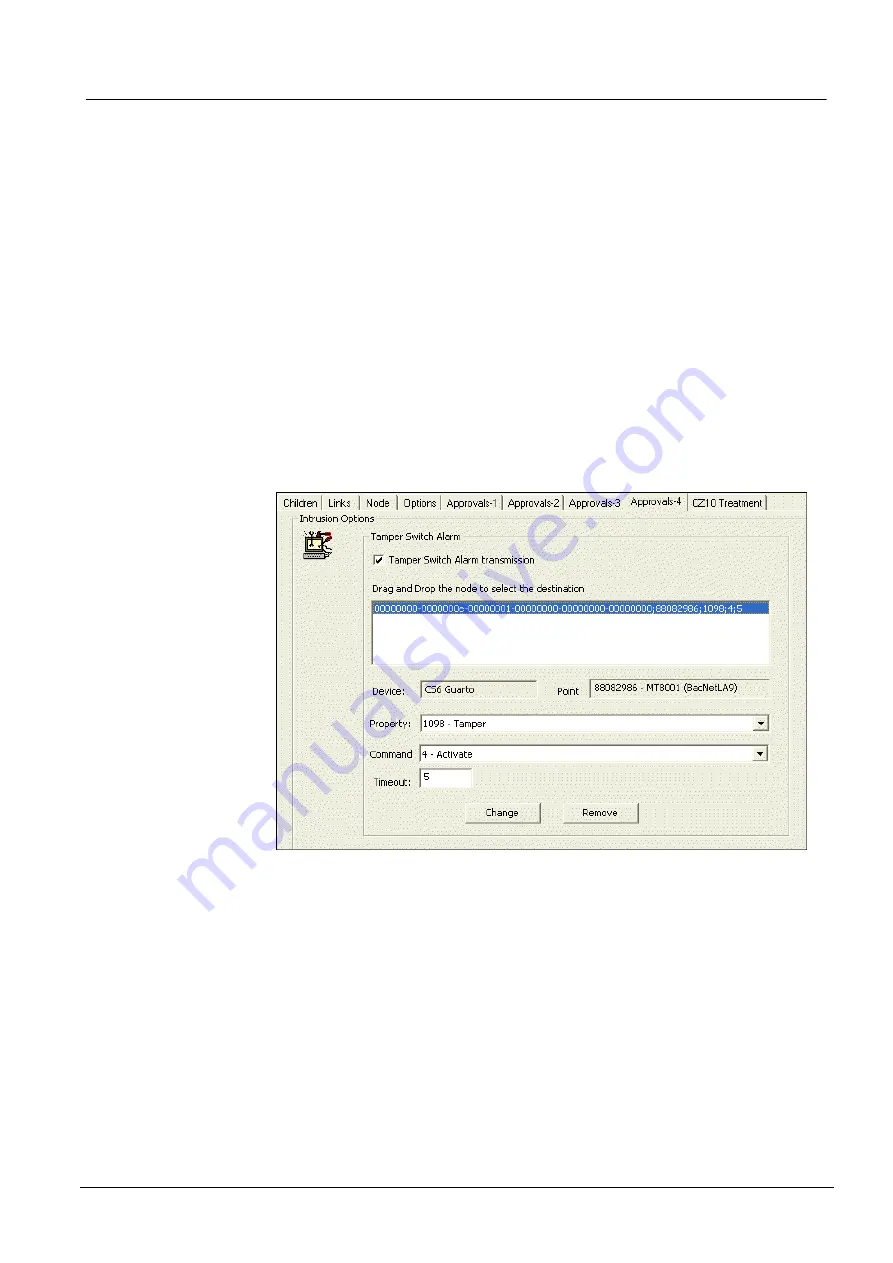
Configure the Approvals-4 tab (see Fig. 41) to define a Tamper Switch Alarm on 
the MT8001. 

To configure Tamper Switch Alarm, do the following: 

1.

 Check the 

Tamper Switch Alarm transmission

 to enable a Tamper Switch 

Alarm on the MT8001. 

2.

 Drag and drop the appropriate node from the Composer tree to the Approvals-4 

tab window. 

Note:

 Typically, the node will be a point on an intrusion panel. 

3.

 In the 

Drop Point

 dialog box, do the following: 

a.

 Choose a property from the 

Property

 drop-down list. 

b.

 Choose a command from the 

Command

 drop-down list. 

c.

 Change the timeout (command feedback), if desired. 

4.

 Select 

Add

.


Note:

 To update the list in the 

Drag and Drop

 window, select the node, and then 

select 

Change

 or 

Remove


Fig. 41  Approvals-4 tab 


Summary of Contents for MT8001 MP4.20

Page 1: ...Building Technologies Fire Safety Security Products MT8001 MP4 20 Management Terminal Installation Function Configuration Commissioning Safety Regulations ...

Page 2: ...ument and in the subject thereof By acceptance of the document the recipient acknowledges these rights and undertakes not to publish the document nor the subject thereof in full or in part nor to make them available to any third party without our prior express written authorization nor to use it for any purpose other than for which it was delivered to him ...

Page 3: ...tors and jumpers 16 4 3 2 Interface Descriptions 18 4 3 2 1 RS232 and TTY interfaces 18 4 3 2 2 System Diagnostic LED 18 4 3 2 3 LON connector 18 4 3 2 4 Inputs power supply and signals 19 4 3 3 Interconnections to subsystems 19 4 3 3 1 CS1140 via ISO1745 interface max 30m 20 4 3 3 2 Cerloop via MK7022 max 30 m 21 4 3 3 3 NK8000 max 30 m 22 4 3 3 4 Power supply from CS11 AlgoRex 23 4 4 Configurati...

Page 4: ...display mode 55 5 4 11 Setting the horn as internal external 55 5 4 12 Defining buzzer mode 55 5 4 13 Setting event limits 56 5 4 14 Setting date and time format 57 5 4 15 Setting date time options 57 5 4 16 Setting up the logging printer 58 5 4 17 Leave everything else alone 58 5 5 Creating a backup of your project 59 5 6 Transferring the configuration 59 5 6 1 Creating XML configuration files 59...

Page 5: ...pository System released at SBT FS for end users via the STEP Web Client interface at the following address https workspace sbt siemens com content 00001123 default aspx The following describes one way to search and find a document Î To learn about other ways to locate a document see DMS8000 Quick Ref erence Guidelines for Search and Finding DMS Documents in STEP Document no A6V10064704 1 Click on...

Page 6: ... maintenance or a lack of maintenance We have checked the contents of this manual for agreement with the hardware and software described Since deviations cannot be precluded entirely we cannot guarantee full agreement However the data in this manual are reviewed regularly and any necessary corrections are included in subsequent editions Suggestions for improvement are welcome Modification index Ve...

Page 7: ...standards Siemens Building Technologies products are developed and produced in compli ance with the relevant international and European safety standards This document provides warnings and recommendations specific to the MT8001 Any additional country specific or local safety standards and or regulations that apply concerning project planning and installation and operation of the MT8001 must also b...

Page 8: ...in the system from one place In the case of a security event the MT8001 alerts the end user to that event fur nishes important information about that event and provides guidance during the handing or treatment process Terminal users can monitor or modify the state of a large area a control unit a single device or even a single device property During routine activities such as maintenance or inspec...

Page 9: ...ion Page Modifications 3 p 10 New XLS support 2 1 1 Documentation changes and corrections in this edition The following is the list of corrections and improvements not related to new soft ware features included in this edition of the document Section Page Modifications Various Updated links and references to MP4 20 documentation mate rial 2 1 2 Approvals EN54 EN54 approval the VdS certificate G 29...

Page 10: ...M3 or COM4 Direct connection RS232 ISO 1745 Fire Detection CS11 AlgoRex FC700A Cerloop via MK7022 RS232 ISO 1745 Fire and Gas Detection CS11 AlgoRex CZ10 CC60 STT11 MF7033 MM7033 Intrusion Detection CS440 NK8000 via NK82xx serial connection Fire and Gas Detection CS11 AlgoRex FC700A CZ10 CC60 XLS Intrusion Detection CS6 Guarto via LON I P CS440 SI410 420 Intrunet Other DF8000 CF9000 I O systems 1 ...

Page 11: ... the MT8001 care should be taken to avoid possible damaging environmental influences such as direct sunlight vibra tion or dust The MT8001 should never be installed close to radiators or washbasins and proximity to sources of electrical or mechanical interference should be avoided Care should also be taken to ensure adequate heat dissipation from the device Î See also the MT8001 hardware limits on...

Page 12: ... The MT8001 Management Terminal may be mounted directly in a 19 cabinet or in a control desk provided by the customer The drawings in Fig 2 Fig 3 and Fig 4 show the details of the required cut out plus the necessary mounting details Note The panel should be fixed with 4 bolts M4 x 4 mm Fig 2 Front view of MT8001 Fig 3 Rear view of MT8001 Fig 4 Cut out dimensions 197 mm 404 mm ...

Page 13: ...nwards and unhook the frame to remove the frame from the base of the housing 4 Release the 4 mounting bolts Installation procedure for wall or desk mounting 1 Mount the tamper contact if required S24230 A135 A1 2 Screw the base of the housing to the wall or onto the control desk 3 Install the MT8001 in the frame taking note of the required text orientation 4 Re mount the frame in the housing 5 Mak...

Page 14: ...rd H28 hous ing may be used To rationalise installation work this housing is equipped with a central terminal block from which you can make all the standard external connec tions The internal wiring of the MT8001 connectors to this terminal block is shown in Appendix B Î The installation of the housing itself is described in document 007756 ME8050 KS Housing Installation Fig 8 View of housing base...

Page 15: ...ies 048_DMS_MT8001_ICC_MP4 20_A6V10096181_a_en doc Fire Safety Security Products 06 2009 4 2 4 Rack mounting option MH8053 The MT8001 can be mounted inside a 19 cabinet using the rack mounting option MH8053 Fig 10 MT8001 rack mounting dimensions ...

Page 16: ...afety Security Products 06 2009 4 3 Wiring 4 3 1 Connectors and jumpers Fig 11 MT8001 rear view showing the position of connectors and jumpers Fig 12 MT8001 side view showing the position of connectors Fig 13 MT8001 rear view COM port details Fig 14 MT8001 side view Ethernet RJ45 details not yet used ...

Page 17: ...tact X20 Pin 3 4 is Normally Open NO Connected 9 10 Battery fault If the jumper is connected then contact X20 Pin 5 6 is Normally Closed NC If the jumper is missing then contact X20 Pin 5 6 is Normally Open NO Connected 11 12 Operational fault If jumper is connected then system faults are displayed as alarms If jumper is missing then system faults are displayed as faults Connected 13 14 Reserved 1...

Page 18: ...nits via CK1142 43 MK7022 or NK8223 maximum distance 30 m No HW adjustments are required for COM 1 to COM 4 Baud rates parity bit set tings and so on are defined via the Composer configuration tool and are downloaded to the MT8001 along with the configuration data The lower 2 connectors are not used TTY interfaces In cases where interconnections are made between separate buildings protective measu...

Page 19: ...ctor X20 4 3 3 Interconnections to subsystems The MT8001 may be connected to subsystems in the following combinations Configuration Housing Types AlgoRex via CK1142 43 Desktop H28 Housing Cerloop via MK7022 Desktop H28 Housing NK8000 network via NK822x Desktop H28 Housing Note Shaded combination is required for EN54 Approval Power supply 24V 1 2 3 4 5 6 7 8 9 10 11 12 13 14 15 16 17 18 External Al...

Page 20: ...700A connection via ISO1745 H28 housing MT8001 1 2 RxD 3 TxD 4 5 GND 6 7 8 9 X33 COM4 A B C A B C No HW configuration of the RS232 interface is required E3H 02x X2 10 9 8 CS11 AlgoRex Shielded cable type LiY CY 3 0 25 or similar TxD RxD GND Settings of SW S5 S5 1 INT OFF S5 2 INT OFF MT8001 20 19 RxD 18 TxD 16 17 1 14 13 12 Main Terminal Block A B C A B C No HW configuration of the RS232 interface...

Page 21: ...housing ME8050 KS Fig 20 Cerloop connection via MK7022 H28 housing MT8001 1 2 RxD 3 TxD 4 5 GND 6 7 8 9 X33 COM4 A B C A B C No HW configuration of the RS232 interface is required K1D 012 K1 4 2 1 3 MK7022 Shielded cable type LiY CY 3 0 25 or similar TxD RxD GND K1H 021 MT8001 20 19 RxD 18 16 17 15 14 13 12 Main Terminal Block A B C A B C No HW configuration of the RS232 interface is required K1D ...

Page 22: ...8000 connection H28 housing MT8001 1 2 RxD 3 TxD 4 5 GND 6 7 8 9 X33 COM4 A B C A B C No HW configuration of the RS232 interface is required COM1 COM2 COM3 COM4 3 2 5 NK822x Shielded cable type LiY CY 3 0 25 or similar TxD RxD GN 9 pin D Sub female MT8001 20 19 RxD 18 TxD 16 17 GND 15 14 13 12 Main Terminal Block A B C A B C No HW configuration of the RS232 interface is required Shielded cable typ...

Page 23: ...9 8 7 6 5 4 3 2 1 ext horn off Isolated LiYv cable min 1 mm 2 if length 3m min 0 75 mm2 if length 3 m Main Terminal Block Terminal 2 3 4 CS11 AlgoRex Power supply 24V 0V E3G 060 Emergency Alarm o p 1 5 6 2k2 Separate cables should be used for power and emer gency alarm wiring To avoid ground loops the terminal should be earthed at the control unit MT8001 18 17 16 15 14 13 12 11 10 9 8 7 6 5 4 3 2 ...

Page 24: ...nts 4 4 1 Composer hardware requirements Screen resolution At least 1024 x 768 Pentium PC 512 MB RAM 1 GB recommended 500 MB free disk space At least one parallel or USB port for hardware key dongle At least one serial port connection 4 4 2 Composer software requirements Windows XP Pro SP3 Vista SP1 WW8000 Composer MP4 20 ActiveSync V3 8 or later included on the installation disk ...

Page 25: ...document n A6V10062401 PAK Product authorisation key Items needed for Installation Microsoft ActiveSync utility ActiveSync cable either purchased in kit or built as shown in Appendix A Installation CD includes Composer MT8001 Firmware and Plug ins Hardware key dongle for Composer PAK for Composer Composer Technical Manual DMS8000 Network Fire Intrusion Connectivity Guide Installation Procedure 1 I...

Page 26: ...construct it as shown in Appendix A After the initial file transfer ActiveSync will ask if you want to connect the device You can cancel and exit at this point if the MT8001 is not connected 4 5 3 Installing Composer Composer is the configuration software you use to customise the MT8001 to your client s site To install it do the following 1 Logon to computer as Administrator for details ask your n...

Page 27: ...stalled 4 5 4 Installing the plug Ins To install the MT8001 plug in launch the AddOnMT8001Installer exe utility avail able in the MT8001 Add on folder of the DMS8000 CD At this point you need to connect and activate the hardware key for Composer See the Composer Technical Manual document no A6V10062401 Now you are ready to create a new project in Composer Note that the DMS8000 Network Fire Intrusi...

Page 28: ... list of the actual steps in the MT8001 configura tion process The following abbreviations are used this table DMS CG DMS Network Fire Intrusion Connectivity Guide document n A6V10062425 SPECS Configuration specifications agreed upon with the customer Items needed for configuration Microsoft ActiveSync Installed on your PC Composer and plug ins installed on your PC A Block diagram of the plant con...

Page 29: ...network to the driver and adjust the communication parameters baud rate ports etc DMS CG 7 Customise the behaviour of the MT8001 p 37 Define event behaviour p 37 Disable events p 46 Define report actions p 47 Define user permissions p 48 Define custom commands p 52 Define display mode p 55 Define buzzer mode p 55 Set the horn as internal or external p 55 Set event limits p 56 Set MT8001 as date ti...

Page 30: ...ned set of objects e g for MM8000 or with an empty structure verify the Composer behaviour in your system Start a new MT8001 project in one of the following ways In case of Cerloop or direct link the best approach is to start from an empty structure If this is not the case using the new project command you can restore an empty project by selecting the related template see Fig 28 For example in the...

Page 31: ...Configuring the MT8001 31 Building Technologies 048_DMS_MT8001_ICC_MP4 20_A6V10096181_a_en doc Fire Safety Security Products 06 2009 Fig 28 Empty project restore Fig 29 NK8000 project restore ...

Page 32: ...e a new folder which you can name e g Management Terminal select it and click the MT8001 icon on the Composer toolbar see Fig 30 If you miss the MT8001 icon in the toolbar check the plug in installation in 4 5 4 at p 27 Fig 30 Adding the MT8001 in a new project structure Adding subsystems and network components You can now define the structure of your system see an example in Fig 6 For more inform...

Page 33: ...nfiguring the graphic maps for the MT8001 management terminal Map characteristics MT8001 can handle graphical Maps representing a building floor with as many dy namic points as required Maps can be organised in multiple layers which can be background or foreground layers At least one background and one foreground layer are present in any map Map layers contain graphical objects which own a number ...

Page 34: ...ited on a map Composer provides its association with an appropriate page automatically Fig 33 A graphic page a partial view on a map Setting up graphical maps In the MT8001 Composer project the support for maps has to be configured in the MT8001 node as shown in Fig 34 below Select the Graphic Maps Support icon to insert a Graphic Maps node in the MT8001 structure Below it you can add maps directl...

Page 35: ...bining background and foreground layers 8 Configure foreground drag and drop points from the tree on the map 9 Save the Map The devices deposited on the maps are then associated to an automatically cal culated page that is used for the graphical view during event treatment You can check this association in the Pages extension tabs of each device close the map configuration first 10 Proceed with ot...

Page 36: ... have special instructions associated with them you will need to have a specific procedure file which you associate to each property of that device or data point Define customised procedures The customer should provide one or more procedure bitmaps or texts that they want to have associated with the safety and security devices in case of an event The bitmap or text may contain standard event treat...

Page 37: ...gs for a typical system MT8001 Options tab Typical settings Mandatory login Not selected Enable logout timeout Selected Logout Timeout inactivity in sec 900 Quiet Window Background Bitmap Bitmap defined by Client or default Quiet bmp Alarm Window Background Bitmap Bitmap defined by Client or left blank Page after event selection Instructions Map Protocol or Report 2 Instruction page Event Ordering...

Page 38: ...nt to override the primary event and display only one event in the Event list instead of two PIZ Approvals 2 Not available EN54 Approvals Select if EN54 Approvals are required ULC Approvals Select if ULC Approvals are required Intrusion Options Duress Alarm Duress Alarm transmission Select to enable a Duress Alarm Duress events suppression time Duress feedback delay in seconds before the Duress Al...

Page 39: ...vere open event category Default 20 seconds To configure Duress Alarm do the following 1 Check the Duress Alarm transmission to enable a Duress Alarm on the MT8001 2 Modify the Duress events suppression time if desired 3 Drag and drop the appropriate node from the Composer tree to the Approvals 1 tab window see Fig 38 Note Typically the node will be a point on an intrusion panel 4 In the Drop Poin...

Page 40: ...Configuring the MT8001 40 Building Technologies 048_DMS_MT8001_ICC_MP4 20_A6V10096181_a_en doc Fire Safety Security Products 06 2009 Fig 38 Approvals 1 tab ...

Page 41: ...onds if desired Note During this time additional logins are prevented 3 Check the PIN code Alarm transmission to enable remote transmission of the Alarm 4 Drag and drop the appropriate node from the Composer tree to the Approvals 2 tab window Note Typically the node will be a point on an intrusion panel 5 In the Drop Point dialog box do the following a Choose a property from the Property drop down...

Page 42: ...n to enable a Code Alarm on the MT8001 2 Drag and drop the appropriate node from the Composer tree to the Approvals 3 tab window Note Typically the node will be a point on an intrusion panel 3 In the Drop Point dialog box do the following a Choose a property from the Property drop down list b Choose a command from the Command drop down list c Change the timeout command feedback if desired 4 Select...

Page 43: ... transmission to enable a Tamper Switch Alarm on the MT8001 2 Drag and drop the appropriate node from the Composer tree to the Approvals 4 tab window Note Typically the node will be a point on an intrusion panel 3 In the Drop Point dialog box do the following a Choose a property from the Property drop down list b Choose a command from the Command drop down list c Change the timeout command feedbac...

Page 44: ... Approvals 1 tab the Su pervisory Event settings are disabled ULC Configure the CZ10 Treatment tab to define specific event behaviour for ULC applications The ULC norm specifies that critical faults and active states display with precise description text namely Supervisory and Device Active This tab allows you to associate MT8001 event to the following ULC categories Supervisory Zone or Element Fa...

Page 45: ...curring Once you have placed these bitmaps in the XMLData Instructions folder you can associate them with the corresponding zones or elements To associate a special procedure or additional information with its corresponding object do the following 1 Select the object that should have the special procedure associated with it See Fig 43 A 2 Select the property that the procedure applies to See Fig 4...

Page 46: ...ent triggering for certain types of states To disable event triggering do the following 1 Select the data point that should have event s disabled 2 Select the state for which you want to disable event triggering in the Field Point Data tab click the number in the LPID field to select the state see Fig 44 A 3 Click the Event enabled box to remove the X and disable event triggering for that state Se...

Page 47: ...list of these actions Each action should be no more than 36 characters out of a maximum of 50 for an optimal view in the MT8001 report list pane To define an action do the following 1 Select MT8001ÆEvent browserÆReport Table nodes 2 Click the report icon to insert a new report action 3 Expand the Report Table node and select the Node tab 4 Select the new report node 5 Enter the report action in th...

Page 48: ...the event horn Acknowledge events Suspend events Close events The customer should tell you which actions can be performed without logging in and you can set the permissions as necessary in the function state table MT8001 ÆSecurity ServerÆUsers The technical user is you The Technical User permissions are set for those responsible for setting up and maintaining the MT8001 The only setting that you s...

Page 49: ...ÆSecurity ServerÆUsers node see Fig 46 2 Select the User icon to create a new user profile 3 Expand the Users node and select the new User node 4 Select the Node tab 5 Name the user 6 Set their numeric login ID in the User Name field 7 Click the Set Password button and set their numeric PIN code Note The PIN code must be at least four and up to eight digits 0 9 Fig 46 Define a new user ...

Page 50: ...he User Groups node and select the new User Group node 4 Select the Node tab 5 Name the User Group 6 Set the Group ID numeric only There are four user groups in the EN54 GUI 1 4 User group 1 is the Default and user group 4 is the Technical User To configure the user profiles follow the procedures for defining user groups and defining users Fig 47 Set user permissions Assign the users to user group...

Page 51: ...corresponds to EN54 level 3 for service technicians Group 4 corresponds to EN54 level 4 for the manufacturers personnel Access rights User Group History browser X X X Plant browser X X X PC connection X Shut down X X About X X X X Date time updating X X Reset ALARM commands for the field X X X Ack commands for the field X X X Day organisation X X X Night organisation X X X Include section zone ele...

Page 52: ... included putting them back to their original state before the command was initi ated To set up a command do the following 1 Select the user group and expand the node 2 Select the Buttons node 3 Select the button icon to insert a command under the Buttons node 4 Name the command in the Description field See Fig 48 A on page 53 5 Describe the command in the Action Description field for example Excl...

Page 53: ...he moment F Page Number The page of the commands list this command should appear on if there is more than one page of commands 1 Current Actions Field z Drag and drop a selection to the Current Actions Field z Double click an action to display the selections in the fields listed below 2 Property Field Select the property 3 Command Field Select the command 4 Timeout Field No of seconds before actio...

Page 54: ...ber of seconds in the Timeout field within which the action has to execute before it will be considered unsuccessful and the command will be aborted the rollback button will display 5 Click Add The action code will display in the Current Actions field To modify an action do the following 1 Click the action to be modified in the Current Actions field The Device Point Property and Command fields wil...

Page 55: ...001 Æ Approvals 1 tab In the EN54 mode after a configured time of user inactivity the display reverts to the alarm event list display Note 20 seconds is recommended 5 4 11 Setting the horn as internal external The horn sounds when an alarm occurs It can be set to sound the internal MT8001 horn buzzer an external horn or both It can also be muted Select which horn will sound from the Buzzer output ...

Page 56: ...n is activated buzzer mode 5 4 13 Setting event limits Set maximum events in the event list In the MT8001 Æ Event server node set the maximum number of events that can be on the event list at any one time The default value is 150 during the commis sioning phase when many faults may be present a value of 300 is recommended max value is 600 Set maximum events in the history browser In the MT8001 Æ H...

Page 57: ...the date time format MUST BE CONSISTENT in the 3 fields 5 4 15 Setting date time options When a terminal is enabled to transmit the date and time message the subsys tems connected to the network will be synchronised to match their times to those of the time master When a MT8001 is set as time master any other terminal connected to the same network must not be enabled to do the same Note that the o...

Page 58: ... port is not already being used MT8001 COM ports COM1 ActiveSync port dedicated COM2 Touch Screen port dedicated COM3 Logging printer port COM4 CK1142 43 MK7022 or NK8223 COM5 Open COM6 Open To set up the logging printer do the following 1 Select the Com port in the MT8001 Æ Diagnostic Node tab recommended 3 2 Adjust the default settings if required to match those of the connected printer 3 Set th...

Page 59: ...ct the MT8001 node in Composer 2 Use the right click menu to select Node Commands Æ Prepare XML Configuration The following message displays when the XML data generation is complete Fig 51 Data generation confirmation message 5 6 2 ActiveSync Make sure that standby mode on your PC is disabled Transferring the configuration files from your PC to the MT8001 will take a while If your PC is set to go ...

Page 60: ...end the Get Connected command from ActiveSync you have only a few seconds to send the Get Connected command from MT8001 If it expires you will need to do it again faster If you have additional problems see Appendix C Troubleshooting Transfer XML files to the MT8001 To do this perform the following steps 1 Select the MT8001 node in the Composer project 2 Use the right click menu to select Node Comm...

Page 61: ... card into the card reader unit 7 Double click the Copy_to_Compact_Flash exe file A window appears prompting you to enter the drive letter for the CF card The tool then copies all the files you extracted to the flash card When the copying is complete a confirmation window appears 8 Press any key to continue 9 Safely remove the CF card 10 Insert the flash card into the MT8001 and turn it on Do not ...

Page 62: ...s section details how to do this 6 1 Checking MT8001 subsystem connection Verify that the subsystems and the MT8001 communicate As soon as you turn on the MT8001 a Fault will be displayed on the Event browser for each control unit that is defined in the configuration As the communication is confirmed with each control unit the Fault state in the event will change to Normal If there is a problem wi...

Page 63: ...01_ICC_MP4 20_A6V10096181_a_en doc Fire Safety Security Products 06 2009 Appendix A ActiveSync cable connection diagram Note This cable is included in the service kit that can be purchased from the Sie mens FS DMS division Fig 52 ActiveSync cable connection diagram ...

Page 64: ...g the configuration 64 Building Technologies 048_DMS_MT8001_ICC_MP4 20_A6V10096181_a_en doc Fire Safety Security Products 06 2009 Appendix B Internal wiring of MT8001 H28 housing Fig 53 H28 housing ME8050 KS ...

Page 65: ... reconnect it ActiveSync should start to function normally If it still doesn t connect perform the steps in the following procedure Do not do this during Configuration download If the cable becomes discon nected during the download of the configuration data after you have started to send the XML data follow the procedure described in the next section 1 Open the Connection Settings window of the Ac...

Page 66: ...is occurring Therefore if your PC has been set to go into standby mode after a period of inactivity it will shut down once that time is exceeded It is best to disable standby mode prior to initiating the configuration transfer If your PC has gone into standby mode while transferring XML files to the MT8001 do the following 1 Turn on your PC The Composer project will still display but will not work...

Page 67: ...nge to normal If there is a problem with any of the connections one of two situations will occur None of the Faults change to Normal MT8001 MK7022 problem Some of the Faults change to Normal but not all MK7022 control unit problem Situation 1 Check the connection between the MT8001 and the MK7022 Check the physical connection and verify that the actual local addresses baud rates and COM port numbe...

Page 68: ...ologies Group International Headquarters Fire Safety Security Products Gubelstrasse 22 CH 6301 Zug Tel 41 41 724 24 24 Fax 41 41 724 35 22 www sbt siemens com Document no A6V10096181_a_en MT8001 Technical Material Edition 06 2009 Section 2 ...

Reviews: