

3 / 7
807906A02
4
Turn off and lock out all power supplying this device before
working on this device.
Replace all covers before power supplying this device is
turned on.
Couper l'alimentation de l'appareil et barrer avant de
travailler.
Remplacez touts les couverts avant que
l'approvisionnement de pouvoir soit alimenté.
Tensión peligrosa.
Puede causar la muerte o lesiones graves.
Tension dangereuse.
Danger de mort ou risque de blessures graves.
Hazardous Voltage.
Will cause death or serious injury.
Desenergice totalmente antes de instalar o darle servicio.
Reemplace todas las barreras y cubiertas antes de
energizar el interruptor.
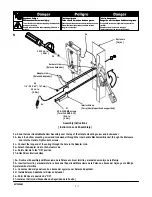
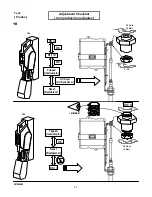
5
2 X 35 Lb. In.
[ 4 Nm ]
5a
5b
5e
5c
5f
2 X 8-32 SEMS screws
[ Tornillo SEMS 8-32 ]
15 Lb. In.
[ 2 Nm ]
Actuator Link
[ Eslavón Actuador ]
Adapter Link
[ Eslavón Adaptador ]
Enclosure
[ Cajón ]
Interlock Hasp
[ Cerrojo del dispositivo de seguridad ]
5d
1 / 4 – 20 X .62” ( 15.7 mm )
50 Lb. In.
[ 6 Nm ]
Assembly Instructions
[ Instrucciones de Ensamblaje ]
5a - Slide the Inner Handle Mechanism Assembly over the top of the Handle mounting screw and lock washer.
5b - Insert the bottom mounting screw and lock washer through the inner handle Mechanism Bracket, through the Enclosure
and into the Handle. Tighten both screws.
5c – Connect the long end of the spring through the hole in the Adapter Link.
5d – Attach the Adapter Link to the Actuator Link .
5e – Rotate Handle to the “ON” position
5f – Attach Door Interlock Hasp.
[ 5a – Deslice el Ensamblaje del Mecanismo de la Palanca sobre el tornillo y arandela de montaje de la Manija.
5b – Inserte el tornillo y arandela inferior a través del Soporte del Mecanismo de la Palanca, a través del Cajón y en la Manija.
Apretar ambos tornillos.
5c – Conecte el lado largo del resorte a través del agujero en el Eslavón Adaptador.
5d – Instale Eslavón Adaptador al Eslavón Actuador.
5e – Rotar Manija a la posición de “ON”.
5f – Instale el Cerrojo del Dispositivo de Seguridad de la Puerta. ]


