background image

en

34

Switching off and 

disconnecting the appliance

Switching the appliance off

Press the On/Off button. 

Refrigeration unit and light switch off.

Disconnecting the appliance

If you do not use the appliance for a prolonged period:
1. Switch off the appliance.
2. Pull out mains plug or switch off fuse.
3. Clean the appliance.
4. Leave the appliance door open.

Defrosting

Freezer compartment

The fully automatic NoFrost system ensures 

that the freezer compartment remains free of ice. 

Defrosting is no longer required.

Refrigerator compartment

Defrosting is actuated automatically.
The condensation runs through the drainage hole into 

an evaporation pan on the rear of the appliance.

Cleaning the appliance

Warning

Never clean the appliance with a steam cleaner!

Caution

Do not use abrasive, chloride or acidic cleaning 

agents or solvents.

Do not use scouring or abrasive sponges. The 

metallic surfaces could corrode.

Never clean shelves and containers in 

the dishwasher. The parts may become deformed!

Proceed as follows:

1. Before cleaning: Switch off the appliance.
2. Pull out mains plug or switch off fuse.
3. Take out the frozen food and store in a cool location. 

Place the ice pack (if enclosed) on the food.

4. Wait until the layer of frost has thawed.

5. Clean the appliance with a soft cloth, lukewarm water 

and a little pH neutral washing-up liquid. The rinsing 

water must not run into the light.

6. Wipe the door seal with clear water only and then 

wipe dry thoroughly.

7. After cleaning reconnect and switch the appliance 

back on.

8. Put the frozen food back into the appliance.

Interior fittings

To clean the equipment, all variable parts of 

the appliance can be taken out (see chapter Variable 

interior design).

Note

To take out and clean the containers, open the doors 

fully beyond 90°.

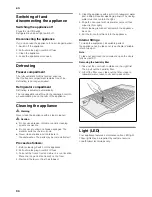
Removing the humidity filter

1. Take out the cool-fresh container on the right first. 

Then, pull out the humidity filter.

2. Lift off the filter cover, take out the filter, clean in 

lukewarm water, leave to dry and re-assemble.

Light (LED)

Your appliance features a maintenance-free LED light.
These lights may be repaired by customer service 

or authorised technicians only.

Summary of Contents for KM F Series

Page 1: ...de Gebrauchsanleitung en User manual Kühl und Gefrierkombination Fridge freezer KM F ...

Page 2: ...2 de Inhaltsverzeichnis 3 en Table of Contents 20 ...

Page 3: ... 11 Temperatur einstellen 11 Alarmfunktion 11 Sonderfunktionen 12 Nutzinhalt 12 Der Gefrierraum 13 Max Gefriervermögen 13 Frische Lebensmittel einfrieren 13 Super Gefrieren 14 Gefriergut auftauen 14 Der Kühlraum 14 Super Kühlen 15 Der Frischkühlbehälter 15 Ausstattung des Gefrierraums 16 Variable Gestaltung des Innenraums 16 Gerät ausschalten und stilllegen 17 Abtauen 17 Gerät reinigen 17 Beleucht...

Page 4: ...ierte Person ersetzt werden Unsachgemäße Installationen und Reparaturen können den Benutzer erheblich gefährden Reparaturen dürfen nur durch den Hersteller Kundendienst oder eine ähnlich qualifizierte Person durchgeführt werden Es dürfen nur Originalteile des Herstellers benutzt werden Nur bei diesen Teilen gewährleistet der Hersteller dass sie die Sicherheitsanforderungen erfüllen Eine Verlängeru...

Page 5: ...t für den häuslichen Gebrauch im Privathaushalt und das häusliche Umfeld bestimmt Das Gerät ist funkentstört nach EU Richtlinie 2004 108 EC Der Kältekreislauf ist auf Dichtheit geprüft Dieses Erzeugnis entspricht den einschlägigen Sicherheitsbestimmungen für Elektrogeräte EN 60335 2 24 Hinweise zur Entsorgung Verpackung entsorgen Die Verpackung schützt Ihr Gerät vor Transportschäden Alle eingesetz...

Page 6: ...mm vorzusehen damit das Gerät bei Bedarf aus der Nische herausgezogen werden kann Die erwärmte Luft an der Rückseite des Gerätes muss ungehindert abziehen können Untergrund m Achtung Das Gerät ist sehr schwer Ausführung 158 kg Der Boden am Aufstellort darf nicht nachgeben Boden eventuell verstärken Damit die Türen bis zum Anschlag geöffnet werden können sind beim Aufstellen in einer Raumecke oder ...

Page 7: ...latz stellen und ausrichten Es muss fest und eben stehen Unebenheiten des Bodens durch die beiden vorderen Schraubfüße ausgleichen Zum Verstellen der Schraubfüße einen Schraubenschlüssel verwenden Hinweis Das Gerät muss senkrecht stehen Richten Sie es mit Hilfe einer Wasserwaage aus ...

Page 8: ...hrend des Transports kann es vorkommen dass sich das im Verdichter enthaltene Öl im Kältesystem verlagert Vor der ersten Inbetriebnahme den Innenraum des Gerätes reinigen siehe Kapitel Gerät reinigen Elektrischer Anschluss Die Steckdose muss nahe dem Gerät und auch nach dem Aufstellen des Gerätes frei zugänglich sein Das Gerät entspricht der Schutzklasse I Über eine vorschriftsmäßig installierte S...

Page 9: ...A Kühlraum B Frischkühlraum C Gefrierraum 1 Bedien und Anzeigefeld 2 Ablage für kleine Flaschen 3 Beleuchtung Kühlraum 4 Türdichtungsklappe 5 Ablage für große Flaschen 6 Butter und Käsefach 7 Frischkühlbehälter 8 Gefriergutbehälter 9 Lichtschalter Kühlraum 10 Hauptschalter Ein Aus 11 Ventilator 12 Verstellbarer Absteller EasyLift 13 Glasablage im Kühlraum 14 Flaschenablage 15 Snack Box ...

Page 10: ...r Auswahl der Sonderfunktionen siehe Kapitel Sonderfunktionen 8 Anzeige Sonderfunktionen Siehe Kapitel Sonderfunktionen 9 Timer Taste Mit dieser Funktion können Sie einen Zeitablauf einstellen und werden mit einem akustischen Signal erinnert siehe Kapitel Sonderfunktionen 10 Anzeige Timer Zeigt den Zeitablauf bei aktivierter Sonderfunktion des Timers an 11 Einstell Tasten Die Tasten dienen zum Ein...

Page 11: ...ar Wir empfehlen eine Einstellung von 18 C Alarmfunktion Durch Drücken der Alarm Taste schaltet sich der Warnton ab In folgenden Fällen kann ein Alarm ausgelöst werden Türalarm Wenn das Gerät für eine längere Zeit offen steht schaltet sich der Türalarm Dauerton ein Durch Schließen des Geräts oder Drücken der Alarm Taste 14 schaltet sich der Warnton wieder ab Temperaturalarm Der Temperaturalarm sch...

Page 12: ...it einem Pfeil markiert ist 3 Mit Taste 13 die Auswahl bestätigen Wenn seitlich neben der Auswahl ein Balken erscheint ist die Funktion eingeschaltet lock Mit der lock Funktion können Sie das Gerät vor ungewollter Bedienung sichern lock ein ausschalten 1 Mode Taste 7 drücken 2 Mode Taste 7 so oft drücken bis auf dem Anzeigefeld lock mit einem Pfeil markiert ist 3 Mit Taste 13 die Auswahl bestätige...

Page 13: ...ie im Buchhandel Hinweis Einzufrierende Lebensmittel nicht mit bereits gefrorenen in Berührung bringen Zum Einfrieren geeignet sind Backwaren Fisch und Meeresfrüchte Fleisch Wild Geflügel Gemüse Obst Kräuter Eier ohne Schale Milchprodukte wie Käse Butter und Quark fertige Gerichte und Speisereste wie Suppen Eintöpfe gegartes Fleisch und Fisch Kartoffelspeisen Aufläufe und Süßspeisen Zum Einfrieren...

Page 14: ...gericht gekocht oder gebraten kann es erneut eingefroren werden Die max Lagerdauer des Gefriergutes nicht mehr voll nutzen Der Kühlraum Der Kühlraum ist der ideale Aufbewahrungsort für fertige Speisen Backwaren Konserven Kondensmilch und Hartkäse Beim Einlagern beachten Lagern Sie frische unversehrte Lebensmittel ein So bleibt Qualität und Frische länger erhalten Bei Fertigprodukten und abgefüllte...

Page 15: ...al Filter abgedeckt der die Rückhaltung der Luftfeuchtigkeit im Lagerfach optimiert Dadurch herrscht im Feuchtebehälter in Abhängigkeit von der Beladung bis zu 95 Luftfeuchtigkeit Dieses Lagerklima bietet ideale Bedingungen für frisches Obst Salat Gemüse Kräuter oder Pilze Hinweis Je nach Lagermenge und Lagergut kann sich im Feuchtebehälter Kondenswasser bilden Kondenswasser mit einem trockenen Tu...

Page 16: ...älter entnehmen Variable Gestaltung des Innenraums nicht bei allen Modellen Sie können die Ablagen des Innenraums und Behälter der Tür nach Bedarf variieren Ablage nach vorne ziehen absenken und seitlich herausschwenken Die Türablagen lassen sich in der Höhe verstellen ohne herausgenommen zu werden Knöpfe an der Unterseite der Türablagen gleichzeitig nach oben drücken um die Türablagen nach unten ...

Page 17: ...lten 2 Netzstecker ziehen oder Sicherung ausschalten 3 Gefriergut herausnehmen und an einem kühlen Ort lagern Kälteakku wenn beiliegend auf die Lebensmittel legen 4 Warten bis die Reifschicht abgetaut ist 5 Gerät mit einem weichen Tuch lauwarmem Wasser und etwas pH neutralem Spülmittel reinigen Das Spülwasser darf nicht in die Beleuchtung gelangen 6 Die Türdichtung nur mit klarem Wasser abwischen ...

Page 18: ...ter oder Abstellflächen wackeln oder klemmen Prüfen Sie die herausnehmbaren Teile und setzen Sie sie eventuell neu ein Flaschen oder Gefäße berühren sich Rücken Sie die Flaschen oder Gefäße leicht auseinander Kleine Störungen selbst beheben Bevor Sie den Kundendienst rufen Überprüfen Sie ob Sie die Störung aufgrund der folgenden Hinweise selbst beheben können Führen Sie einen Geräte Selbsttest dur...

Page 19: ...rmeiden Sie sparen die damit verbundenen Mehrkosten Reparaturauftrag und Beratung bei Störungen Die Kontaktdaten aller Länder finden Sie im beiliegenden Kundendienst Verzeichnis Störung Mögliche Ursache Abhilfe Der Boden des Kühlraums ist nass Die Tauwasserrinne oder das Ablaufloch sind verstopft Reinigen Sie die Tauwasserrinne und das Ablaufloch siehe Kapitel Gerät reinigen Die Seitenwände des Ge...

Page 20: ... Switching on the appliance 28 Setting the temperature 28 Alarm function 28 Special functions 29 Usable capacity 29 Freezer compartment 30 Max freezing capacity 30 Freezing fresh food 30 Super freezing 31 Thawing frozen food 31 Refrigerator compartment 31 Super cooling 32 Cool fresh container 32 Features of the freezer compartment 33 Variable interior design 33 Switching off and disconnecting the ...

Page 21: ...y be used The manufacturer guarantees that only these parts satisfy the safety requirements A extension cable may be purchased from customer service only Important information when using the appliance Never use electrical appliances inside the appliance e g heater electric ice maker etc Explosion hazard Never defrost or clean the appliance with a steam cleaner The steam may penetrate electrical pa...

Page 22: ...r inquire at your local authority about current means of disposal Disposal of your old appliance Old appliances are not worthless rubbish Valuable raw materials can be reclaimed by recycling old appliances m Warning Redundant appliances 1 Pull out the mains plug 2 Cut off the power cord and discard with the mains plug 3 Do not take out the trays and receptacles children are therefore prevented fro...

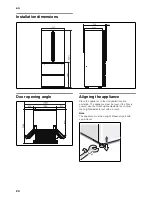
Page 23: ...t not give way if required reinforce floor To ensure that the doors can open all the way observe lateral minimum distances when installing the appliance in a corner or recess see Installation dimensions section If the depth of the adjacent kitchen equipment is more than 60 cm observe lateral minimum distances in order to utilise the full door opening angle see Door opening angle section Observe am...

Page 24: ...ance Place the appliance in the designated location and align The appliance must be level If the floor is uneven use the front height adjustable feet Adjust the height adjustable feet with a wrench Note The appliance must be upright Please align it with a spirit level ...

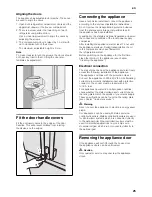
Page 25: ...ce starts up During transportation the oil in the compressor may have flowed into the refrigeration system Before switching on the appliance for the first time clean the interior of the appliance see chapter Cleaning the appliance Electrical connection The socket must be near the appliance and also freely accessible following installation of the appliance The appliance complies with the protection...

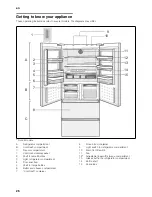
Page 26: ... C Freezer compartment 1 Control and display panel 2 Shelf for small bottles 3 Light refrigerator compartment 4 Door seal flap 5 Shelf for large bottles 6 Butter and cheese compartment 7 Cool fresh container 8 Frozen food container 9 Light switch for refrigerator compartment 10 Main On Off switch 11 Fan 12 Adjustable EasyLift storage compartment 13 Glass shelf in the refrigerator compartment 14 Bo...

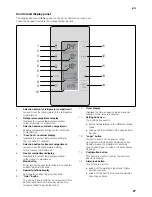
Page 27: ...n the freezer compartment 7 Mode button For selecting the special functions See chapter entitled Special functions 8 Special functions display See chapter entitled Special functions 9 timer button You can use this function to set a period of time and be reminded by an acoustic signal See chapter entitled Special functions 10 Timer display Displays the time sequence when a special function of the t...

Page 28: ...o 26 C We recommend a setting of 18 C Alarm function Press the alarm button to switch off the warning signal In the following cases an alarm may be actuated Door alarm If the appliance is left open for a longer time the door alarm continuous sound switches on Close the appliance or press the alarm button 14 to switch the warning signal off again Temperature alarm The temperature alarm switches on ...

Page 29: ... Keep pressing the 7 mode button until vacation is marked with an arrow on the display panel 3 Confirm the selection by pressing 13 If a bar appears at the side next to the selection the function is switched on lock The lock function can be used to safeguard the appliance from unintentional use lock switch on off 1 Press 7 mode button 2 Keep pressing the 7 mode button until lock is marked with an ...

Page 30: ...od which is to be frozen away from food which is already frozen The following foods are suitable for freezing Cakes and pastries fish and seafood meat game poultry vegetables fruit herbs eggs without shells dairy products such as cheese butter and quark ready meals and leftovers such as soups stews cooked meat and fish potato dishes soufflés and desserts The following foods are not suitable for fr...

Page 31: ...e refrigerator compartment is the ideal storage location for ready meals cakes and pastries preserved food condensed milk and hard cheese Storing food Store fresh undamaged food The quality and freshness will then be retained for longer In the case of ready made products and bottled goods observe the best before date or use by date specified by the manufacturer To retain aroma colour and freshness...

Page 32: ...pecial filter to optimise retention of the air humidity in the storage compartment As a result there is up to 95 air humidity in the humidity container depending on the amount of products put in This storage climate offers ideal conditions for fresh fruit salad greens vegetables herbs and mushrooms Note Condensation may form in the humidity container depending on the type and quantity of products ...

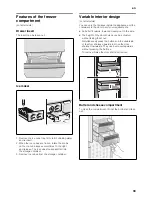
Page 33: ...e container Variable interior design not all models You can vary the flip trays inside the appliance and the containers in the door to suit your requirements Pull shelf forwards lower and swing out to the side The height of the door shelves can be adjusted without taking them out Simultaneously press the buttons on the underside of the door shelves upwards to move the door shelves downwards They c...

Page 34: ... parts may become deformed Proceed as follows 1 Before cleaning Switch off the appliance 2 Pull out mains plug or switch off fuse 3 Take out the frozen food and store in a cool location Place the ice pack if enclosed on the food 4 Wait until the layer of frost has thawed 5 Clean the appliance with a soft cloth lukewarm water and a little pH neutral washing up liquid The rinsing water must not run ...

Page 35: ... storage areas wobble or stick Please check the removable parts and re insert them correctly if required Bottles or receptacles are touching each other Move the bottles or receptacles slightly away from each other Eliminating minor faults yourself Before you call customer service Please check whether you can eliminate the fault yourself based on the following information Run an appliance self test...

Page 36: ...d advice on faults Contact information for all countries can be found on the enclosed customer service list Fault Possible cause Remedial action Floor of the refrigerator compartment is wet The condensation channel or drainage hole are blocked Clean the condensation channel and the drainage hole See chapter Cleaning the appliance The side panels of the appliance are warm Pipes run into the side pa...

Page 37: ...9001023540 9411 de en ...

Reviews: