background image

5

en

Installation

Install the appliance in a dry, well
ventilated room. The installation location
should neither be exposed to direct
sunlight nor near a heat source, e.g. a
cooker, radiator, etc. If installation next to
a heat source is unavoidable, use a
suitable insulating plate or observe the
following minimum distances to a heat
source:

3 cm to an electric cooker.
30 cm to an oil or solid-fuel cooker.

Appliances with fitted handles must be
situated at least 55 mm from the wall on
the hinge side so that the door can be
opened by 90°.

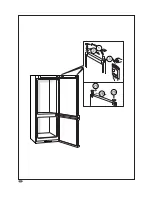
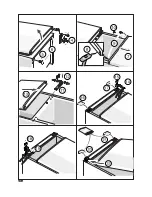
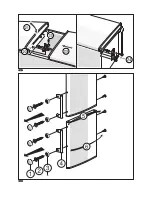
Changing over the door
hinges

We recommend that you have the door
hinges changed over by our customer
service.
Before you start the conversion work, pull
out the mains plug or remove the fuse.

Attention! Carefully place the 

appliance on its back.

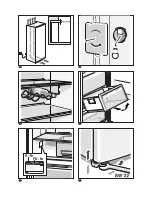
Installation in numerical sequence. 

Fig.

Aligning the appliance

Fig.

Place the appliance in the designated

location and align.

Adjust the height-adjustable feet with 

a screwdriver.

7

8

Summary of Contents for KG33NX14GB

Page 1: ......

Page 2: ......

Page 3: ...o proper disposal Safety and warning information Before you switch ON the appliance Please read the operating and installation instructions carefully They contain important information on how to install use and maintain the appliance Keep al I documentation for subsequent use or for the next owner Technical safety This appliance contains a small quantity of environmentally friendly but flamm able ...

Page 4: ... a high percentage of alcohol must be sealed and stored in an upright position Keep plastic parts and the door seal free of oil and grease Otherwise parts and door seal will become porous Never cover or block the ventilation openings for the appliance People who have limited physical sensory or mental abilities or inaequate Knowledge must not use this appliance unless They are supervised or given ...

Page 5: ...il or solid fuel cooker Appliances with fitted handles must be situated at least 55 mm from the wall on the hinge side so that the door can be opened by 90 Changing over the door hinges We recommend that you have the door hinges changed over by our customer service Before you start the conversion work pull out the mains plug or remove the fuse Attention Carefully place the appliance on its back In...

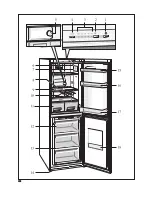
Page 6: ... feet 15 Egg rack 16 Shelf for small bottles 17 Shelf for large bottles 18 Ice block Frozen food calendar A Refrigerator compartment B Freezer compartment Fascia Fig 1 On Off button 2 Temperature selection button freezer compartment Can be selected from 16 C to 24 C Press the button until the required temperature lamp illuminates The value last selected is stored 3 Temperature display lamp freezer...

Page 7: ...tation the oil in the compressor may have flowed into the refrigeration system Before switching on the appliance for the first time clean the interior see Cleaning The socket should be freely accessible Connect the appliance to 220 240 V 50 Hz alternating current via a correctly installed earthed socket The socket must be fused with a 10 16 A fuse If the appliance is to be operated in a non Europe...

Page 8: ... door the other door may move slightiy This is quite normal and can be ignored If you cannot open the freezer compartment door immediately after closing it wait 2 3 minutes until the partial vacuum has equalised Selecting the temperature Fridge Rotate temperature selector Fig 5 to a setting A higher setting lowers the temperature in the refrigerator compartment We recommend for long term storage o...

Page 9: ...tment from top to bottom cakes and pastries ready meals dairy products meat and sausage in the vegetable container vegetables salad fruit In the door from top to bottom butter cheese eggs tubes small bottles large bottles milk juice cartons Features not all models Bottle shelf Fig Bottles can be stored securely on the bottle shelf The holder can be adjusted Freezer calendar Fig 18 The figures next...

Page 10: ...nd the food stacked directly on the freezer shelves To remove a freezer drawer pull out all the way lift at the front and remove Making ice cubes Fill the ice tray 3 4 full of water and place in the bottom of the freezer compartment if the ice tray is stuck to the freezer compartment loosen with a blunt implement only spoon handle To loosen the ice cubes twist the ice tray slightly or hold briefly...

Page 11: ...ed the max freezing capacity of your appliance Freezing capacity Information about the max freezing capacity within 24 hours can be found on the rating plate Thawing frozen food Depending on the type of food and intended use frozen produce can be thawed as follows At room temperature In the refrigerator in an electric oven with without fan assisted hot air In the microwave Note Do NOT refreeze foo...

Page 12: ...e appliance door as briefly as possible Occasionally clean the rear of the appliance with a vacuum cleaner or paint brush to prevent an increased power consumption Observe required distance of 60 mm to the back wall The heated air can then escape without obstruction But that distance should not be more than 75 mm Operating noises Normal noises Humming refrigerating unit is running Bubbling gurglin...

Page 13: ...ompartment Increase the refrigerator refrigerator compartment temperatures can also give rise compartment temperature slightly is too cold to colder fridge compartment If this is insufficient e g at temperatures This is quite excessively cold ambient normal temperatures also increase the freezer compartment temperature Displays do not illuminate Power failure the fuse has been Check whether the po...

Page 14: ... run into the evaporation pan at the rear of the appliance To prevent the evaporation pan from overflowing in this case mop up the condensation with a sponge The evaporator is defrosted when the water stops running into the evaporation pan Clean the interior Switch the appliance back on again Customer service Your local customer service can be found in the telephone directory or in the customer se...

Page 15: ......

Page 16: ......

Page 17: ......

Page 18: ......

Page 19: ......

Page 20: ......

Reviews: