Siemens HK9R3A250M Instruction Manual Download Page 28

en

        Tested for you in our cooking studio

28

J

Tested for you in our 

cooking studio

Tested for you in our cooking studio

Here, you can find a selection of dishes and the ideal 

settings for them. We will show you which type of 

heating and temperature are best suited to your dish. 

You will get information on suitable cooking 

accessories and the height at which they should be 

placed in the oven. You will also get tips about 

cookware and preparation methods.
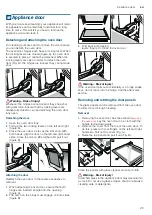
Note: 

A lot of steam can build up in the cooking 

compartment when cooking food.

Your appliance is very energy-efficient and radiates very 

little heat to its surroundings during operation. Due to 

the significant differences in temperature between the 

appliance interior and the external parts of the 

appliance, condensation may build up on the door, the 

control panel or the front panels of adjacent kitchen 

cabinets. This is a normal physical phenomenon. 

Condensation can be reduced by preheating the oven 

or opening the door carefully.
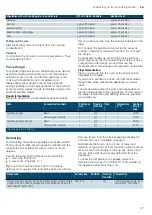
General information

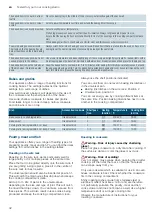
Recommended setting values

The table lists the optimal heating function for various 

types of food. The temperature and cooking time 

depend on the amount of food and the recipe.For this 

reason, the table specifies setting ranges. Try using the 

lower value to start with. A lower temperature will result 

in more even browning. You can increase the 

temperature next time if necessary.

Note: 

Cooking times cannot be reduced by using 

higher temperatures. The food would only be cooked 

on the outside, but would not be fully cooked in the 

middle.

The setting values apply to food placed in the cooking 

compartment while the cooking compartment is still 

cold. This will save energy.If you preheat the oven, you 

can reduce the indicated baking times by several 

minutes.
Preheating is necessary for selected types of food – 

this is indicated in the table. Do not place your food and 

accessory into the cooking compartment until it has 

finished preheating.
If you wish to follow one of your own recipes, you 

should use the settings listed in the table for similar 

food as reference. Additional information can be found 

in the baking tips listed after the settings tables.
Remove any accessories that are not being used from 

the cooking compartment. This will allow you to achieve 

optimal cooking results while saving energy.

Hot air gentle heating function

Hot air gentle is an intelligent heating function that 

allows you to gently cook meat, fish and baked items. 

The appliance optimally controls the supply of energy to 

the cooking compartment. The food is cooked in 

phases using residual heat. This means that it remains 

more succulent and browns less. Depending on the 

method of preparation and the type of food, it is 

possible to save energy. If you open the appliance door 

before the food has finished cooking or if you preheat 

the appliance, you may not be able to achieve this 

result.
Only use genuine accessories for your appliance. 

These have been tailored to the cooking compartment 

and the heating functions of your appliance. Remove 

any accessories that are not being used from the 

cooking compartment.
Place the food into the empty cooking compartment 

before the oven is heated up. Select a temperature of 

between 120 °C and 230 °C.Always keep the 

appliance door closed when cooking. Only cook on one 

level when using this function.
The Hot air gentle heating function is used to measure 

both the energy consumption in air recirculation mode 

and the energy efficiency class.

Baking on one level

When baking on one level, use the following shelf 

positions:

Position 2 – tall baked items and tins/dishes on the 

wire rack

Position 3 – shallow baked items and baking trays

Baking on two or more levels

Use the hot air heating function. Items that are placed in 

the oven on baking trays or in baking tins/dishes at the 

same time will not necessarily be ready at the same 

time.

Baking on two levels:

Universal pan, position 3

Baking tray, position 1

Baking tins/dishes on the wire rack

First wire rack, position 3

Second wire rack, position 1

Baking on three levels:

Baking tray, position 5

Universal pan, position 3

Baking tray, position 1

You can cut energy use by cooking different items at 

the same time. Position baking tins/dishes either next to 

one another or offset on different shelves so that they 

are not directly one above the other in the cooking 

compartment.

Accessories

Only use original accessories supplied with your 

appliance. These have been tailored to the cooking 

Summary of Contents for HK9R3A250M

Page 1: ...5HJLVWHU RXU SURGXFW RQOLQH VLHPHQV KRPH EVK JURXS FRP ZHOFRPH en Instruction manual Free standing cooker HK9R3A250M ...

Page 2: ......

Page 3: ...rature 16 Rapid heating 17 O Time setting options 17 Setting a cooking time 17 Setting the end time 18 Setting the timer 19 Setting the time 19 A Childproof lock 19 Activating and deactivating 19 D Cleaning 20 Cleaning agents 20 Surfaces in the cooking compartment 21 Keeping the appliance clean 22 humidClean cleaning aid 23 Setting the cleaning aid 23 Cleaning the cooking compartment after use 23 ...

Page 4: ...cooking compartment the right way round Accessories on page 13 Important safety information Importantsafetyinformation Warning Risk of fire Combustible items stored in the cooking compartment may catch fire Never store combustible items in the cooking compartment Never open the appliance door if there is smoke inside Switch off the appliance and unplug it from the mains or switch off the circuit b...

Page 5: ... injury If the appliance is placed on a base and is not secured it may slide off the base The appliance must be fixed to the base Risk of injury The hinges on the appliance door move when opening and closing the door and you may be trapped Keep your hands away from the hinges Risk of injury If you leave the appliance door open people may bump into it resulting in injury The appliance door must be ...

Page 6: ...osed cooking compartment for extended periods of time Do not store food in the cooking compartment Cooling with the appliance door open Following operation at high temperatures only allow the cooking compartment to cool down with the door closed Do not trap anything in the appliance door Even if the door is only left open a crack the front of nearby furniture may become damaged over time Only leav...

Page 7: ...objects in the plinth drawer It could be damaged 7Environmental protection EnvironmentalprotectionYour new appliance is particularly energy efficient Here you can find tips on how to save even more energy when using the appliance and how to dispose of your appliance properly Saving energy Only preheat the appliance if this is specified in the recipe or in the tables in the operating instructions L...

Page 8: ...e the upper diameter of the saucepan This is usually bigger than the diameter of the base of the pan Use a small saucepan for small quantities A larger less full saucepan requires a lot of energy Always place suitable lids on saucepans When cooking without a lid four times the energy is required Cook with only a little water This will save energy Vitamins and minerals in vegetables are preserved S...

Page 9: ... present in the installation circuit This is not necessary if the appliance is connected by a plug that is accessible to the user Electrical safety The cooker corresponds to safety class I and may only be used in conjunction with a safety earth terminal A type H 05 VV F or equally rated lead must be used to connect the appliance Levelling the cooker Always place the cooker directly on the floor 1 ...

Page 10: ...pective appliance model Residual heat indicator The hob has a residual heat indicator for each hotplate It shows which hotplates are still hot Even if the hob is switched off the display remains lit until the hotplate has cooled down sufficiently You can save energy by using the residual heat to keep a small dish warm for example Explanations 1 Hob 2 Control panel 3 Cooling fan 4 Oven door 5 Plint...

Page 11: ... and holding the button for approx 4 seconds A Minus Plus Reduce setting values Increase setting values Type of heating Use 3D hot air For baking and roasting on one or more levels The fan distributes the heat from the ring heating element in the back panel evenly around the cooking compartment 7 Hot air gentle For gently cooking selected types of food on one level without preheating The fan distr...

Page 12: ...m overheating Opening the appliance door If you open the appliance door when the appliance is in operation the appliance will continue to operate as before Interior lighting With most heating functions and other functions the interior lighting in the cooking compartment will remain lit while the oven is in operation When the function selector is turned to bring operation to an end the lighting wil...

Page 13: ...sert the accessories into the cooking compartment the right way round Always insert the accessories fully into the cooking compartment so that they do not touch the appliance door Take any accessories that you will not be using out of the cooking compartment Optional accessories You can buy optional accessories from our after sales service from specialist retailers or online You will find a compre...

Page 14: ... Apply the settings indicated below You can find out how to set the heating function and the temperature in the next section Operating the appliance on page 16 Switch off the appliance after the time indicated Once the cooking compartment has cooled down clean the smooth surfaces with soapy water and a dish cloth Cleaning the accessories Clean the accessories thoroughly using soapy water and a dis...

Page 15: ...new settings The small dual circuit hotplate is particularly good for heating small amounts Caution Never turn the hotplate control beyond the ð or æ symbols to 0 Table of cooking times The following table provides some examples Cooking times and heat settings may vary depending on the type of food its weight and quality Deviations are therefore possible When heating thick liquids stir regularly F...

Page 16: ... C 1 Use the function selector to set the heating function 2 Use the temperature selector to set the temperature or grill setting The appliance starts to heat up after a few seconds Once the food is cooked turn the function selector to the Off position to switch the appliance off Note On the appliance you can set a cooking time and an end time for the operation Time setting options on page 17 Chan...

Page 17: ...g time for your food on the appliance This prevents the food from accidentally being cooked for too long and means that you do not have to stop what you are doing to switch off the oven The maximum time that can be set is 23 hours and 59 minutes The cooking time can be set in 1 minute increments up to 1 hour and in 5 minute increments thereafter The cooking time starts at a different default value...

Page 18: ...t for types of heating with grill function The end of the cooking time can be delayed by up to 23 hours 59 minutes Example in the picture The time is 10 30 a m a cooking time of 45 minutes has been set and you want the food to be ready at 12 30 p m 1 Setting the heating function and temperature or setting 2 Press the v button and use the A button or to set the cooking time 3 Touch the v button aga...

Page 19: ...ll the way to zero The timer is now switched off Setting the time Once the appliance has been connected to the mains or following a power failure the clock will flash on the display Set the time The function selector must be set to the Off position 1 Use the A or button to set the time The time will stop flashing 2 Confirm by pressing the v button The appliance will apply the time you have set Cha...

Page 20: ... cleaning Optional available for some appliances depending on the appliance model Upper glass cover depending on appli ance model Glass cleaner Clean with a soft cloth You can remove the upper glass cover for cleaning To find out how to do this please refer to the section Upper glass cover Rotary knobs Do not remove Hot soapy water Clean with a dish cloth and dry with a soft cloth Hob surround Hot...

Page 21: ...not remove Hot soapy water Clean with a dish cloth Do not scour Cooking zone Hot soapy water or a vinegar solution Clean with a dish cloth For stubborn dirt use a stainless steel scour ing pad or oven cleaner Only use when the cooking compartment is cold Please use the self cleaning function to clean self cleaning surfaces To find out how to do this please refer to the section Self cleaning Cautio...

Page 22: ...ing 2 Set the maximum temperature 3 Start the mode and leave it to run for at least one hour The ceramic coating is regenerated When the cooking compartment has cooled down remove the brown or white residue with water and a soft sponge Note During operation reddish spots form on the surfaces This is not rust but residues from food These spots are not harmful and do not restrict the cleaning abilit...

Page 23: ... time counts down Once the time has elapsed an audible signal sounds and the display shows the time as zero 7 Switch off the appliance and leave it to cool down for approx 20 minutes Cleaning the cooking compartment after use Caution The prolonged presence of moisture in the cooking compartment leads to corrosion After using the cleaning aid wipe the cooking compartment clean and allow it to cool ...

Page 24: ...e rails upwards and carefully remove them Fig B Clean the rails with washing up liquid and a sponge For stubborn deposits of dirt use a brush Installing the frames 1 Insert the two hooks carefully into the upper holes Figure A B Warning Incorrect assembly Never move the frame before the two hooks are fully anchored in the upper holes The enamel could be damaged and may break figure C 2 the two hoo...

Page 25: ...door on the left and right hand sides Close the door a little further and pull it out figure B Attaching the door Reattach the oven door in the reverse sequence to removal 1 When attaching the oven door ensure that both hinges are inserted straight into the opening figure A 2 The notch on the hinge must engage on both sides figure B 3 Fold back both locking levers figure C Close the oven door Warn...

Page 26: ...ctions at the end of this instruction manual Tested for you in our cooking studio on page 28 Warning Risk of injury Incorrect repairs are dangerous Do not attempt to repair the appliance yourself Repairs must only be carried out by one of our trained after sales engineers If the appliance is defective call the after sales service Warning Risk of electric shock Incorrect repairs are dangerous Repai...

Page 27: ... the correct position Push the bulb in firmly 4 Screw the glass cover back on Depending on the appliance model the glass cover may have a sealing ring If the glass cover has a sealing ring put it back in place before screwing the cover back on 5 Remove the tea towel and switch on the circuit breaker 4Customer service CustomerserviceOur after sales service is there for you if your appliance needs t...

Page 28: ...d after the settings tables Remove any accessories that are not being used from the cooking compartment This will allow you to achieve optimal cooking results while saving energy Hot air gentle heating function Hot air gentle is an intelligent heating function that allows you to gently cook meat fish and baked items The appliance optimally controls the supply of energy to the cooking compartment T...

Page 29: ...re can cause damage to the enamel Some food turns out better if it is baked in several stages These dishes are indicated in the table The setting values for bread dough apply to both dough placed on a baking tray and dough placed in a loaf tin Cakes in tins Cakes on trays Dish Accessories cookware Shelf posi tion Heating function Tempera ture in C Cooking time in mins Sponge cake simple Vienna rin...

Page 30: ...l pan baking tray 3 1 190 210 35 45 Dish Accessories cookware Shelf position Heating function Temperature in C Cooking time in mins Viennese whirls Universal pan 3 140 150 30 40 Viennese whirls 2 levels Universal pan baking tray 3 1 140 150 30 45 Viennese whirls 3 levels Baking trays universal pan 5 3 1 130 140 40 55 Biscuits Universal pan 3 140 160 20 30 Biscuits 2 levels Universal pan baking tra...

Page 31: ... Dish Accessories cookware Shelf posi tion Heating function Step Temperature in C Cooking time in mins Preheat You want to find out whether the baked item is completely cooked in the middle Push a cocktail stick into the highest point on the baked item If the cocktail stick comes out clean with no dough residue the baked item is ready The baked item collapses Next time use less liquid Alternativel...

Page 32: ...e cooking compartment Shiny roasting dishes made from stainless steel or aluminium reflect heat like a mirror and are therefore not particularly suitable The poultry meat and fish cooks slower and does not brown so well Use a higher temperature and or a longer cooking time Observe the manufacturer s instructions for your roasting cookware The baked item is too dark in a tin or loaf tin Place the b...

Page 33: ...e weight of the heaviest piece as a basis for determining the cooking time The individual pieces should be approximately equal in size The larger the poultry meat or fish is the lower the cooking temperature and the longer the cooking time Turn the poultry meat and fish after approx to Z of the indicated time Poultry When cooking duck or goose pierce the skin on the underside of the wings This all...

Page 34: ... 1 5 kg Cookware uncovered 2 210 230 130 150 Leg of lamb boned medium 1 5 kg Cookware uncovered 2 4 170 190 70 80 Saddle of lamb on the bone medium 1 5 kg Wire rack 2 4 180 190 45 55 Grilling sausages Wire rack 3 3 20 25 Meat loaf 1 kg Cookware uncovered 2 4 170 180 70 80 Do not turn Insert the universal pan at level 1 Fish Weight Accessories and cookware Position Heating function Temperature in C...

Page 35: ...e use a larger roasting dish and add less liquid if necessary The meat gets burned during brais ing The roasting dish and lid must fit together well and close properly Reduce the temperature and add more liquid when braising if necessary Dish Accessories cookware Shelf posi tion Heating function Tempera ture in C Cooking time in mins Grilled vegetables Universal pan 5 3 10 20 Baked potatoes halved...

Page 36: ...an this The lids could crack Only use fruit and vegetables in good condition Wash them thoroughly The times given in the tables are a guide only The time will depend on the room temperature number of jars and the quantity and temperature of the contents Before you switch off the appliance or change the cooking mode check whether the contents of the jars are bubbling as they should Preparation 1 Fi...

Page 37: ...it vegetables and baked items Poultry meat and fish should ideally be defrosted in the refrigerator Not suitable for cream cakes or cream gateaux Use the following shelf positions when defrosting 1 wire rack Position 2 2 wire racks Positions 3 1 Tip Food that has been frozen flat or in portions defrosts more quickly than food items frozen in a block Remove frozen food from its packaging and place ...

Page 38: ...6 ...

Page 39: ...6 ...

Page 40: ...0DQXIDFWXUHG E 6 DXVJHUlWH PE XQGHU 7UDGHPDUN LFHQVH RI 6LHPHQV 6 DXVJHUlWH PE DUO HU 6WU 0 QFKHQ VLHPHQV KRPH EVK JURXS FRP 50 1 9001475506 9001475506 001012 B ...

Reviews: