1 Introduction
1 - 20
Instructions for Use
Sample Image Screens
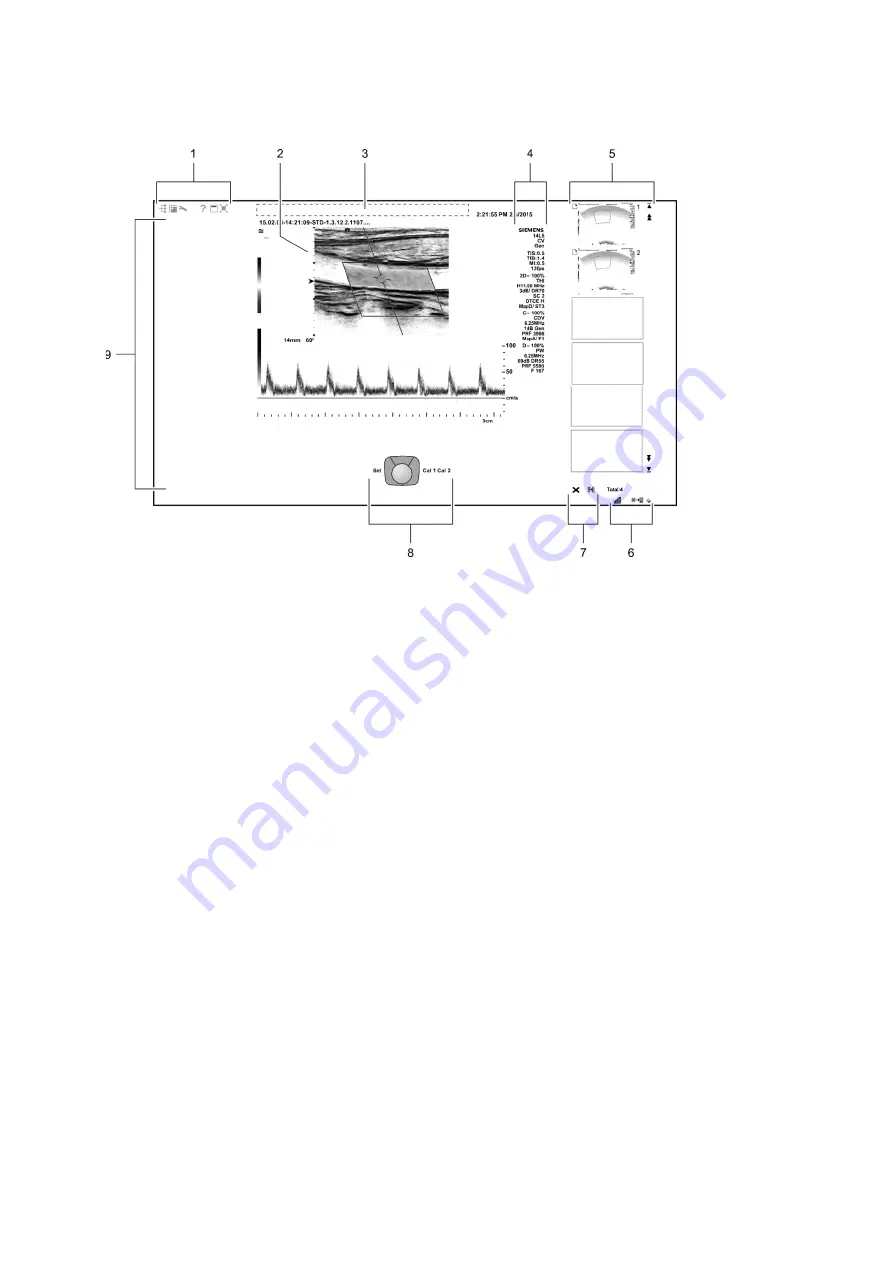
Example of a typical image screen.
1
Toolbar buttons
. Displays controls for system functions,
for example, displaying or hiding the menu, accessing
the patient browser, and displaying information about
using the ultrasound system.
Displays the security icon when the security package is
activated.
2
Measured Results
. Displays values for measurements
and calculations.
Drag the measured results to the required location.
3
Patient banner
. Customizable information for identifying
the patient, operator, institution, date, and time.
4
Imaging Parameters
. Displays a list of imaging
parameter settings for each active mode. Displays a clip
icon when the clip store function is activated.
5
Thumbnail Display
. Displays reference images
(reduced-size images) of stored clips, images, and
volumes. Use the arrows on either end of the thumbnail
panel to scroll the thumbnails.
6 Displays information about the network connection and
network job status.
7 Controls for printing and deleting thumbnails.
8
Trackball status
. Indicates the function currently
assigned to the trackball and the controls adjacent to the
trackball.
For systems without a touch screen, this location
includes soft key selections available for the active mode
or function. Soft key selections correspond to the
controls and scroll wheel on the control panel directly
above the trackball.
9
Image menu
. Displays controls and functions of the
optional software programs available during review.
Use the trackball pointer to expand or collapse the
display of selections for each section in the menu.
For systems without a touch screen, this location
includes mode-specific optimization parameters and
functions, measurement labels and tools, review
selections, and access to exam types and transducers.
Summary of Contents for Acuson S2000
Page 12: ...1 Introduction 1 2 Instructions for Use ...
Page 14: ...1 Introduction 1 4 Instructions for Use System Review Example of the ultrasound system ...
Page 84: ...2 Safety and Care 2 54 Instructions for Use ...
Page 86: ...3 System Setup 3 2 Instructions for Use ...
Page 112: ...3 System Setup 3 28 Instructions for Use ...
Page 114: ...4 Examination Fundamentals 4 2 Instructions for Use ...
Page 144: ...5 Transducer Accessories and Biopsy 5 2 Instructions for Use ...
Page 196: ...7 Specialty Transducers 7 2 Instructions for Use ...
Page 200: ...7 Specialty Transducers 7 6 Instructions for Use ...
Page 202: ...8 Physiologic Function 8 2 Instructions for Use ...
Page 208: ...9 eSieFusion Imaging 9 2 Instructions for Use ...
Page 236: ...10 Virtual Touch Applications 10 2 Instructions for Use ...
Page 258: ...10 Virtual Touch Applications 10 24 Instructions for Use ...
Page 302: ...Appendix A Technical Description A 44 Instructions for Use ...
Page 326: ...Appendix B Control Panel and Touch Screen B 24 Instructions for Use ...
Page 328: ...Appendix C Control Panel C 2 Instructions for Use ...
Page 394: ...Appendix D On screen Controls D 50 Instructions for Use ...
Page 444: ...Appendix F Acoustic Output Reference F 2 Instructions for Use ...
Page 516: ...Appendix F Acoustic Output Reference F 74 Instructions for Use ...
Page 517: ......
Page 518: ......


