background image

 27

5996

8

2020

-

SAC 240 & SAC 320

MG_0010

P.O. Box 519

N-1612 Fredrikstad Tel: +47 69 30 00 60 

Sleipner Motor

 AS

Copyright all RIGHTS reserved Sleipner Motor

 AS

P/N:

DWG No:

All Dimensions in mm

Drawn

Approved

Revised

Date

Name

Sheet

Sh.

Rev:

E

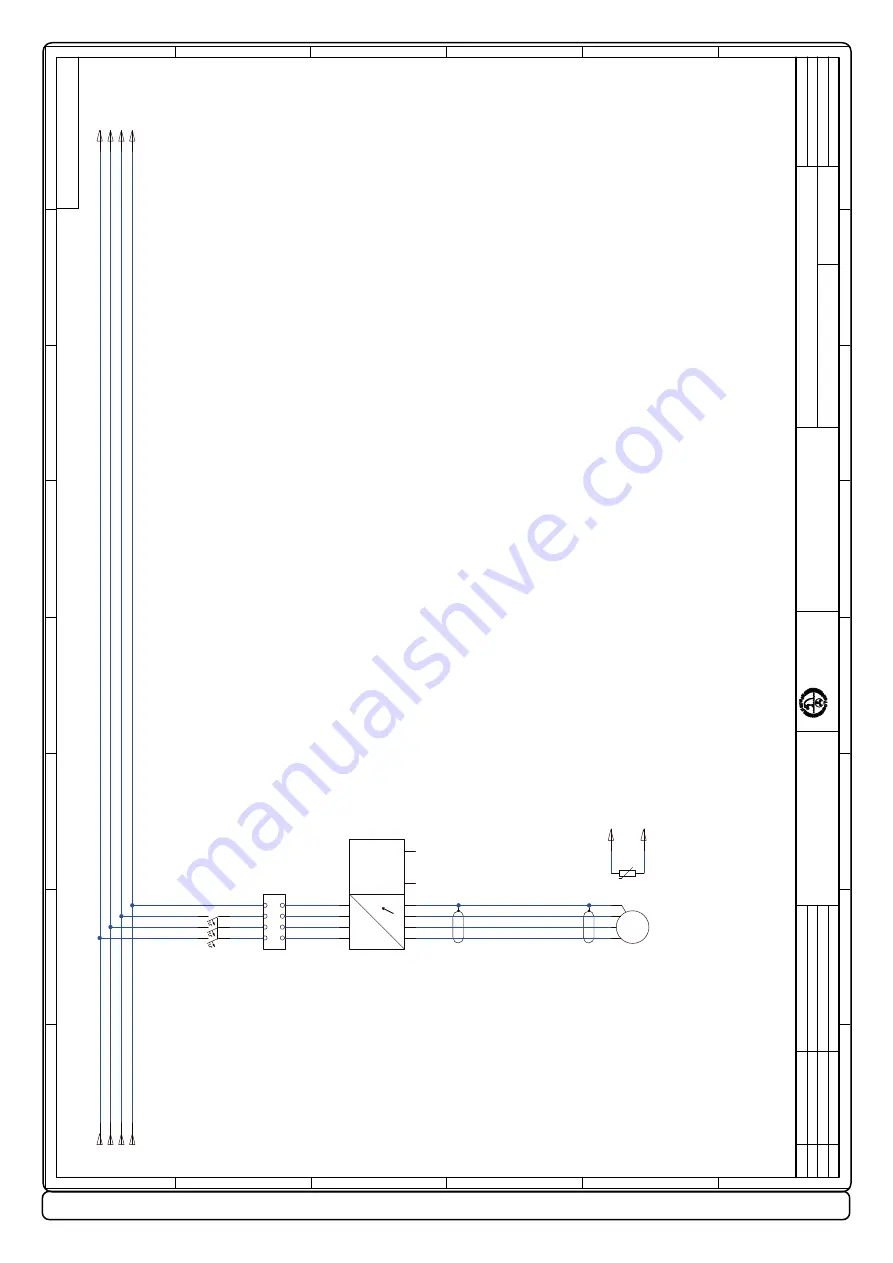
D

C

B

F

A

E

D

C

B

F

A

8

7

6

5

4

3

2

1

8

7

6

5

4

3

2

1

AC

3

SAC PDC 301 -

 ACS580/ACH580

VFD Power

BS-013-EL-161

E

18.04.18

BS

07.01.20

SV

M

3

~

~

~~

~

T1

T2

-U2

L1

L2

L3

PE

1

2

3

4

5

6

Module Circuit Breaker 3P

-F1

L3

PE

L1

L2

L1

L2

L3

PE

U1

V1

W1

UDC+

UDC-

PE

U2

V2

W2

PE

ACS580/ACH580

-U1

AC Motor 3

-M1

1

2

U

V

W

PE

AC Motor 3

-M1

Temperature Sensor

Use shielded cable designed for use  with variable frequency drives.

High voltage DC bus. Do not connect.

MG_0009

P.O. Box 519

N-1612 Fredrikstad Tel: +47 69 30 00 60 

Sleipner Motor

 AS

Copyright all RIGHTS reserved Sleipner Motor

 AS

P/N:

DWG No:

All Dimensions in mm

Drawn

Approved

Revised

Date

Name

Sheet

Sh.

Rev:

E

D

C

B

F

A

E

D

C

B

F

A

8

7

6

5

4

3

2

1

8

7

6

5

4

3

2

1

PDC-301

3

SAC PDC 301 -

 ACS580/ACH580

Control

BS-013-EL-161

E

18.04.18

BS

07.01.20

SV

Power Management System

Thruster

Enable

Power

Limit

Thruster

Request

Aux. voltage output and programmable digital inputs

Serial data link switches

Relay output RO2 [Running]

250V

 AC /30V DC, 2A

Relay output RO1 [Ready run]

250V

 AC /30V DC, 2A

EFB (EIA-485) / Embedded fieldbus

Safe torque o

ff

Reference voltage and analog inputs and outputs

RO2A

RO2C

DGND

+24V

AO1

AO2

AGND

RO3B

RO3A

RO3C

IN2

Panel Port

Relay output RO3 [Fault (-1)]

250V

 AC /30V DC, 2A

BIAS

S5 (BIAS)

ON

S4 (TERM)

ON

TERM

X14

Option slot 2

X13

Option slot 1

Voltage/Current selection switches

U

S1

 AI1 (U/I)

U

S2

 AI2 (U/I)

I

S3

 AO1 (U/I)

U

I

I

All control boards do not have switches S1, S2 and S3. In that case, select voltage or current for inputs AI1 and

 AI2 and output

 AO1 with parameters.

DI6

DI5

DI4

DI3

DI2

DI1

AGND

+10V

AI2

AGND

IN1

SGND

OUT2

OUT1

B+

RO2B

DCOM

SCR

AI1

A-

DGND

RO1B

RO1A

RO1C

SIDE-POWER

S-link

VFD

(RS-485)

-W2.X1

*5

T2

T1

6 1321

*5

*5

PMS

ACS580/ACH580

ACS580/ACH580

-U1

1

2

3

4

5

6

7

8

9

10

11

12

13

14

15

16

17

18

RJ45

34

35

36

37

38

29

30

31

19

20

21

22

23

24

25

26

27

X1

X2 & X3

X4

X5

X6

X7

X8

6 1326

-X1

PDC-301

-U4

Optional

Red Wire: Cut and Insulate

Ground the outer shield of the cable 360 degrees under  the grounding clamp on the grounding shelf for the control cables inside VFD.

S-Link

WH

BU

BK

Summary of Contents for SAC250-240/240-2-SAC240

Page 1: ...Made in Norway Sleipner Motor AS 2020 SLEIPNER MOTOR AS P O Box 519 N 1612 Fredrikstad Norway www side power com Document id Revision Date 5996 8 Installation Manual AC 240 250 320 300 2020 ...

Page 2: ...on 18 Propeller Installation 19 Coupling Installation 20 Motor Installation 21 Control Panel Cable Installation 22 S link Planning Precautions 23 PDC 301 24 Startup and Commissioning 24 Functions and Operation 25 Power Cable Dimensions 25 Wiring Diagram 26 28 Control Panel Installation 29 Checklist for DC and IP Thrusters 30 Spare Parts 31 Warranty statement 31 Contents EN Products SAC320 300 I 4 ...

Page 3: ... national regulations Instructions in this guide cannot be guaranteed to comply with global electric mechanic regulations classification rules To follow all health and safety laws in accordance with their local outlined regulations classification rules Before installation it is important that the installer reads this guide to ensure necessary acquaintance with this product The recommendations made...

Page 4: ...AC700 412 C 4L V TL WD H W L ID T Propeller or gear leg must never extend out of the tunnel Tunnel centre line Twin Propeller MC_0271 Thruster Measurements EN Measurement code Measurement description mm inch mm inch ID Internal tunnel diameter 250 9 8 300 11 8 T min Tunnel thickness min 7 3 10 4 T max Tunnel thickness max 10 4 10 4 TL Minimum tunnel length 300 11 8 300 11 8 TL recommended Recommen...

Page 5: ... Motor bracket Seawater resistant aluminium Tunnel Cross spun with rowing G R P tunnel Steel aluminium tunnels available at request Propeller 5 blade skewback Q prop propeller fibreglass reinforced composite Composite 4 blade kaplan propeller AC 320 300 I Control System S LINK Cables and control panel not included Safety Flexible coupling between AC motor and drive shaft protects gear system again...

Page 6: ...228 203 454 SAC240 250 C 4 H V ACS580 01 033A 4 11 8 228 203 454 SAC320 300 C 2 H V ACS580 01 089A 2 28 3 295 203 636 SAC320 300 C 4 H V ACS580 01 046A 4 11 8 228 203 454 SAC360 300 C 2 H V ACS580 01 115A 2 28 3 295 203 732 SAC360 300 C 4 H V ACS580 01 073A 4 19 258 203 636 SAC400 300 C 2 H V ACS580 01 115A 2 28 3 295 203 732 SAC400 300 C 4 H V ACS580 01 073A 4 19 258 203 636 SAC450 386 C 2 H V AC...

Page 7: ... 2866 1400 3086 Motor output kW Hp 14 19 21 27 27 37 30 41 28 38 35 48 35 48 42 57 41 56 53 72 70 95 70 95 74 101 83 113 Typical boat size m ft 13 23 42 75 17 31 55 100 18 33 59 108 18 33 59 108 22 35 75 110 25 40 85 140 25 40 85 140 29 44 95 145 29 44 95 145 30 45 100 150 32 49 105 160 32 49 105 160 40 52 130 170 40 55 130 175 Voltage range 3 Phase supply 208 240 380 440V 208 240 380 440V 208 240...

Page 8: ...er as deep as possible under the waterline 2 Deeper installations prevent air from being sucked into the tunnel from the surface resulting in reduced thrust performance and increase noise levels during operation Deeper installations increase water pressure for maximum efficiency from the thruster The centre of the tunnel should be a minimum of 1 x the tunnel diameter below the waterline The installe...

Page 9: ... allow the variable length of the tunnel walls to vary in length excessively EG the top tunnel wall is x 4 longer than the bottom wall 2 If the tunnel is too long the friction inside will reduce the water speed and thereby the thrust 3 If the tunnel is too short typically only in the bottom section of the tunnel cavitation problems can occur as water flow will not be able to straighten itself befo...

Page 10: ...ead fit the tunnel halfway into the underneath section of the existing hull Strengthen it with a deflector spoiler directing the water flow around the tunnel This will allow installation of the thruster in the proper position on the boat maintaining the reliability and space advantages of the tunnel thruster This installation is being used by some of the world s largest sail boat builders and has ...

Page 11: ...is angled slightly down because of the water flow on this area 2 3 Making a deflector spoiler in front and underneath the tunnel can also reduce damage to the thruster and drag The deflector spoiler will push the water flow out from the hull so water can pass by the back face of the tunnel The shape and size of this deflector spoiler will depend on the hull shape The easiest way of making the defl...

Page 12: ... tunnel and thereby reduces the effective tunnel diameter and thrust Turbulence cavitation on the propeller will lessen the thrusters performance and create excess noise 2 For steel aluminium hulls angled tunnel ends also offer similar performance as a rounded connection 3 A rounded tunnel end makes the thruster draw water from along the hull side creating a vacuum that will suck the boat sideways a...

Page 13: ... the back face 5 Cut the tunnel ends to the desired shape and lightly sand its surface Clean the area with acetone or similar where you are going to apply fibreglass NB Do not cast or add fibreglass to the area were the thruster will be placed 6 Cast the tunnel to the inside of the hull use at least eight layers of 300g fibreglass and resin preferably alternating mat and rowing types of fibreglass ...

Page 14: ...ith tunnel installed and cast 1 Round the edges with a radius of 10 of the tunnel diameter 2 For steel aluminium hulls make a slope with a length of 10 15 of the tunnel diameter NB If this is not possible round the tunnel end as much as possible 3 Additionally cast two layers on the outside of the tunnel hull in a 10cm area 4 Follow the same method if making the deflector spoiler You must apply ge...

Page 15: ... to fig 3 4 The bedding must be rigid and dimensioned to support the weight and torque specified in the technical data of the product The bedding must be in the correct height so that the angle of the cardan shaft does not exceed 1 5 degrees fig 5 The distance from the centerline fig 6 of the tunnel to the top of the bedding for the specific thruster motor combination is found as measurement G on the...

Page 16: ...SAC 240 SAC 320 Stern Tunnel Installation EN Stern thruster installation has extra considerations and precautions and thruster installation procedures See the attached manual supplied in the stern thruster kit MC_0003 ...

Page 17: ...l national regulations Instructions in this guide cannot be guaranteed to comply with global electric mechanic regulations classification rules To follow all health and safety laws in accordance with their local outlined regulations classification rules Before installation it is important that the installer reads this guide to ensure necessary acquaintance with this product The recommendations mad...

Page 18: ...e the tunnel Place the propeller on the gear leg to ensure it is centred and rotates freely with the same clearance from each blade to the tunnel wall Place top motor bracket to measure the drive shaft has come through the motor bracket at the correct height Remove the gear leg and propeller for final installation 6 Apply appropriate sealant to both sides of the gasket and place on the gear leg Pl...

Page 19: ...t in the propeller 2 Insert the washer to the end of the shaft spline Tighten with the propeller lock nut 3 Insert the anode to the end of the propeller and tighten the anode holding screw Apply a thread glue Loctite 243 or similar to ensure that the anode holding screw does not unscrew itself from during the rotation of the propeller 4 Apply anti fouling to the gear leg and propeller Do not apply...

Page 20: ...or operation A low bolt torque will allow the bolts to loosen over time destroying the shaft A torque wrench must be used to fasten bolts to specified torque tension Maintenance and Safety Precaution The coupling is entirely maintenance free Avoid contact with oil and similar substances since the natural rubber is not oil resistant For a detailed Universal Joint Shaft installation manual contact y...

Page 21: ...21 5996 8 2020 SAC 240 SAC 320 MG_0168 Motor Installation EN ...

Page 22: ...r until it receives a single signal or thrust in one direction Sidepower on off equipment it is entirely plug play and require no additional configuration setup See the Control panel manual for more information MC_0041 Please refer to the graphic for special considerations relating to your model MG_0169 Proportional Joystick Control Panel Station 2 opt Proportional Joystick Control Panel Station 1 ...

Page 23: ... be as short as practically possible POWER Cable Must be one in each system length 2 5m 4 Port T Connector The 4 port T connector allows multiple spur cables to be connected NB Comes with two sealing caps to protect T Connector Must be one for each spur including power cable BACKBONE extender Connects two BACKBONE cables to extend length END terminator Must be one for each end of the BACKBONE loop...

Page 24: ...n now operate from the Side Power joystick panels NB The PDC 301 drive controller is configured as a bow thruster By default If operated as a stern thruster or in a catamaran configuration change the thruster instance from the setup menu of the PJC 2xx control panel PMS Power Management System Optional The thruster control system comes preconfigured for the thruster but additional configuration is r...

Page 25: ...0 0 default value 30 24 Maximum torque 2 50 0 default value IMPORTANT Installation must be done by certified electricians and according to the VFD install manual This table is a general recommendation and installer must consider relevant regulations temperature conditions and cable lengths Minimum power cable dimensions Temp class 70 Temp class 90 Item no Supply Voltage Max current draw A Multi cor...

Page 26: ...C DGND 24V AO1 AO2 AGND RO3B RO3A RO3C IN2 Panel Port Relay output RO3 Fault 1 250V AC 30V DC 2A BIAS S5 BIAS ON S4 TERM ON TERM X14 Option slot 2 X13 Option slot 1 Voltage Current selection switches U S1 AI1 U I U S2 AI2 U I I S3 AO1 U I U I I All control boards do not have switches S1 S2 and S3 In that case select voltage or current for inputs AI1 and AI2 and output AO1 with parameters DI6 DI5 D...

Page 27: ... D C B F A E D C B F A 8 7 6 5 4 3 2 1 8 7 6 5 4 3 2 1 AC 3 SAC PDC 301 ACS580 ACH580 VFD Power BS 013 EL 161 E 18 04 18 BS 07 01 20 SV M 3 T1 T2 U2 L1 L2 L3 PE 1 2 3 4 5 6 Module Circuit Breaker 3P F1 L3 PE L1 L2 L1 L2 L3 PE U1 V1 W1 UDC UDC PE U2 V2 W2 PE ACS580 ACH580 U1 AC Motor 3 M1 1 2 U V W PE AC Motor 3 M1 Temperature Sensor Use shielded cable designed for use with variable frequency drive...

Page 28: ...er Motor AS P N DWG No All Dimensions in mm Drawn Approved Revised Date Name Sheet Sh Rev E D C B F A E D C B F A 8 7 6 5 4 3 2 1 8 7 6 5 4 3 2 1 S link 3 SAC PDC 301 ACS580 ACH580 S link BS 013 EL 161 E 18 04 18 BS 07 01 20 SV SIDE POWER S link ExtAlarm 6 1326 X2 6 1326 X3 6 1328 X5 5 Alarm_NO PJC2xx U5 Alarm_C B B B B S Link Yellow Black Red ...

Page 29: ...r devices Install the control panel on a flat surface where it is easy to use 1 Use the supplied cut out template to mark the area to remove on your control dash 2 Cut out the area per template for the control panel NB If the front surface around your cut out is jagged or chipped use a sealant to assist the gasket 3 Place the gasket to the back face of the panel 4 Plug cables into the connectors a...

Page 30: ...nd filled with gear oil Correct drive direction as per control panel The bolts holding the gear house and motor bracket together are tightened correctly The bolts holding the motor to its bracket are tightened correctly The thruster has been installed as per the instructions in this manual and all points in checklist above have been controlled Signed Date Extra pre delivery tests by installer yard...

Page 31: ...ion Manual have been complied with and that the defect remains e warranty service shall be performed only by the Warrantor or an authorized Service Centre and any attempt to remedy the defect by anyone else shall render this warranty void 5 There shall be no warranty for defects or damages caused by faulty installation or hook up abuse or misuse of the equipment including exposure to excessive hea...

Page 32: ...ocument was correct at the time it was published However Sleipner Motor AS can not accept liability for any inaccuracies or omissions it may contain Continuous product improvement may change the product specifications without notice Therefore Sleipner Motor AS can not accept liability for any possi ble differences between product and document ...

Reviews: