


2.6
Checklist for mechanical and electrical installation
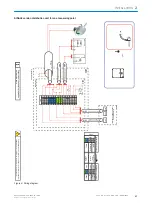
NOTE
The circuit diagrams shown in this Chapter are also available in larger format in the sys‐
tem documentation..
2.6.1
Installing the enclosure
Table 3: Installing the enclosure
Enclosure
Reference
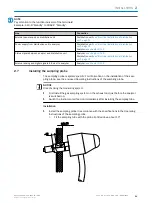
Installation of sampling probe
see "Installing the sampling probe", page 21
Installation of sample conditioning
see "Fitting the sample conditioning", page 24
Installation of distribution unit
see "Installing the distribution unit", page 27
Installation of analyzer
see "Fitting the analyzer", page 34
Optional: Installation of MPR
see enclosed “MPR Operating Instructions”
2.6.2
Laying and connecting the gas lines
Table 4: Connecting gas lines
1
Gas line
Connection
2
Heated sample gas line: From sampling probe
to sample conditioning
Sampling probe:
Sample conditioning:
6
Sample gas line: From sample conditioning to
distribution unit
Sample conditioning:
Distribution unit:
ß
Sample gas line: From distribution unit to ana‐
lyzer
Distribution unit:
Analyzer:
â
Analyzer sample gas outlet
Analyzer:
5
Instrument air feeding to sample conditioning
Sample conditioning:
5
Test gas feeding to sample conditioning
(optional)
3
Instrument air feeding from sample condition‐
ing to sampling probe (optional)
Sample conditioning:
Sampling probe:
ã
Zero gas feeding to distribution unit
Distribution unit:
ä
Sample conditioning condensate outlet
Sample conditioning:
1
Numbering
see "Installation overview", page 11
INSTALLATION
2
8017324/15A2/V6-0/2019-10 | SICK
T E C H N I C A L I N F O R M A T I O N | MARSIC200
15
Subject to change without notice