background image

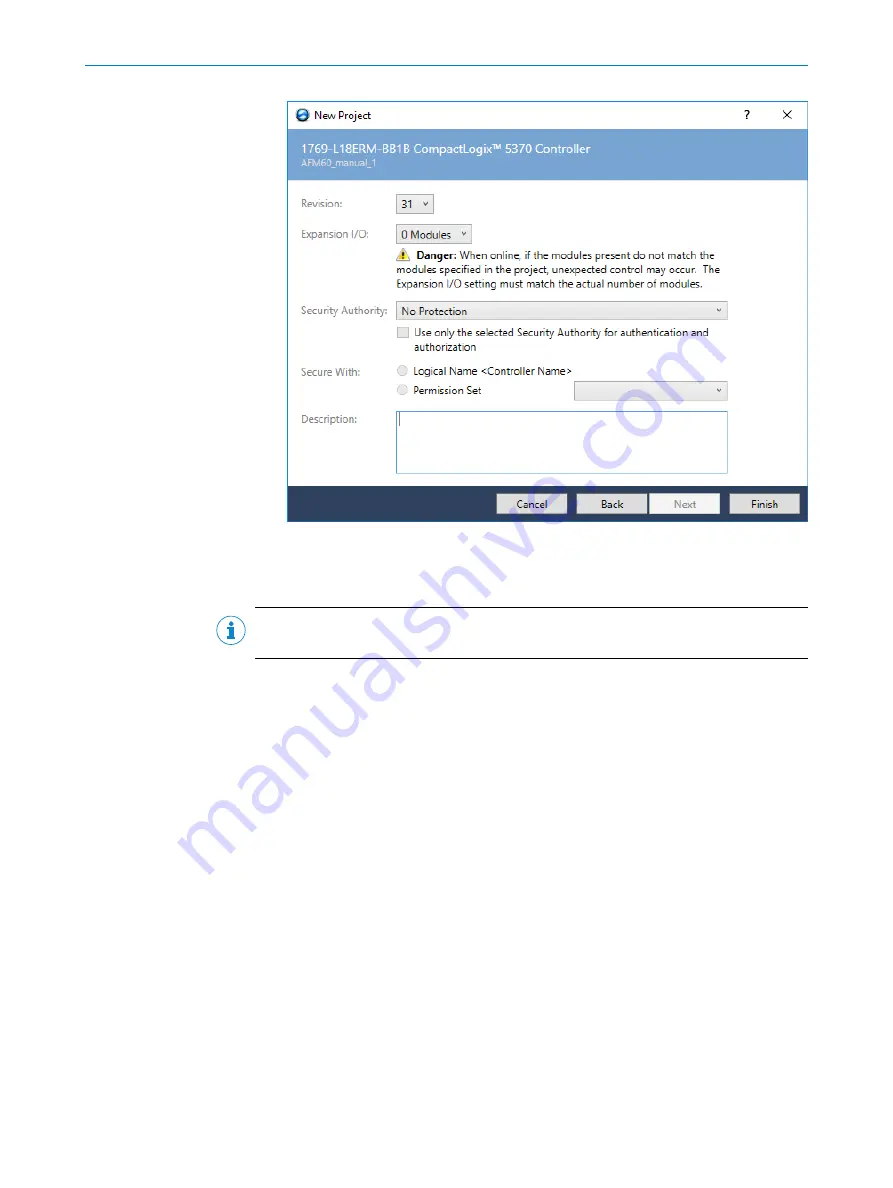
Figure 30: Projecting the hardware

4.

Click 

OK

 .

The 

RSLogix 5000 [Name]

 window opens.

NOTE

Type and Chassis Type must match your controller.

You can then integrate and configure the encoder in the project in three ways:

Using an EDS file (

see "Integration and configuration using an EDS file", page 52

)

Using the function block (

see "Function block", page 66

)

As generic module (

see "Integration of the encoder as generic module", page 67

)

Due to the fast and easy integration, we recommend integrating the encoder using an
EDS file.

Please note that with older encoders before DateCode (YYWW) 1535 (firmware version
before 2.1.8), only integration as generic module is possible.

5.4

Integration and configuration using an EDS file

The EDS file (electronic data sheet) contains all information about the parameters and
the operating modes of the absolute encoder. The absolute encoder can be configured
and put into operation using the EDS file.

5.4.1

Requirements

An Allen-Bradley control system with 

RSLogix 5000

 control software V22 or later is

used (or another controller that allows integration using an EDS file).

The encoder is integrated into the EtherNet/IP network (

see "IP address of the

encoder", page 46

).

The EDS file has been integrated into the control software using the Rockwell
Hardware Installation Tool.

CONFIGURATION USING A PLC

52

O P E R A T I N G   I N S T R U C T I O N S | AFS/AFM60 EtherNet/IP

8014213/1EF3/2021-12-08 | SICK

Subject to change without notice

Summary of Contents for EtherNet/IP AFM60

Page 1: ...O P E R A T I N G I N S T R U C T I O N S AFS AFM60 EtherNet IP Absolute encoder...

Page 2: ...ble within the limits of the legal determination of Copyright Law Any modi fication abridgment or translation of this document is prohibited without the express written permission of SICK AG The trade...

Page 3: ...ommunication in EtherNet IP 16 3 5 CIP object model 18 3 5 1 Supported classes 18 3 5 2 Identity object 20 3 5 3 Assembly object 22 3 5 4 Position sensor object 27 3 6 Integration and configuration op...

Page 4: ...ne 56 5 5 1 Import of the ladder routine 56 5 5 2 Integration as SubRoutine in MainRoutine 61 5 5 3 Using the SubRoutine 62 5 5 4 Reading out and changing parameters of the encoder 63 5 6 Function blo...

Page 5: ...t notes 105 7 Troubleshooting 106 7 1 Response to errors 106 7 2 Support 106 7 3 Diagnostics 106 7 3 1 Error and status indications of the LEDs 106 7 3 2 Self test via EtherNet IP 107 7 3 3 Warnings a...

Page 6: ...eople who put the encoder into operation for the first time or who are in charge of maintenance These instructions are written for trained persons who are responsible for the installa tion mounting an...

Page 7: ...ibe the status of a diagnostics LED Examples The LED is illuminated continuously The LED is flashing The LED is off 1 6 Abbreviations used CIP Common Industrial Protocol CMR Counts per Measuring Range...

Page 8: ...Media Access Control ODVA Open DeviceNet Vendor Association PLC Programmable Logic Controller TCP Transmission Control Protocol UDP User Datagram Protocol connectionless network protocol 1 ABOUT THIS...

Page 9: ...ding to the recognized industrial regulations and which meets the quality requirements stipulated in ISO 9001 2008 as well as those relating to environmental management systems as defined in ISO 14001...

Page 10: ...n their particular application e g industrial robots storage and conveyor systems Commissioning oper ation and configura tion Knowledge of the current safety regulations and of the operation and contr...

Page 11: ...0 x 19 mm round 6 Face mount flange 3 8 round 7 Face mount flange 3 8 10 Electrical interface I EtherNet IP 11 Connection type B 3 x M12 4 pin axial 12 Resolution Singleturn Number of steps per revolu...

Page 12: ...Number of steps per revolution of programmable devices Singleturn Between 4 262144 Programma ble via programming tool and Safety Designer configuration software www sick com 3 2 Specific features Tab...

Page 13: ...lution can be scaled and adapted to the respective application The steps per revolution are scalable from 1 262 144 in whole numbers The total resolution of the AFM60 must be 2 fold the steps per revo...

Page 14: ...are required for precise measurement of the distance between two fillers 1 2 3 4 Figure 2 Example of position measurement on a rotating table with transmission ratio 1 Rotating table with nine fillers...

Page 15: ...a filler position and counts up to 999 until the next filler position 1000 steps are configured as the total resolution 1 is configured as the numerator of the number of revolutions 9 as the denominat...

Page 16: ...et node This 6 byte device identification cannot be changed and consists of the following components 3 byte ident number 3 byte device identifier TCP IP and UDP IP EtherNet IP uses TCP IP or UDP IP fo...

Page 17: ...TP is used to send files for example 1 2 3 Explicit Messaging Implicit Messaging FTP HTTP CIP TCP UDP IP Ethernet Figure 6 CIP and other services 1 Process level 2 Communication levels 3 Physical leve...

Page 18: ...ributes which describe the properties of this instance Different instances in a class have the same services and the same attrib utes They can however have different attribute values Attribute Attribu...

Page 19: ...ic attrib utes for triggering transport connec tion type etc Get 1 23h Position sensor object Contains all attributes for program ming the encoder parameters such as scaling Set Get 1 F4h Port object...

Page 20: ...e_All Returns the values of all attributes 0Eh Get_Attribute_Single Returns the values of an attribute Table 10 Class attributes of the identity object Attribute ID Access Description Data type Defaul...

Page 21: ...umber e g 01 depending on the release Uint 01h Get Minor revi sion Rear part of the revision number e g 02 depending on the release Uint 02h 05h Get Status Device status flags WORD see table 13 06h Ge...

Page 22: ...Idling operating mode 1000 1111 Reserved 3 5 3 Assembly object The assembly object enables data attributes from different objects to be grouped together into one single object The absolute encoder sup...

Page 23: ...2 8 9 103 3 Set Get Error Position value Speed 32 32 32 12 101WS 3 Get Error Position value 32 32 8 102WS 3 Get Error Position value Warning and alarm flags 32 32 8 9 103WS 3 Set Get Error Position va...

Page 24: ...2 Position value 3 Position value most significant byte 2 0 Position value least significant byte 1 Position value 2 Position value 3 Position value most significant byte 4 Warning Alarm 3 0 Position...

Page 25: ...sition value 6 Position value 7 Position value most significant byte 8 Warning Alarm 103 103WS 0 Fault header least significant byte see table 33 page 108 1 Fault header 2 Fault header 3 Fault header...

Page 26: ...h instances 101 102 and 103 Not active with instances 101WS 102WS and 103WS When the configuration assembly is activated it must not be empty Otherwise the control may output an error Table 20 Data fo...

Page 27: ...scf scaling function 3 raf round axis functionality NOTE The structure of the configuration assembly is fixed During initialization of the encoder it reads the data from the controller The heartbeat c...

Page 28: ...gu ration page 36 16h Save Saves parameters to the non volatile mem ory see Saving and resetting configuration page 36 Table 22 Class attributes of the position sensor object Attribute ID Access Descr...

Page 29: ...sition format Format of position measurement 1001h steps ENG UInt 1001h 10h Set NV Counts per range Number of steps per revolution CPR UDInt 00000001h 00040000h 00040000h 11h Set NV Total measuring ra...

Page 30: ...ment DUInt 1 20h Set NV Minimum acceler ation setpoint Lower upper limit of acceleration in counts ms 5 If the acceleration undercuts exceeds this value the warning flag attribute 2Fh is set DInt C000...

Page 31: ...lag attribute 2Fh is set INT F060h F060h 4 000 68h Set NV Maximum temper ature setpoint INT 2710h 2710h 10 000 or 52D0h 21 200 69h Get V Fault header see table 33 page 108 DWORD 00000000h 6Ah Set V Sp...

Page 32: ...INT 0 77h Get V Revolution counter backwards Number of counterclock wise starts The numer ator increases when the encoder moves counter clockwise UDINT 0 78h Get V Power supply volt age Current supply...

Page 33: ...mit Limit of the number of changes in the direction of rotation UDINT 00000000h FFFFFFFFh 1 000 000 89h Set V Starts in cw limit Limit of the number of clockwise starts UDINT 00000000h FFFFFFFFh 1 000...

Page 34: ...forms a low pass for the speed measured values The filter with attribute 83h forms a low pass for the acceleration measured values This is configured to 100 Hz at the factory I e only speed or acceler...

Page 35: ...ailable for the absolute encoder see Installing the ladder routine page 56 If the ladder routine is used for mapping and if instances 101WS 102WS or 103WS are used see table 18 page 23 then the encode...

Page 36: ...ory settings Contains the factory preset values 1 2 3 4 5 6 7 8 Figure 14 Configuration memory 1 Parameterization 2 Volatile memory 3 Non volatile memory 4 Saved factory settings 5 Save 6 Restore 7 Ac...

Page 37: ...e the Save class service service code 16h from the position sensor object see table 21 page 28 The parameters are saved to the non volatile memory The following table shows which parameters are saved...

Page 38: ...ed via DHCP then any address range is possible If the IP address is set via address switches then the address range is set to 192 168 1 xxx 3 7 3 Slave sign of life The absolute encoder supports the s...

Page 39: ...ere is any danger from the machine or system in which the encoder is integrated The Scaling function can lead to an immediate change of the position value output by the encoder This could cause an une...

Page 40: ...t by the encoder This could cause an unexpected movement that could endanger people or damage the system or other objects NOTE The Preset function should only be used when the encoder is at a standsti...

Page 41: ...le value range for monitoring the position limits is automatically limited to the total measuring range CMR of the round axis functionality NOTE If a preset value was already set for the current posit...

Page 42: ...are multicolored see Error and status indications of the LEDs page 106 for the meaning of the signals The following control elements are located under the screw cover Address switch Preset pushbutton...

Page 43: ...on the rear side 1 2 3 Figure 16 Position of the AFS60 AFM60 EtherNet IP connections 1 Spannungsversorgung 2 Ethernet Port 1 3 Ethernet Port 2 2 1 3 4 Figure 17 Ethernet port M12 4 female con nector 1...

Page 44: ...encoder housing b Observe the maximum lengths of cable b Mount all cables with strain relief 4 2 Settings on the hardware The following elements for adjustment are located under the screw cover Three...

Page 45: ...d IP address page 49 The following procedure ensures that the encoder retains the IP address assigned via DHCP even after it is switched on again b Set the address switches to 000 From now on the enco...

Page 46: ...ionality 2 048 Denominator for the number of revolutions round axis functionality 1 Position of the address switches 999 meaning see table 30 page 45 5 2 IP address of the encoder 5 2 1 Without DHCP s...

Page 47: ...riodically send DHCP requests to get an IP address assigned to its MAC address However the server laptop PC cannot yet respond accordingly 7 Add encoder to the list via the Add Relation button 8 Assig...

Page 48: ...ddress This typically takes up to 30 seconds Figure 23 Sending the IP address to the encoder As soon as the encoder has correctly received the assigned IP address the status message at Errors and warn...

Page 49: ...ndow area to activate the Disable BOOTP DHCP button 5 Click the Disable BOOTP DHCP button to deactivate the encoder s DHCP server Figure 25 Disable BOOTP DHCP button 6 If the button does not respond t...

Page 50: ...he address switches in the 000 position ensures that the encoder always reads the IP address correctly assigned via DHCP from the encoder s EEPROM at every restart 5 2 4 Checking integration into Ethe...

Page 51: ...ncoder in the AB_ETHIP 1 of RSLinx Classic path 5 3 Creating a project in the control software 1 Start the RSLogix 5000 control software usually in the start menu of your PC note book under Rockwell S...

Page 52: ...as generic module is possible 5 4 Integration and configuration using an EDS file The EDS file electronic data sheet contains all information about the parameters and the operating modes of the absol...

Page 53: ...pe in the Catalog tab Figure 32 Select module Depending on the connected type the following designation is displayed AFS60A Eth IP for the AFS60 EtherNet IP AFM60A Eth IP for the AFM60 EtherNet IP 3 C...

Page 54: ...t connection is displayed as Connections This is instance 101 of the assembly object see table 18 page 23 5 If you want to change this instance click on Change Figure 34 Changing connections 6 For exa...

Page 55: ...s folder 2 In Controller Tags in the Name column open the AFx60_EIP I1 AFx60_EIP I1 Data item Displayed data in the example AFx60_EIP I1 Data 0 Fault header 0 AFx60_EIP I1 Data 1 Position 1037225780 A...

Page 56: ...encoder module Figure 38 Selection of the instance in the example 103WS An executable project with the absolute encoder in the RSLogix 5000 The following steps must be performed The ladder routine mus...

Page 57: ...AFx_A102WS_FB_Enc1_GetSet L5X file via Add and click on Import Routine The Import Configuration dialog opens NOTE b Do not click on OK until all configuration steps for import have been com pleted If...

Page 58: ...e assigned to the routine for each encoder 4 Select the Other Components item 5 In the Final Name column select the drop down list 6 Select the encoder module for which the ladder routine is to be imp...

Page 59: ...Name column select the drop down list 10 Select the encoder module whose tags are to be adjusted Figure 43 Selection of the tag of the instance used 11 In the Operation column select the Use Existing...

Page 60: ...in a project then each final name may only be assigned once Then the name is to be changed for example from Enc1 to Enc2 Figure 45 Changing the tag names 13 Click OK The ladder routine is imported 5...

Page 61: ...he ladder routine must be integrated as the SubRoutine into the MainRoutine of your project Figure 47 MainRoutine without SubRoutine CONFIGURATION USING A PLC 5 8014213 1EF3 2021 12 08 SICK O P E R A...

Page 62: ...utine 5 5 3 Using the SubRoutine 1 Switch the controller to online mode Figure 49 Imported SickAFx ladder routine in online mode 2 In the MainProgram switch to SickAFx_A101WS_A103WS_FB_Enc1_GetSet 5 C...

Page 63: ...encoder can be per formed both on the controller side and via the web server 5 5 4 Reading out and changing parameters of the encoder Under Controller Tags the parameters of the encoder can be read o...

Page 64: ...in the web server and reading out the parameters in the controller NOTE If a parameter is changed via the web server bit 15 in the Fault header is automatically set as a warning see table 33 page 108...

Page 65: ...SetData Parameters that are changed in the controller are displayed in the web server on the Parameterization page NOTE The web browser must be updated to display the changed data CONFIGURATION USING...

Page 66: ...downloaded from SICK homepage EthernetIP function block EtherNet IP function block for encoder specific addi tional functions for RSLogix5000 including operating instructions The encoder must be inte...

Page 67: ...ck as a PDF 5 7 Integration of the encoder as generic module 1 Right click the Ethernet symbol and select the New Module command Figure 56 Integrating encoder The Select Module dialog opens 2 Search f...

Page 68: ...put and Configuration Figure 58 Entering module properties Example Name AFM60_Encoder name is freely selectable Comm Format Input data DINT IP Address 192 168 1 123 Input Assembly instance 103 size 3...

Page 69: ...d with valid data see table 20 page 26 beforehand Otherwise the controller may output an error see Error messages of the Allen Bradley control system page 110 3 Click OK Example data for a configurati...

Page 70: ...9 80h Direction of rotation cw 0 C Data 12 00h Scaling on 1h C Data 13 01h Speed format 1F0Fh C Data 24 0Fh and C Data 25 1Fh 5 7 2 Downloading the configuration to the control 1 Load the configuratio...

Page 71: ...me open the AFM60_Encoder I AFM60_Encoder I Data item in the Controller Tags column Displayed data in the example AFM60_Encoder I Data 0 Fault header 0 AFM60_Encoder I Data 1 Position 15130 AFM60_Enco...

Page 72: ...ure of the encoder is to be read out using parameter 64h Temperature Value Defining and declaring variables First variables TEMP_Trigger TEMP_OneShot TEMP_Value and TEMP_Message have to be defined and...

Page 73: ...only once another element in this case edge sensitive must be defined and declared This causes the process to be triggered only when an edge change of variable TEMP_Trigger from 0 to 1 occurs 3 Selec...

Page 74: ...Type field and click on OK Another variable must be created which will later contain the temperature value see table 24 page 29 attribute ID 64h temperature value 5 Select New Tag again 5 CONFIGURATI...

Page 75: ...pe in the Data Type field and click on OK Finally a variable must be defined and declared that obtains the temperature value from the controller 7 Select New Tag again CONFIGURATION USING A PLC 5 8014...

Page 76: ...emperature Figure 69 Variable structure for reading out the temperature Defining process flow After the variables have been defined and declared the program blocks must be inserted into the ladder log...

Page 77: ...ing variable must be assigned to this input in our example variable TEMP_Trigger Figure 72 Assignment of variable TEMP_Trigger to ExamineOn 3 Click on the question mark A drop down menu will open 4 Se...

Page 78: ...mark A drop down menu will open 7 Select variable TEMP_OneShot In the next step the message must be configured to read the temperature value from the encoder Figure 75 Inserting MSG block 8 From the...

Page 79: ...lock must then be configured Figure 77 Opening configuration dialog of the MSG block 10 Click on the button with the three dots The Message Configuration dialog opens CONFIGURATION USING A PLC 5 80142...

Page 80: ...see table 24 page 29 Destination TEMP_Value NOTE TEMP_Value is the fourth variable created The value of the temperature is written into this when the example program is executed 12 Open the Communica...

Page 81: ...program to controller The program is then transmitted to the controller 1 In the Offline menu select the Download command Figure 82 Transmitting the program to the controller 2 Confirm the next messa...

Page 82: ...ining and declaring variables First variables PRESET_Trigger PRESET_OneShot PRESET_Value and PRESET_Mes sage must be defined and declared for the program First variable PRESET_Trigger is created to tr...

Page 83: ...s only once another element in this case edge sensitive must be defined and declared This causes the process to be triggered only when an edge change of variable PRESET_Trigger from 0 to 1 occurs 3 Se...

Page 84: ...he Data Type field and click on OK Another variable must be created which will later contain the preset value see table 24 page 29 attribute ID 13h preset value 5 Select New Tag again 5 CONFIGURATION...

Page 85: ...ta type in the Data Type field and click on OK Finally a variable must be defined and declared that obtains the preset value from the controller 7 Select New Tag again CONFIGURATION USING A PLC 5 8014...

Page 86: ...set value Figure 89 Variable structure for setting a preset value Defining process flow After the variables have been defined and declared the program blocks must be inserted into the ladder logic and...

Page 87: ...The first block to be inserted is an input that is to trigger the Set preset value process Figure 92 Inserting ExamineOn module 3 From the Favorites tab select the ExamineOn block and insert it into t...

Page 88: ...tivity of the process flow the ONS block must be inserted Figure 94 Inserting ONS block 6 From the Bit tab select the ONS block and insert it into the MainRoutine A variable must also be assigned to t...

Page 89: ...xt step the message must be configured to write the preset value into the encoder Figure 96 Inserting MSG block 9 From the Input Output tab select the MSG block and insert it into the MainRoutine CONF...

Page 90: ...block must then be configured Figure 98 Opening configuration dialog of the MSG block 11 Click on the button with the three dots The Message Configuration dialog opens 5 CONFIGURATION USING A PLC 90...

Page 91: ...PRESET_Value Source Length 4 NOTE PRESET_Value is the fourth variable created The preset value is taken from this when the example program is executed and written to attribute 13h of the position sens...

Page 92: ...K Transmitting program to controller The program is then transmitted to the controller 1 In the Offline menu select the Download command Figure 103 Transmitting the program to the controller 5 CONFIGU...

Page 93: ...bles PRESET_Value enter a value in Controller Organizer 500 in the example 2 Set variable PRESET_Trigger from 0 to 1 In position date AFM60_EIP I Data 1 the value now jumps to 500 CONFIGURATION USING...

Page 94: ...onnected The encoder must communicate with a browser enabled device The web server supports Internet Explorer V8 0 64 bit and higher Google Chrome V38 0 and higher Firefox V33 0 2 and higher The IP ad...

Page 95: ...ser see Limits page 100 6 1 3 Speed This page shows the following parameters from the position sensor object see table 24 page 29 Current speed attribute ID 18h The unit of speed is defined by attribu...

Page 96: ...es are to be changed e g the lower and upper speed limits press the Enter key after each entry The following parameterization options are available without logging in Overview Units Preset The followi...

Page 97: ...to prevent the password from being read 6 2 1 Overview This page shows an excerpt of the attributes of the position sensor object see table 24 page 29 The Aktuell column shows the currently configure...

Page 98: ...d with the Enter key the value is accepted as the position value The Preset function can lead to an immediate change of the position value output by the encoder This could cause an unexpected movement...

Page 99: ...f round axis functionality is activated then no scaling can be set DANGER Before using the Scaling function check whether there is any danger from the machine or system in which the encoder is integra...

Page 100: ...the encoder is at a standstill 6 2 7 Limits On this page the position speed acceleration and temperature limits can be parame terized Lower limit of the position attribute ID 16h Upper limit of the po...

Page 101: ...which the encoder is integrated The Reset function leads to a reset of the parameters of the position sensor object to the factory settings which can lead to an immediate change of the position value...

Page 102: ...ng attribute ID 6Dh Lower speed limit attribute ID 1Bh Upper speed limit attribute ID 1Ch 6 3 3 Temperature This page shows the following values for the temperature from the position sensor object see...

Page 103: ...tbeat Green Active Gray Not active NOTE Since the website is updated every second the change between statuses cannot be displayed in real time The Aktueller RPI in ms column shows the RPI The update f...

Page 104: ...UPDATE_DRIVE folder 5 Transmit the update file bin 1 to this folder The firmware update takes about 3 minutes During the firmware update the Encoder LED initially flashes red The Encoder LED then ligh...

Page 105: ...formation page 6 5 Test notes DANGER No commissioning without inspection by authorized personnel Before a system equipped with AFS60 AFM60 EtherNet IP is put into operation for the first time it must...

Page 106: ...Meaning of the Mod Net and Encoder status LEDs Display Description Mod LED Off No supply voltage Green Device in operation Green Standby device not configured no IP address assigned Red Warning but d...

Page 107: ...o check the sensor system and the most important functions of the encoder NOTE The self test may only be performed when the encoder is at standstill The self test can be triggered via the diagnostic b...

Page 108: ...sition configured with the attribute IDs 16h or 17h has been undercut exceeded see table 24 page 29 W 1 8 Position error amplitude error of singleturn measurement A 9 Position error amplitude error of...

Page 109: ...he application must be evaluated In the event of a serious error a correct position value may not be output This could cause an unexpected movement that could endanger people or damage the system or o...

Page 110: ...4 The minimum maximum supply voltage has been undercut exceeded 7 3 4 Error messages of the Allen Bradley control system If the encoder is integrated in an Allen Bradley control system certain error m...

Page 111: ...ata DINT The encoder requires the communica tion format Input Data DINT 16 0204 Connection Request Error Connec tion timed out b Check the supply voltage at the encoder b Check the Ethernet lines of t...

Page 112: ...that the standards and or technical specifications stated in the EU declaration of conformity have been used as a basis for this 8 1 2 Compliance with UK statutory instruments UK declaration of confor...

Page 113: ...080 7425 E Mail enquiry my sick com Mexico Phone 52 472 748 9451 E Mail mexico sick com Netherlands Phone 31 0 30 229 25 44 E Mail info sick nl New Zealand Phone 64 9 415 0459 0800 222 278 tollfree E...

Reviews: