


Chapter
6
Operating Instructions
CLV 490 Bar Code Scanner
6-50
©
SICK AG · Division Auto Ident · Germany · All rights reserved
8 009 993/O824/20-12-2004
Operation
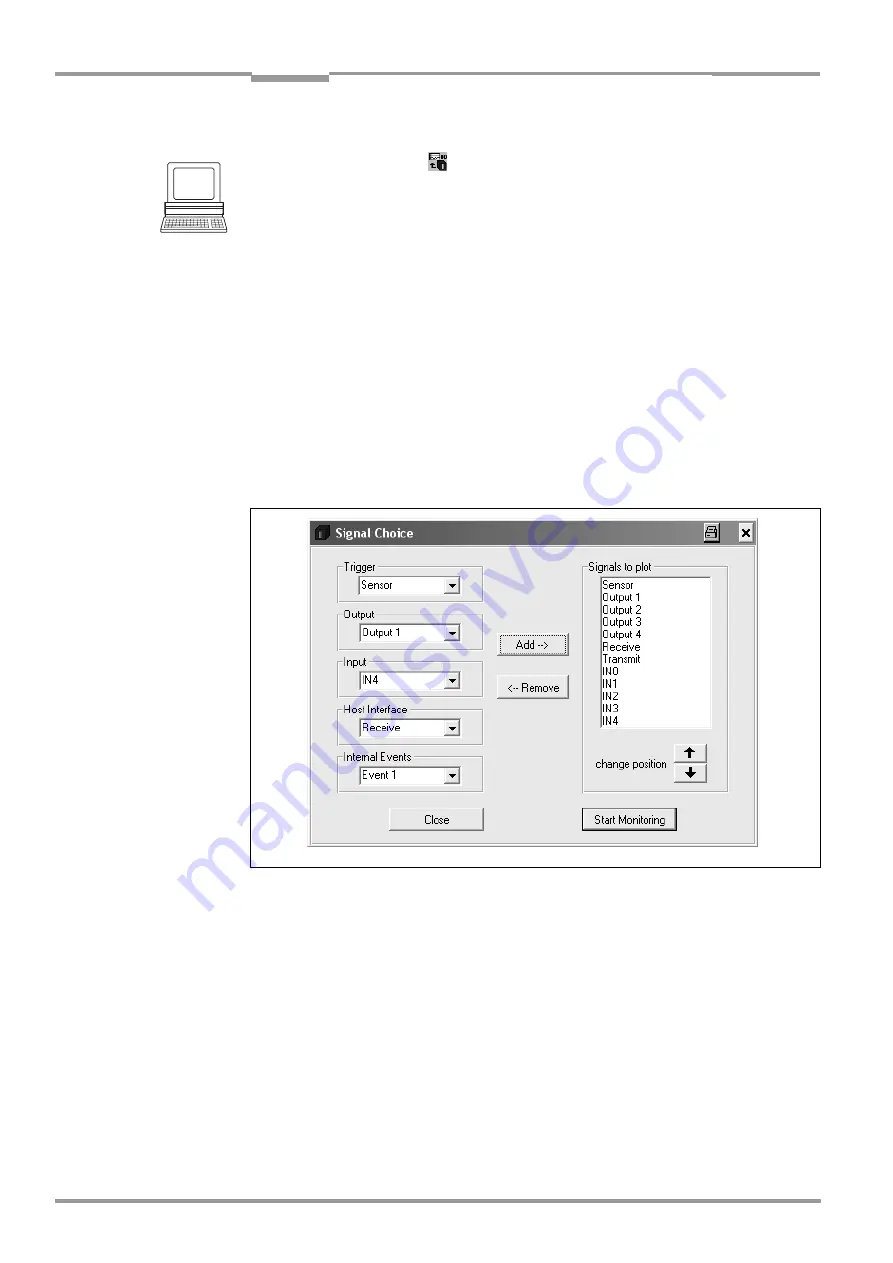
Configuring and calling up I/O monitor for display
1.
In the symbol bar, click
or select CLV 490, I/O M
ONITORING
in the menu bar.
The S
IGNAL
C
HOICE
dialog box is then displayed (
).
2.
Select the desired input, output or data transfer direction for each selection (entry) on
the left side in one of the drop-down lists.
3.
Click the A
DD
button.
The previously selected entry appears at the end of the list in the S
IGNALS
TO
PLOT
field
to the right.
4.
Repeat for other entries. A signal cannot be selected twice.
5.
If necessary, delete undesired inputs, outputs or a data transfer direction from the list.
Select the relevant entry and click the R
EMOVE
button. Several entries can be chosen
selectively by holding down the [CTRL] key and selecting with the left mouse button. A
block selection is done by holding down the [SHIFT] key and selecting with the left
mouse button.
6.
If the sequence in the list is to be changed, select the desired entry and move it to the
preferred location using the "up arrow" and "down arrow" buttons. Several entries can
be moved selectively or as a block at the same time here as well.
7.
After configuration is complete, click S
TART
M
ONITORING
.
CLV-Setup begins with the display of the switching statuses/data output in the I/O
M
ONITORING
dialog box as soon as data is output from the CLV. An example is shown in
8.
To cancel the display, click C
LOSE
in the I/O M
ONITORING
dialog box and exit the S
IGNAL
C
HOICE
dialog box by clicking C
LOSE
.
– or –
Click E
XIT
in the I/O M
ONITORING
dialog box.
CLV-Setup resets the operating mode of the terminal interface to its original function.
This also applies when the S
IGNAL
C
HOICE
dialog box is exited with C
LOSE
without having
started the I/O Monitor.
Fig. 6-15:
CLV-Setup: Selection of the signals to be displayed in I/O Monitoring


