background image

5

Mounting

5.1

Mounting instructions

Observe the technical data.

Protect the sensor from direct and indirect sunlight.

To prevent condensation, avoid exposing the device to rapid changes in tempera‐
ture.

The mounting site has to be designed for the weight of the device.

The device can be mounted in any position.

It should be mounted so that it is exposed to as little shock and vibration as possi‐
ble. Optional mounting accessories are available

see "Accessories", page 38

.

In application areas with severe vibrations or shocks caused by vibrations, jolts or
abrupt changes in directions (e.g., when mounted to a manned forklift truck),
mounting with vibration dampers is to be carried out (

see "Accessories",

page 38

). Mount the device in a freely suspended manner.

During mounting, make sure there is no reflective surface behind the reference
target, 

see "Setup and dimensions", page 11

.

To avoid inaccurate measurements when installing multiple devices: Make sure
that the laser spot of one device is not in the visible range of another device

see

"Mutual interference", page 18

.

Avoid having shiny or reflective surfaces in the scanning range, e.g., stainless
steel, aluminum, glass, reflectors, or surfaces with these types of coatings.

Protect the device from moisture, contamination, and damage.

Make sure that the status indicator is clearly visible.

The M3 x 5 screws included with delivery are intended for mounting the fastening
clips via the blind hole threads on the rear or underside of the device

see "Setup

and dimensions", page 11

. If the mounting clamps are not used or if other screws

are used, the screws must not be screwed into the thread by more than 2.8 mm.
The maximum tightening torque is 0.8 Nm.

5.2

Mounting position

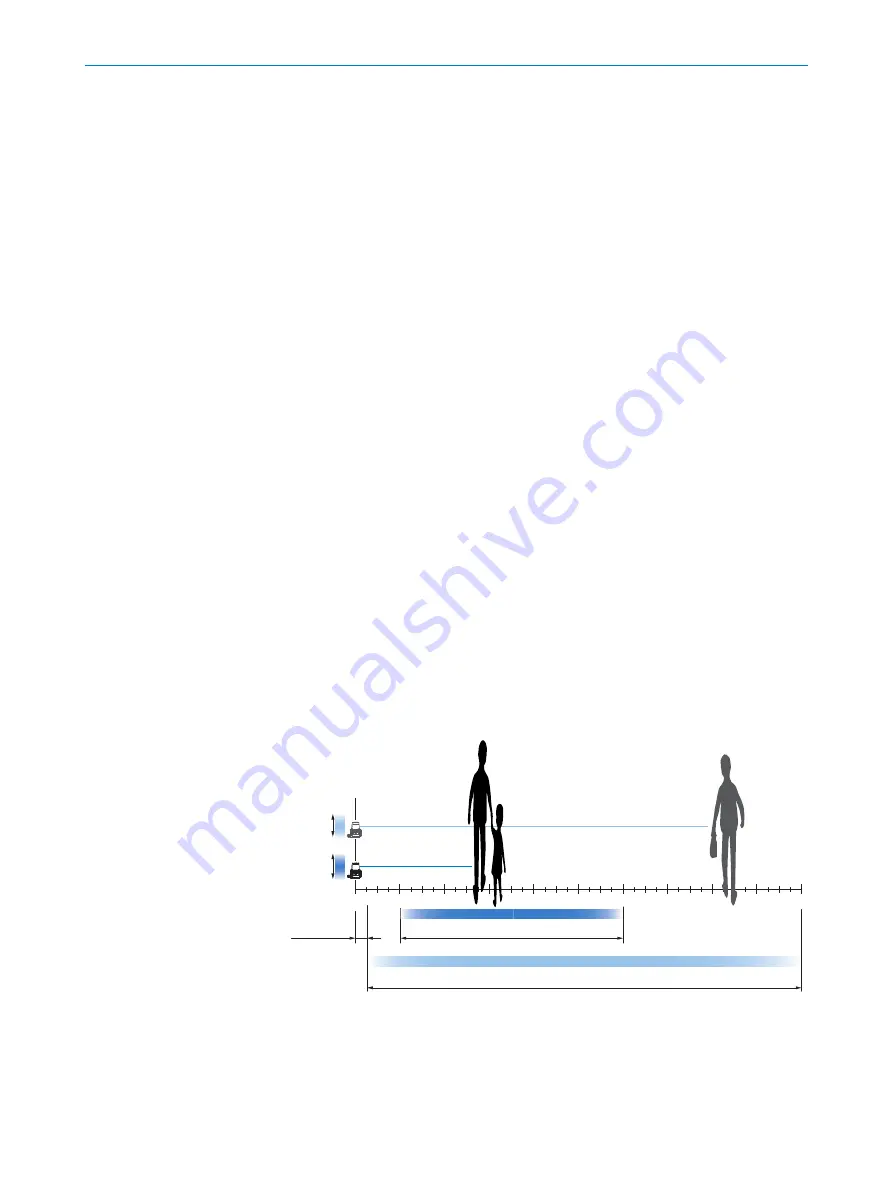
For reliable function, observe the following framework conditions when positioning the
device.

0.90 ... 1.20 

3

0.40 ... 0.60 

2

min. 0.25 

1

typ. 1.00 ... 6.00 

2

0

1

2

3

4

5

6

7

8

9

10

max. 0.25 ... 10.00 

3

1

Minimum distance from device to detected people

2

Recommendation: Measurement at knee/upper thigh height (device height 0.4 m to
0.6 m) at a monitoring distance of typ. 1.00 m to 6.00 m.

3

Recommendation: Measurement at hip/stomach height (device height 0.90 m to 1.20 m)
when the maximum monitoring distance of 0.25 m to 10.00 m is utilized.

MOUNTING 

5

8025963//2020-08-05 | SICK

O P E R A T I N G   I N S T R U C T I O N S | TiM8xx DistanceGuard

17

Subject to change without notice

Summary of Contents for 1112243

Page 1: ...O P E R A T I N G I N S T R U C T I O N S TiM8xx DistanceGuard 2D LiDAR sensors...

Page 2: ...only permissible within the limits of the legal determination of Copyright Law Any modifica tion abridgment or translation of this document is prohibited without the express writ ten permission of SI...

Page 3: ...ication 13 3 6 Principle of operation 13 3 6 1 Measurement principle 13 3 6 2 Distance monitoring application 13 4 Transport and storage 15 4 1 Transport 15 4 2 Unpacking 15 4 3 Transport inspection 1...

Page 4: ...lan 32 8 2 Cleaning 32 9 Troubleshooting 33 9 1 General faults warnings and errors 33 9 2 Repairs 33 9 3 Returns 33 9 4 Disposal 34 10 Technical data 35 10 1 Features 35 10 2 Performance 35 10 3 Inter...

Page 5: ...operating the machine or system in which the device is integrated For information about this refer to the operat ing instructions of the specific machine 1 2 Explanation of symbols Warnings and impor...

Page 6: ...ntended use will be deemed to be incorrect use The device does not constitute a safety component in accordance with the respec tive applicable safety standards for machines The device must not be used...

Page 7: ...ir Technical modifications Use of unauthorized spare parts consumables and accessories With special variants where optional extras have been ordered or owing to the latest technical changes the actual...

Page 8: ...in their particular application Commissioning configura tion Basic knowledge of the computer operating system used Basic knowledge of the design and setup of the described con nections and interfaces...

Page 9: ...ust be complied with WARNING Risk of injury and damage caused by potential equalization currents Improper grounding can lead to dangerous equipotential bonding currents which may in turn lead to dange...

Page 10: ...pe ordered 2 fastening clips 2 M3 x 5 mm screws TiMxx1 only TX6 screwdriver for the plastic cover of the micro USB female connector Without connecting cables 1 Printed safety notes multilin gual Quick...

Page 11: ...cluded in scope of delivery 2 M3 threaded mounting hole 2 8 mm deep blind hole thread max tightening torque 0 8 Nm 3 Optics cover 4 Receiving range light inlet 5 Transmission range light emission 6 Pu...

Page 12: ...ng 3 4 Type code The devices of the product family are arranged according to the following type code TIM x y z aa bb c dd 1 2 3 4 5 6 7 8 9 Table 3 Type code Position Description Characteristic 1 Devi...

Page 13: ...is marked by a circular indentation in the center of the optics cover If a laser beam strikes an object the position of that object is deter mined in terms of distance and direction Figure 3 The 2D L...

Page 14: ...3 270 2 Distance infringement 6 Min distance indication 5 ROI 4 7 1 1 Sensor blind spot 2 Scanning area 3 Taught in background 4 Defined region of interest ROI 5 Blue circle Defined minimum distance a...

Page 15: ...mpleteness and for any damage that may have occurred in transit In the case of transit damage that is visible externally proceed as follows Do not accept the delivery or only do so conditionally Note...

Page 16: ...periods of longer than 3 months check the general condition of all components and packaging on a regular basis 4 TRANSPORT AND STORAGE 16 O P E R A T I N G I N S T R U C T I O N S TiM8xx DistanceGuard...

Page 17: ...eflective surfaces in the scanning range e g stainless steel aluminum glass reflectors or surfaces with these types of coatings Protect the device from moisture contamination and damage Make sure that...

Page 18: ...tored The marking 90 axis on the upper side of the optics cover serves as a alignment aid View live measurement data on the PC for exact align ment see Operation page 27 and use alignment aid or scan...

Page 19: ...Figure 5 Distance 200 mm MOUNTING 5 8025963 2020 08 05 SICK O P E R A T I N G I N S T R U C T I O N S TiM8xx DistanceGuard 19 Subject to change without notice...

Page 20: ...is connected to the peripheral devices voltage supply any local trigger sen sor s system controller via shielded cables The cable shield for the data cable for example rests against the metal housing...

Page 21: ...ues can no longer be complied with and that the safe operation of the device data interfaces can no longer be guaranteed Measures for widely distributed system installations On widely distributed syst...

Page 22: ...ler 2 Device 3 Voltage supply 4 Grounding point 3 5 Insulated mounting 6 Grounding point 2 7 Ground potential difference 8 Grounding point 1 9 Metal housing Shielded electrical cable Even in the event...

Page 23: ...wed plug con nectors or protective caps Protect the device from dust and moisture when the plastic USB cover is open All circuits connected to the device must be configured as SELV or PELV circuits SE...

Page 24: ...ing output 3 Device over loaded Black 8 OUT 4 Switching output 4 Reserved Gray 9 INGND Common ground for all inputs Reserved White 10 IN 3 Switching input 3 Reserved Violet 11 IN 4 Switching input 4 R...

Page 25: ...puts are shown below Device 1 OUT X 2 X Y GND Vout 3 4 Figure 10 Wiring of digital output PNP version 1 Device 2 Signal OUT X 3 Output voltage Vout 4 If an inductive load is present Provide an arc sup...

Page 26: ...lting fall in voltage This is calculated as follows U 2 x length x current conductance value x cross section Conductance value for copper 56 m mm2 6 ELECTRICAL INSTALLATION 26 O P E R A T I N G I N S...

Page 27: ...ayed 7 2 Overview 1 2 3 4 5 1 Show Hide menu bar buttons and open start menu display of open menu 2 Device information display 3 Menu bar 4 User level button and display 5 Workspace 7 3 User levels Th...

Page 28: ...a blue circle whose diameter corresponds to the minimum distance to be observed If two circles intersect the minimum distance has been undercut Live information The live information shows the current...

Page 29: ...maximum number of people is under cut the respective status display changes from green to red and switch ing output OUT2 activates Teach Background Teach in the background again It is saved automatic...

Page 30: ...ween clusters of one person mm Maximum distance of clusters of the same person Depends on the installation height of the sensor arms and legs continue to be correctly assigned factory setting 0 7 m Te...

Page 31: ...ted minimum distance in mm http 192 168 0 1 api crown BasicDistanceGuard setMinDistanceThreshold Use distance value as JSON Payload or Body raw Example for 1 m args value 1000 The changed value is not...

Page 32: ...s on the place of use ambi ent conditions or operating require ments Recommended At least every 6 months Specialist Check that all unused connections are sealed with protective caps Depends on ambient...

Page 33: ...es are impre cise Optics cover contaminated Clean the cover Highly glossy objects in the field of view of the sensor Modify Remove objects or change angle of inclination and teach in the background ag...

Page 34: ...y specific waste disposal regulations Do not dis pose of the product along with household waste NOTICE Danger to the environment due to improper disposal of the device Disposing of devices improperly...

Page 35: ...e typ 67 ms Detectable object shape Almost any Systematic error 60 mm 1 Statistical error 20 mm 1 Integrated application DistanceGuard Maximum number of peo ple in the region of interest 20 Maximum su...

Page 36: ...rface plastic cover Protection class III IEC 61140 2016 1 Weight 250 g without connecting cables Dimensions L x W x H 60 mm x 60 mm x 86 mm 10 5 Ambient data Variant TiM8xx DistanceGuard Object remiss...

Page 37: ...housing EN 61010 1 2011 07 Damp heat 25 55 C air humidity 6 cycles EN 60068 2 30 2005 Temperature change 25 50 C 10 cycles EN 60068 2 14 2009 TECHNICAL DATA 10 8025963 2020 08 05 SICK O P E R A T I N...

Page 38: ...ICK Support Portal supportportal sick com registration required you will find besides useful service and support information for your product further detailed infor mation on the available accessories...

Page 39: ...lic License LGPL MIT license zlib license and licenses derived from the BSD license This program is provided for general use without warranty of any kind This warranty dis claimer also extends to the...

Page 40: ...8080 7425 E Mail enquiry my sick com Mexico Phone 52 472 748 9451 E Mail mexico sick com Netherlands Phone 31 0 30 229 25 44 E Mail info sick nl New Zealand Phone 64 9 415 0459 0800 222 278 tollfree...

Reviews: