background image

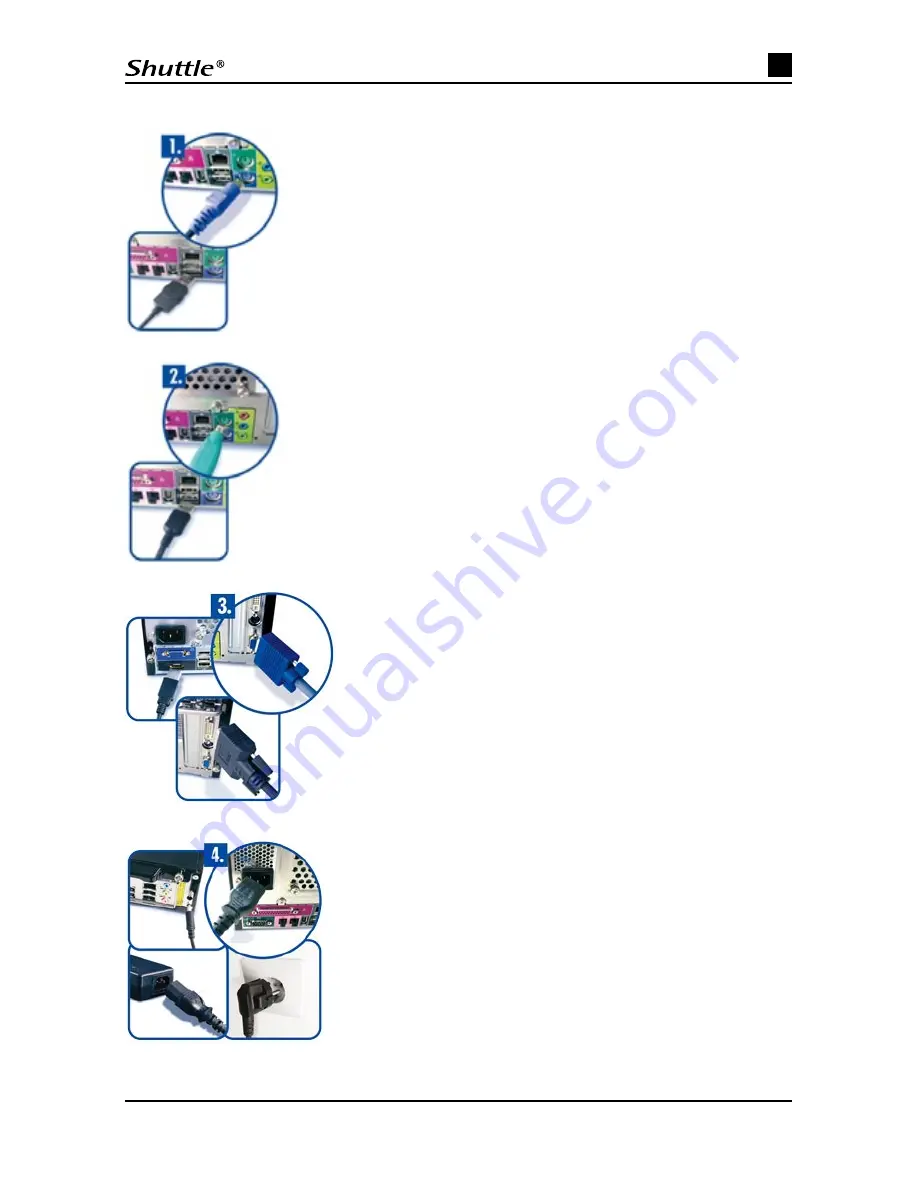
1. Connecting the keyboard

Connect your keyboard via the jack marked as “Tastatur“ 
(keyboard) which is located at the back of your computer. 
Please take care that both connections are the same colour 
(violet). Carefully plug the connector in to the jack.
If you have a USB-keyboard, please connect it via the jack 
marked as “USB”.

2. Connecting the mouse

Connect your mouse via the jack marked as “Maus“ (mouse) 
which is located at the back of your computer. Please take 
care that both connections are the same colour (green).
Carefully plug the connector in to the jack.
If you have a USB-mouse, please connect it via the jack 
marked as “USB”.

3. Connecting the monitor

Connect the monitor cable (15-pin) to your VGA-
output or directly to the graphics card. As an option 
for some models, you can also use the DVI or HDMI-
output for connecting monitor and graphics card.

4. Power connection

Connect the power supply cable with the power supply 
unit of the PC and a wall socket. For devices with an 
external power supply, first connect the external power 
supply to the PC and then connect the power supply 
cable to the wall socket. Ensure that your monitor is 
also connected to a secured power supply.

EN

4

Summary of Contents for D 1000

Page 1: ...ing a Shuttle Mini PC Complete System Shuttle is pleased to present you the latest technology which meets the most demanding requirements This handbook will help you as you work with your new Shuttle Mini PC Complete System The individual chapters of the handbook explain step by step the most important components and how to use them You also have access to a whole range of technical information by...

Page 2: ... PC Complete System correctly and carefully Please always follow the instructions on the safety notices and in this handbook Do not operate your Shuttle Mini PC Complete System in a cabinet or in a closed 1 space such as a box or chest etc Never put objects through the openings of the casing If you should do this you 2 could be exposed to dangerous voltages Your Shuttle Mini PC Complete System is ...

Page 3: ... PC Complete System If you do have to open the casing e g when upgrading your system please adhere to the following Disconnect the Shuttle Mini PC Complete System from the power network and also 1 remove all connections to connected appliances Always ensure that the casing is closed firmly and that all of the screws have been 2 screwed tight before you re connect the Shuttle Mini PC Complete Syste...

Page 4: ...the same colour green Carefully plug the connector in to the jack If you have a USB mouse please connect it via the jack marked as USB 3 Connecting the monitor Connect the monitor cable 15 pin to your VGA output or directly to the graphics card As an option for some models you can also use the DVI or HDMI output for connecting monitor and graphics card 4 Power connection Connect the power supply c...

Page 5: ...e Mini PC Complete System was exposed to rain water or any other fluids You have dropped the Shuttle Mini PC Complete System or the casing was damaged The Shuttle Mini PC Complete System is showing changes in its performance which indicate that repair is necessary There are some important details which you should have available to be able to use our technical hotline You can find these on your inv...

Page 6: ...fundamental components and their functions This also includes their maintenance The Shuttle Mini PC Complete Systems connections and operating controls Your Shuttle Mini PC Complete System has the following connectors and operating controls Please note that there may be differences in the positioning and what is included depending on the system The illustrations should provide you with an over vie...

Page 7: ... 4500 P2 Models e g P2 3500 1 1 3 3 4 4 5 6 7 7 8 8 7 10 10 11 11 12 12 12 12 12 14 13 14 14 12 18 18 19 19 21 22 23 23 24 24 25 26 26 28 28 29 29 31 13 32 32 33 34 36 39 43 44 48 45 35 46 47 48 45 35 46 47 48 10 EN 7 ...

Page 8: ...800 G5 G5M Models e g G5 3300B 1 1 3 3 4 4 5 6 7 8 8 10 10 11 11 12 12 12 12 12 12 13 13 13 13 14 14 17 18 18 19 19 21 22 23 23 24 24 26 26 28 28 29 29 31 31 32 32 36 36 39 39 44 44 42 48 45 35 46 47 48 45 35 46 47 EN 8 ...

Page 9: ...D Models e g D 1000 K Models e g K4800 1 1 3 3 4 4 8 8 12 12 15 16 18 23 23 24 24 26 26 28 30 30 31 31 32 32 33 33 34 34 36 36 37 42 10 35 47 10 35 47 EN 9 ...

Page 10: ...X Models e g X 200 K Models e g K450V 1 2 3 4 4 8 8 12 12 12 12 12 12 13 18 23 23 25 26 27 27 28 30 31 32 32 32 33 33 34 34 36 37 37 42 38 10 35 47 10 35 47 10 35 47 24 38 EN 10 ...

Page 11: ...X Models e g X 2700 M Models e g M 2000 1 1 2 3 4 4 8 8 10 10 11 11 12 12 13 13 12 12 12 18 20 23 24 25 26 27 30 32 33 34 45 36 37 40 42 41 10 35 47 48 47 46 28 19 19 32 44 29 EN 11 ...

Page 12: ...tional 22 Wireless LAN Antenna optional 23 Optical SPDIF Connector optional 24 Coaxial SPDIF Connector optional 25 Connector for mains plug 26 Connector for external power supply 27 Additional expansion card optional 28 Graphics card optional 29 Serial Interface 30 Parallel Interface optional 31 Ethernet 32 PS 2 Mouse connector 33 PS 2 Keyboard connector 34 Audio Line IN L R 35 VGA output 36 DVI o...

Page 13: ...he cursor across the screen You can also use the mouse to open programs or to work with menus and texts A standard mouse has the three following buttons Left button This is used the most frequently An object is selected with a single click or you can place the cursor at any point on the text When you double click two clicks immediately one after the other you can open programs or documents Right b...

Page 14: ... You should also clean the rollers inside of the mouse with dampened cotton wool Keyboard With the mouse the keyboard is the most important tool for communicating with the computer The keyboard makes it possible for you to enter text into the computer e g for a letter or an email Many modern keyboards have what are known as hot keys You can use these to open your favourite internet sites or freque...

Page 15: ...ading from a CD You normally press on the Eject Button that is located on the CD or DVD drive This will open the drawer Then insert the silver disk with the label facing upwards Then press the Eject Button again or gently press the drawer so that it closes again Many data carriers now start automatically as they use the Autostart function The Card Reader Card readers are a relatively new developme...

Page 16: ...front of this handbook Speakers The computer s speakers play back the sound of music games videos and DVD films Depending on the soundcard you can enjoy 2 channel 4 channel 8 channel 5 1 or 7 1 multi channel sound Network LAN The LAN or network connection makes it possible for you to connect computers to one another at home or in the office to exchange data or to go online and surf the internet If...

Page 17: ... or your computer You can access Help by Pressing the F1 key if you are on the desktop interface Troubleshooting My Shuttle Mini PC Complete System will not start Check whether the Shuttle Mini PC Complete System is turned on Check whether the power cable is connected and the power socket is turned on Nothing is displayed on the screen Check whether the monitor is turned on Check whether the monit...

Page 18: ...e volume control on the boxes turned on My keyboard or mouse are not working Check whether these peripherals are connected to the right jacks at the PC Remove the cable and clean the respective jack in order to remove any possible dirt which may exist If you have a mouse with a ball try to clean the ball with a soft cloth You should also clean the mouse inside with dampened cotton wool Further Hel...

Reviews: