background image

LX Wireless

11

RECEIVER MOUNTING

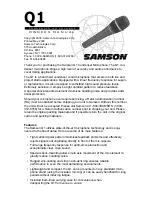
Single Rack–Mounted Receiver (Figure 6)

If the receiver is to be located on a table or other horizontal surface, attach the four

adhesive bumpers to the bottom corners of the receiver. If the receiver is to be mounted
in an audio equipment rack, identify the rack-mount kits supplied with your system and
follow the appropriate assembly directions below.

1. Remove two screws from each side of the receiver.

2. Position the large mounting brackets over the holes on the sides of the receiver and

secure them to the receiver with the screws removed in Step 1.

3. If you are not going to front mount the antennas with a Shure WA503 Front Mount

Conversion Kit, insert the plastic plugs into the holes in the brackets.

4. Secure the assembly to a standard audio equipment rack with four screws.

SINGLE RACK–MOUNTED RECEIVER

FIGURE 6

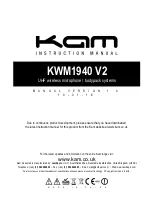
Double Rack–Mounted Receivers (Figure 7)

1. Remove the two screws on the 

outer side of each receiver.

2. Position the small mounting brackets over the holes on the outer side of each receiv-

er, and secure them with the screws removed in Step 1.

3. Remove the screws on the 

inner side of each receiver.

4. Position two link bars over the holes and secure them with the screws removed in

Step 3. For the receiver on the 

left, the link bar should be positioned so that its

threaded hole is toward the 

front of the receiver. For the receiver on the right, the

link bar should be positioned so that its threaded hole is toward the 

rear of the receiv-

er.

5. Place the two receivers next to each other so that the threaded holes in the link bars

line up, one on top of the other.

6. Fasten the receivers together by inserting a small screw from the 

top into the threaded

hole at the 

front of the link bar. Then insert the other screw from the bottom into the

threaded hole at the 

rear of the link bar.

7. Secure the assembly to a standard audio equipment rack, using four screws.

DOUBLE RACK–MOUNTED RECEIVERS

FIGURE 7

LINK BARS

Summary of Contents for LX Wireless System

Page 1: ...Shure Brothers Incorporated 222 Hartrey Avenue Evanston IL 60202 3696 U S A www shure com 27B8654 SC E1999 Shure Brothers Incorporated LX Wireless System User Guide...

Page 2: ...eless microphone system If you have questions about your system that are not answered in this guide please contact Shure Customer Service at 847 866 2553 Monday through Friday 8 00 am 4 30 pm CST In E...

Page 3: ...wo sets of five RF level lights on the receiver will also glow to indicate the strength of the received signal The more lights that glow the stronger the signal 3 Have someone talk or sing into the mi...

Page 4: ...allation 13 LX2 Hand Held Microphone Transmitter Battery Installation 13 Checking the Transmitter Battery 14 Connecting a Lavalier Microphone or Instrument Cable to the LX1 14 Attaching the LX1 to a B...

Page 5: ...a combination of the following items One of the following transmitters LX1 Body Pack Transmitter with your choice of instrument cable or microphone or LX2 Hand Held Microphone Transmitter with your ch...

Page 6: ...ify and troubleshoot RF dead spots Audio Metering A five light audio meter helps to optimize transmitter gain setting and lets you monitor audio level during operation True Guitar Sound Guitar players...

Page 7: ...rument A small screw driver is supplied to make adjustments see the Setting Audio Level section 4 Input Jack This is a Tini Q G connector that provides connection with a variety of lavalier and headse...

Page 8: ...l Gauge When the Power switch is turned to the PWR position one or two of the three lights on the transmitter will glow The color of the glowing light s indicates the amount of battery life remaining...

Page 9: ...cations 4 Audio Output Level Control Lets you adjust output level to match the input level requirements of a mixer or amplifier In most situations this control should be set fully clockwise 5 Power On...

Page 10: ...to provide optimal operation in most applications 5 Audio Output Level Control Lets you adjust output level to match the input level requirements of a mixer or amplifier In most situations this contr...

Page 11: ...vers Figure 7 1 Remove the two screws on the outer side of each receiver 2 Position the small mounting brackets over the holes on the outer side of each receiv er and secure them with the screws remov...

Page 12: ...panel of the receiver 4 Plug the ac adapter into an appropriate ac power source LX4 45 45 LX4 WIRELES S RECEIVER 1 RF AUDIO SQUELCH LEVEL POWER 3 4 2 5 6 ANT OUTPUT HI Z POWER 12 5 18 9 VDC LX3 LX3 A...

Page 13: ...ould provide 18 to 20 hours of operation However an 8 4V nickel cadmium nicad battery will only pro vide 3 hours of operation Carbon zinc and zinc chloride batteries will not provide sufficient power...

Page 14: ...argeable 8 4V nicad battery will cause the indicators to change more quickly than if a 9V alkaline battery is used Actual times depend on the type and brand of battery used Connecting a Microphone or...

Page 15: ...P FIGURE 12 Installing the WA555 Grip Switch Cover Accessory on the LX2 Figure 13 The LX2 transmitter is supplied with an external sleeve accessory WA555 that pre vents accidental movement of the micr...

Page 16: ...to the instrument 4 Slide the transmitter PWR OFF switch to the PWR position One of the three lights on the transmitter will glow 5 Press the POWER button on the receiver The green power on light on t...

Page 17: ...e ON position and begin speaking or playing your instrument NOTE If the red PEAK light on the receiver does not flicker during the loudest sounds the transmitter gain may need to be increased Refer to...

Page 18: ...trol For high sound pressure level applications such as loud singing decrease the au dio gain level by rotating the gain control counterclockwise while the vocalist is sing ing or the musical instrume...

Page 19: ...placing the receiver in the bottom of an equipment rack unless the antennas are remotely located Use the proper receiver antenna s A 1 4 wave antenna can be used if it is mounted directly on the recei...

Page 20: ...and microphone mixer Talk into the microphone and observe the receiver audio level lights If they glow the problem is elsewhere in the sound system Received signal is noisy or contains extraneous sou...

Page 21: ...tions Dynamic Range 102 dB A weighted RF Sensitivity 0 45 mV for 12 dB SINAD typical Image Rejection 80 dB typical Spurious Rejection 75 dB typical Ultimate Quieting ref 15 kHz deviation 100 dB A weig...

Page 22: ...Side HR Rack Panel Kit LX4 WA502 Grip Switch Cover LX2 WA555 Zipper Bag LX1 26A13 Zipper Bag LX2 26A13 Screwdriver 80A498 OPTIONAL ACCESSORIES Instrument Adapter Cable 1 4 Plug LX1 WA302 Instrument Ad...

Page 23: ...ack Grille LX2 BETA 87 RK324G Belt Clip LX1 53A8247A 1 4 Wave Antenna 169 186 MHz 90A8380 1 4 Wave Antenna 186 204 MHz 90B8380 1 4 Wave Antenna 204 216 MHz 90C8380 1 4 Wave Antenna 216 240 MHz 90D8380...

Reviews: