background image

LED UP Quad-4 


CAUTION: Overhead Items  may cause serious injuries when not installed correctly!! If 
there is concern about the safety DO NOT INSTALL the device. 


DANGER OF FIRE! 

When installing the device, make sure there is no highly-flammable  material 
(decoration articles, etc.) within a distance of min. 0.5m. 
 
Mount the projector with the mounting bracket to your trussing system using an 
appropriate clamp. 
For overhead use, always  install a rated safety  - wire that can hold at least 10 times 
the weight of the fixture. You must only use rated safety 

 wire with quick links with 

screw cap. Pull the rated safety - wire through the hole in the mounting bracket and 
over the trussing system  or a safe fixation spot. Insert the end in the quick  link and 
tighten the safety screw. The maximum  drop distance must never exceed 20cm 
A safety - wire which has already held the strain of a  fall or which is defective must 
not be used again.   
 

IMPORTANT! 

Before taking  into operation for the first  time, the installation  has to be approved by 
an expert. 


Summary of Contents for LED UP Quad-4

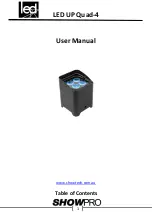
Page 1: ...LED UP Quad 4 1 User Manual www showtech com au Table of Contents ...

Page 2: ...LED UP Quad 4 2 1 Safety instructions 3 1 1 Power Connection 4 1 2 Overhead Rigging 4 1 3 Cleaning and Maintenance 6 2 Menu Navigation 7 3 DMX Allocation 11 4 Technical Specifications 15 ...

Page 3: ...l and stable location to avoid vibration Do not use chemicals or volatile liquids for cleaning Use a dry cloth to wipe off dust or a wet soft cloth for stubborn dirt NO USER SERVICABLE PARTS INSIDE If unit is out of service please contact your point of purchase If any troubles arise remove the power plug and contact your ShowPro representative for repair Do not open the machine by yourself it migh...

Page 4: ...ust be approved by an expert The operator has to make sure that safety relating and machine technical installations are approved by a skilled person once a year IMPORTANT OVERHEAD RIGGING REQUIRES EXTENSIVE EXPERIENCE Including but not limited to calculating working load limits installation material being used and periodic safety inspection of all installation material and the projector If you lac...

Page 5: ...ead use always install a rated safety wire that can hold at least 10 times the weight of the fixture You must only use rated safety wire with quick links with screw cap Pull the rated safety wire through the hole in the mounting bracket and over the trussing system or a safe fixation spot Insert the end in the quick link and tighten the safety screw The maximum drop distance must never exceed 20cm...

Page 6: ...ings fixations and installations spots 3 Any defects on the electronics power cables or housing must be repaired for safe use If the exterior of the unit is going to be cleaned please use moist lint free cloths Never use alcohol or solvents The Cooling fan must be cleaned monthly and check to ensure it is free of obstructions To cleanthe interior of the device please use a vacuum cleaner or an air...

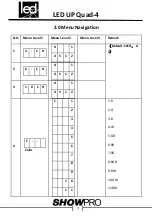
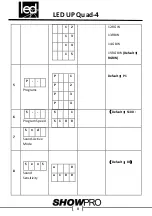
Page 7: ...vigation NO Menu Level1 Menu Level 2 Menu Level 3 Remark 1 4 C H d 1 d 5 1 2 Default 10CH d 1 2 6 C H d 1 d 5 1 2 3 1 0 C H d 1 d 5 1 2 4 C Color C 1 2 3 4 5 6 7 8 9 1 0 1 1 1 R 2 G 3 B 4 W 5 GB 6 RB 7 RG 8 RGB 9 RW 10 GW 11 BW ...

Page 8: ...1 2 1 3 1 4 1 5 12 RGW 13 RBW 14 GBW 15 RGBW Default RGBW 5 P Programs P 1 P 2 P 3 P 4 Default P 1 6 S Program Speed S 1 S 1 0 0 Default S100 7 S n d Sound Active Mode 8 S e n S Sound Sensitivity u 0 u 1 0 0 Default 80 ...

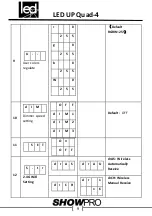
Page 9: ... 5 5 b 0 2 5 5 W 0 2 5 5 Default RGBW 255 10 d I M Dimmer speed setting O F F d I M 1 d I M 2 d I M 3 Default OFF 11 S E T O n O F F 12 S t r 2 4G WiFi Setting d r A S d r A U drAS Wireless Automatically Receive d r C H d r 1 1 6 drCH Wireless Manual Receive ...

Page 10: ... 1 d t A S d t A U dtAS d t C H d t 1 1 6 dtCH 1 The signal points is at the lower right corner of display screen the status prompt of 2 4G WIFI is flashing 2 Automaticcode button to proceed to the automatic mode to be effective ...

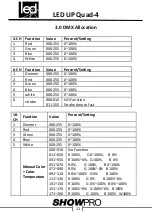
Page 11: ...0 6 strobe 000 010 011 255 NO Function Strobe slow to fast 10 CH Function Value Percent Setting 1 Dimmer 000 255 0 100 2 Red 000 255 0 100 3 Green 000 255 0 100 4 Blue 000 255 0 100 5 White 000 255 0 100 Manual Color Color Temperature 000 010 011 030 031 050 051 070 071 090 091 110 111 130 131 150 151 170 171 200 No Function R 100 G 0 100 B 0 R 100 0 G 100 B 0 R 0 G 100 B 0 100 R 0 G 100 0 B 100 R...

Page 12: ...Color temperature10 Color temperature11 7 strobe 000 010 011 255 NO Function Strobe slow to fast 8 Auto Sound Programs 000 010 011 060 061 120 121 180 181 240 241 255 No Function AutoProgram 1 AutoProgram 2 AutoProgram 3 AutoProgram 4 SoundShow 9 Auto Speed 000 255 SpeedSlow to Fast 10 Dim Mode 000 051 052 101 102 152 153 203 204 255 Presetdimmerspeedfrom display menu Dimmer speedmode off Dimmer s...

Page 13: ...TO SOU ND STOBE SPEED SENSITIVITY FADE MANUNAL RGBAUVW 7 AUTO Functio n 1 AUTO Auto program mode Functio n 2 AUTO SPEED Auto program speed Functio n 3 AUTO STROBE Auto program strobe Functio n 4 AUTO 8 SOUND Functio n 1 SOUND Sound mode Functio n 2 SOUND SENSITIVIT Y Functio n 3 SOUND STROBE Functio n 4 SOUND 9 FADE Functio n 1 FADE Fade mode Functio n 2 FADE SPEED Functio n 3 FADE STROBE Functio ...

Page 14: ... V W Functio n 1 R G B A U V W Functio n 2 R G B A U V W STROBE R red G green B blue A amber UV purple W white 12 Number 0 9 Functio n 1 Number 0 9 The color on IRC is match with the lighting color Functio n 2 Number 0 9 STROBE Functio n 3 Number 0 9 ...

Page 15: ...X Compatibility N A DMX Channels 4 6 and 10 DimmingCurves 4 Modes DimmingResolution 16 bit Data Connections 3 Pin XLR Electrical Battery Specifications 14 8V Lithium WorkingHours 12 hours colorchange mode 8 hours permanentwhite full on Charging hours 5 Hours Input Voltage AC 100V 240V AC 50 60 Hz auto ranging Power Consumption N A Fuse T2A 250V Physical Weight 3 4Kg ...

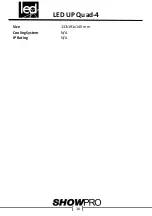
Page 16: ...LED UP Quad 4 16 Size 137x191x145 mm CoolingSystem N A IP Rating N A ...

Reviews: