

.
Pre Cautions:
1. Do not attempt to disassemble the Flood Sensor, unless described in the user’s manual. There are no user serviceable parts.
2. Handle with Care – Avoid striking or shaking.Improper use or storage could damage the Flood Sensor. Modifying or
tampering the device or its internal components can cause a malfunction and void the Water Leak’s warranty.
3. If you feel the Flood Sensor or any part of the Choice Alert system is not operating correctly or as described, please contact
Customer Service for assistance.
4. The Flood Sensor is battery device, so it doesn’t have repeater function
Important safeguards
Introduction
.
Preparing the Flood Sensor for Installation
The Flood Sensor is composed of two sections linked together with a cable The Sensor (transmitter) and the Probe. Before
installing, remove the white battery isolation tape from the Sensor. This activates the Lithium battery inside. The approximate
battery life is up to a year. When replacing batteries it is recommended to replace all batteries in a Zone at the same time in
order ensure proper operation of the entire system.
Installation
The Probe section will need to be mounted
fi
rst. It is intended to be positioned with the contacts pointing down. Find a suitable
location where water could accumulate if a leak were to occur (eg. along the baseboard of wall).You will need to determine if
the surface to mount the Probe is smooth or rough/porous. If smooth you can use one piece of the included double sided tape.
When using doublesided tape apply to clean dry surface.Remove one side of the tape and attach it to the back side of the Probe.
Once the mounting surface is ready, remove the other side of the double side tape and position probe so that the metal contacts
are pointing down, touching the
fl
oor and the back of the Probe (with the double side tape) is up against the wall, baseboard or
mounting plate. Apply pressure to secure the Probe to the surface. If the mounting surface is rough or porous, you will need to
use the alternate mounting plate and screws (included). Secure the plate to the desired location with the screws.
Note:
If postioning the probe to a metal surface, ensure the Probe’s contacts do not touch the metal surface.Next, stretch the
cable vertically and locate a suitable position to mount the transmitter. Follow the same mounting instructions above for mounting
the transmitter.Once the Flood Sensor is mounted, you’ll need to assign it to a Zone on the Control Center.
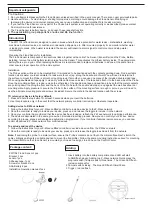
1.Insert battery into the battery compartment and LED will start
to RGB
flash slowly
, Adding to a Z-Wave network, Quick press the
program switch (Tamper switch) three times , The Green LED
flash ,
inclusion successful.
2.Tamper switch closing , The blue LED
fl
ash 1time/30sec.
3.Trigger : red led
fl
ash
ZW1104 Flood Sensor-1pcs
Bracket -1pcs
sensor-1pcs
Adhesive tape -1pcs
Screws for bracket-1pcs
AAA Battery-2pcs
Installation Operation manual-1pcs
Package content:
Adding:
AAA
AAA
LED
Tamper switch
-
+
+
-
TO return your device to factory default:
1. Press and hold the top button for at least 3 seconds while you insert the batteries.
2.Use this procedure only in the event that the network primary controller is missing or otherwise inoperable.
Adding device to Z-Wave network:
1. Follow the instructions for your Z-Wave certi
fi
ed controller to include a device to the Z-Wave network.
2. Once the controller is ready to include your device, press up and release the toggle to include it in the network.
3. Once your controller has con
fi
rmed that the device has been included, refresh the Z-Wave network to optimize performance.
4. The device is associated in the same group when it included in setting process. Now you can control your Z-Wave device
according to groups, scenes, schedules and automation programmed. If your controller features remote access, you can now
control all devices in Z-Wave network from mobile devices.
To exclude and reset the device
1. Follow the instructions for your Z-Wave certi
fi
ed controller to exclude a device from the Z-Wave network.
2. Once the controller is ready to Exclude your device, press up and release the toggle to exclude it from the network.
The ZW1104 is flood sensor, designed to used in areas where there is a potential for water leaks – dishwashers, washing
machines, hot water tanks, air conditioner condensation drip pans, etc. After mounted properly it can monitor whether water
is leaking into areas. When water is detected, the sensor will transmit a alarm signal to control center and stop water
immediately.
5. The association group supports five nodes and life line function


