background image

214mm

170mm

214mm

5

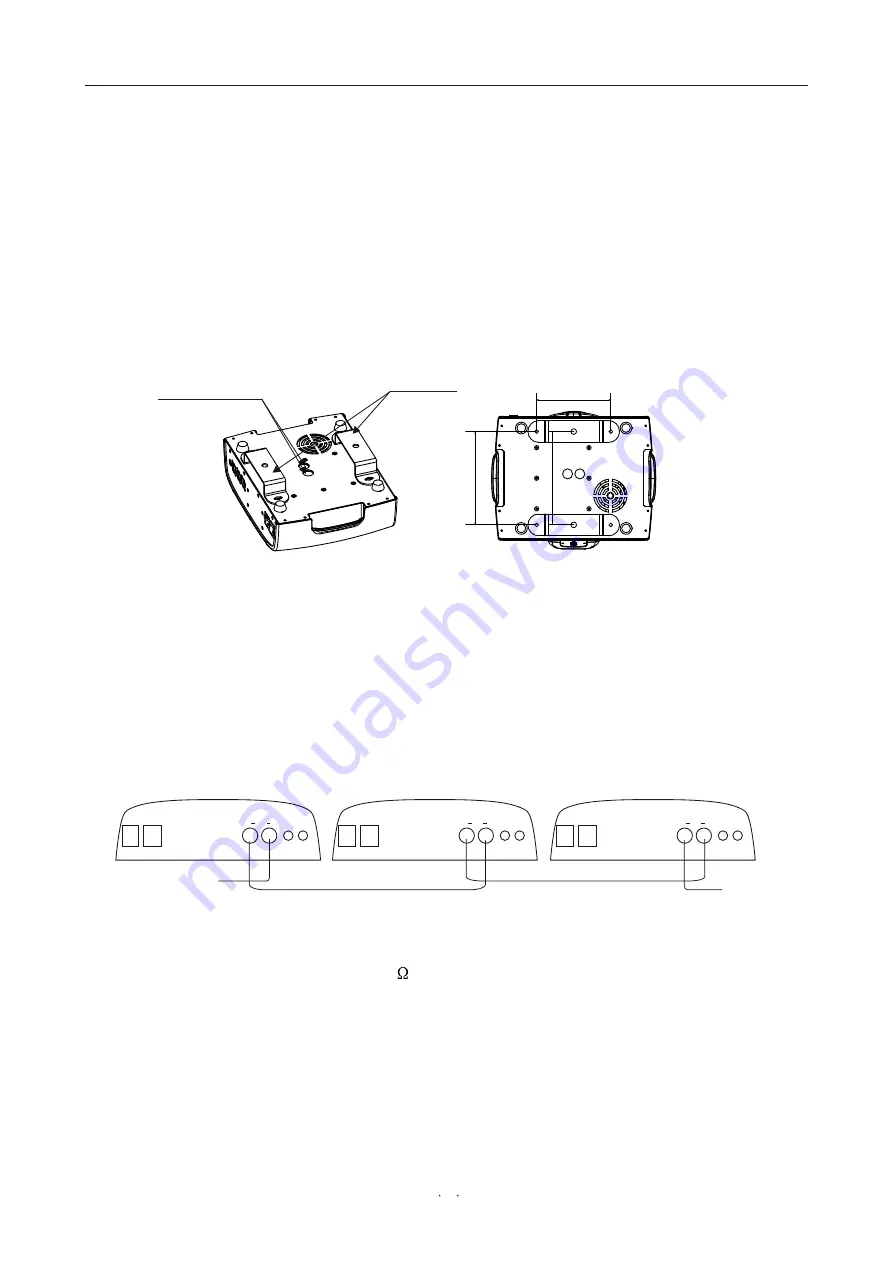
6. Installing the projector 

The projector should be mounted via its bracket using two M12 bolt. 
The bracket itself attaches to the underside of the projector with four(2)M8x25 bolts 
provided. 
Always ensure that the projector is firmly anchored to avoid vibration and slipping whilst 
operating. 
Always ensure that the structure to which you are attaching the projector is secure and is 
able to support a weight of 19.4 Kg for each equipment.
 For safety the projector should have a secondary fixing with a safety chain through the 
holes on the underside of the unit.  
 WARNING: The projector should NEVER be lifted or carried by the yoke.  

BRACKET

Pass safety fixing

through these holes

Ø

Connect the XLR-XLR control line from the DMX output of controller to DMX input of 
each product and connect the DMX output of the first one to the DMX input of the 
second one. Connect all products in this way. Then use the attached circle plug to 
connect the signal output of last machine like picture show:

Ø

Note

: Please remember the signal output of last machine must connect the attached circle 

plug. The circle plug connect a 120

resistance between 2 feet and 3 feet canon plug. 

The signal reflects phenomena can be avoided by using circle plug during DMX 512 
signal transfer.

Ø

The product use 3 feet XLR plug. If the controller you use is 5 feet XLR plug, you must 
use a interchange line from 5 feet to 3 feet as following picture: 

7. Control connections

Console singal input

Output and input connect together

Output and input connect together

POWER IN

MIC

OUT   DMX    IN

ON

OFF

AUX

POWER IN

MIC

OUT   DMX    IN

ON

OFF

AUX

POWER IN

MIC

OUT   DMX    IN

ON

OFF

AUX

Light 1

Lignt N

Light 2

Terminator

www.carlosmendoza.com.mx

Summary of Contents for Spot 250 S

Page 1: ...Showco Spot 250 S www carlosmendoza com mx...

Page 2: ...pecification Structure of the fixture Page 1 2 Page 1 3 Page 2 4 Page 3 5 Page 4 6 Page 5 7 Page 5 8 Page 6 9 DMX512 Channel function setting Page 8 10 Page 16 11 Page 16 12 Electrical diagram Page 17...

Page 3: ...om rain and moisture Unplug mains lead before opening the housing FOR YOUR OWN SAFETY PLEASE READ THIS USER MANUAL CAREFULLY BEFORE YOU INITIAL START UP Be careful with your operations With a high vol...

Page 4: ...vice Leave the device switched off until it has reached room temperature Never run the device without lamp Do not shake the device Avoid brute force when installing or operating the device Never lift...

Page 5: ...with the little bubble vertically either upwards or downwards as shown in the diagram above Do not position it horizontally Close the access hatch carefully and re tighten the 3 screws To optimize lig...

Page 6: ...of controller to DMX input of each product and connect the DMX output of the first one to the DMX input of the second one Connect all products in this way Then use the attached circle plug to connect...

Page 7: ...n 1 GND SCREEN Pin 2 Signal Pin 3 Signal Pins canon The transform of the controller line of 3 pins and 5 pins plug and socket Pin 1 Screen Pin 2 Signal Pin 3 Signal 3 pins canon plug of DMX512 connect...

Page 8: ...Reverse 6 Tilt select normal 6 Tilt select Reverse 7 Color select Step 7 Color select Line 8 Channels select Basic 1 Address 2 Reset 3 Operation 4 Display 5 Plane 6 Tilt 7 Color 8 Channels 9 Info Mode...

Page 9: ...Goboo shake Gobo rotation Automatic Reset Effect Prism 1 2 3 4 5 6 7 8 9 10 11 12 13 14 9 DMX512 Channel function setting Function under MASTER Mode Function under BASIC Mode Focus PAN TILT Color whe...

Page 10: ...9 CHANNEL 2 TIL T CHANNEL 1 PAN Value 100 256 0 0 0 Effect Clockwise 0 rotate 54 Anti clockwise 265 rotate Value 100 256 0 0 0 Effect www carlosmendoza com mx...

Page 11: ...NNEL 4 TIL T movement fine adjust CHANNEL 3 PAN movement fine adjust Value 100 256 0 0 0 Effect Value 100 256 0 0 0 Effect Fine control oftilt movement Fine control oftilt movement www carlosmendoza c...

Page 12: ...fect Value Effect Fast Slow 0 14 15 29 30 44 45 59 60 74 75 89 90 104 105 119 120 134 135 149 150 255 12 17 18 23 24 29 30 35 36 41 42 47 48 53 54 59 60 100 0 5 6 11 Orange Pale blue Green Purple Pink...

Page 13: ...28 31 32 39 40 46 47 54 55 62 63 70 71 78 79 86 87 100 Flow effect Shaking gobo 1 Shaking gobo 2 Shaking gobo 3 Shaking gobo 4 Shaking gobo 5 Shaking gobo 6 Shaking gobo 7 Gobo 7 Gobo 6 Gobo 5 Gobo 4...

Page 14: ...159 160 169 170 252 253 255 0 3 4 27 28 31 32 35 36 58 59 62 63 66 67 98 99 100 Fastest Strobe in normal from slow tofast Open Hole Fastest Rondom strobe effect from slow to fast Open Hole Fastest St...

Page 15: ...69 150 159 140 149 130 139 120 129 110 119 100 109 90 99 80 89 70 79 60 69 50 59 40 49 30 39 20 29 10 19 0 9 98 255 94 97 5 90 93 5 86 89 5 82 5 85 5 78 5 82 74 5 78 70 5 74 66 5 70 62 5 66 59 62 55 5...

Page 16: ...15 CHANNEL 14 Focus CHANNEL 13 Prism Value Effect Value Effect Close distance Far distance 100 256 0 0 0 0 127 128 255 0 50 51 100 In 3 facet prism No prism www carlosmendoza com mx...

Page 17: ...ffect Dimmer strobe dimmer black out and strobe in double pieces mode 0 2 times per second adjustable o o Rotation angle vertical 270 horizontal 540 Size 380 290 515mm Net weight 18kg Other effect hig...

Page 18: ...p Lamp holder Back panel of lamp holder Arm Belt Driver Board 1 Driver Board 2 Display Board Capacitance Transformer Ballast power supply Board Ignitor Voltage switch board 17 12 Structure of the fixt...

Page 19: ...t use the organic liquor like alcohol the crust of the equipentto avoid any damage 17 Announcement the function and package of this equipent are well when leaving factory All users should be abidance...

Reviews: