background image

VSI Error Codes  

Your VSI controller has the ability to diagnose possible errors in the electrical 
system, which may prevent your powerchair from operating. These are 
displayed on the battery gauge. The fault is shown against the number of 
lights flashing on the display. 
 
 
Battery Gauge 

Possible Fault 

10 bars flash 

Battery voltage too high. Check battery connections. 

9 bars flash 

Electromagnetic brake fault 

8 bars flash 

Possible joystick controller fault 

7 bars flash 

Possible joystick fault 

6 bars flash 

Battery charger connected 

5 bars flash 

Right hand motor wiring fault 

4 bars flash 

Right hand motor disconnected 

3 bars flash 

Left hand motor wiring fault 

2 bars flash 

Left hand motor disconnected 

1 bar flashing 

Low battery voltage 


Note: If your powerchair fails to operate after checking the above 
possible faults consult your local Dealer immediately. Also ensure that 
the VSI has not been accidentally locked or is in ‘sleep’ mode. 


Further Information 


Safety Information Regarding Electromagnetic Interference (EMI) 

Scooters and powerchairs are designed to operate under certain conditions. 
However, radio waves or electromagnetic fields may affect the operation of 
the scooter. The source of EMI could be radio or television transmitters or 
portable devices such as mobile phones, portable CB radios, automatic door  
openers etc. 
Should any unintentional movement occur turn the scooter off as soon as 
safely possible. 
 

Solar Energy 

During periods of sunny weather, it is possible that surfaces of your 
powerchair may reach high temperatures (as with motor vehicles). Please 
take precautions if leaving the powerchair in direct sunlight for any period of 
time. Seek shade or cover the seat and hand controls to keep any 
temperature increases to a minimum. 
 

Health Factors 

Suitability for this product has been assessed on the user’s current state of 
health. It is essential that the user regularly monitor their ability to use the 
powerchair safely. 
Please read and adhere to the guidelines set out in this manual. 


15

Summary of Contents for Sena 888WNLS

Page 1: ...Sena Model No 888WNLS USER MANUAL Please ensure this manual is read and understood before using the scooter Apr 2015 ...

Page 2: ...eat Height Back Angle 6 Controls 7 8 Electro magnetic Brake Release Freewheel Operation 8 Starting to Drive Getting started 9 Moving off and steering 9 Reversing 9 Kerb climbing 9 Reaching and stretching 10 Transport and Storage Dismantling 11 Patient transfer 12 Batteries and Battery Charger 12 Maintenance 13 Troubleshooting 14 Further Information 15 1 ...

Page 3: ...ant that the user reads and understands the safety advice given within this manual before attempting to operate the product to avoid possible injury to the user or bystanders and avoid damage to the powerchair or surrounding property Note Persons with lower body amputations should not use this device unless evaluated with artificial limbs fitted as stability may be compromised due to an irregular ...

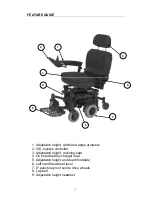
Page 4: ...and angle armrests 2 VSI Joystick controller 3 Adjustable height reclining seat 4 On board battery charger lead 5 Adjustable height and depth footplate 6 Left hand freewheel lever 7 8 puncture proof centre drive wheels 8 Lap belt 9 Adjustable height headrest 3 ...

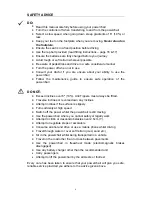
Page 5: ... Exceed inclines over 6º 10 Anti Tippers must always be fitted Traverse inclines or reverse down any inclines Attempt inclines if the surface is slippery Turn suddenly at high speed Switch off the power whilst the powerchair is still moving Use the powerchair where you cannot safely or legally walk Attempt to climb or descend obstacles over 2 5cm 1 Attempt to negotiate steps or escalators Consume ...

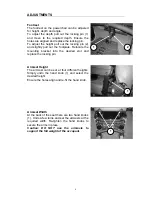
Page 6: ... Relocate the mounting bracket into the desired slot and replace the locking pin 2 1 Armrest Height 1 The armrest can be set at four different heights Simply undo the hand knob 1 and select the desired height Ensure the holes align and re fit the hand knob Armrest Width At the back of the seat there are two hand knobs 1 Undo a few turns and set the armrests at the required width Re tighten the han...

Page 7: ... height remove the locking pin from the left hand support bracket Support the seat and gently pull out the right side spring locking pin and adjust to the required height Ensure the locking pins are fully re engaged before operating the powerchair Backrest angle Pull up on the backrest reclining lever left hand side of the seat and set the angle required by holding the backrest in the desired posi...

Page 8: ... your joystick controller VSI on and off Do not use this button to stop the power chair except in an emergency VSI Joystick Horn Button 4 This button operates your powerchair s horn This should only be used to warn others of your presence and not as a rebuke of any form Speed Decrease Button 5 This button decreases your maximum speed Speed Increase Button 6 This button increases your maximum speed...

Page 9: ...is indicates that the system is unlocked and ready for use Should the rubber boot gaitor on the joystick become damaged replace immediately Brake Release Freewheel Operation In the event of power failure or the need to move the powerchair without driving the electromagnetic brakes can be disengaged by operating the two yellow levers One is located at the rear right of the powerchair opposite and t...

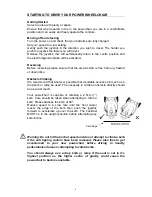
Page 10: ...er possible that a suitable access point such as a drop kerb or ramp be used The necessity to climb an obstacle directly should be as a last resort Your powerchair is capable of climbing a 2 5cm 1 kerb Care should be taken when attempting to climb a kerb Please address the kerb at 90º Reduce speed to a slow rate until the front castor meets the edge of the kerb then push the joystick forward to ac...

Page 11: ...ramp onto a main thoroughfare Reaching and Stretching Care must be taken when reaching and stretching for objects as this may affect the stability of the powerchair When attempting to reach for objects it is very important that the power is OFF Do not attempt to reach for objects on the floor by leaning forward or reaching between your knees Do not attempt to reach for high objects by moving to th...

Page 12: ...e armrests to make the seat easier to handle Step 2 Remove the footplate by removing the locking pin and simply pulling the footplate away from the frame Step 3 Remove the four seat support brackets after removing the locking pins Step 4 Remove the shroud by gently lifting it away from the retaining Velcro Step 5 There are two locking pins situated at the bottom of the frame behind the centre driv...

Page 13: ...d the weight of the user Your battery gauge is a guide only on the level of charge remaining in the batteries An active user can use 30 of the battery capacity or more per day An inactive user may only use 50 of the battery capacity in a week Battery Charger Charge the batteries completely 8 12 hours prior to first use Batteries supplied with your powerchair are specially designed for use on power...

Page 14: ...r information regarding your nearest recycling facility please contact your local authority MAINTENANCE Cleaning the Powerchair When cleaning the vehicle please pay attention to the following points Only use a damp cloth and gentle detergent Do not use any abrasive products Do not use a hose or pressure washing equipment Avoid water contact with any electrical components Note We advise the above m...

Page 15: ...arent reason please check that the circuit breaker has not tripped The circuit breaker is located at the rear left of the powerchair just under the seat Note Should the breaker continue to trip turn off the powerchair immediately and consult your dealer Fuses Inline fuses to the batteries protect any overload in the circuit 40A blade type fuses situated under the shroud on the main battery cable N...

Page 16: ...tally locked or is in sleep mode Further Information Safety Information Regarding Electromagnetic Interference EMI Scooters and powerchairs are designed to operate under certain conditions However radio waves or electromagnetic fields may affect the operation of the scooter The source of EMI could be radio or television transmitters or portable devices such as mobile phones portable CB radios auto...

Page 17: ... turns can create a situation where the product becomes unstable Therefore it is essential that the user pay attention the guidance set out in this manual For maximum stability the speed setting should be set up to 50 of the maximum available halfway between the tortoise and the hare or just entering the red sector on the speed indicator depending on the model The main factors affecting stability ...

Page 18: ...fficient room for two fingers to slide between your body and the belt Warning Should any damage occur to the lapbelt please replace immediately The user should transfer to a bespoke vehicle seat whilst being transported DO NOT sit in the powerchair whilst in any moving vehicle Driving in Pedestrian Areas When using the powerchair in pedestrian areas always lower your maximum speed to that of the p...

Page 19: ...Notes 18 ...
Page 20: ...e product will be repaired or replaced at the Companys discretion free of charge Any unauthorised modifications will invalidate the warranty Parts which are subjected to normal wear and tear accidental damage neglect or misuse are excluded from this warranty Normal wear and tear includes tyres chassis covers bulbs seat coverings etc Component parts replaced outside this period carry a six month wa...

Reviews: