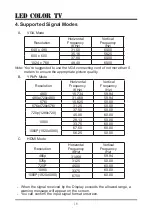
background image

8

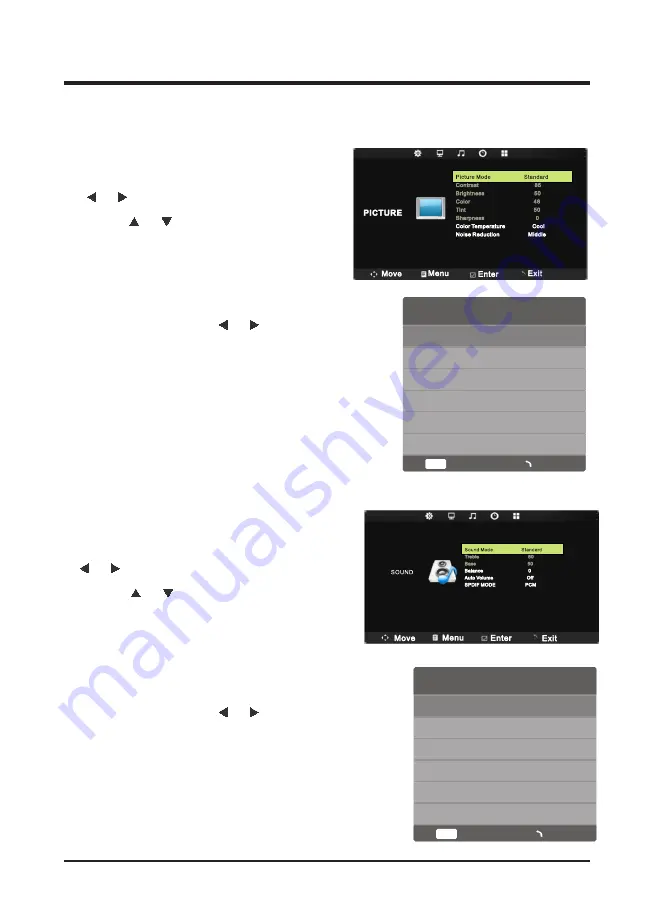
2.5.3 PICTURE Function

  Adjustment of the PICTURE.   

Press the 

Menu

 button, and then press


   or   button to the “

PICTURE

” item.

Press


 or   button to highlight the 

    “Picture Mode”, “Color Temperature”,

“Noise Reduction”

     item and then press 

ENTER

 button to 

     enter Sub-menu.

3

 In Sub-menu Press 

button to   

    adjust different setting.

Press the 

Menu

 button to return or exit.

2.5.4 SOUND Function

※ 

Adjustment of the SOUND 

Press the 

Menu

 button, and then press

     or   button to the “

SOUND

” item.

Press


 or   button to highlight the  

    “Sound Mode”,“Balance”,“Auto Volume”,

    “SPDIF MODE”,

     then press 

ENTER

 button to enter  

     Sub-menu.

3

 In Sub-menu Press 

button to 

    adjust different setting.

Press the 

Menu

 button to return or exit.


   or 


 or 

ENTER

Enter

Menu

Picture Mode

Dynamic

Standard

Mild

User

the setting.

In the “PICTURE”menu,select “Picture Mode” 

and then press 

ENTER

button to change

Standard

Music

Movie

Sports

User

ENTER

Enter

Menu

Sound Mode

the setting.

In the “SOUND”menu,select “Sound Mode” 

and then press 

ENTER

button to change

LE  D COLOR TV

Summary of Contents for STV-32LED5

Page 1: ...Operating Instruction Please read these instructions before operating your set and retain them for future reference LED COLOR TV RWWT00 E001 STV 32LED5 ...

Page 2: ...de blade or the third prong are provided for your safety If the provided plug does not fit into your outlet consult an electrician for replacement of the obsolete outlet 11 Protect the power cord from being walked on or pinched particularly at plugs convenience receptacles and the point where they exit from the apparatus 12 Only use attachments accessories specified by the manufacturer 13 Use only...

Page 3: ...or maintenance It might cause picture remnants to display electronic games and motionless picture of PC more than a period of time To avoid such effect please decrease the contrast and brightness when displaying motionless picture CAUTION Where the MAINS plug or an appliance coupler is used as the disconnect device the disconnect device shall remain readily operable CAUTION These servicing instruc...

Page 4: ...y using furniture that can safely support the television Ensuring the television is not overhanging the edge of the supporting furniture Not placing the television on tall furniture for example cupboards or bookcases without anchoring both the furniture and the television to a suitable support Not standing the televisions on cloth or other materials placed between the television and supporting fur...

Page 5: ... 3 Selection of Input Mode 5 2 4 Menu Option Adjustment 6 2 5 Menu Functions 7 2 5 3 PICTURE Function 7 2 5 4 SOUND Function 7 2 5 1 TIME Function 2 5 2 OPTION Function 8 8 2 5 5 CHANNEL Function 9 2 6 Screen Menu 10 2 7 Multimedia 11 2 7 1 MEDIA Function 2 7 2 USB Remote 12 2 7 3 USB Function 12 2 7 4 PHOTO 12 2 7 5 MUSIC 13 2 7 6 MOVIE 13 2 7 7 TEXT 14 3 Technical Specification 15 4 Supported Si...

Page 6: ... R03P AAA x 2 1 2 Installation of Stand 1 Place the TV with the front panel facing downwards on the soft cloth or soft pads on a desk 2 Please put the PVC sticker on the turning axle fristly 26 47 3 Insert the stand into the bottom socket of the TV 4 Insert the screws into the sockets and tighten them LE D COLOR TV ...

Page 7: ...m key 7 Program key 8 Volume key 9 Volume key 10 Source key 11 Standby key 12 Power plug input 14 USB 15 HDMI1 16 HDMI2 18 D SUB VGA input 24 Coaxial output 23 22 13 EARPHONE OUT 20 RF input 17 HDMI3 19 PC AUDIO input 22 YPbPr input 24 21 AV input 23 AV output 12 EARPHONE USB HDMI 1 HDMI 2 HDMI 3 D SUB VGA PC AUDIO RF IN VIDEO R L AV IN Y Pb Pr YPbPr IN VIDEO R L AV OUT COAXIAL ...

Page 8: ... Enter or exit menu 16 EXIT Exit menu or operation 17 key The menu item selection 18 ENTER Confirm or enter 19 S MODE Select the sound mode 20 Press one time to pause press twice to playback 22 P MODE Select the picture mode 23 ZOOM Zoom in or out the current picture Some pictrues or videos may not be operated 24 A B Setup repeat play segment 25 REPEAT Allows you to repeat single random shuffle an...

Page 9: ...ur TV in standby mode for a long period of time 2 3 Selection of Input Mode This set has different signal source modes you may continue to press the Source button to select a signal source 1 5 Installation of Batteries 1 Open the back lid of the remote control 2 Install two 7 AAA 1 5V batteries Ensure the correct polarity of the batteries 3 Cover the back lid Please take out of the batteries from ...

Page 10: ... include Menu Enter buttons Press the Menu button to open the OSD Menu then press button to select the pages The pages are displayed in the following sequence circular display 1 Press the Menu button to display the menu system 2 Press button to select the menu pages 3 Press and then press button to select an item 4 Press button to select or adjust a setting 5 If you do not make a selection within ...

Page 11: ...to the TIME item 2 Press or button to highlight the Sleep Timer Auto Sleep or OSD Time ENTER button to enter Sub menu 3 In Sub menu Press or button to adjust different setting 4 Press the Menu button to return or exit 2 5 Menu Functions Sleep Time off item and then press Blue Scteen Key Lock Reset or or Software Upday OSD Language English Aspect Ratio 16 9 Blue Screen On Key Lock Off Reset Softwar...

Page 12: ...1 Press the Menu button and then press or button to the SOUND item 2 Press or button to highlight the Sound Mode Balance Auto Volume SPDIF MODE then press ENTER button to enter Sub menu 3 In Sub menu Press button to adjust different setting 4 Press the Menu button to return or exit or or ENTER Enter Menu Picture Mode Dynamic Standard Mild User the setting In the PICTURE menu select Picture Mode an...

Page 13: ...NEL Auto Tuning ATV Manual Tuning Programme Edit ATV Manual Tuning Programme Edit MOVE MENU OK EXIT Programme E dit Channel Tuning TV 5Programme 44 433 75MHZ TV In the CHANNEL menu select ATV Manual Tuning and then press ENTER button to change the setting Current CH 1 Color System PAL Sound System DK Fime Tune 49 MHZ 75 AFC Off Search Menu ATV Manual Tuning Current CH Color system Sound System Fin...

Page 14: ...ss the button to set the channel to moving state then press to move it to the position you want to put Press the button to skip the select channel Your TV set will skip the channel automatically when using CH to view the channels Green Yellow Blue press to highlight the channel you want to delete or rename or move or skip then ress the button to delete the channel to select the word you want to ch...

Page 15: ...2 7 Multimedia 2 7 1 MEDIA Function B USB don t connect PC C Compatible USB devices The format is FAT or FAT32 D We cannot guarantee compatibility operation and or bus power with all USB mass storage devices and assumes no responsibility for any loss of data that may occur when connected to this unit Please update formats for all file types audio photo video ...

Page 16: ...t the PHOTO that you want press ENTER button to select playlist than press button to play C Press Display button to the media item D Press or button to highight the media and than press ENTER button USB2 0 PHOTO TEXT MOVIE MUSIC Play Prev Next Stop Repeat Music Playlist Info 1 Press one time to pause press twice to renew playback 2 Stop the playback and return to flelist 3 A B Setup repeat play se...

Page 17: ... media and than press ENTER button 2 7 6 MOVIE Play pause Fast Backward Fast Forward Previous Next Stop Repeat ALL MUTE Playlist Info Goto Time A Press or to select folder or file press ENTER button to enter next folder press RECALL to return previous folder B Press or to select the MOVIE that you want press ENTER button to select playlist than press button to play C Press Display button to the me...

Page 18: ...to select the TEXT that you want press ENTER button to select playlist than press button to play C Press Display button to the media item D Press or button to highight the media and than press ENTER button Prev Page Next Page Previous Next Stop Music Off Playlist Info Next Prev Stop Set A FF FB Pause 00 00 06 00 06 12 AB 00 00 06 00 06 12 Move Vi Next Stop Music Playlist Info Prev Pa Prev Next Pa ...

Page 19: ...ondensing Antenna Input F Type x 1 VGA D Sub 15 Pin Type x 1 HDMI Connector x 3 Y Pb Pr Input Terminals x 1 Video Input RCA Terminals x 2 Stereo Audio x 2 RCA x1 Phone J ack for VGA USB x 1 1 set of Audio Output Terminals RCA L R 1 set of Video output RCA Terminals 1 set of Coaxial Terminals STV 32LED5 32 60W 733x61x438 733x200x487 ...

Page 20: ...00 B YPbPr Mode C HDMI Mode Resolution Horizontal Frequency KHz Vertical Frequency Hz 480i 15 734 59 94 480p 720x480 31 468 59 94 576i 15 625 50 00 576p 720x576 31 25 50 00 720p 1280x720 37 50 50 00 45 00 60 00 1080i 28 13 50 00 33 75 60 00 1080P 1920x1080 67 50 60 00 56 25 50 00 Resolution Horizontal Frequency KHz Vertical Frequency Hz 640 x 480 31 50 60 00 800 x 600 35 16 56 25 37 90 60 00 1024 ...

Page 21: ...ck that there are no emission Car HV cable or Neon lamp or other possible interference sources Image colour or quality deteriorates Check that all the video settings are adjusted appropriately such as brightness contrast colour etc For more information about video settings refer to OSD Functions in Chapter 2 Screen position and size are incorrect Check that the screen position and size is adjusted...

Reviews: