background image

                                                                                                                                  Einstart

®

-C User Manual 


20 


Skip to 30 

33 


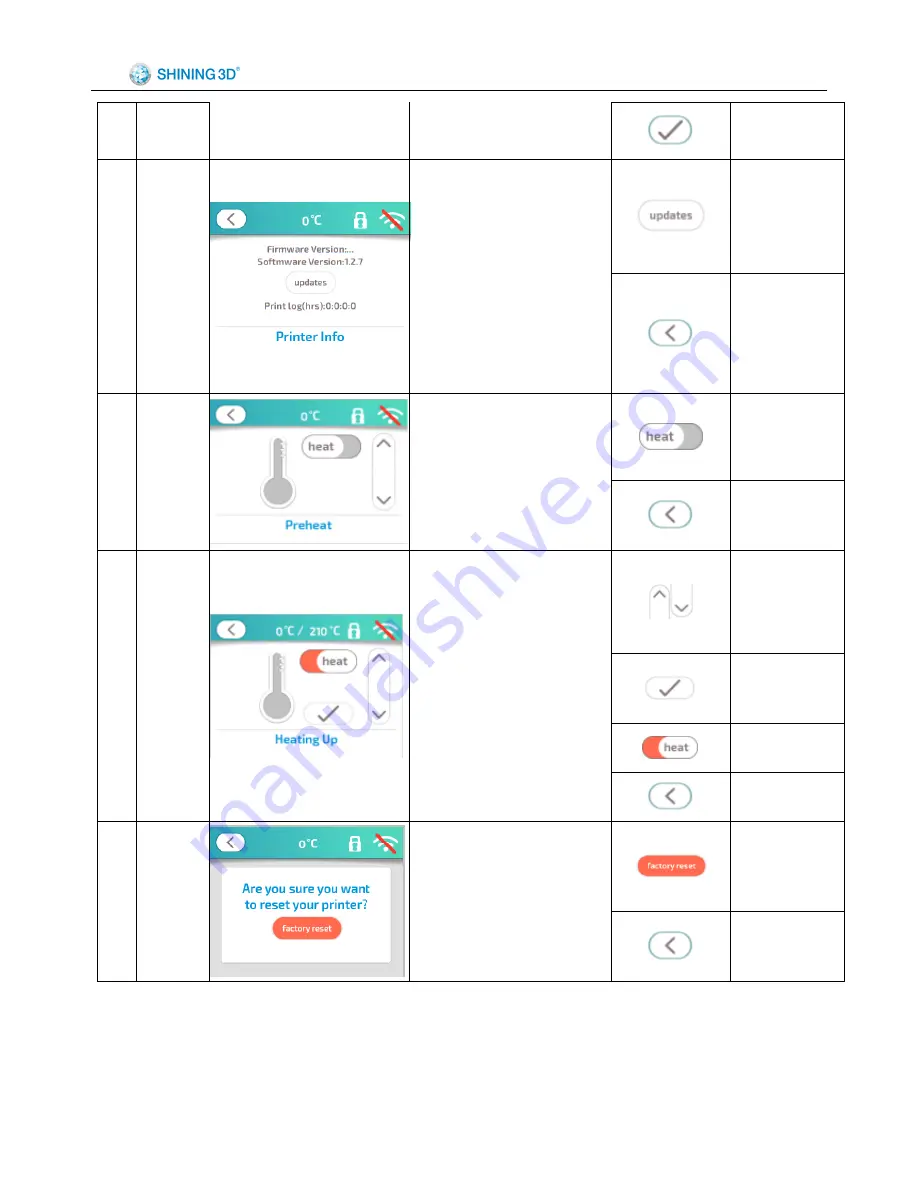
About 

Printer 


        Firmware/software 

version and total printing time. 


Skip to 8 


Skip to 30 

34  Preheat A 


  Allows user to preheat. 


Skip to 35 


Skip to 30 

35  Preheat B 


Preheat temperature 

setting. 


Change target 

temp 


Save target 

temp 


Stop preheat 


Skip to 34 

36 

Factory 

Reset 


  Allows user to reset the 

printer to default settings. 


Reset to factory 

setting 


Skip to 30 

Summary of Contents for einstart-c

Page 1: ...Einstart C User Manual Add NO 1398 XIANGBIN RD WENYAN XIAOSHAN HANGZHOU 311258 CHINA Website www shining3d com www 3dker cn Einstart C USER MANUAL HANGZHOU SHINING3D TECH CO LTD STOCK CODE 830978 ...

Page 2: ... Registration 3 4 Using the Printer 6 4 1 Slicing 6 4 2 Print 8 5 Software 9 5 1 A detailed look at the software interface 9 5 2 Software functions 10 5 3 Advanced Parameters 12 5 4 Introduction of LED Screen Button and Its Logic 13 6 3Dker Platform Website address http www 3dker com 22 6 1 Model Downloading 22 6 2 Software and Firmware Down loading 22 7 Maintenance 23 7 1 Printer Working Environm...

Page 3: ...justment 24 8 3 Model won t stick to the platform 24 8 4 Nozzle is surrounded by filament 24 8 5 3dStar software cannot connect to the 3D printer 25 8 6 Cannot read files on USB drive 25 8 7 The extruder is blocked forming thin strands during printing or the model is dislocated 25 8 8 Limit switch malfunction 25 8 9 USB drive cannot be detected 25 Appendix 26 ...

Page 4: ...y outside airflow which can affect print quality DO NOT touch the model print nozzle print bed and any other part inside the printer until fully cooled to room temperature Care must be taken during the removal of 3D printed parts Although considered safe the printer sends out small concentrations of vapor during printing therefore good ventilation is recommended 1 2 2 Protection Keep the printer a...

Page 5: ...e desired 3D model The design is built up layer upon layer with each successful layer turning solid to give a finished printed model that is sturdy and durable 2 1 Product Appearance Einstart C 2 2 Device parameters and accessories See Appendix 2 3 Sound illustration The printer uses sound effects to give the user an indication of processes that are occurring e g Printer start up filament loading ...

Page 6: ...k right of the printer 3 1 5 Turn On the Printer Once the power supply is connected press the switch on the right side of the printer to turn on The LCD screen display will indicate that the printer is turned on 3 1 6 Filament Load Remove the filament packaging and cut the end of the filament at an angle with pliers or scissors to create a pointed tip Place the filament reel on the filament holder...

Page 7: ...ware from our website Find the Setup exe and run it Click Next to enter the below interface and click I Agree after reading and accepting the 3DPRINT END USER LICENSE AGREEMENT Choose the installation path you want by clicking Browse and click Install Upon Agreeing the license clause click Install in the popup window Complete the installation process by Clicking Finish ...

Page 8: ... Manual 5 Note If you ve installed Microsoft Visual C 2013 just click Repair as below picture shows Install the FTDI CDM Drivers Click Extract and operate according to the guidance given until installation is complete ...

Page 9: ...USB drive provided 4 1 Slicing 4 1 1 For slicing open the 3dStar software and choose corresponding device model in setting Application For this printer you should choose E c 4 1 2 Choose the corresponding machine type For this printer you should choose E C Click the folder icon to open and load an stl file as the below picture demonstrates ...

Page 10: ...se To rotate around your model left click and drag To pan across your model right click and drag 4 1 4 Click the settings icon on the top right of the screen to make any necessary adjustments to your 3D model See charter 5 1 5 2 and 5 3 for detailed information on software and print settings Click the generator icon to generate path in gsd format once you have confirmed your settings ...

Page 11: ...ile on to USB flash drive Note When saving your file the file name should avoid special characters and contain English characters and numbers only 4 2 Print 4 2 1 For set up refer to section 3 1 4 2 2 Refer to the below steps for print operation For further detail on the LCD touch screen please refer to section 5 4 ...

Page 12: ...r loading successfully Model edit area View move rotate and scale up down the model Fast print setting In 3dStar users can conveniently load file generate path parameters will be the same as your previous print and print after generating only when printer is online Print parameter information Check and edit the slicing parameters in detail Model advanced edit switch Allows the user to switch displ...

Page 13: ...ent model as other position Exit Exit 3dStar 2 Menu Edit Select All Select all models Copy Copy selected model Paste Paste copied model Delete Delete selected model Layout Optimal layout for current model View View model from different views Move Move model from X Y or Z direction Rotate Rotate model around X Y or Z axis Scale Up Down Scale up or down the model 3 Menu Print Start Stop Print Start ...

Page 14: ...ne Machine Calibration Calibrate the machine Firmware Update Detect firmware update Manager for STL File Manage local STL file Manager for Machine Manage machine Manager for Material Manage material Path Viewer View the generated path Setting Settings for generator and machine Language Select language 5 Menu Help Version Check current software version About More information ...

Page 15: ...d to print failure or extruder blockage 5 3 1 1 Print Mode Simple 0 4mm layer thickness Fast 0 3mm layer thickness Standard 0 3mm layer thickness Quality 0 15mm layer thickness Extreme 0 1mm layer thickness 5 3 1 2 Support Null Support No support when generating path Outer Support Outer Support creates support where the support structure is printed directly on the raft or platform when printing wi...

Page 16: ...d raft by changing this factor It is a ratio related to layer thickness For example if layer thickness is 0 2 mm and peel off factor is 2 the distance between the model and raft is 0 4 mm Extruder Temperature Temperature the nozzle will reach when printing We suggest you set this value based on the requirement of the material used Print once generated Once the path is generated and the machine is ...

Page 17: ...ally Skip to 4 4 WIFI List A list of available WIFI is generated Scroll using the arrows and Refresh the list Skip to 11 5 Input WIFI Password Enter the password using the keyboard Skip to 6 or 7 Skip to 4 6 WIFI Connectio n succeeds WIFI is connected successfully Skip to 8 7 WIFI Connectio n fails WIFI connection has failed Skip to 5 ...

Page 18: ...uring updating restart will occur automatically if updates are successful Skip automatically Skip to 10 10 Welcome Page This is displayed once the printer is prepared and ready for use Click any area on the screen to skip to the home page Any area Skip to 11 11 HOME Page Home Page You can select any function button to enter its interface Skip to 12 Skip to 24 Skip to 29 12 Printing Selection Selec...

Page 19: ...rface will allow you to select a model from the USB drive to print Select any model in the list Skip to 16 Skip to 12 15 USB undetecte d If the USB drive is not plugged in or cannot be detected this will be displayed Skip to 12 16 Copying File Copying model file to the device Finish copying Skip to 13 Skip to 14 17 Leveling print bed After printing has begun this display can be seen Skip automatic...

Page 20: ...ed Error If an error occurs during bed auto leveling this display will be seen Skip to 17 22 Printing Printing in process Pause current printing Skip to 23 Stop current printing Skip to 23 23 Stop current printing confirmation Skip to 11 Skip to 22 24 Printing Paused Printing Paused display Various printing processes can be managed at this stage Skip to 25 Skip to 12 Skip to 22 ...

Page 21: ...automatically Skip to 27 or 28 Skip to 25 27 Filament loading When the print head reaches loading temperature this display indicates that you can insert filament Skip to 25 28 Filament Unloading When the print head reaches unloading temperature this display indicates that the Printer is reversing filament Skip automatically Skip to 29 29 Ready to unload Follow screen prompts for loading of filamen...

Page 22: ...to 33 Skip to 34 Skip to 36 Skip to 37 Currently Nonfictional Mute or not Unlock door Currently Nonfictional Skip to last page or 11 To next page 31 Motor Control Control the axial motor XYZ motor control buttons Control motor Skip to 30 32 Print head Offset Change the print head offset Increase or decrease offset ...

Page 23: ...ting time Skip to 8 Skip to 30 34 Preheat A Allows user to preheat Skip to 35 Skip to 30 35 Preheat B Preheat temperature setting Change target temp Save target temp Stop preheat Skip to 34 36 Factory Reset Allows user to reset the printer to default settings Reset to factory setting Skip to 30 ...

Page 24: ...Einstart C User Manual 21 37 Touch screen locate Relocate touch screen area Skip automatically Skip to 10 ...

Page 25: ... 3Dker platform where you can find and download 3D model data designed by other users or designers 6 2 Software and Firmware Down loading Click Tools in the top menu to enter downloading page and select 3D printer Scroll down the page and download the newest software firmware and user manual on the below page ...

Page 26: ...e Filament Filament should be changed when there is around 20 cm filament left or before using the unload command 7 4 Loading Filament Make sure the print head reaches loading temperature before inserting filament The tip of the filament should be straight and sharp 7 5 STL File 3Dstar slicing software supports STL format only 7 6 Set the Print Bed The print bed should be orientated and set correc...

Page 27: ...eds to be adjusted Refer to section 5 3 4 8 3 Model won t stick to the platform Problem The edges of the model are warped or are becoming unstuck when printing Solution Apply a thin layer of glue stick evenly on the platform It is also worth considering a reduction in strip rate or an increase in nozzle temperature 5 10 Strip rate ranges from 1 8 to 2 6 a lower strip rate generally results in bett...

Page 28: ...e filament and check whether the nozzle is blocked 2 Load filament again 3 Shut down the printer and check whether the X axis and Y axis move normally 4 Attempt to print the model again to determine if there are further problems Reason 1 Poor quality filament may cause the extruder to become blocked 2 The nozzle is knocking in to the model causing dislocation 3 The nozzle is blocked 4 The temperat...

Page 29: ...26 Appendix 1 List of Product and Accessories Einstart C Einstart C 3d Printer 1 unit Power Supply Output 19V 4 95A 1 PCS USB cable 1 PCS Bowden tube 1 PCS 3D printing Material 2 reels Print bed 1 PCS USB flash drive 4G 1 PCS ...

Page 30: ...Einstart C User Manual 27 Scraper 1 PCS User manual 1 PCS Handy tool 1 PCS ...

Page 31: ...Einstart C User Manual 28 2 Parameter of the Printer ...

Page 32: ...r more of the following measures Reorient or relocate the receiving antenna Increase the separation between the equipment and receiver Connect the equipment into an outlet on a circuit different from that to which the receiver is connected Consult the dealer or an experienced radio TV technician for help This device complies with Part 15 of the FCC Rules Operation is subject to the following two c...

Page 33: ...rinter department 3Dker Hangzhou Shining3D Tech Co Ltd Add NO 1398 XIANGBIN RD WENYAN XIAOSHAN HANGZHOU 311258 P R CHINA Zip code 311258 Working time 8 30 17 30 Tel 0571 83821911 Tax 0571 82999510 Technical support QQ 1984522360 Skype shining_support e mail aftersales shining3d com Website http www shining3d com ...

Page 34: ...ou Shining 3D Tech Co Ltd Disclaimer This user manual is an instruction for installation operation and maintenance but not product warranty All efforts have been made to ensure the accuracy and completeness of the information in this manual However Shining 3D Tech Co Ltd accepts no responsibility for any errors or omissions contained in the documentation and reserves the right to explain and revis...

Reviews: