background image

Starting 
 

This chapter explains you basic functions of STM-7100. 


When you turn on the unit, basic screen will be displayed. 

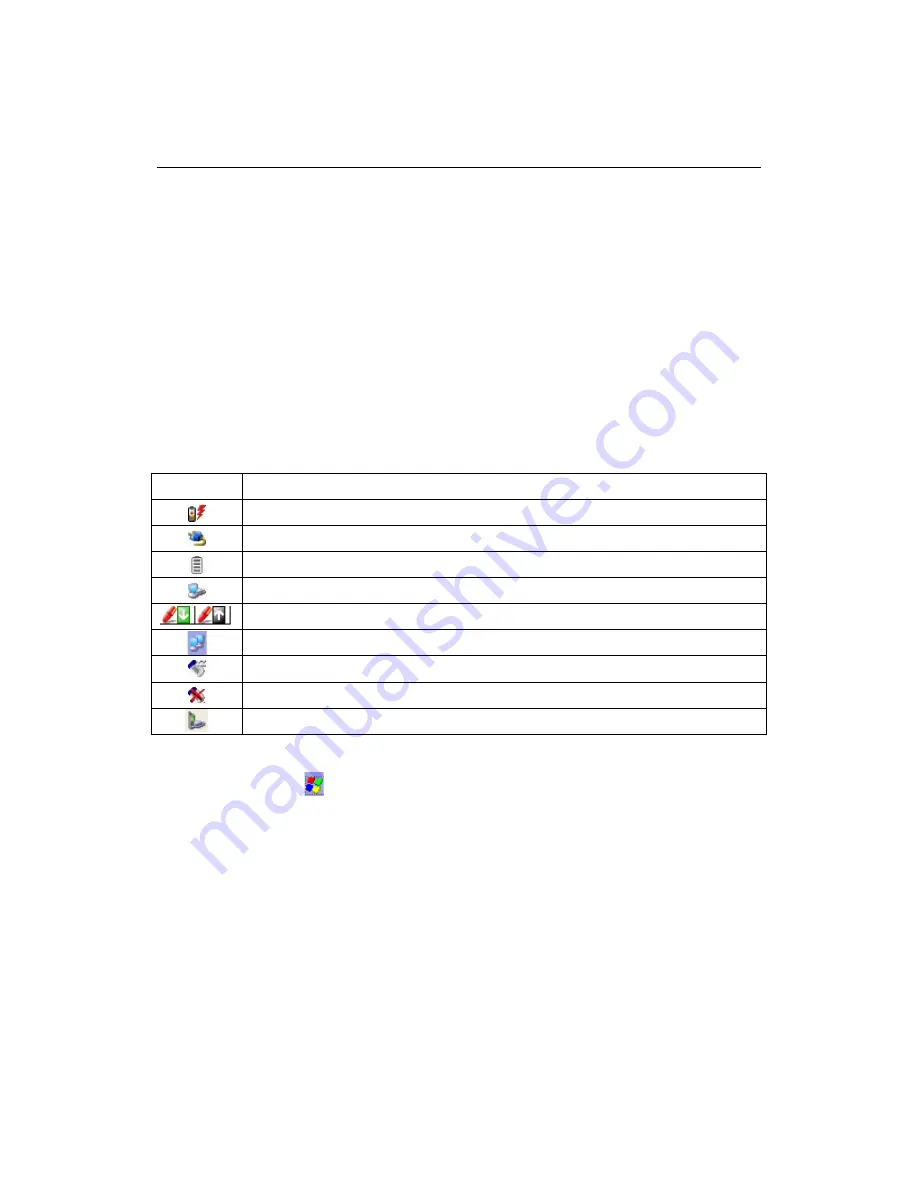
Functions of Icons in the basic screen are explained as bellows. 

You need to install the ActiveSync program for connecting this unit to the Computers. 

Please refer the “Connect to the PC” pages for installation and how to use of ActiveSync. 


 Screen Icon 


Like PC Windows, you can see the Task bar on the lower part of the main screen. 


Icon 

Description 


Battery is charging 


Battery is full (connect to the AC power) 


Remaining battery status 


Connecting to the PC (ActiveSync) 


Show/ Hide the input panel 


Wireless LAN status( On/Off)   


Wireless LAN Off 


Wireless LAN is On, but not connected to the AP 


Network connection status 


 Access the Program 


    Tab the “Start” button. 

    You  can access the program with selecting the program on “Start” menu or main screen. Also 

you can use the file explorer. 


- 13 - 

Summary of Contents for STM-7100

Page 1: ...S ST TM M 7 71 10 00 0 U Us se er r G Gu ui id de e Shinheung Precision Co Ltd 1...

Page 2: ...g Precision Company This User Guide is basically available for those who are familiar with Windows OS You can refer to your PC manual or User guide for further information on PC operation Programs inc...

Page 3: ...ot use in the pool bathroom or where are wet And do not deal with it with wet hands not to be get electric shock 9 Do not leave your product in hot or cold places such as in a car Direct rays of the s...

Page 4: ...lation 19 Driver Installation 20 Synchronize the terminal and PC with ActiveSync 22 Synchronize the data 24 4 Shell and File Explorer 28 Shell 28 File Explorer 30 5 Device setting and Optimizing 32 Da...

Page 5: ...ActiveSync 45 Reset 46 Fundamental Problems 46 Appendix A Additional Information 49 Usage and maintenance 49 Device Handling 49 Specification 50 5...

Page 6: ...1 Basic Unit 8 Parts Name 8 Using the Stylus 11 Reset 12 6...

Page 7: ...Introduction This chapter explains you each parts of STM 7100 Parts Name Please find each parts name of STM 7100 Front Side LCD Display Printer Cap IC Card Hole MSR Power LED Keypad 7...

Page 8: ...MSR UP Button Down Button Battery Cap Left Side Right Side Feed Button Scanner Button Paper check Window Paper Open Button 8...

Page 9: ...Hand strap Holder Battery Cover Battery Locker Speaker Camera Scanner DC Connector 24Pin Connector USB port Headset Jack Bottom Side Top side 9...

Page 10: ...elect the action that you want Notice Please use the provided stylus If you use other materials instead of the provided stylus it may cause the serious damage to the unit Pop up Menu You can select th...

Page 11: ...ction Before HARD RESET you should try RESET to recover your device Do not try HARD RESET indiscreetly HARD RESET does not delete files and documents in FileBox folder Back up important data to FileBo...

Page 12: ...2 Getting started 14 Status Icon 14 Running Programs 14 Switching Programs 15 Text input with input panel 16 Using WLAN 17 12...

Page 13: ...of ActiveSync Screen Icon Like PC Windows you can see the Task bar on the lower part of the main screen Icon Description Battery is charging Battery is full connect to the AC power Remaining battery s...

Page 14: ...the programs menu When you select the programs that you want to switch the selected program comes to the front Number Description Start button Start Menu Current running program display Connection to...

Page 15: ...Text input with Input panel To input the information on the certain application you can use the input panel You can input the text via Keyboard or writing If you tab the arrow besides of input panel y...

Page 16: ...input panel Input the Key with stylus on the Keyboard How to use WLAN From the Start menu run Internet Connector to connect with network through WLAN Then you can use internet explorer to browse the i...

Page 17: ...nnect to the PC 19 ActiveSync installation and partnership establishment 19 ActiveSync Installation 19 Driver Installation 20 Synchronize the terminal and PC with ActiveSync 22 Synchronize the data 24...

Page 18: ...tes both devices with the most recent information To establish a partnership with a PC you need to install Microsoft ActiveSync on your PC You can download ActiveSync at www microsoft com korea Active...

Page 19: ...to the PC We will start the drive installation Driver Installation After you connect this unit to the PC Select List or specific location installation and click Next on the New H W explorer Wizard Sel...

Page 20: ...Click Next If you click Finish driver installation will be finished Once you finish installing drivers it is ready to synchronize the unit and PC via ActivSync 20...

Page 21: ...creen Click Next Set up the partnership screen select Yes and click Next Next screen is for setting up how many PC you want to set the partnership If you want one computer please select Yes If not sel...

Page 22: ...Establish a partnership is finished Click Finish 22...

Page 23: ...or Favorites of Explorer Inbox and Notes with PC To synchronize the Microsoft Outlook data you need ActiveSync 4 5 version or later version You can select the information that you want to synchronize...

Page 24: ...reen Notice Don t remove the USB cable or run other process during Backup process Restore Notice Before the Restore work please Backup or move the new generated backup files and programs to the PC or...

Page 25: ...atically cab Download the programs or insert the program CD to the PC Connect the unit to the PC Copy the cab file and paste to the My documents Programs Files folder on the Mobile Device windows whic...

Page 26: ...4 Shell and File Explorer 28 Shell 28 File Explorer 30 26...

Page 27: ...and File Explorer Shell Main Screen Main screen has same as Desktop PC Task Bar Start show Hide start menu No Indication Start Button Start Menu Running Program Status Icon Keyboard Switch Program me...

Page 28: ...m Favorites Saved user selected favorites Documents Files in the My Documents Setting Setting for STM7100 Run Program running Switch Program Showing current running program and you can select the prog...

Page 29: ...application status You can see button on the left side if the number of icons are over the limited number If you click this button you can see the icons that are not showing 2 File Explorer File Explo...

Page 30: ...work Setting and Dial up connection 33 Display 33 Brightness 34 Volume and sound 34 Scanner setting 34 Stylus 35 System Property 36 Storage management 37 Power Property 40 Printer Setting 41 MSR Setti...

Page 31: ...Device setting and Optimizing Let s check the control panel Date Network setting and Dial up Connection IP Setting for WLAN 31...

Page 32: ...Connecting through Serial ports Display Wall paper Back light control can change it manually can adjust Backlight option Brightness 32...

Page 33: ...Volume Sound Change Configuration save Can change setting of sounds to hear selected sound Scanner Can test scanner and fix option for Test 33...

Page 34: ...Stylus When stylus does not operate correctly you can tap Re Align to revise the coordinates System Property 34...

Page 35: ...Basic system information Storage memory Program memory setting 35...

Page 36: ...Storage management Storage management SD MMC formatting Format Storage Filebox Micro SD formatting WARRNING When the user format the system all of users data is to removed To Divide FileBox 36...

Page 37: ...37...

Page 38: ...Option is needless to change Tap Start to start formating Check Quick format to format quickly 38...

Page 39: ...Tap Mount Otherwise you cannot see it in File explorer Power Property Can see charging Battery status and Choosing Sleep conditions 39...

Page 40: ...Printer Setting Test Program to check printer status 40...

Page 41: ...MSR Property Card Reader Test Process Read the magnetic stripe of a card to the end of it Any direction is OK The result will be shown each track data WLAN Power On Off 41...

Page 42: ...e needless files and programs to Web folder Files in the folder do not use storage memory Buy additional Micro SD Card and move files to a Micro SD Card Delete unnecessary files Delete temporary inter...

Page 43: ...is a small and removable flash memory that allows you to store more data You can back up important data and transfer big sized data to other devices Micro SD Card is available in many electronic prod...

Page 44: ...6 Trouble Shooting 45 ActiveSync 45 Reset 46 Fundamental Problems 46 Appendix A Additional Information 49 Usage and maintenance 49 Device Handling 49 Specification 50 44...

Page 45: ...ether it is installed actual ActiveSync version on your PC Check the power is on Check the device is connected to PC with a USB cable in USB port Set USB connection as following Microsoft ActiveSync F...

Page 46: ...tializing Hard Reset When you initialize your device it returns to the status when it was purchased Notice When you initialize your device all data stored in the memory is deleted Your device s initia...

Page 47: ...ing power battery set idling condition For more detail see chapter 8 Device setting and optimizing Q3 The power was suddenly cut off The built in battery is exhausted Please charge the battery If not...

Page 48: ...Q5 I want to check data in Micro SD card Open File Explorer and mount Micro SD card Then Storage Card folder is formed For more detail see chapter 2 File Explorer 48...

Page 49: ...cleaning turn off the device Utilize soft dry cloth with conventional window cleaning liquid to clean Do not directly spray the cleaning liquid over the touch screen Miscellaneous When device is on fo...

Page 50: ...leaving the device inside the automobile during hot summer period The device has rechargeable Lithium Ion battery Exposed under hot temperature may damage even cause explosion or shortened the battery...

Page 51: ...Communications 802 11b g WLAN CDMA Data only MSR Track 1 2 3 support multi direction Printer 2 inch Thermal Printer built in Expansion Micro SD card slot for Memory expansion I O USB Serial Speaker S...

Page 52: ...istance of 0 cm must be maintained between the user s body and the back of the device Third party belt clips holsters and similar accessories containing metallic components may not be used Body worn a...

Page 53: ......

Reviews: