background image


Shenzhen Konvision Technology Co,.Ltd      www.konvision.com 


29

G.


Status 

Menu item 

Description 

Source & Format 

The current window’s input signal source and resolution 

Fh 

H frequency of the current window’s input signal   

Fv 

V frequency of the current window’s input signal 

Color Temp 

Current Color Temperature 

Image Size 

Current selected image size 

Scan Mode 

Current scan mode 

CTI 

Color Transient Improvement mode status 

Screen Saver 

System screen saver mode status 

Power Saving 

System power saving mode status 

 
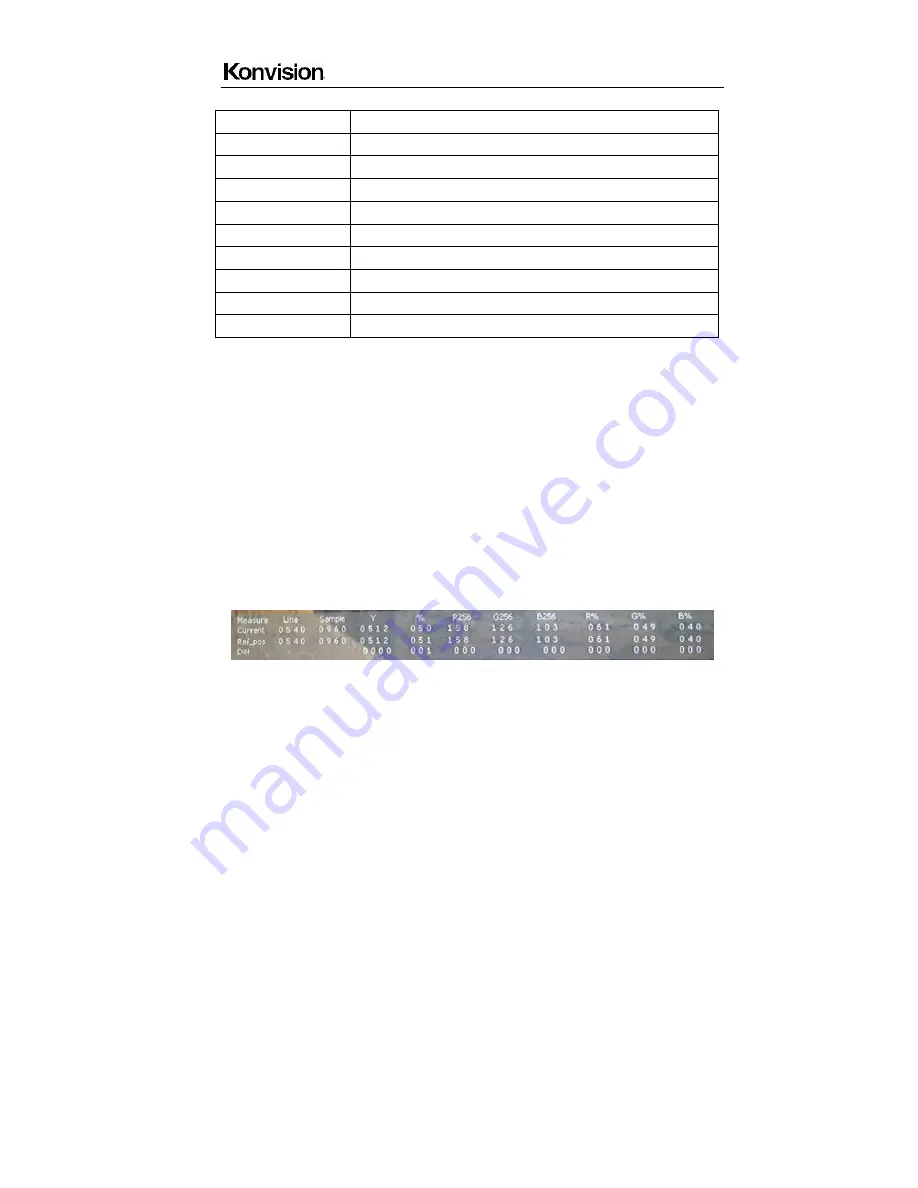
Pixel Measure operating instructions: 

Press MENU button, enter into menu items, rotate VOLUME knob to Scope item, and 

then rotate IMAGEADJ knob to select Pixel Measure, active the pixel measure function, 

rotating VOLUME knob (left/right) and/or IMAGEADJ knob(up/down) can move the large 

cross, to measure any pixel position and RGB value. 

This function can be used for comparison of any two pixels: enter into Pixel Measure 

function. Rotating VOLUME knob (left/right) and/or IMAGEADJ knob (up/down) can move 

the large cross to the first pixel, press VOLUME knob or IMAGEADJ knob to mark first 

pixel with a small cross, and then rotate VOLUME knob (left/right) and/or IMAGEADJ 

knob (up/down), it will appear a large cross, move it to the second pixel you want to 

compare, it will display difference between the current pixel and the former marked pixel. 


Measure: measurement 

Current: current pixel 

Ref-pos: former marked pixel 

Diff: difference between the current pixel and former marked pixel 

Summary of Contents for KVM-7050W

Page 1: ...KVM 7050W KVM 9050W KVM 7050W 2 KVM 9050W 2 LCD Monitors USER MANUAL Shenzhen Konvision Technology Co Ltd http www konvision com...

Page 2: ...ce 4 Installation 5 Rack mount installation 5 Transportation 5 Features 6 Parts and Their functions 9 Front view 9 Rear view 14 OSD Menu 16 Menu Structure 16 Menu Operation 18 Menu Item Description 18...

Page 3: ...ease do not place vessels with liquid such as cups beverage bottles on the monitor 5 Please do not place this product in high heat places 6 Please make sure the earth terminal is good in order to avoi...

Page 4: ...n hard Do not wipe the screen with solvents such as alcohol thinner or gasoline Do not spray detergent or other cleaners on the monitor or LCD panel as it may cause fault because of water droplets int...

Page 5: ...r circulation or install an external electric fan Please follow the instructions and install with the rack mounts provided by manufacturer Transportation This monitor is precise equipment and need pro...

Page 6: ...le to show intermittent 4 Screen and cabinet will become warm gradually during operating Features High resolution LCD panel LED backlight and high resolution High contrast high speed response and wide...

Page 7: ...put through this connector YPbPr Input YPbPr video signal Compatible YCbCr can be input through this connector HDMI Input HDMI signal can be input through this connector Signal Source Loop through Sig...

Page 8: ...meraman to control the illumination to avoid overexposure Vector scope Vector UV analysis for color bar signal input Pixel Measure User can measure any pixel s specific position and RGB value also can...

Page 9: ...Zoom in any part of the picture to watch picture details more clearly and assist for focus Remote Control Function Available to connect to the remote terminal to operate the equipment directly select...

Page 10: ...Shenzhen Konvision Technology Co Ltd www konvision com 10 KVM 9050W front view KVM 7050W 2 front view...

Page 11: ...r supply with electricity the indicator light is red Press this POWER button to power on the monitor and the indicator light turns blue Press this button again to turn off the monitor 3 MENU Button Pr...

Page 12: ...f the green box after you select the position you want to zoom in press VOLUME knob or IMAGEADJ knob it will zoom in and display full screen If under Part Zoom In status press VOLUME knob or IMAGEADJ...

Page 13: ...ume turn the knob to adjust speaker volume HD Volume turn the knob to adjust headphone volume 10 IMAGE ADJ Knob In OSD menu turn this knob for Up and Down operation Press this knob for shortcut functi...

Page 14: ...Shenzhen Konvision Technology Co Ltd www konvision com 14 B Rear View KVM 7050W rear view KVM 9050W rear view...

Page 15: ...bPr Y input Composite video in and Y input of YPbPr component signal 5 YC Y Pb input Y input of YC signal and Pb input of YPbPr signal 6 YC C Pr input C input of YC signal and Pr signal of YPbPr signa...

Page 16: ...rpness Colour Hue Colour Temp Img Adj Image Size Scan Mode DVI YUV Color Space only for HDMI signal CTI Color Transient Improvement Ntsc 7 5IRE only for video signal Gray Mode Blue Mode Fast Mode H V...

Page 17: ...l Meter only for SDI signal Audio Out Channel only for SDI signal Audio Display Mode only for SDI signal PIP PBP Layout Main Window Source Second Window Source for PIP PBP PIP Size only for PIP PIP Po...

Page 18: ...h on the monitor Press the Menu button the main menu will be displayed on the screen and press the MENU button again to exit the menu 2 In the main menu turn the VOLUME knob to select different items...

Page 19: ...r user definition Brightness 0 100 Brightness Adjustment Contrast 0 100 Contrast Adjustment Sharpness 0 15 Sharpness Adjustment Colour 0 100 Saturation Adjustment Hue 0 100 Color Adjustment Colour Tem...

Page 20: ...spect ratio DSLR Full screen for Canon 5D II via HDMI input Scan Mode 100 Scan Over Scan 5 Under Scan 5 100 Image display 95 Image display 105 image display DVI YUV Color Space ON OFF DVI input signal...

Page 21: ...paque to completely transparent selection Menu disappear time when no button operation Marker setting Marker Enable ON OFF All markers on All markers off Marker Select OFF 4 3 16 9 15 9 14 9 13 9 1 85...

Page 22: ...background beyond marker Background beyond marker filled up with grey Fill up with black Background beyond marker transparent Part Zoom in Right Enter PIP Part Zoom in Zoom in any part of the picture...

Page 23: ...o Menu item Setting Description Volume 0 100 Speaker volume adjustment Headphone Volume 0 100 Headphone volume adjustment Audio Level Meter only for SDI signal ON OFF Turn on off audio level meter dis...

Page 24: ...ignals except SDI The two pictures should be different signal formats Main Window Source Video S Video YPbPr SDI1 SDI2 HDMI VGA Main Window select signal input among Video S Video YPbPr SDI1 SDI2 HDMI...

Page 25: ...is adjustable by user When the user select this option it will automatically pop up at the following H position and V position menu items H Position this item shows when PIP position select Custom 0...

Page 26: ...alue from 000 127 It can be used for multidevice cascading set different UMD ID for different devices In remote control situation this function can be used for distinguishing different devices so as t...

Page 27: ...save successfully when press MENU otherwise it will not save UMD Second Window Char this item shows in PIP PBP mode xxxxxxxx Setting is same as UMD Main Window Char F Scope only for SDI signal Wavefor...

Page 28: ...le 100 75 Vector 100 display Vector zoom out to 75 display Zebra ON OFF Turn on off zebra Zebra Level 84 100 Zebra level can be set at any percentage between 84 100 it will alarm when measured luminan...

Page 29: ...EADJ knob to select Pixel Measure active the pixel measure function rotating VOLUME knob left right and or IMAGEADJ knob up down can move the large cross to measure any pixel position and RGB value Th...

Page 30: ...preset Please try to reset the monitor when the following situations occur 1 The monitor parameters are adjusted incorrect by user 2 The monitor picture or sound is abnormal and not due to hardware p...

Page 31: ...ription BE EF 01 05 00 D1 FA 01 02 00 00 00 1E BE EF 01 04 00 37 3D 01 02 00 01 Return value is correct the communication setup is normal Two methods of controlling tally indicator 1 Connect the monit...

Page 32: ...Shenzhen Konvision Technology Co Ltd www konvision com 32...

Page 33: ...rts Repairer User Signature Name Qty This warranty card should be filled in immediately when purchasing Please keep a proper record of this warranty card As the continuous improvement of the products...

Reviews: