background image

20 


until the cutter move to the drum outside. Turn off the drum/rotor switch and 
spindle motor switch. 
21. Spindle feed speed should be adjusted by feed timing potentiometer. High 
speed used to roughing cut, low speed used to finish cut. 

NOTE:

 Refer to rotor diameter to find spindle speed and feed speed. Large 

diameter, you should select low speed; small diameter, you should select high 
speed. 

“Some experimentation may be required for optimum surface 

finish.”


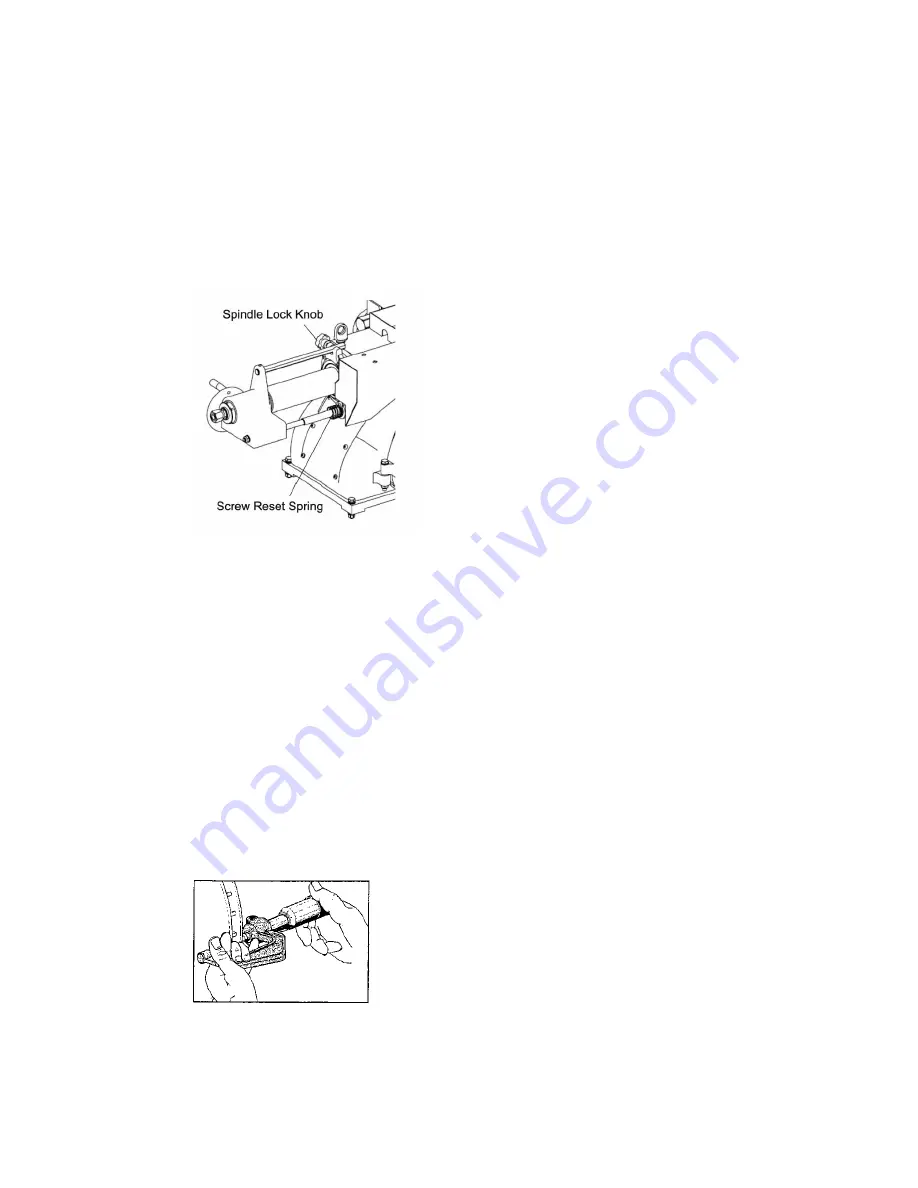
22. When moving to the terminal 
position, nut separate from the screw, 
you should turn off the power switch, 
turn the spindle feed handwheel 
clockwise, so the screw and the nut 
can mesh each other again. Screw 
reset spring can do it, you can see 
fig.18. 

Fig18 

Reconditioning Disc Brake Rotors 

Preparation 

1.  Inspect the rotor carefully for scoring, rust ridges (at the inner and outer 
circumference of the rotor), and hard spots. Any excessive wear or deformity 
should be noted and if not within acceptable limits, the rotor should be 
replaced. 
2.  Use a micrometer to check the thickness of the rotor at no less than 3 
points around the circumference about 1" (2.54mm) in form the outer diameter. 

If the rotor thickness varies between readings, it should be reconditioned. 

However, if the thickness is less than the minimum established by the 
manufacturer, or if will be less after reconditioning, the rotor should be 
replaced. 

Note:

 Most often the discard thickness dimension is cast or stamped into the 

rotor, not the minimum machine to thickness. 


Figure 19 – Measure rotor thickness 


Summary of Contents for C9350C

Page 1: ...perating Instructions Safety Instructions Maintenance Instructions READ these instructions before placing unit in service KEEP these and other materials delivered with the unit in a binder near the machine for ease of reference by supervisors and operators SHENYANG 245 FACTORY ...

Page 2: ... 6 Before You Begin Receiving 8 Electrical Requirements 9 Installation 9 Operating Specifications 11 Principle Operating parts 12 Arbor Installation 12 Chang and Choose Arbor 13 Adapters 13 Basic operation Spindle 14 Control and Operating 14 Spindle Speed 14 Spindle Speed Adjustment 14 Cross Feed 15 V belt Tension and Adjustments 15 Basic Operation of Handwheels 16 ...

Page 3: ...ross Feed Extension Installation Instructions 25 Maintenance and Service Oiling 26 Cleaning 27 Care of Arbors and Adapters 27 Important Information Regarding Operation Safety and Eye and Face Protection 28 Definitions of Hazard Levels Identify the hazard levels used in this manual with the following definitions and signal words DANGER Watch for this symbol DANGER It Means Immediate hazards which w...

Page 4: ...d make sure installation conforms to all applicable Local Country s Law Regulations and Electrical Codes 2 Carefully check the unit for correct initial function 3 Read and follow the safety instructions Keep them readily available for machine operators 4 Make certain all operators are properly trained know how to safety and correctly operate the unit and are properly supervised 5 Allow unit to be ...

Page 5: ...the safety notices and decals included here and on the unit Read entire manual before installing operating or servicing this equipment Proper maintenance and inspection is necessary for safe operation Do not operate a damaged lathe Warning This equipment incorporates parts such as snap switches and power receptacles which tend to produce arcs or sparks Therefore when located in ...

Page 6: ... secure 4 Do not wear loose clothing jewelry or gloves when operating or working around a lathe 5 Do not overload the lathe Read and understand the lathe specifications Overloading is poor machine tool practice shortens the life of the lathe and could cause a failure resulting in personal injury Failure to follow danger warning and caution instructions may lead to serious personal injury or death ...

Page 7: ...Don t force a tool or an attachment to do a job for which it was not designed 9 Dress properly Keep loose clothing gloves neckties shop rags or jewelry may get caught in moving parts Non slip footwear is recommended Wear protective hair covering to contain long hair 10 Wear eye protection Safety glasses goggles or a face shield will help protect the operator from injury Use a face shield and dust ...

Page 8: ...ed the work into a blade or cutter and against the direction of rotation Cutters and tool bits are designed to cut from the inside of a drum or rotor to the outer edge do not attempt to cut from the outside edge in to the center 20 Never leave tools running unattended Turn the power off Don t leave the tool until it comes to a complete stop 21 Never use compressed air to blow the tool clean Chips ...

Page 9: ...t in tracing lost shipments Our willingness to assist in every possible manner does not make us responsible for collection of claims or replacement of lost or damaged materials Shipping damage claims will not be handled under warranty Electrical Requirements The lathe must be properly grounded to protect the operator from shock The lathe is equipped with an approved 3 conductor cord and a 3 prong ...

Page 10: ...ch the correct mark on the dipstick Use only EP 80 90 gear oil Oil level should be checked often Figure 2 Check oil level 8 Clear the area and turn lathe on Check for proper operation motor and spindle rotation Preparation for Use 1 Inspect all adapters and accessories for burrs nicks or other damage 2 Clean accessories with a vaporizing solvent 3 Apply a light film of oil to all adapters to prote...

Page 11: ...dle travel 6 7 8 175 mm C9350C 9 875 251 mm C9370C Spindle speed Inner Groove 70 RPM Middle Groove 88 RPM Outer Groove 118 RPM Spindle feed speed Infinitely variable 0 0 023 r 0 0 6mm r Cross travel 3 74 inch 95mm C9350C 5 9 inch 150mm C9370C Cross feed speed Infinitely variable 0 0 015 r 0 0 4mm r Maximum brake rotor diameter 7 17 178 432 mm C9350C 7 18 178 457 mm C9370C Cross Feed Extension lath...

Page 12: ... Screw GB85 M8x25 12 Stud 13 Shield 14 Screw Plug 15 T ool Box 16 Cover 17 Control Box 18 Eye Bolt 19 Portrait Motor Cover 20 Spindle Assembly 21 Portrait Gear Box 22 Belt Cover 23 Body 24 BackCoverBoard Arbor Installation The 1 arbor shipped with the lathe has been carefully matched to the lathe during final assembly and testing Witness marks have been etched onto the arbor and the spindle for pr...

Page 13: ...ign on arbor near spindle 5 If radial flop 0 001 inch loose drawbar round 1 8 arbor and lock drawbar 6 Check radial flop once more 7 If radial flop 0 001 inch do 5 and 6 until radial flop 0 001 inch then mark a sign Adapters Important Although the adapters arbor and spindle are made of top grade steel and are turned hardened and precision ground to close tolerances great care should be taken in th...

Page 14: ... is shut off When switched ON the spindle motor starts The spindle will begin to rotate Disc Drum Switch Item 2 Figure 5 This switch is a three position select switch When the left side of this switch is depressed power is supplied to the Disc feed motor When the right side of the switch is depressed power is supplied to the Drum feed motor When the switch is in the neutral position centered power...

Page 15: ...d spindle speed and feed speed Large diameter you should select low speed small diameter you should select high speed Some experimentation may be required for optimum surface finish V Belt Tension and Adjustment A loose belt can cause slippage when taking heavy cuts A belt that is too tight can cause vibration and possible sub standard finishes on machined drums and rotors Check and adjust belt mo...

Page 16: ...lockwise rotation of the spindle feed handwheel extends the spindle out away from the lathe Counterclockwise rotation of the cross fee handwheel moves the cutting tool out away from the lathe Figure 10 Counterclockwise rotation of handwheels Reconditioning Brake drums Preparation 1 Measure the diameter of the brake drum with a brake drum micrometer Figure 11 Measure drum diameter 2 Determine if th...

Page 17: ...cer band snugly around the drum Be sure it covers up to the right hand edge Figure 12 Attach silencer band 4 Position the cross slide and spindle by turning the cross feed handwheel to maximum clockwise position Then back off the cross feed handwheel 2 complete turns 5 Position the boring bar by loosening the boring bar clamp nut and sliding the boring bar inward toward the drum until the tool bit...

Page 18: ... Large Double Taper Adapter L Small Double Taper Adapter Hubbed Brake Drums Tapered cone adapters fit in the bearing seats making contact near the middle of the bearing race whenever possible rather than near an edge Various adapters and spacers maybe used to fill out the shaft of the arbor Hubless Brake Drums Slip the hubless adapter onto the arbor followed by Inside Floating Adapter a spring the...

Page 19: ...int of the tool bit 16 Advance the tool bit into the bottom of the groove by rotating the cross feed hand wheel counter clock wise Note These operations may be done with the lathe running In crossfeeddial onecasemeans0 002 0 05mm 17 Determine the depth of cut Roughing cuts should be no deeper than 0 020 0 5mm Finish cuts should be no shallower than 0 004 0 1mm 18 With the lathe running set the dep...

Page 20: ...ew reset spring can do it you can see fig 18 Fig18 Reconditioning Disc Brake Rotors Preparation 1 Inspect the rotor carefully for scoring rust ridges at the inner and outer circumference of the rotor and hard spots Any excessive wear or deformity should be noted and if not within acceptable limits the rotor should be replaced 2 Use a micrometer to check the thickness of the rotor at no less than 3...

Page 21: ...The adapters cones and spacers supplied with the lathe will allow reconditioning of the majority of the rotors found on current production vehicles Note Adapters may also be used as spacers to fill out the arbor shaft if care is taken to prevent damage to their machined surfaces The self aligning spacer prevents diagonal thrust on the adapters The self aligning spacer should always be used adjacen...

Page 22: ... glasses or a face shield Cutting or grinding on an exposed surface such as a rotor will produce flying chips and debris 4 Adjust the drive belt to match the rotor size Use the outer pulley groove for passenger car and most light duty truck rotors Choose one of the inner pulley grooves when machining medium duty and larger truck rotors and some solid rotors Figure 24 Adjust drive belt location 5 M...

Page 23: ...s made back the tools bits off and turn the lathe off The scratch will usually appear as an incomplete circle This is caused by run out or wobbles due to rotor condition or by the way the rotor is mounted on the arbor Figure 26 First scratch cut 11 Check rotor mounting by loosening the arbor nut and turning the rotor 180 by hand on the arbor Make sure the inside adapter does not rotate along with ...

Page 24: ...andwheel clockwise until the tool bits are near the rotor hub 16 Turn the lathe ON 17 Turn both tool bit controls to the desired depth of cut and lock them In position by tightening the red lock knobs above the tool bits Note Either rough or finish cuts may be taken to resurface a rotor Generally finish cuts should be 0 004 0 10 mm to 0 006 0 15 mm per side Very shallow cuts of less than 0 004 0 1...

Page 25: ... the outside radius Arbor nut does not over tighten 1 1 Arbor 2 Flange Plate 3 Spring 4 Centering Cone 5 disc 6 Flange Plate 7 Spacer 8 Self Aligning Spacer 9 Arbor Nut Adapter Usage for Drums CROSS FEED EXTENSION INSTALLATION INSTRUCTIONS The cross feed extension is used to increase the capacity of the twin cutter to machine large diameter brake discs on the standard model C9370 brake lathe The p...

Page 26: ...ad Turn the nut and washer assembly down with a wrench to lock the cross shelves in place Maintenance and Service Oiling Oiling The lathe is shipped from the factory with the correct amount and type of oil Check oil level frequently and refill as necessary with EP 80 90 gear oil Figure 32 Oiling After every 500 hours of use drain the oil and refill to the appropriate level on the dipstick with cle...

Page 27: ...to bearings causing undue wear Care of Arbors and Adapters Although the adapters arbors and spindle are made of top grade steel and are turned hardened and precision ground to close tolerances great care should be taken In their use handling and storage Even the smallest nick scratch or loose chip can cause Incorrect rotor or drum alignment resulting in inaccurate reconditioning Remove all adapter...

Page 28: ...ve eye and face equipment is required to be used where there is a reasonable probability of injury that can be prevented by the use of such equipment Shenyang 245 factory as manufacturer of drum and disc break lathes provides a safety shield with each model C9350 C9350C C9370 C9370C brake lathe to be used with the twin cutter In addition to a safety shield protective goggles safety spectacles or a...

Reviews: