background image

Covering Your World

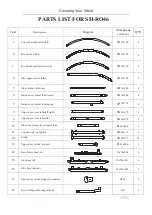
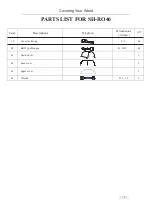
PARTS LIST FOR SH-RO46

Parts# 

Descriptions 

Diagram 

Dimensions 

( in mm ) 

Q'TY 

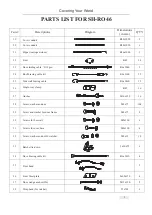
19

Cover conduit


2

20

Cover conduit


6

21

Zipper tool(open/close)


1

22

Fixer 


34

23


Φ6x5000


2

24


12

25


12

26


16

27


16

28


104

29


8

30


6

31


4

32


12

33


6

34


4

35


2

36


8x60x150


4

37


M12x120


8

38


25x700


6


Door sliding cable

S:18pcs


Roof bracing cable kit 

Side wall bracing cable 

Single-way clamp 

Anchor 

Screw, washer and nut 

Screw and washer for door frame  

Screws for base rail

Screws for door base 

Screw, washer and nut for ratchet 

Ratchet tie-down 

Door bracing cable kit  

Fixer band

Fixer Steel plate

Door wedge anchor(#36)

Strap band (for ratchet)

Φ6x5430

3x30x75

M8x15

M8x100

M8x100

M8x75

M8x75

M16x350

Φ45

Φ6x2460

Φ6x3260

Φ45

Φ16x1000

Φ28x1020

Φ28x1020

Summary of Contents for SH-RO46

Page 1: ...e had in making it for you Our shelters have been designed for rapid assembly and minimal maintenance We have rigorous quality control at every step of the shelters manufacturing process to insure you the best unit money can buy Our parts are triple checked prior to packaging to insure you will have everything you need before you start In the unlikely event that a part is damaged or missing you sh...

Page 2: ...he shelter has not been designed for human weight Erecting shelter during wind or rain is unsafe and could result in serious injury CLIMBING EQUIPMENT Check your local weather forecast prior to planning your building day Wind snow and or rain may cause unsafe conditions that could lead to serious injury CHECK LOCAL WEATHER CONDITIONS Check all local building codes prior to storing any hazardous ma...

Page 3: ...ctural components is highly recommended Tightening the cover and the structure will prolong the life of your investment Common Sense is the knack of seeing things as they are and doing things as they ought to be done PERIODIC SHELTER INSPECTION Prior to assembling your New Portable Shelter unpack all crates and complete an inven tory of all parts according to the following list and diagrams UNPACK...

Page 4: ...1277 12 Φ 38x1277 12 13 Φ 45x800 2 14 Door frame base rail 25x70x500 4 16 25x70x1407 2 15 25x70x1316 4 17 Φ 45 2 18 2 Door sliding cable support hook Upper door vertical support connector Side base rail Side base rail end Purlin Top and side roof purlin Side door frame cross support tube Upper door cross tube mid Upper door cross tube left right Side vertical rafter leg Side upper curved rafter Ro...

Page 5: ...37 M12x120 8 38 25x700 6 Door sliding cable S 18pcs Roof bracing cable kit Side wall bracing cable Single way clamp Anchor Screw washer and nut Screw and washer for door frame Screws for base rail Screws for door base Screw washer and nut for ratchet Ratchet tie down Door bracing cable kit Fixer band Fixer Steel plate Door wedge anchor 36 Strap band for ratchet Φ6x5430 3x30x75 M8x15 M8x100 M8x100 ...

Page 6: ... Your World PARTS LIST FOR SH RO46 2 2 39 40 door cover Ball Type Bungee Cover locker up T 2 Parts Descriptions Diagram Dimensions in mm Q TY 40 Φ 5x33 68 41 Main Cover 1 42 2 43 upper cover 2 44 13 16 2 Wrench ...

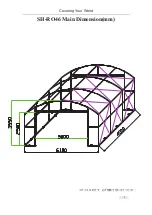
Page 7: ...Covering Your World PARTS LIST FOR SH RO46 2 3 L4 x W 6 1x H3 55m SH RO46 ...

Page 8: ...Covering Your World SH RO46 Main Dimension mm 2 4 サイズは約です 必ず現物で合わせてください ...

Page 9: ...Covering Your World Base drawing 2 5 サイズは約です 必ず現物で合わせてください ...

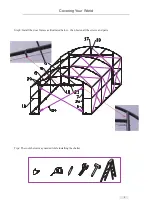
Page 10: ...base rails as illustrated below with 15 16 17 Fix to ground with 27 Then install the ratchet on it Step 2 Install the first row of rafters with 1 2 and 3 4 5 then put into base feet It is very important to hold the first row of rafter with wood rope and etc to avoid the hurts and damage of falling down 2 6 ...

Page 11: ...our World Step 3 Install the second row of rafter with 1 2 and 4 5 put into the base feet then connect with first row with 11and 12 brace them with 24 25 Step 4 The same step to install other rows of rafters 2 7 ...

Page 12: ...Covering Your World Step5 Install the door frames as illustrated below then fasten all the screws and parts Tips The tools below may needed while installing the shelter 2 8 ...

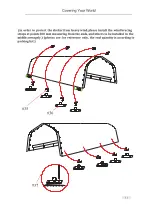
Page 13: ...y Covering Your World TIPS Slide the roof cover over assembled frame from one side insert the conduit to pocket on side Pocket for side wall conduit Ratchet tie down for tension ing the Side wall roof cover 9 19 20 41 38 ...

Page 14: ...ch the cover 35 36 to the frame as following Note 39 for main roof cover tensioning 40 for front and end covers tensioning Your assembled shelter will be similar to the illustration as below Illustration for Ratchet 42 43 40 10 39 21 ...

Page 15: ......

Reviews: