CHARGING THE DRONE
CAUTION: To avoid fire hazards, use only the charger included in this
package.
1. Connect the charging cable to the drone battery.
2. Plug the other end of the charging cable into an AC outlet.
3. While the battery is charging, the LED on the charger will
light up RED.
4. When the battery is fully charged, the LED on the charger will
light up GREEN.
SPECIFICATIONS
CHARGER
Input: 110-240V
Charging Current: 650MA
Full Voltage: 8.45 +/- 0.3V
LI-PO BATTERY
Battery Specification: 7.4V650mAh
Aircraft Flight Time: 10-12 minutes
Charge Time: Approx. 1.5 hours
AA BATTERIES
Battery Specification: 1.5V (GP 15G R6P)
Transmitter Operation Time: 18 hours
- 5 -
CAUTION
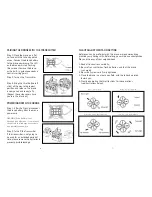
THROTTLE CONTROL PRACTICE
AILERON AND ELEVATOR
CONTROL PRACTICE
RUDDER CONTROL
PRACTICE PRACTICE
• Be sure that no people or obstructions are nearby as you practice.
• You must first practice hovering. (This is a basic flight action.)
“Hovering” means keeping the drone in mid-air in a fixed position.
• Please stand approximately 12 feet behind the drone while it is flying.
• When the vehicle begins to lift
off the ground, slowly reduce
the throttle to bring the flight
vehicle back down. Keep
practicing this skill until
you can control the throttle
smoothly.
• Raise the throttle stick slowly.
• Move the drone in any
direction: forward, back, left
and right. Slowly move the
Aileron and Elevator Sticks
in the opposite direction to fly
back to its original position.
• Slowly raise the throttle stick.
• Use the rudder stick to move the
nose of the drone to the right
or the left. Then, slowly move
the rudder stick in the opposite
direction to fly back to its original
position.
NOTE: After you are familiar with
the above actions, draw a circle on
the ground and practice within the
circle to increase your accuracy.
Reduce the size of the circle as you
become more advanced.
- 8 -


