background image

E-6

Important

Information

Usage Guidelines

95˚F
(

35˚C)

41˚F
(

5˚C)

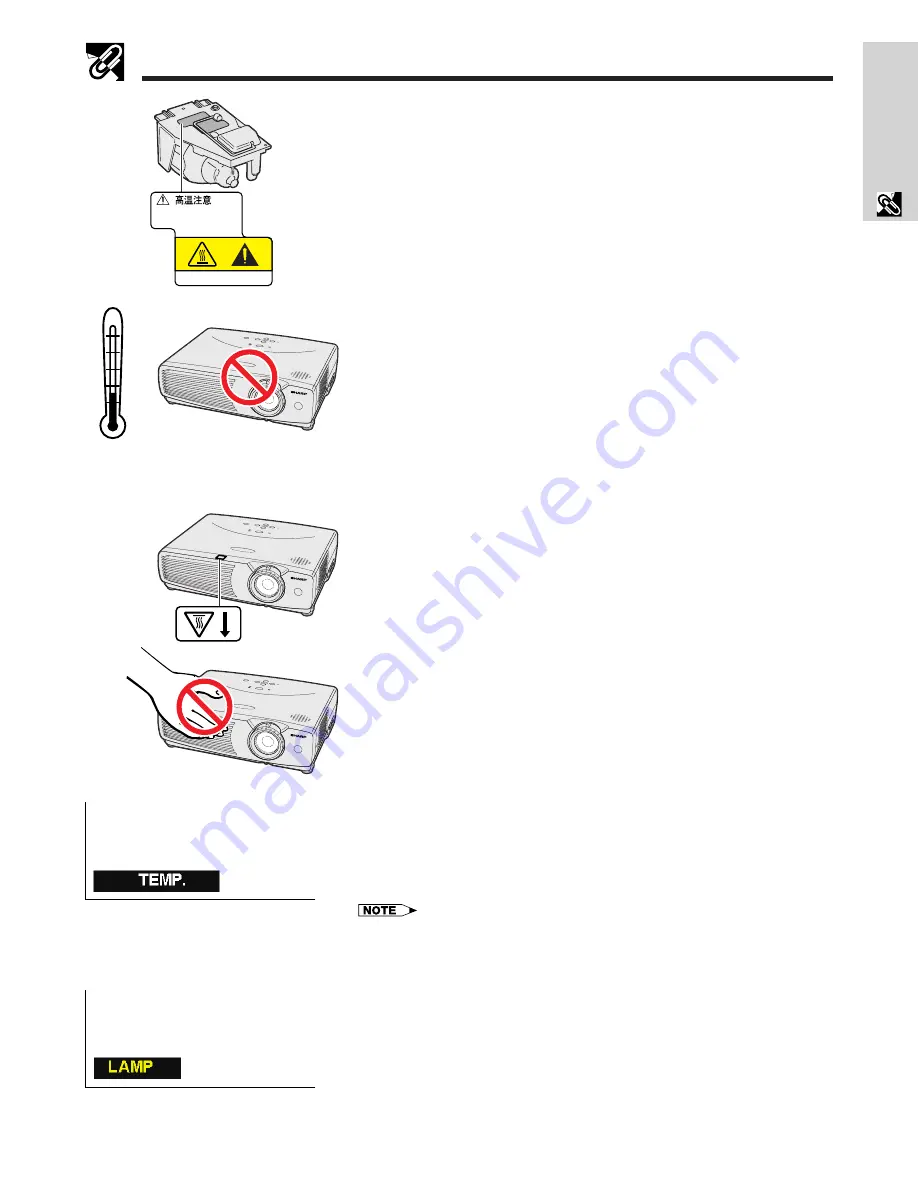
Temperature Monitor Function

If the projector starts to overheat due to setup problems or a dirty air filter, “TEMP.”
will appear in the lower-left corner of the picture. If the temperature continues to
rise, the lamp will turn off, the TEMPERATURE WARNING indicator on the projector
will flash, and after a 90-second cooling-off period the power will shut off. Refer
to “Lamp/Maintenance Indicators” on page 37, for details.

• The cooling fan regulates the internal temperature, and its performance is automatically

controlled. The sound of the fan may change during projector operation due to changes
in the fan speed.

Lamp Monitor Function

When the projector is turned on after the lamp has been used for 900 hours,
“LAMP” will appear in the lower-left corner of the picture to advise you to replace
the lamp. See pages 38 and 39 for lamp replacement. If the lamp has been used
for 1,000 hours, the projector power will automatically turn off and the projector
will enter standby mode. Refer to “Lamp/Maintenance Indicators” on page 37,
for details.

Caution Concerning the Lamp Unit

Potential hazard of glass particles if lamp ruptures. Please have the nearest
Authorized SharpVision Service  Center or Dealer replace lamp if rupture occurs.
See “Replacing the Projection Lamp” on pages 38 and 39.

Cautions Concerning the Setup of the Projector

For minimal servicing and to maintain high image quality, SHARP recommends
that this projector be installed in an area free from humidity, dust and cigarette
smoke. When the projector is subjected to these environments, the lens and filter
must be cleaned more often. Periodically the filter should be replaced and the
projector should be cleaned internally. As long as the projector is properly
maintained in this manner, use in these environments will not reduce the overall
operation life. Please note that all internal cleaning must be performed by the
nearest Authorized SharpVision Service Center or Dealer.
• Do not expose the projector to extreme heat or cold.

Operating temperature: 41°F to 95°F (

5°C to 

35°C)

Storage temperature: 

4°F to 140°F (

20°C to 

60°C)

• The mark shown on the left calls the user’s attention to a part of the projector

that emits intense heat during operation.

• The exhaust vent, the lamp cage cover and adjacent areas may be extremely

hot during projector operation. To prevent injury, do not touch these areas until
they have sufficiently cooled.

• Allow at least 4 inches (10 cm) of space between the cooling fan (exhaust

vent) and the nearest wall or obstruction.

• If the cooling fan becomes obstructed, a protection device will automatically

turn off the projector lamp. This does not indicate a malfunction. Remove the
projector power cord from the wall outlet and wait at least 10 minutes. Then
turn on the power by plugging the power cord back in. This will return the
projector to the normal operating condition.

Notes on Operation

BQC-PGC20X //1

C AUT I O N

A T T E NT I ON

Summary of Contents for XV-Z7000U

Page 1: ... beam of light or view directly Be especially careful that children do not stare directly into the beam of light WARNING To reduce the risk of fire or electric shock do not expose this product to rain or moisture WARNING FCC Regulations state that any unauthorized changes or modifications to this equipment not expressly approved by the manufacturer could void the user s authority to operate this e...

Page 2: ...ur in a particular installation If this equipment does cause harmful interference to radio or television reception which can be determined by turning the equipment off and on the user is encouraged to try to correct the interference by one or more of the following measures Reorient or relocate the receiving antenna Increase the separation between the equipment and the receiver Connect the equipmen...

Page 3: ...ing type plug a plug having a third grounding pin This plug will only fit into a grounding type power outlet This is a safety feature If you are unable to insert the plug into the outlet contact your electrician to replace your obsolete outlet Do not defeat the safety purpose of the grounding type plug 13 Power Cord Protection Power supply cords should be routed so that they are not likely to be w...

Page 4: ...re to suit the type of image input to the projector Page 29 8 GAMMA CORRECTION FUNCTION The gamma value setting can be adjusted according to the input source for optimal image contrast Page 30 9 WIDESCREEN IMAGES Allows projection of DVD DTV and other anamorphic images recorded in widescreen format with a 16 9 aspect ratio Page 31 10 BRIGHTNESS SWITCHOVER FUNCTION Function with toggle switch to co...

Page 5: ...de Function 33 Reverse Invert Image Function 34 Special Mode Adjustment 34 Setup Connections Operation Useful Features Maintenance Troubleshooting Appendix Attaching the Lens Cap 41 Connection Pin Assignments 42 RS 232C Port Specifications 43 Computer Compatibility Chart 45 Specifications 46 Dimensions 47 Glossary 48 Setup Connections Supplied Accessories 10 Connecting the Projector 11 Basic Opera...

Page 6: ...or For minimal servicing and to maintain high image quality SHARP recommends that this projector be installed in an area free from humidity dust and cigarette smoke When the projector is subjected to these environments the lens and filter must be cleaned more often Periodically the filter should be replaced and the projector should be cleaned internally As long as the projector is properly maintai...

Page 7: ...ATURE WARNING indicator Remote control sensor Speaker MENU button Side and Rear View Air filter Cooling fan Intake vent Foot releases S VIDEO INPUT terminal 4 pin Mini DIN VIDEO INPUT terminal RCA AUDIO INPUT S VIDEO VIDEO INPUT terminals RCA Eyelet for lens cap strap Kensington Security Standard connector AC socket Remote control sensor VIDEO INPUT S VIDEO INPUT AUDIO INPUT S VIDEO VIDEO INPUT L ...

Page 8: ...DE button CLR TEMP button Remote control signal transmitter Inserting the Batteries 1 3 Slide in the direction of the arrow to remove the battery cover 2 Insert two AAA size batteries making sure their polarities match the ⴐ and ⴑ marks inside the battery compartment Insert the side tabs of the battery cover into their slots and press the cover in until it is properly seated If the remote control ...

Page 9: ...he signal from the remote control can be reflected off a screen for easy operation However the effective distance of the signal may differ due to the screen material Attaching the Rubber Leg Tips The rubber leg tips are provided to prevent the remote control from skidding and shaking over a flat surface 30 45 23 7 m 30 45 30 Remote control Remote control ...

Page 10: ...s for remote control GLEGG9095CEZZ Remote control RRMCG1636CESA Two AAA size batteries LCD projector operation manual TINS 7273CEZZ Lens cap PCOVZ1095CEKA Extra air filter PFILD0123CEZZ Lens cap strap UBNDT0013CEZZ Power cord CACCU5013DE01 DIN D sub RS 232C cable QCNW 5288CEZZ ...

Page 11: ...IDEO INPUT terminal on the projector S video cable is sold separately If your video equipment does not have an S video output terminal use the composite video output terminal Connecting the Projector to Audiovisual Equipment You can connect your projector to a VCR laser disc player DVD player DTV decoder and other audiovisual equipment CAUTION Always turn off the projector while connecting to audi...

Page 12: ... output terminals Projector Connecting an audiovisual source DTV decoder or DVD player using the 15 pin video and audio input DTV decoder or DVD player To analog component output terminals D sub RCA cable sold separately Projector Audio cable sold separately To audio output terminals When connecting this projector to a DVD player or a DTV decoder select Component by using RGB COMPONENT on the remo...

Page 13: ...ble with the projector Use with computer signals other than those listed may cause some of the functions not to work A Macintosh adaptor may be required for use with some Macintosh computers Contact your nearest Authorized SharpVision Service Center or Dearler When connecting this projector to a computer select RGB by using RGB COMPONENT on the remote control or the GUI menu See page 25 Connecting...

Page 14: ...ct an RS 232C cable null modem cross type sold separately to the other end of DIN D sub RS 232C cable and to the serial port on the computer Connecting the Projector CAUTION Do not connect or disconnect an RS 232C cable to or from the computer while it is on This may damage your computer The RS 232C function may not operate if your computer port is not correctly set up Please refer to the operatio...

Page 15: ...ately turned on again it may take a short while before the lamp turns on After the projector is unpacked and turned on for the first time a slight odor may be emitted from the exhaust vent This odor will soon disappear with use Do not press any buttons before the startup image disappears Before Adjusting The Image appears only ON OFF or POWER is available ON OFF POWER LAMP TEMP KEYSTONE INPUT BACK...

Page 16: ...g ON OFF or POWER When the power is turned on the POWER indicator and the LAMP REPLACEMENT indicator light green The POWER indicator flashes if the right side filter cover is not securely installed 6 Press VOLUME on the remote control to adjust the volume 7 Press MUTE on the remote control to temporarily turn off the sound Press MUTE again to turn the sound back on 8 Press ON OFF on the projector ...

Page 17: ...2 60 40 WIDE Mode 16 9 3 43 64 9 3 cm 3 17 64 8 3 cm 2 29 64 6 2 cm 2 11 64 5 5 cm 1 47 64 4 4 cm 1 41 64 4 2 cm 1 1 2 3 8 cm 1 3 8 3 5 cm 1 11 64 3 0 cm 63 64 2 5 cm 21 32 1 7 cm Distance from the lens center to the bottom of the image H Maximum L1 32 10 10 0 m 2 32 10 10 0 m 3 25 7 7 8 m 22 8 6 9 m 18 1 5 5 m 17 5 2 m 15 8 4 8 m 14 3 4 4 m 12 3 3 7 m 10 2 3 1 m 6 9 2 0 m Minimum L2 32 0 9 8 m 28...

Page 18: ...s Project the normal image onto the mirror The image reflected from the mirror is projected onto the translucent screen Rear projection Place a translucent screen between the projector and the audience Use the projector s menu system to reverse the projected image See page 34 for use of this function CAUTION When using a mirror be sure to carefully position both the projector and the mirror so the...

Page 19: ...e and then press ENTER 4 Press ƒ to move the mark to the desired setting 5 To exit from the GUI press MENU To reset the keystone setting press BACK Straight lines and the edges of the displayed image may appear jagged when adjusting the keystone setting GUI On screen Display Projector Remote control ON OFF POWER LAMP TEMP KEYSTONE INPUT BACK ENTER MENU PICT MODE RGB COMPONENT INPUT 1 PICT MODE AUT...

Page 20: ...ng buttons s S VIDEO or VIDEO mode 1 Press MENU to display the main menu 2 Press ƒ to select an adjustment item in the main menu 3 Press ENTER to display the sub menu 4 Press ƒ to select an adjustment item in the sub menu 5 Press ENTER to activate the selected adjustment item 6 Press ƒ to adjust the item 7 Press BACK to return to the previous screen 8 Press MENU to exit from the GUI For details on...

Page 21: ...Blue Reset Special Modes 480P 640 480 Ⳮ30 ⳮ30 Ⳮ30 ⳮ30 Ⳮ30 ⳮ30 Ⳮ30 ⳮ30 Signal Type 1 Component RGB Options Signal Info Lamp Timer Keystone Auto Power Off Background Color Picture2 Tint Sharp Progressive 2 Reset Theater Mode 3D Progressive 2D Progressive Film Mode 1 Film Mode 2 ON OFF OFF Blue None Ⳮ127 ⳮ127 Ⳮ30 ⳮ30 Ⳮ30 ⳮ30 ON 7 0 Fine Sync Options Signal Info Lamp Timer Language English PRJ Mode Ce...

Page 22: ...nguage English PRJ Mode CeilingⳭFront CeilingⳭRear Deutsch Español Nederlands Français Italiano Svenska Português Front Rear Keystone Auto Power Off Background Contrast Picture1 Bright Red Color Picture2 Tint 3 Sharp Progressive Reset Blue Reset Theater Mode Video System Auto PAL NTSC3 58 SECAM NTSC4 43 PAL M PAL N PAL 60Hz 3D Progressive 2D Progressive Film Mode 1 Film Mode 2 ON OFF OFF Blue None...

Page 23: ...o input system mode is preset to Auto however it can be changed to a specific system mode if the selected system mode is not compatible with the connected audiovisual equipment 1 Press MENU 2 Press ƒ to select Video System and then press ENTER 3 Press ƒ to select the desired video system mode 4 Press ENTER to save the setting 5 To exit from the GUI press MENU When the system mode is set to Auto yo...

Page 24: ...PONENT mode is selected Progressive only appears when receiving a 480i signal in the INPUT 2 COMPONENT mode Color Tint and Sharp do not appear in the INPUT 2 RGB mode Tint does not appear when receiving PAL SECAM PAL M PAL N or PAL 60Hz in the S VIDEO or VIDEO mode 1 Press MENU 2 Press ƒ to select Picture1 or Picture2 in INPUT 1 or 2 COMPONENT S VIDEO or VIDEO mode or to select Picture in INPUT 2 ...

Page 25: ...d progressive display 5 Press ENTER to save the setting 6 To exit from the GUI press MENU ON OFF POWER LAMP TEMP KEYSTONE INPUT BACK ENTER MENU PICT MODE VOL POWER MUTE BACK MENU ENTER 2 3 4 2 3 5 1 6 ON OFF POWER LAMP TEMP KEYSTONE INPUT BACK ENTER MENU PICT MODE VOL POWER MUTE BACK MENU ENTER 2 3 4 2 3 5 1 6 Description of Progressive Modes 2D Progressive Useful for displaying fast moving images...

Page 26: ...or the input selection is changed 1 Press AUTO SYNC on the remote control Remote control On screen Display During Auto Sync adjustment Adjusting The Image is displayed as shown on the left Auto Sync adjustment may take some time to complete depending on the image of the computer connected to the projector When the optimum image cannot be achieved with Auto Sync adjustment use manual adjustments Se...

Page 27: ...n screen image by moving it to the left or right Centers the on screen image by moving it up or down Clock Phase H Pos V Pos Description of Adjustment Items Select the desired computer input mode with INPUT on the projector or INPUT 2 on the remote control 1 Press MENU 2 Press ƒ to select Fine Sync and then press ENTER 3 Press ƒ to select a specific adjustment item and then press ENTER 4 Press ƒ t...

Page 28: ... display a still image from a computer or video giving you more time to explain the image to the audience 1 Press FREEZE on the remote control to freeze the image 2 Press FREEZE again to return to the moving image Remote control On screen Display RGB COMPONENT INPUT 1 PICT MODE AUTO SYNC INPUT 2 GAMMA KEYSTONE VIDEO FREEZE S VIDEO CLR TEMP 1 2 ...

Page 29: ...bluish images for a brighter picture Description of Color Temperature 1 Press CLRTEMP on the remote control Each time CLRTEMP is pressed color temperature toggles as shown below Increases color temperature for cooler bluish florescent like images High color temperature Decreases color temperature for warmer reddish incandescent like images Low color temperature Red Blue 1 2 3 4 1 2 3 4 On screen D...

Page 30: ...ges in a bright room this feature makes the dark scenes easier to see and gives the impres sion of greater depth in the image Gamma Modes Remote control On screen Display s s STANDARD GAMMA 1 GAMMA 2 RGB COMPONENT INPUT 1 PICT MODE AUTO SYNC INPUT 2 GAMMA KEYSTONE VIDEO FREEZE S VIDEO CLR TEMP 1 Gamma mode Selected Mode For a highly defined image emphasizing high contrast and color reproduction Fo...

Page 31: ... screen image Input Signal FULL WIDE NORMAL 4 3 aspect ratio Letterbox Squeeze 16 9 aspect ratio VGA SVGA XGA SXGA Output screen image Input Signal FULL 4 3 aspect ratio PICT MODE NORMAL PICT MODE NORMAL PICT MODE NORMAL PICT MODE WIDE PICT MODE WIDE PICT MODE WIDE PICT MODE WIDE PICT MODE FULL PICT MODE FULL PICT MODE FULL PICT MODE FULL FULL WIDE NORMAL 4 3 720P 1080i 800 600 800 600 800 600 800...

Page 32: ...ption of Automatic Power Shutoff 1 Press MENU 2 Press ƒ to select Options and then press ENTER 3 Press ƒ to select Auto Power Off and then press ENTER 4 Press ƒ to select ON or OFF 5 To exit from the GUI press MENU Auto Power Off is factory preset to ON Power OFF in 5 min will appear five minutes before the power is automatically turned off Automatic Power Shutoff Function GUI On screen Display Pr...

Page 33: ...trol the quantity of projected light Select ON or OFF to decrease or increase brightness power consumption and fan noise Description of Theater Modes 1 Press MENU 2 Press ƒ to select Options and then press ENTER 3 Press ƒ to select Theater Mode and then press ENTER 4 Press ƒ to select ON or OFF 5 To exit from the GUI press MENU Theater Mode is factory preset to ON When selecting OFF in Theater Mod...

Page 34: ...d ceiling mount setups See page 18 for these setups Ordinarily the type of input signal is detected and the correct resolution mode is automatically selected However since the projector cannot distinguish 640 480 signal resolution on computers or 480P on DTVs select an appropriate mode on Special Modes 1 Press MENU 2 Press ƒ to select Special Modes and then press ENTER 3 Press ƒ to select the opti...

Page 35: ...st Authorized SharpVision Service Center or Dealer exchange the filter PFILD0123CEZZ when it is no longer possible to clean it Cleaning the air filter 1 Disconnect the power cord Unplug the power cord from the AC socket 3 4 Clean the air filter Replace the filter cover Insert the tab on the end of the filter cover into the filter cover opening and press the filter cover into position Clean the dus...

Page 36: ...Replacing the air filter Tab Disconnect the power cord Unplug the power cord from the AC socket 5 Replace the filter cover Insert the tab on the end of the filter cover into the filter cover opening and press the filter cover into position Tab 4 Replace the air filter 1 Put the new air filter into position 2 Put the air filter stopper back into position Be sure the filter cover is securely install...

Page 37: ...at the lamp be replaced after 900 cumulative hours of use or when you notice a significant deterioration of the picture and color quality The lamp usage timer can be checked with the On screen Display See page 32 CAUTION Intense light hazard Do not attempt to look into the aperture and lens while the projector is operating As the usage environment can vary significantly the projector lamp may not ...

Page 38: ...upture occurs Do not remove the lamp cage directly after operation of the projector The lamp may be extremely hot Wait at least one hour after the power cord is disconnected to allow the surface of the lamp cage to fully cool before removing the lamp cage It is recommended that the lamp be replaced after approximately 900 cumulative hours of use or when you notice a significant deterioration of th...

Page 39: ...asten the securing screws 8 Remove the lamp cage Loosen the securing screws on the lamp cage Hold the lamp cage by the handle and pull it towards you 1 Connect the power cord Reset the lamp timer Plug the power cord into the AC socket of the projector Resetting the lamp timer 2 Reset the lamp timer only after replacing the lamp 1 Press KEYSTONE and KEYSTONE ƒ on the projector at the same time 2 Pr...

Page 40: ... page 24 Color and Tint adjustments are not correct See page 24 Adjust the focus See page 15 Projection distance is too long or too short to allow for proper focus See page 17 Cables incorrectly connected to side and rear panels of the projector See pages 11 14 Volume is set to minimum See page 16 If the picture is normal the sound is due to cabinet shrinkage caused by temperature changes This wil...

Page 41: ...ns cap 1 Attach the lens cap strap to the lens cap 2 Attach the lens cap strap to the projector 3 Attach the lens cap to the projector with the lens cap eyelet facing up CAUTION Do not lift or carry the projector by the lens or the lens cap as this may damage the lens You can also use the end of a mechanical pencil or other pointed object to feed the lens cap strap through the openings ...

Page 42: ...Receive Data Input Connected to internal circuit 3 SD Send Data Output Connected to internal circuit 4 Not connected 5 SG Signal Ground Connected to internal circuit 6 Not connected 7 Not connected 8 Not connected 9 Not connected Pin No Signal Name I O Reference 1 Not connected 2 RD Receive Data Input Connected to internal circuit 3 SD Send Data Output Connected to internal circuit 4 Not connected...

Page 43: ...Port Specifications Return code 0DH C1 C2 C3 C4 P1 P2 P3 P4 Response code format Normal response O K Return code 0DH Problem response Failure due to incorrect command parameter or the other communication errors E R R Return code 0DH Command 4 digits Parameter 4 digits Command format When more than one code is being sent send each command only after the OK response code for the previous command fro...

Page 44: ...M M M M M B B A A A B B B A A A A A A A A A C T S R P B R B R B B L T T R R I I I I I I S S S S S S S S S S S M M M M M M O I H E I R D E E G G A E E E E N N P P P P I I R R R R R R V V V V V V R R R _ _ _ _ _ _ _ _ _ _ _ _ _ _ _ _ _ _ _ _ _ _ _ _ _ _ _ _ _ _ _ _ _ _ _ _ _ _ _ _ _ _ _ _ _ _ _ _ _ _ _ _ _ _ _ _ _ _ _ _ _ _ _ _ _ _ _ _ _ _ _ _ _ _ _ _ _ _ _ _ _ _ _ _ _ _ _ _ _ _ _ _ _ _ _ _ _ _ _ _ ...

Page 45: ...ge from Mac 16 832 624 cannot be displayed in FULL mode PC MAC WS Horizontal Frequency kHz Vertical Frequency Hz VGA PC PC SVGA XGA VESA Standard Resolution 640 350 1 152 864 1 152 882 1 280 1 024 720 350 640 400 720 400 640 480 800 600 1 024 768 Display Upscale Intelligent Compression True 27 0 60 27 0 60 27 0 60 60 31 5 70 31 5 70 31 5 70 31 5 60 34 7 70 37 9 72 37 5 75 43 3 85 31 3 50 35 1 56 3...

Page 46: ...IGNAL TTL level positive negative or composite sync Apple only VERTICAL SYNC SIGNAL Same as above 12 108 MHz 43 85 Hz 15 80 kHz 9 pin Mini DIN female connector RS 232C port 1 7 64 2 8 cm round AC 100 240 V 2 6 A 50 60 Hz 230 W Selecting OFF in the Theater Mode 200 W Selecting ON in the Theater Mode 41 F to 95 F 5 C to 35 C 4 F to 140 F 20 C to 60 C Plastic 38 kHz 10 15 64 W 2 29 32 H 8 5 32 D 260 ...

Page 47: ...F POWER LAMP TEMP KEYSTONE INPUT BACK ENTER MENU PICT MODE VIDEO INPUT S VIDEO INPUT AUDIO INPUT S VIDEO VIDEO INPUT L R FOCUS ZOOM 6 43 64 169 5 3 15 64 82 8 5 32 207 1 21 32 42 1 17 64 32 10 15 64 260 2 9 32 58 4 21 32 118 5 16 8 Units inches mm Top View Rear View Dimensions Side View Front View Bottom View ...

Page 48: ...ection according to image and room brightness Three gamma settings are available GUI Graphical User Interface User interface with graphics that allow easier operation Intelligent compression and expansion High quality resizing of lower and higher resolution images to fit the projector s native resolution Phase Phase shift is a timing shift between isomorphic signals with the same resolution When p...

Reviews: