background image

12/3/17

HF401PH_OM_EN.fm

E-7

Setting the clock (Remote control only) 
(continued)

To confirm the time display:

Press the CLOCK/TIMER button. The time display will
appear for about 5 seconds.

Note:

When power supply is restored after unit is plugged in again or 
after a power failure, reset the clock (pages 6 - 7).

To readjust the clock:

Perform “Setting the clock” from step 1. If the “Clock” does not
appear in step 2, step 4 (for selecting the 24-hour or 12-hour
display) will be skipped.

To change the 24-hour or 12-hour display:

Wi-Fi network Setup for AirPlay / DLNA

(AirPlay)

With Apple AirPlay technology, you can stream your music from your
iTunes on a Mac, PC, iPod touch, iPhone, or iPad to external
speakers (XL-HF401PH) via a Wi-Fi network.

AirPlay usage requires:

MacBook or MacBook Pro running MacOS 10.6.6 or greater.

iTunes 10.2 or greater (Mac/PC).

iOS 4.3 or later
- iPod touch (4th, 3rd and 2nd generation)
- iPhone 4S
- iPhone 4
- iPhone 3GS (iPhone 3G cannot support AirPlay)
- iPad 2
- iPad

(DLNA)

DLNA technology enables you to share media from one device to 
another via a Wi-Fi network.

DLNA usage requires:

DLNA compatible devices with appropriate application. (Refer to
your devices’ manual) Support status varies depending on model
and software features such as client and server functions.

PC with Windows 7.

DLNA version 1.5

This product supports audio source with playback capability only.
Streaming (audio and video) from DLNA devices is not supported
by this product.

DRM file playback (DTCP-IP) is not supported.

SHARP does not guarantee that this product will work with all
DLNA compatible devices and wireless LAN routers.

Note:

When this unit is placed too near a Wireless LAN device or
microwave, noise interference may occur, causing crackling sound. It
may also reduce the communication speed and cause invalid
connection. If these happen, do the following:
- Place the unit away from the Wireless LAN device or microwave.
-  Place the unit closer to the source device.

1

Press the ON/STAND-BY button.

2

Press the NETWORK button.

3

Press the iPod MENU button on the remote control.

4

Press the 

/

 button to select 

‘Wi-Fi Setup’

.

Press the ENTER button.

5

Press the 

/

 button to select 

‘Direct’

. Press the ENTER

button. Wait until the display shows 

‘Direct Ready’

 which

take about 40 seconds.

6

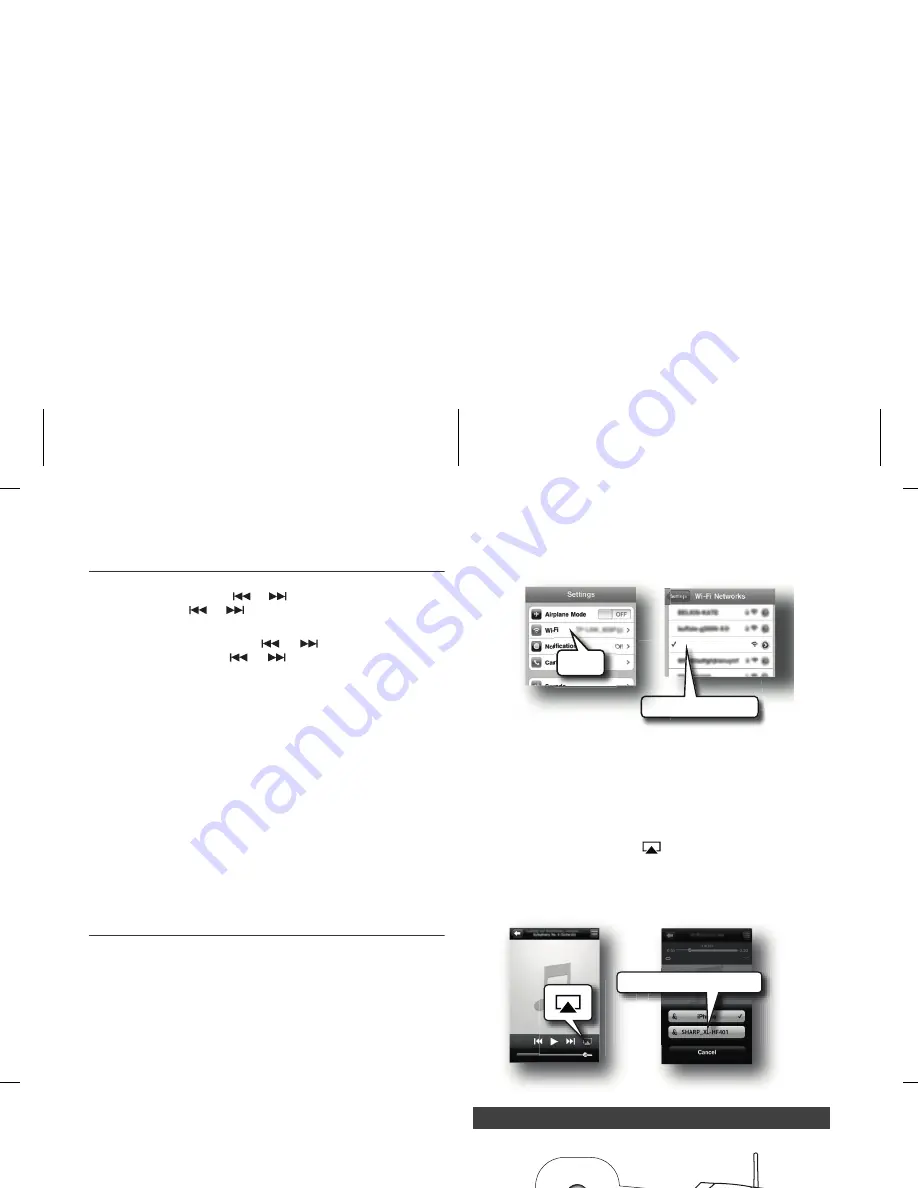
On the iPod touch/iPhone/iPad, select 

‘Settings’

 -->

‘Wi-Fi’

. On the PC/Mac, enter the list of available

wireless networks.

For other DLNA compatible devices, turn on the Wi-Fi. For more details, 
refer to your devices’ manual.

7

Select 

SHARP_XL-HF401

 from the list of available networks.

8

Launch 

Music

 and play desired song on your iPod touch / iPhone or

iPad. For PC/Mac, launch 

iTunes

.

For other DLNA compatible devices, launch the DLNA compatible
media software. For more details, refer to your devices’ manual.

9

Tap / click on the 

AirPlay

 icon 

.

Select the speaker : 

SHARP_XL-HF401_xxxxxx

.

Sound will be heard from the XL-HF401 speakers via audio
streaming.

1

Press the WPS button on the wireless router

.

2

Press the ON/STAND-BY button.

3

Press the NETWORK button.

4

Press the iPod MENU button on the remote control.

5

Press the 

/

 button to select 

‘Wi-Fi Setup’

.

Press the ENTER button.

6

Press the 

/

 button to select 

‘WPS’

. Press the ENTER button. Wait

until ‘ 

 ’ on the display stop blinking and the display shows

"Successfully Connected to [network name]"

.

7

On the iPod touch/iPhone/iPad, select 

‘Settings’

 --> 

‘Wi-Fi’

. On the PC/

Mac, enter the list of available wireless networks. For other 

DLNA

compatible devices, turn on the Wi-Fi. For more details, refer to your
devices’ manual.

8

Select your router from the list of available networks. Enter your network
password if required.

9

Continue with step 8 to 9 in 

‘Direct wireless connection’

on this page.

Note:

WPS process (network search) takes about 2 minutes. If
fail to connect, the display will show 

Cannot connect to

Network. Please try again’

. Repeat step 4 to retry.

To adjust the hour, press the 

 or 

 button and then press the ENTER

button. Press the 

 or 

 button once to advance the time by 1 hour.

Hold it down to advance continuously.

6

To adjust the minutes, press the 

 or 

 button and then press the

ENTER button. Press the 

 or 

  button once to advance the time

by 1 minute. Hold it down to advance the time by 5 minutes interval.

1

Clear all the programmed contents. [Refer to “Factory
reset, clearing all memory” on page 23 for details.]

2

Perform “Setting the clock” from step 1 onwards.

Direct wireless connection

Note:

 The last 6 digits ‘xxxxxx’ is MAC ID.

Connection via wireless router with WPS

S

HARP_XL-HF401

S

S

HA

Wi-Fi

S

HARP_XL-HF401

S

HARP_XL-HF401_xxxxxx

WPS

Summary of Contents for XL-HF401PH

Page 1: ...YSTEM HI FI SISTEMA HI FI SYSTEEM SISTEMA DE COMPONENTE Hi Fi HI FI KOMPONENTTIJÄRJESTELMÄ ZESTAW HI FI HI FI COMPONENT SYSTEM MODEL MODELO MALLI MODEL MODEL BEDIENUNGSANLEITUNG MODE D EMPLOI MANUAL DE MANEJO BRUKSANVISNING KÄYTTÖOHJE INSTRUKCJA OBSŁUGI OPERATION MANUAL MANUALE DI ISTRUZIONI GEBRUIKSAANWIJZING MANUAL DE OPERAÇÃO ...

Page 2: ...ras exigencias relevantes de la Directiva 1999 5 EC Pueden consultar la declaración de conformidad en http www sharp de doc XL HF401PH pdf Para su uso en Europa Este producto es para su uso en interiores solamente Hierbij verklaart SHARP Electronics Europe GmbH dat het toestel SHARP Hi Fi Systeem XL HF401PH in overeenstemming is met de essentiële eisen en de andere relevante bepalingen van richtli...

Page 3: ...nns nätspänning i apparaten Med ON STAND BY knappen i läge STAND BY kan apparaten startas med timerfunktion eller fjärrkontrollen Wanneer de ON STAND BY toets in de STAND BY stand staat loopt er nog steeds stroom netspanning in het toestel Wanneer de ON STAND BY toets in de STAND BY stand staat kan het toestel ingeschakeld worden via de timerfunctie of de afstandsbediening Waarschuwing Dit toestel...

Page 4: ...G UT STICKPROPPEN Vorsicht Das Gerät weder Tropf noch Spritzwasser aussetzen Ansonsten besteht die Gefahr eines Brandes oder elektrischen Schlages Es dürfen keine mit Flüssigkeiten gefüllten Gegenstände wie Vasen auf dem Gerät abgestellt werden Attention Pour éviter un incendie ou une secousse électrique mettre l appareil à l abri de l eau éclaboussure goutte Ne pas poser sur l appareil un récipie...

Page 5: ...kortslutning utsett ikke produktet for vann eller fuktighet Gjenstander som inneholder vaeske feks en blomstervase må ikke plasseres oppå apparatet Varoitus Älä vie laitetta sateeseen tai kosteisiin tiloihin Jos laite on kostunut anna sen kuivua ennen kuin käytät sitä verkkovirralla Nestettä sisältäviä astioita kuten esim kukkamaljakoita ei saa asettaa laitteen päälle Dieses Produkt ist ein Laserp...

Page 6: ...o à radiação Como os raios laser usados neste player de CD são perigosos para os olhos não tente desmontar o aparelho Solicite o conserto somente para pessoas especializadas VAROITUS Muiden kuin tässä määriteltyjen ohjaustoimintojen säätöjen ja toimintojen käyttö saattaa johtaa vaaralliseen säteilyaltistumiseen Koska tässä cd soittimessa käytetty lasersäde on silmille vahingollinen älä pura soitin...

Page 7: ...li standard normativi e relativi alla sicurezza L utilizzo di questo accessorio con iPod o iPhone potrebbe influire sulle prestazioni wireless Made for iPod Made for iPhone en Made for iPad betekent dat een electronische accessoire ontworpen is om specifiek aangesloten te worden op de iPod iPhone of iPad respectievelijk en gecertificeerd is door de ontwerper om aan de Apple prestatie maatstaven te...

Page 8: ... eliminación A Información sobre eliminación para usuarios particulares 1 En la Unión Europea Atención si quiere desechar este equipo por favor no utilice el cubo de la basura habitual Los equipos eléctricos y electrónicos usados deberían tratarse por separado de acuerdo con la legislación que requiere un tratamiento una recuperación y un reciclaje adecuados de los equipos eléctricos y electrónico...

Page 9: ... de produtos usados 2 Em outros Países fora da UE Se quiser eliminar este produto contacte as entidades locais e informese sobre o método correcto para proceder à sua eliminação Atenção O seu produto está identificado com este símbolo Significa que os produtos eléctricos e electrónicosnão devem ser misturados com o lixo doméstico comum Existe um sistema de recolhas específico para estes produtos T...

Page 10: ...g van de wet door de lidstaten mogen particuliere huishoudens in de lidstaten van de Europese Unie hun afgedankte elektrische en elektronische apparatuur kosteloos naar hiertoe aangewezen inzamelingsinrichtingen brengen In sommige landen kunt u bij de aanschaf van een nieuw apparaat het oude Let op Uw product is van dit merkteken Informacje dotyczące usuwania zużytego urządzenia A Informacje dla u...

Page 11: ...Europea Por favor póngase en contacto con las autoridades locales para un correcto procedimiento de eliminación de las baterías usadas Information om batteriavyttring Informatie over afvalverwerking van batterijen De batterij die bij dit toestel geleverd wordt bevat sporen van Lood Voor EU De doorgestreepte vuilnisbak op wieltjes duidt aan dat de gebruikte batterijen niet mogen terechtkomen in het...

Page 12: ...ing streaming applications via Internet intranets and or other networks other revenue generating content distribution systems pay audio or audio on demand applications and the like or on revenue generating physical media compact discs digital versatile discs semiconductor chips hard drives memory cards and the like An independent license for such use is required For details please visit http mp3li...

Page 13: ...lity The ventilation should not be impeded by covering the ventilation openings with items such as newspapers tablecloths curtains etc No naked flame sources such as lighted candles should be placed on the apparatus Attention should be drawn to the environmental aspects of battery disposal This unit should only be used within the range of 5 C 35 C 41 F 95 F The apparatus is designed for use in mod...

Page 14: ...ton 17 17 Network Button 7 8 18 Open Close Button 11 19 Memory Button 12 16 20 Clear Button 13 21 Clock Timer Button 6 20 22 Sleep Button 21 23 Repeat Button 12 24 Mute Button 6 25 Random Button 13 26 Tuning Up Skip Up Fast Forward Time Up Button 6 11 14 16 20 27 Volume Up Button 6 28 Enter Button 6 10 15 16 29 Demo Dimmer Button 4 6 30 Audio Line INPUT Button 5 22 31 Tuner Button 16 32 iPod Play ...

Page 15: ...irst time the unit is plugged in the unit will enter the demonstration mode refer page 9 To cancel the demonstration mode press the DEMO DIMMER button remote control during power stand by mode The unit will enter the low power consumption Make sure to unplug the AC power lead before making any connections Right speaker FM aerial To video input socket Video cable not supplied Red Black Left speaker...

Page 16: ... if the operation becomes erratic Purchase a AA size battery UM SUM 3 R6 HP 7 or similar Periodically clean the transmitter on the remote control and the sensor on the unit with a soft cloth Exposing the sensor on the unit to strong light may interfere with operation Change the lighting or the direction of the unit if this occurs Keep the remote control away from moisture heat shock and vibrations...

Page 17: ...cies and X Bass On will appear To cancel the extra bass mode press the X BASS button on the remote control When the FUNCTION button on main unit is pressed the current function will change to different mode Press the FUNCTION button repeatedly to select desired function Note The backup function will protect the memorised function mode for a few hours should there be a power failure or the AC power...

Page 18: ...le wireless networks For other DLNA compatible devices turn on the Wi Fi For more details refer to your devices manual 7 Select SHARP_XL HF401 from the list of available networks 8 Launch Music and play desired song on your iPod touch iPhone or iPad For PC Mac launch iTunes For other DLNA compatible devices launch the DLNA compatible media software For more details refer to your devices manual 9 T...

Page 19: ... ID SSID 16Select your router from the list of available networks 17Continue with step 8 to 9 in Direct wireless connection of page 7 You can add other AirPlay devices to join the same Wi Fi network as the unit 1 On the iPod touch iPhone iPad select Settings Wi Fi On the PC Mac enter the list of available wireless networks For other DLNA compatible devices turn on the Wi Fi For more details refer ...

Page 20: ...e output of the main unit is switched off during inserting iPod iPhone and iPad unit This is an Apple product specification Note USB terminal does not support VIDEO out For Mac iTunes 1 On the toolbar menu click iTunes and select Preferences 2 Under Devices tab check the Allow iTunes audio control from remote control speakers box For Windows iTunes 1 On the toolbar menu click Edit and select Prefe...

Page 21: ...g station or iPad connector from USB terminal It is safe to do so even during playback iPod and iPhone connection Dock only Adaptor No iPhone Description 12 iPhone 15 iPhone 3G 15 iPhone 3GS 19 iPhone 4 19 iPhone 4S To insert adaptor for iPod or iPhone 1 Open the docking station for iPod and iPhone by pulling up the cover 2 Insert the adaptor for iPod or iPhone into unit and connect your iPod or i...

Page 22: ...Pod iPhone or connected iPad unit will automatically turn to stand by mode Listening to a CD or MP3 WMA disc This system can play back a standard CD CD R RW in the CD format and CD R RW with MP3 or WMA files but cannot record on them Some audio CD R and CD RW discs may not be playable due to the Navigating the iPod iPhone or iPad menus 1 Press the iPod MENU button to view the menu on iPod iPhone o...

Page 23: ...ti session discs with unfinished writing can still be played Advanced CD or MP3 WMA disc playback By using the Numeric buttons the desired tracks on the current disc can be played Use the Numeric buttons on the remote control to select the desired track while playing the selected disc The Numeric buttons allow you to select up to number 9 When selecting number 10 or higher use the 10 button Notes ...

Page 24: ...rammed stop mode press the CD USB button The display will show Memory Clear and all the programmed contents will be cleared Adding tracks to the programme If a programme has been previously stored the MEM indicator will be displayed Press the MEMORY button Then follow step 2 to add tracks Notes Random play shuffle Programmed play CD 1 While in the stop mode press the MEMORY button on the remote co...

Page 25: ...which is recorded on the disc depends on the writing software There maybe possibilities that this unit will playback the files not according to our expected playback order For CD MP3 WMA 999 numbers of folders and files inclusive of the folders which have non playable files can be read To play back CD R RW About folder playback order 1 ROOT folder is set as folder 1 2 As for folders inside ROOT fo...

Page 26: ... USB cable will affect the performance of this audio system iPod iPhone and iPad is not prone to this To play back USB MP3 player with folder mode off 1 Press the USB button on the remote control or FUNCTION button repeatedly on main unit to select USB function Connect the USB memory device that has MP3 WMA format files on the unit When the USB memory is connected to the main unit the device infor...

Page 27: ...999 including folder with non playable file However the display shows only folder with MP3 files The display playback time may not be displayed correctly when playing back a variable bitrate file The ID3TAG information supported are TITLE ARTIST and ALBUM only Title name artist name and album name can be displayed by pressing the CD USB DISPLAY button during file playback or pause mode WMA meta ta...

Page 28: ...e received broadcast carries traffic information and TA Traffic Announcement will appear while a traffic information is on air PTYI Dynamic PTY Indicator will appear while the Dynamic PTY station is received You can control the RDS by using the buttons on the remote control only Each time the RDS DISPLAY button is pressed the display will switch as follows Memorising a station 1 Perform steps 1 3 ...

Page 29: ...fic programme etc see page 19 from the stations in memory Using the Auto Station Programme Memory ASPM 1 Press the TUNER button on the remote control or FUNCTION button repeatedly on the main unit to select TUNER function 2 Press and hold down the RDS ASPM button on the remote control 1 After ASPM has flashed for about 4 seconds scanning will start 87 50 108 00 MHz 2 When an RDS station is found R...

Page 30: ...M Current contemporary music considered to be easy listening as opposed to RELIGION Any aspect of beliefs and faiths involving a God or Gods the nature of existence and ethics PHONE IN Involving members of the public expressing their views either by phone or at a public forum TRAVEL Features and programmes concerned with travel to near and far destinations package tours and travel ideas and opport...

Page 31: ...ge 6 7 If it is not set you cannot use the timer function For timer playback Plug in USB or load discs or dock iPod to be played 1 Press the ON STAND BY button to turn the power on 2 Press and hold the CLOCK TIMER button 3 Within 10 seconds press the or button to select Once or Daily and press the ENTER button 4 Within 10 seconds press the or button to select Timer Set and press the ENTER button 5...

Page 32: ...s reached the system will enter the power stand by mode automatically Once timer The timer will be cancelled Daily timer The timer operates at the same time every selected day It will continue until the daily timer setting is cancelled Cancel the daily timer when it is not in use 1 Turn the power on and press and hold down the CLOCK TIMER button 2 Within 10 seconds press the or button to select On...

Page 33: ... turn the power on 3 Press the AUDIO LINE INPUT button on the remote control or FUNCTION button repeatedly on main unit to select AUDIO IN function 4 Play the connected equipment If volume level of the connected device is too high sound distortion may occur Should this happen lower the volume of the connected device If volume level is too low increase the volume of the connected device Headphones ...

Page 34: ...n Symptom Possible cause Wi Fi network connection failed Is your router Wi Fi certified WPS Pin and WPS PBC routers is not supported by this unit Is the SSID broadcast on the Wi Fi router enabled Avoid using Wi Fi channel which is much overlapped by the nearby Wi Fi network Is the unit placed near a potential source of interference which may affect Wi Fi signal such as microwave ovens Is your PC u...

Page 35: ...rol paint thinner etc It may damage the cabinet Do not apply oil to the inside of the unit It may cause malfunctions Specifications As part of our policy of continuous improvement SHARP reserves the right to make design and specification changes for product improvement without prior notice The performance specification figures indicated are nominal values of production units There may be some devi...

Page 36: ......

Page 37: ...XL HF401PH HI FI COMPONENT SYSTEM U P DOWN ...

Reviews: