background image

WF-1000W

– 5 –

DISASSEMBLY

Caution on Disassembly
Follow the below-mentioned notes when disassembling
the unit and reassembling it, to keep it safe and ensure
excellent performance:
1. Take cassette tape  out of the unit.
2. Be sure to remove the power supply plug from the wall

outlet before starting to disassemble the unit and remove
the batteries from the unit.

3. Take off nylon bands or wire holders where they need

to be removed when disassembling the unit. After
servicing the unit, be sure to rearrange the leads where
they were before disassembling.

4. Take sufficient care on static electricity of integrated

circuits and other circuits when servicing.

STEP

REMOVAL

PROCEDURE

FIGURE

1

Front Cabinet/

1. Battery Compartment Lid.

5-1

Rear Cabinet

................................. (A1)x1

2. Screw ................... (A2)x3
3. Screw ................... (A3)x4
4. Socket .................. (A4)x1

2

Main PWB/

1. Knob ..................... (B1)x1

5-2

Graphic Equalizer 2. Socket .................. (B2)x3
PWB/

3. Screw ................... (B3)x5

Volume PWB/

4. Screw ................... (B4)x2

Fine Tuning PWB 5. Mic ....................... (B5)x1

3

Tape mechanism 1. Open the cassette holder.

5-2

2. Screw ................... (C1)x6

4

Power PWB/

1. Screw ................... (D1)x3

5-3

Terminal A PWB/ 2. Screw ................... (D2)x2
Terminal B PWB

3. Bracket ................. (D3)x1

4. Screw ................... (D4)x2
5. Hook ..................... (D5)x2

Figure 5-4

Figure 5-2

Figure 5-1

Figure 5-3

STEP

REMOVAL

PROCEDURE

FIGURE

1

Speaker

1. Screw ................... (E1)x5

5-4

2. Front Panel .......... (E2)x1
3. Screw ................... (E3)x4

MAIN UNIT

SPEAKER UNIT

(A1)x1

(A4)x1

Front

Cabinet

Rear

Cabinet

(A2)x1

ø3x6mm

(A2)x1

ø3x6mm

(A3)x4

ø3x20mm

(A2)x1

ø3x10mm

Main PWB

Rear Cabinet

(D1)x3
ø3x10mm

(D2)x2
ø4x16mm

(D4)x2
ø3x10mm

Power 
Transformer 

Voltage Selector

AC Socket

(D3)x1

Power
PWB

Terminal B
PWB

Terminal A
PWB

(D5)x2

(E3)x4
ø3x10mm

(E1)x5
ø4x16mm

Speaker Box

Main Unit

Speaker
Release
Lever

Speaker Cord 
Holder

Speaker 
Cord 

Driver

Woofer

Tweeter

Front Panel
(E2)x1

Front Cabinet

Washer

Nat

(B1)x1

(B4)x2
ø3x10mm

(C1)x4
ø3x10mm

(B3)x5
ø3x10mm

(C1)x2
ø3x10mm

Tape
Mechanism

(B5)x1

(B2)x3

Cassette
Holder
(Left/Right)

Open

Fine Tuning PWB Volume

PWB

Graphic
Equalizer PWB

Main PWB

Summary of Contents for WF-1000W

Page 1: ...OR AND LED 7 SCHEMATIC DIAGRAM WIRING SIDE OF P W BOARD 8 PARTS GUIDE EXPLODED VIEW WF 1000W BK WF 1000W S SERVICE MANUAL SHARP CORPORATION No S0957WF1000WK In the interests of user safety the set should be restored to its original condition and only parts identical to those specified should be used This document has been published to be used for after sales service only The contents are subject t...

Page 2: ... 12 5 W DC operation 10 T H D Input terminal Mixing microphone 600 ohms CD LINE 350 mV 47 kohms Output terminal Headphones 16 50 ohms recommended 32 ohms Dimensions Width 300 mm 11 13 16 Height 240 mm 9 1 2 Depth 220 mm 8 11 16 Weight 3 8 kg 8 4 lbs without bat teries Radio section Frequency range FM 88 108 MHz SW1 2 3 7 3 MHz SW2 7 3 22 MHz MW 526 5 1 606 5 kHz Tape recorder section Frequency res...

Page 3: ...ent 16 TAPE 1 Record Button 17 TAPE 1 Play Button 18 TAPE 1 Rewind Button 19 TAPE 1 Fast Forward Button 20 TAPE 1 Stop Eject Button 21 TAPE 1 Pause Button 22 TAPE 2 Play Button 23 TAPE 2 Rewind Button 24 TAPE 2 Fast Forward Button 25 TAPE 2 Stop Eject Button 26 FM SW Telescopic Rod Aerial 27 CD Line Input Sockets 28 Beat Cancel Switch 29 Speaker Terminals 30 AC Voltage Selector 31 AC Power Input S...

Page 4: ... until it stops Set the tuner variable capacitor to 0 point F LOW state 6 Adjust the dial pointer so that its stopper becomes the Figure 4 2 position Adjust the engagement of the pointer gear and the tuner gear to get the minimum space between the PWB and the stopper This position is the 0 point 7 Screw up the PWB and the dial pointer guide Fine Tuning PWB Dial Pointer 211 0 Point Dial Pointer 211...

Page 5: ... Socket B2 x3 PWB 3 Screw B3 x5 Volume PWB 4 Screw B4 x2 Fine Tuning PWB 5 Mic B5 x1 3 Tape mechanism 1 Open the cassette holder 5 2 2 Screw C1 x6 4 Power PWB 1 Screw D1 x3 5 3 Terminal A PWB 2 Screw D2 x2 Terminal B PWB 3 Bracket D3 x1 4 Screw D4 x2 5 Hook D5 x2 Figure 5 4 Figure 5 2 Figure 5 1 Figure 5 3 STEP REMOVAL PROCEDURE FIGURE 1 Speaker 1 Screw E1 x5 5 4 2 Front Panel E2 x1 3 Screw E3 x4 ...
Page 6: ... preparing the test circuit shown in Fig 6 connect the Pin 13 Pin 21 and ground of the IC2 with the test circuit and measure the value FM IF RF Specified Value Adjusting Point Test Stage FM IF L9 Input FM Antenna FM Detection L10 Output Pin 9 of IC2 FM Band fL L1 Input Antenna Coverage fH TC1 Output Headphone Socket FM Tracking fL 88 0 MHz L2 Load resistance fH 108 MHz TC2 32 ohms Instrument Conne...

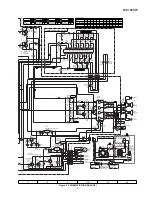
Page 7: ...without prior notice Parts marked with are important for maintaining the safety of the set Be sure to replace these parts with specified ones for maintaining the safety and performance of the set DESCRIPTION POSITION SW1 BAND SELECTOR FM SW101 RECORD PLAYBACK PLAYBACK SW102 BEAT CANCEL A SW103 DUBBING SPEED MIC MIC FM MONO FM MODE SW401 X BASS ON SW501 FUNCTION SELECTOR CD LINE SW501A TAPE 2 MAIN ...

Page 8: ...180K R104 56K R102 56 R110 4 7K C114 4 7 50 R103 56K C101 470P C105 330P C103 820P R107 5 6K C111 0 033 ML R105 180K R109 4 7K C109 10 16 C113 4 7 50 C107 330P R136 15K C132 120P L104 22mH R121 10K R101 56 C115 4 7 50 C127 1000 10 C128 2 2 50 C121 330P R115 2 2K R117 330K C117 10 16 C119 0 015 ML C123 0 0015 L101 2 7mH C125 4 7 50 R114 180K R116 2 2K C122 330P R118 330K C120 0 015 ML C118 10 16 R1...

Page 9: ...01 B 50K B C416 0 15 ML R419 3 3K C414 0 001 ML C413 0 001 ML R420 3 3K C415 0 15 ML R416 1K R415 1K CNP601 2 1 CNS601 2 1 SW401 X BASS POWER R CH 8 Ohm 8 Ohm L CH L CH IC402 CNS103 SP404 TWEETER SP403 TWEETER SP402 WOOFER SP401 WOOFER SO601 AC POWER INLET SOCKET AC110 127V AC220 240V 50 60Hz SW601 VOLTAGE SELECTOR AC220V 240V AC110V 127V OUT2 OUT1 OUT2 OUT1 IN OUT IN SW502 TAPE1 MAIN SW503 TAPE2 ...

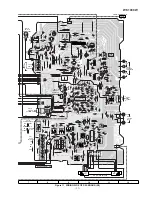
Page 10: ...ED ORANGE YELLOW GREEN BLUE VIOLET GRAY WHITE BLACK PINK FM SW ROD ANTENNA 253 C217 VR203 VR204 VR205 C206 C208 C210 C218 C214 C220 C216 C212 IC201 C200 C213 C209 C211 C219 R200 C201 C202 R202 C221 C205 C207 C203 C204 R204 R205 R203 C222 LED502 R206 R201 C215 R518 C414 C416 R420 R419 C413 C415 LED1 FW1 VR401 VOLUME R212 TC9 FINE TUNING PWB A4 VOLUME PWB A3 GRAPHIC EQUALIZER PWB A2 BK BK FW2 2 1 5 ...

Page 11: ...R130 R511 R133 R134 C506 C513 IC501 C514 C512 CNP103 C185 C186 C183 Q181 R183 C181 R124 C182 R184 Q182 C184 FW1 IC502 D156 D158 D155 C418 R429 R427 R428 IC402 C420 C424 C419 Q403 Q404 C510 C433 C423 R425 R426 R435 R433 C427 CNP601 R515 VR102 R516 L501 Q504 R517 R514 C511 C509 R513 C508 R512 Q502 R504 R503 DZ501 C507 Q501 C504 C503 C502 C505 R174 D159 R100 R304 C307 C306 L301 R306 R305 C303 Q301 C3...

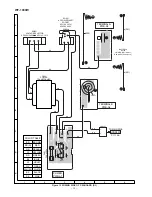
Page 12: ... TERMINAL B PWB A6 POWER PWB A7 1 2 CNP601 CNS601 WH WH RD RD RD BK BL SW601 VOLTAGE SELECTOR AC220V 240V AC110V 127V OR OR BK SO601 AC POWER INLET SOCKET AC110V 127V AC220V 240V 50 60Hz T601 POWER TRANSFORMER 250 237 251 251 TO MAIN PWB P11 12 A F601 T4A L 250V BR COLOR TABLE RD R OR YL GR BL VL GY WH W BK PK BROWN RED ORANGE YELLOW GREEN BLUE VIOLET GRAY WHITE BLACK PINK BK ...

Page 13: ... type VCT Semiconductor type VC MF Cylindrical type without lead wire VC MN Cylindrical type without lead wire VC TV Square type without lead wire VC TQ Square type without lead wire VC CY Square type without lead wire VC CZ Square type without lead wire VC J The 13th character represents capacity difference J 5 K 10 M 20 N 30 C 0 25 pF D 0 5 pF Z 80 20 If there are no indications for the electrol...

Page 14: ...CQPKV2AA301J J 300 pF 100V Polypropylene C20 VCQPKV2AA152J J 1500 pF 100V Polypropylene C21 VCCUPA1HH5R0C J 5 pF UJ 50V C22 VCKZPA1HF223Z J AA 0 022 µF 50V C23 RC GZA227AF1A J AB 220 µF 10V Electrolytic C24 26 VCKZPA1HF223Z J AA 0 022 µF 50V C27 VCQPKV2AA472J J AB 0 0047 µF 100V Polypropylene C29 RC GZA226AF1C J AB 22 µF 16V Electrolytic C30 VCKZPA1HF223Z J AA 0 022 µF 50V C31 VCQYKA1HM472K J AB 0...

Page 15: ...172 173 VRD ST2CD103J J AA 10 kohm 1 6W R174 VRD ST2CD223J J AA 22 kohms 1 6W R176 VRD ST2CD224J J AA 220 kohms 1 6W R177 VRD ST2CD102J J AA 1 kohm 1 6W R180 VRD ST2EE561J J AA 560 ohms 1 4W R181 182 VRD ST2CD102J J AA 1 kohm 1 6W R183 184 VRD ST2CD334J J AA 330 kohms 1 6W R185 186 VRD ST2CD221J J AA 220 ohms 1 6W R187 188 VRD ST2CD392J J AA 3 9 kohms 1 6W R200 VRD ST2EE331J J AA 330 ohms 1 4W R20...

Page 16: ...JKNBP0001BGSA J Knob Function Selector 259 JKNBP0001BGSA J Knob Dubbing Speed 260 JKNBP0002BGSA J Knob Band Selector 261 LHLDS1002BGZZ J Holder Record Lever 262 MLEVP0002BGZZ J Lever Record 263 GFTAB1001BGSA J Battery Compartment Lid S 263 GFTAB1001BGSB J Battery Compartment Lid BK 264 TSPC 0008BGZZ J Label Specifications S For Malaysia Asia Middle East Africa Syria 264 TSPC 0009BGZZ J Label Speci...

Page 17: ...N0006BGZZ J Label Serial No Bar Code BK Asia Middle East Africa Only TLABS0001BGZZ J Label Manufucture TLABZVR09BGZZ J Label VY TLABZ0003BGZZ J Label Feature Left For Malaysia TLABZ0004BGZZ J Label Feature Right For Malaysia TLABZ0005BGZZ J Label Feature Left Except for Malaysia TLABZ0006BGZZ J Label Feature Right Except for Malaysia P W B ASSEMBLY Not Replacement Item PWB A1 9 DUNTK0002BG01 J Mai...

Page 18: ...T601 PWB A7 249 236 240 241 601 213 235 MIC151 211 PWB A8 601 218 258 259 VR401 257 260 PWB A3 601x2 PWB A1 601x2 601x2 601 605x5 214x2 201 601 213 601 262 261 238 TAPE MECHANISM 605x6 300 300 1 300 2 300 3 300 4 300 5 300 6 300 7 300 8 300 9 M501 300 10 SW501A 300 11 SW502 300 12 SW503 222 223 224 225 226 227 230 229 231 232 203 215 209 208 202 242 601 206 221 212 216 210 205 204 PWB A4 PWB A2 21...

Page 19: ... 6 BLACK RED WHITE WOOFER SP401 L CH SP402 R CH TWEETER SP403 L CH SP404 R CH TWEETER SP403 L CH SP404 R CH WOOFER SP401 L CH SP402 R CH 701x4 305 301 LEFT 302 RIGHT SP403 L CH SP404 R CH SP401 L CH SP402 R CH 305 BLACK 702x5 303 LEFT 304 RIGHT 305 306 307 305 308 309 ...

Page 20: ...ma Hiroshima 739 0192 Japan Printed in Japan COPYRIGHT 1999 BY SHARP CORPORATION ALL RIGHTS RESERVED No part of this publication may be reproduced stored in a retrieval system or transmitted in any from or by any means electronic mechanical photocopying recording or otherwise without prior written permission of the publisher ...

Reviews: