background image

46 

Advanced Features

Audio Dubbing

1

Play back the recorded Mini DV cassette
and locate the tape position where you
wish to start audio dubbing.

2

Press 

m

 to pause playback.

3

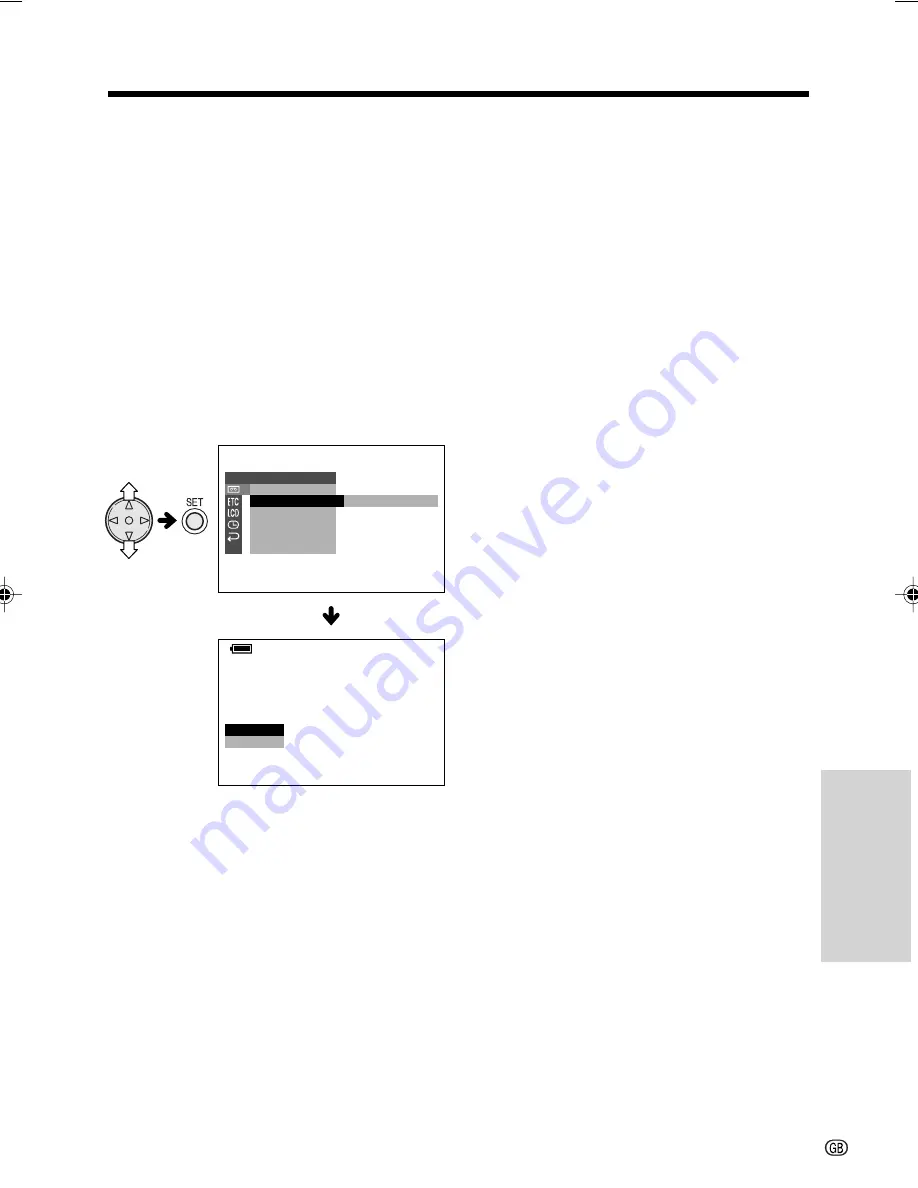
Press the MENU button until the menu
screen appears.

4

Press 

l

 or 

m

 on the operation button

to select 

V

, then press the SET button.

5

Press 

l

 or 

m

 to select “AUDIO DUB”,

then press the SET button.

• The audio dubbing screen appears.

6

Press the SET button to begin audio
dubbing. Record your narration.

To pause audio dubbing

Press the SET button. To resume audio
dubbing, press the SET button again.

To cancel audio dubbing

Press the MENU button. The audio dubbing
screen disappears.

If you wish to change the
dubbed audio or dub additional
scenes

1

Press the MENU button to turn off the
audio dubbing screen.

2

Repeat steps 1 to 6 above.

Notes:

• It is recommended that you use Audio Dubbing

only with recordings made with this camcorder.
Use of recordings made with other digital video
equipment may result in poor audio quality.

• Audio dubbing will automatically pause if the

original audio changes from 12-bit mode to 16-
bit mode or vice versa. Press the SET button to
resume operation.

• Audio dubbing will automatically stop if a portion

recorded in LP mode or an unrecorded portion
of the tape is encountered.

• You can play back the dubbed audio and the

original audio together or separately (see page
47).

E X E C U T E

A UD I O D U B

S T O P

S T A R T

A UD I O

A UD I O

2

1 +

2

1 +

E F F E C T

P L A Y B A C K

P I C .

A U D I O D U B

A U D I O
R E T U RN

S E T

VL-NZ50S-GB-042-047

02.3.28, 3:14 PM

46

Summary of Contents for ViewCam VL-NZ50S

Page 1: ... PORTUGUÊS ENGLISH CAMCORDER CON PANTALLA DE CRISTAL LÍQUIDO VIDEOKAMERA MED FLYTANDE KRISTALLSKÄRM CAMCORDER COM VISOR DE CRISTAL LÍQUIDO LIQUID CRYSTAL DISPLAY CAMCORDER VL NZ50S MANUAL DE MANEJO MANUAL DE OPERAÇÃO BRUKSANVISNING OPERATION MANUAL ...

Page 2: ......

Page 3: ...isual material may consist of copyrighted works which must not be recorded without the authority of the owner of the copyright Please refer to relevant laws in your country Power supply This unit can be operated by connecting it to either the AC adapter or battery pack The AC adapter incorporates the AUTO VOLTAGE AC 110 240 V 50 60 Hz function NOTE The LCD panel of this camcorder is a very high te...

Page 4: ... it locks into place 2 Charging the Battery Pack 1 Attach the battery pack on the camcorder and make sure that the Power switch is set to OFF 2 Connect the supplied power cord to the AC power socket on the AC adapter and insert the AC plug into a power outlet 3 Insert the DC plug into the DC input jack The charge indicator lights up The charge indicator turns off when the battery is charged 4 Remo...

Page 5: ...door by pressing the centre until it clicks into place SAVE R E C Tips on Recording Positions To create images that are easy to watch during playback try to record with an upright posture and steady hand to prevent a shaky image Holding the camcorder Place your right thumb close to the REC START STOP button and Power Zoom control Place your left thumb on the thumb rest on the left side of the scre...

Page 6: ...sh the Power Zoom control to T 1 tele photo or W 2 wide angle side Playback 1 Hold down the Lock button and set the Power switch to VCR 2 Press j or k on the Operation button to rewind or fast forward the tape to the desired point 3 Press m to begin playback To stop playback Press l Volume Control Push the Volume control to the L or side to increase 1 or decrease 2 the volume Power switch REC STAR...

Page 7: ...d image Avoid placing the camcorder in close proximity to lighting equipment The heat from incan descent lights may de form the camcorder or cause it to malfunction Always respect prohibitions or restrictions on the use of electronic equipment on commercial flights or in other sensitive ar eas Be aware of the temperature and humidity You can use your camcorder at 0 C to L40 C and at 30 to 80 relat...

Page 8: ...ew forms the word DEW flashes on the screen and the power will automatically turn off in approximately 10 seconds 1If DEW flashes remove the cassette leave the cassette compartment open and wait for a few hours to allow the camcorder to acclimatise to the surrounding tempera ture 2To use the camcorder again turn on the power after waiting for a few hours Be sure that DEW has disappeared 3Do not in...

Page 9: ...gged with dirt soon after cleaning this might be caused by a damaged tape In this case stop using that cassette immediately 1 Insert a cleaning tape into the camcorder 2 Set the camcorder to VCR mode The video head cleaning screen appears 3 Press the SET button to begin video head cleaning NOW CLEANING flashes during cleaning After about 20 seconds video head cleaning automatically finishes and EJ...

Page 10: ...vii Supplied Accessories Battery pack BT L225 Power cord Audio video cable Lens cap Lens hood Wrist strap Tripod adapter CR2025 type lithium battery AC adapter ...

Page 11: ...viii Optional Accessories Standard life battery pack BT L225 Extended life battery pack BT L445 ...

Page 12: ...e and Time 13 Attaching the Lens Hood 14 Attaching the Wrist Strap 14 Using the Lens Cap 14 Tips on Recording Positions 15 Camera Recording Easy Camera Recording in Full Auto Mode 16 Zooming 17 Auto Focus 17 Macro Shots 17 Remaining Recording Time Display 18 Remaining Battery Power Display 18 Playback Playback 19 Volume Control 19 Video Search 20 Still 20 Watching Playback on a TV 21 Using the Men...

Page 13: ...d Features Camera Recording Manual Focus 37 Manual Exposure 38 White Balance Lock 39 Setting the Camcorder to Full Auto Mode 39 Digital Picture Effects 40 Scene Menu Program AE 41 Playback Using the Time Code 42 Editing 43 Editing with the DV Terminal IEEE1394 44 Audio Dubbing Feature 45 Selecting the Audio Playback Mode 47 Appendix Preparation Useful Features Operation References Basic Operations...

Page 14: ...es For details on the use of each part refer to the page number indicated in brackets Front view Lithium battery compartment door p 11 Stereo microphone Zoom lens Cassette holder p 10 Cassette compartment door p 10 Cassette compartment door release p 10 DC input jack pp 8 9 ...

Page 15: ...ration References 2 Rear view DV terminal p 44 AV jack pp 21 43 GUIDE ON OFF switch p 23 Operation button Jack cover pp 21 43 44 Power Zoom Wide angle Telephoto control p 17 VOLume control p 19 LCD monitor ...

Page 16: ...14 Battery release p 7 Battery mounting surface p 7 Tripod adapter socket p 29 GAMMA BRIGHTER button pp 25 26 35 FADE button p 27 SET button p 22 STILL button p 29 Power switch CAMERA VCR select switch pp 16 19 Speaker MANUAL button p 5 RECord START STOP button p 16 MENU button pp 5 22 ...

Page 17: ...H E RS B E E P REMO T E T I ME CODE T C OU T RE T URN E F F E C T P I C S C E NE MENU QK RE T URN RE T URN E F F E C T P L A Y B AC K P I C AUD I O DUB AUD I O RE T URN S E T S E T T I NG 1 DG T L Z OOM T A P E D I S S PE ED 1 6 9 AUD I O MODE RE TURN E F F E C T P I C S C E NE MENU QK RE T URN RE T URN OTH E RS B E E P T I ME CODE T C OU T DEMO L A NGUAGE RE TURN MODE S E T T I NG 1 S E T T I NG ...

Page 18: ...screen Indicators off White balance screen p 39 Exposure setting screen p 38 Indicators on Each time you press the MENU button the screen changes as shown below The example screens shown are for CAMERA mode AU T O 3 0 min E F F E C T S E T T I NG P I C S C E NE MENU QK RE T URN RE T URN 1 AU T O AU T O E X POSURE AU T O WH I T E BA L AU T O 3 0 min MAN F OCUS AUT O AUT O AUT O MANUAL button MENU b...

Page 19: ...to the record protect position preventing recording see page 52 The tape is about to end Prepare a new cassette see page 10 THE ENDS SOON TAPE DEW LAMP LAMP DEW The tape has reached the end Replace it with a new cassette see page 10 The battery is almost depleted Replace it with a fully charged battery pack see page 7 Dew has formed inside the camcorder Wait a few hours for the dew to dry away see...

Page 20: ...long period of time Make sure that the battery pack is firmly attached during operation If it is not the battery pack may come off or camcorder operation may fall because of the poor contact pressure To prevent damage to the battery pack when removing be sure to firmly hold the battery pack while pressing the release Use only SHARP model BT L225 or BT L445 battery packs with this camcorder Use of ...

Page 21: ... recommended to perform the following procedure at least once every six months 1Fully charge the battery pack 2Attach the battery pack to the camcorder and set the Power switch to CAMERA without inserting a cassette Allow the battery power to fully discharge by leaving it on the camcorder until the camcorder power automatically turns off 3Remove the battery pack and store it between 10 C and 20 C ...

Page 22: ... plug into a power outlet 3 Insert the DC plug into the DC input jack The camcorder is supplied power 4 Hold down the Lock button and set the Power switch to CAMERA or VCR DC input jack Lock button Note When using the AC adapter to power the camcorder the battery pack is not charged Cautions BEFORE REMOVING THE DC PLUG ALWAYS STOP RECORDING OR PLAYBACK AND TURN THE POWER OFF Removing the DC plug w...

Page 23: ...ment door while the cassette holder is extending or retracting Be careful not to get your fingers caught in the cassette holder Do not apply force to the cassette holder except when pressing the W mark to close it Do not tilt the camcorder or hold it upside down when you are inserting or removing a cassette It may damage the tape Remove the cassette if you will not use the camcorder for a long per...

Page 24: ... the W mark gently then close the cassette compartment door by pressing the centre until it clicks into place Removing Perform steps 1 and 2 above then lift out the battery from the battery holder Notes on the Use of the Lithium battery Do not short circuit recharge disassemble or heat the lithium battery Should the lithium battery leak wipe the battery compartment clean and then insert a new batt...

Page 25: ...E SPRACHE or LANGUE then press the SET button The language selection screen appears 4 Press l or m to select the desired language then press the SET button The menu screen displays in the language selected 5 Press the MENU button to turn off the menu screen ENGL I SH L ANGUAGE DEUTSCH F RANÇ A I S AU T O E NGL I SH OTH E RS B E E P T I ME CODE T C OU T DEMO L A NGUAGE RE TURN MODE ENGL I SH L ANGU...

Page 26: ...to select 2003 year then press the SET button 7 Press l or m to select 10 hour then press the SET button 8 Press l or m to select 30 minute then press the SET button The internal clock now starts operating 9 Press the MENU button to turn off the menu screen Note If the date and time have been set the SETTING 1 screen T appears in step 2 Select SETTING in the CLOCK SET screen P using the Operation ...

Page 27: ...thin five minutes 1 2 H 2 4 H C L O C K S E T D I S P L A Y S E T T I NG 1 2 H 2 4 H RE TURN 12H 2 1 H 24H Attaching the Wrist Strap Attach the wrist strap to the wrist strap loop as shown below Caution Do not swing the camcorder by the strap Attaching the Lens Hood Turn the lens hood in the direction of the arrow to attach it To remove it turn it in the opposite direction Note Filters and other a...

Page 28: ... the screen Basic posture Shooting from a high angle Shooting from a low angle Always attach the lens cap when not using the camcorder Note Be sure the lens hood is attached to the camcorder before attaching the lens cap When recording hang the lens cap on the wrist strap to keep the cap out of the way Turn the LCD monitor so that the screen faces upward Turn the LCD monitor so that the screen fac...

Page 29: ...dby mode Turn off the power if you will not be recording again soon If the camcorder remains in Recording Standby mode for more than 5 minutes the power will automatically turn off to save battery power and to protect the tape from being damaged To resume recording set the Power switch to OFF and then back to CAMERA The camcorder will make a confirmation sound when it is left in Recording Standby ...

Page 30: ...the centre of the scene Notes If no subject is in the centre of the scene the focus area will expand and the subject nearest the centre will be focused on If no subject is displayed the camcorder will automatically zoom out until a subject comes into the frame Auto Focus may not work in the situations described on page 37 In these situations use the manual focus function Macro Shots This camcorder...

Page 31: ...er to suddenly lose power The tape has reached the end THE ENDS SOON TAPE TAPE END CHANGE THE CASSE TTE TAPE END Warning indicator Approx remaining time Less than 1 min 3 0 min BAT TERY I S TOO LOW Remaining Recording Time Display When the camcorder is recording an on screen indicator displays the approximate remaining tape time in minutes Notes The remaining recording time indicator appears when ...

Page 32: ...back Basic Operations Playback To stop playback Press l To turn the power off Set the Power switch to OFF without pressing the Lock button Note The tape is automatically rewound when playback reaches the end of the tape VOLUME Volume Control When the camcorder is in VCR mode push the Volume control to the L or side to increase 1 or decrease 2 the volume The volume level indicator will appear on th...

Page 33: ...ast forward or rewind picture displays 2 If the scene is still rather far from the current tape position release the Operation button to normal fast forward or rewind 3 Repeat steps 1 and 2 above until you find the scene 4 Press m to begin normal playback Notes The sound is off during search You may experience picture noise during search This is not a malfunction Still The still function allows yo...

Page 34: ...set it to the AV or LINE input channel Operate the TV as you normally do to view the signal from the VCR See the operation manuals of your TV and VCR 4 Set the Power switch on the camcorder to VCR and begin playback see page 19 Notes If your TV or VCR has a 21 pin Euro SCART connector use the RCA 21 pin Euro SCART conversion connector QSOCZ0033TAZZ POWER TV VCR SET UP CHANNEL REC PLAY STOP EJECT P...

Page 35: ...utton You can press k instead of the SET button To adjust another menu item press l or m to select RETURN and press the SET button then perform steps 3 to 5 To turn off the menu screen Press the MENU button Notes Certain menu items are common to all camcorder modes If the BEEP menu item for example is set to OFF in CAMERA mode it will be automatically set to OFF in VCR mode The menu screen automat...

Page 36: ...ypes Cross A cross mark at the centre of the screen for placing the subject at the centre Focus Focus brackets for guiding you to the focus area Landscape Grid lines dividing the screen into 9 areas to help you with the horizontal and vertical composi tion Snapshot For captur ing a small group of friends in a frame with surrounding back ground Portrait Green frame fitting a full body view and yell...

Page 37: ...es when higher digital zoom settings are used 1 In CAMERA mode press the MENU button until the menu screen appears 2 Press l or m on the operation button to select Y then press the SET button 3 Press l or m to select DGTL ZOOM then press the SET button 4 Press l or m to select 40 or 300 then press the SET button 5 Press the MENU button to turn off the menu screen OF F 4 0 3 0 0 DG T L Z OOM T A P ...

Page 38: ...In CAMERA mode press the GAMMA BRIGHTER button once GAMMA appears indicating that Gamma Brightness Compensation is now working To obtain a brighter picture Press the GAMMA BRIGHTER button again The x indicator appears Note When the x indicator is displayed the background will become slightly brighter To cancel Gamma Brightness Compen sation Press the GAMMA BRIGHTER button until GAMMA disappears AU...

Page 39: ...Press the GAMMA BRIGHTER button again The e indicator appears To cancel the gain up function Press the GAMMA BRIGHTER button until GAMMA disappears Notes You may experience some picture noise in Gain up mode which increases when the e displays When the e indicator displays you may get a shadow image behind a subject that is moving around a lot Fine brightness adjustments are possible when using ma...

Page 40: ...TOP button at the point where you wish to stop recording The image and sound fade out as the picture gradually turns white The camcorder then returns to Recording Standby mode To cancel Fade mode Press the FADE button again in Recording Standby mode To use Fade Out only 1 During camera recording press the FADE button to display FADE 2 Press the REC START STOP button at the point where you wish to ...

Page 41: ...creen Notes To cancel the quick return function while SEARCH is flashing press the SET button twice Quick return will not work if you remove the cassette and reload it after recording or if nothing has been recorded since loading S T AR T S T OP E F F E C T P I C S C E NE MENU QK RE T URN RE T URN S E T T I NG 1 SE ARCH Edit Search The edit search function lets you search without switching from CA...

Page 42: ...ot retractable Still Recording You can record continuous still images of subjects 1 In Recording Standby mode press the STILL button fully A still image of the subject is displayed 2 Press the REC START STOP button The still image of the subject will be recorded To pause recording Press the REC START STOP button To cancel the still image Press the STILL button fully Notes Still Recording can also ...

Page 43: ...igital image stabilization DIS function allows you to stabilize the image by electroni cally compensating for relatively minor image shaking that is often annoying in close up shots 1 In CAMERA mode press the MENU button until the menu screen appears 2 Press l or m on the operation button to select Y then press the SET button 3 Press l or m to select DIS then press the SET button 4 Press l or m to...

Page 44: ...or section to the self recording position during recording or playback For recording in Self Recording mode be sure to rotate the monitor section NOT the lens section If you hold the camcorder upside down with the lens at the bottom the subject will be recorded upside down More Information on Self Re cording The screen image automatically inverts when the monitor rotation is between 135 and 200 Wh...

Page 45: ...n To return to SP mode Select SP in step 4 above S P L P DG T L Z OOM T A P E D I S S PE ED 1 6 9 AUD I O MODE RE TURN S E T T I NG 2 LP TAPE SPEED L P AU T O 4 5 min Notes on the use of LP mode To record in LP mode be sure to use a Mini DV cassette labelled for use with LP mode Frozen images mosaic pattern picture noise audio interruptions or audio loss may occur in the following cases When using...

Page 46: ...ect AUDIO MODE then press the SET button 4 Press l or m to select 16bit then press the SET button 5 Press the MENU button to turn off the menu screen The 16 bit audio recording mode indicator only appears when the on screen indicators are turned on To return to 12 bit audio recording mode Select 12bit in step 4 above Note When using Audio Dubbing with 16 bit audio recordings both the dubbed and or...

Page 47: ...or m to select ON then press the SET button 5 Press the MENU button to turn off the menu screen Operating Aim the remote control at the remote sensor of the camcorder and press the control buttons to operate Notes Do not use old and new batteries together or batteries of different brands together Be careful not to expose the remote sensor to direct sunlight or strong interior lighting as this may ...

Page 48: ...been set the display will be left blank when playing back the recording The display will also be left blank for unrecorded or damaged portions of the tape In VCR mode the current date and time are displayed when the tape is not being played back OF F DA T E DA T E T I ME C L O C K S E T D I S P L A Y S E T T I NG 1 2 H 2 4 H RE TURN D I SPL AY DATE T IME AU T O 3 0 min 3 0 0 2 6 0 3 0 1 2 Gamma Pl...

Page 49: ...a colour similar to that of an old photograph SOLARI The contrast of the subject is enhanced creating a unique artistic image NEGA The blacks and whites of the image are reversed and colours of the image are inverted BLUE The picture is displayed with the effect of playback through a blue filter 1 During playback press the MENU button until the menu screen appears 2 Press l or m on the operation b...

Page 50: ...n is displayed Notes The camcorder may not be able to focus correctly if the subject is closer than approxi mately 1 5 m Set the zoom control to wide angle and try refocusing again If the lens is dirty or fogged the camcorder may not be able to focus correctly When MF is displayed you can manually adjust the focus by pressing l or m even if the focus setting screen is not displayed Fast speed shut...

Page 51: ...e use the manual exposure function to correct the exposure level Background is too bright and subject too dark backlit subject Increase the exposure level to allow more light through the lens Subject is too bright against background Decrease the exposure level to allow less light through the lens 1 In CAMERA mode press the MANUAL button until the exposure setting screen appears 2 Press l or m to s...

Page 52: ...stop flashing when the camcorder is set to Full Auto mode White paper or white cloth White Balance Lock The colour of the subject on the screen looks different depending on lighting conditions Lock the White Balance if the Auto White Balance does not work properly 1 In CAMERA mode press the MANUAL button until the white balance setting screen appears 2 Aim the lens at a white object Adjust the dis...

Page 53: ...E P I A SOL AR I B L U E NE G A E F F E C T P I C S C E NE MENU QK RE T URN RE T URN S E T T I NG 1 B W P I C EFFECT Types B W To record in black and white SEPIA To record in sepia colour similar to that of an old photograph SOLARI To record with enhanced contrast creating a unique artistic image NEGA To record a picture whose blacks and whites of the image are reversed and colours of the image ar...

Page 54: ...enu screen The selected scene setting indicator displays when the on screen indicators are turned on To cancel the scene setting Select OFF in step 4 above Note Scene settings cannot be used when displaying a still image OF F SUNL I GH T SPORT DUS K PAR T Y E F F E C T P I C S C E NE MENU QK RE T URN RE T URN S E T T I NG 1 SPORT SCENE MENU SPORT Types SPORT When you want to record a fast moving s...

Page 55: ...REMO T E T I ME CODE T C OU T RE T URN Advanced Features Playback 5 Press the MENU button to turn off the menu screen The time code appears when the on screen indicators are turned on To turn off the time code Select DISP OFF in step 4 above Note When the tape reaches an unrecorded section the time code returns to zero TC0 00 00 Once recorded the time code cannot be changed Displaying the time cod...

Page 56: ...equence to be cut 5 Press the Pause Still or Record button on the VCR to resume recording when the source tape reaches the end of the sequence to be cut POWER TV VCR SET UP CHANNEL REC PLAY STOP EJECT PAUSE STILL Notes If your VCR has a 21 pin Euro SCART connector use the RCA 21 pin Euro SCART conversion connector QSOCZ0033TAZZ See page 2 for how to open the jack cover If your VCR has only one aud...

Page 57: ...fer all dubbing signals including video and audio Cutting Unwanted Sequences Perform Cutting Unwanted Sequences on page 43 using the video equipment as the recording source Note Make sure that the video equipment to which you are recording can input dubbing signals via the DV terminal To DV terminal To DV terminal DV cable commercially available Video equipment with DV terminal e g DV camcorder Th...

Page 58: ...2 bit audio recording The audio is recorded in stereo on Audio 1 Audio 1 Stereo left and right sound Audio 2 No audio 16 bit audio recording The audio is recorded in stereo with the left and right sound on two separate channels Audio 1 Left sound Audio 2 Right sound In Audio Dubbing mode 12 bit audio recording The dubbed audio is recorded on Audio 2 Audio 1 Original stereo left and right sound Aud...

Page 59: ... If you wish to change the dubbed audio or dub additional scenes 1 Press the MENU button to turn off the audio dubbing screen 2 Repeat steps 1 to 6 above Notes It is recommended that you use Audio Dubbing only with recordings made with this camcorder Use of recordings made with other digital video equipment may result in poor audio quality Audio dubbing will automatically pause if the original aud...

Page 60: ...ppears 3 Press l or m on the operation button to select V then press the SET button 4 Press l or m to select AUDIO then press the SET button 5 Press l or m to select the desired audio playback mode then press the SET button 6 Press the MENU button to turn off the menu screen The selected audio playback mode indicator only appears when the on screen indicators are turned on Note The audio playback ...

Page 61: ...ture not the recorded image Adjusting the Backlight 1 Press the MENU button until the menu screen appears 2 Press l or m on the operation button to select O then press the SET button 3 Press l or m to select BACKLIGHT then press the SET button 4 Press l or m to select AUTO NORMAL BRIGHT or OFF then press the SET button AUTO The camcorder automatically switches between NORMAL and BRIGHT depending o...

Page 62: ...elow to turn off the confirmation sounds 1 Press the MENU button until the menu screen appears ON OF F OTH E RS B E E P T I ME CODE T C OU T DEMO L A NGUAGE RE TURN MODE OFF BEEP 2 Press l or m on the operation button to select I then press the SET button 3 Press l or m to select BEEP then press the SET button 4 Press l or m to select OFF then press the SET button 5 Press the MENU button to turn o...

Page 63: ...ing playback Use a wide angle setting for fast moving subjects Note It may take longer to focus when zooming and panning are used frequently Lighting For clear good quality recording 500 to 100 000 lux is needed Recording is possible with less light but the picture quality may suffer Adequate lighting is also essential for correct white balance Note The figures in the chart are approximations Situ...

Page 64: ...rporates copyright protection technology that is protected by method claims of certain U S patents and other intellectual property rights owned by Macrovision Corporation and other rights owners Use of this copyright protection technology must be authorized by Macrovision Corporation and is intended for home and other limited viewing uses only unless otherwise authorized by Macrovision Corporation...

Page 65: ...ge the tape Do not place the Mini DV cassette in direct sunlight near strong heat sources or in areas with excessive steam Store the Mini DV cassette in its case and stand it in an upright position If the tape is not properly wound rewind the tape Do not drop the Mini DV cassette or subject it to excessive shocks To protect recordings against acciden tal erasure Slide the protect tab on the rear o...

Page 66: ...ecomes noticeably shorter with a normal charge the battery pack is at the end of its service life Replace it with a new battery pack If the terminals of the battery pack are dirty wipe the terminals with a soft dry cloth Battery Pack This camcorder uses a lithium ion type battery pack Charging Charge the battery pack immediately or a day before use The battery pack gradually self discharges even i...

Page 67: ... Abroad Television signal standards and electrical voltages and frequencies vary substantially from country to country When you are abroad check the sections below before using the AC adapter or connecting the camcorder to a TV AC Adapter Supplied Accessory The supplied AC adapter is compatible with 50 Hz and 60 Hz electrical systems in the range of 110 V to 240 V AC Television Signal Standards In...

Page 68: ...o select OFF then press the SET button 5 Press the MENU button to turn off the menu screen Note The demonstration will pause if you press the MENU button If you leave it for 60 seconds or turn the power off temporarily and then set the Power switch to CAMERA the demonstration will begin again OFF DEMO MODE Watching the Demonstration 1 Remove the Mini DV cassette from the camcorder see page 10 2 In...

Page 69: ... p 17 Focus manually p 37 Direct lens to some subject or set zoom to widest angle before shooting p 17 Set DEMO MODE menu item to OFF p 55 Select video input channel or TV channel properly p 21 Connect audio video cable properly p 21 Possible cause Power source is not properly con nected Battery pack is not charged Dew in camcorder Safety function is in effect Erasure protect tab on video cassette...

Page 70: ...e will not eject No image on monitor Monitor picture is hard to see Charge indicator flashes in red when charging battery pack Cannot edit to connected VCR Possible cause Position at beginning or end of tape Dirty video heads Old or worn tape Power source is not properly con nected Battery pack is not charged Camcorder is recording Backlight has been turned off Fluorescent lamp has burned out Inap...

Page 71: ...e balance lock Minimum Illumination 1 lux with gain up F1 8 Power Requirement DC 7 4 V Power Consumption 4 3 W during camera recording in Full Auto mode with zoom motor off and backlight in normal mode Operating Temperature 0 C to L40 C Operating Humidity 30 to 80 Storage Temperature 20 C to L60 C Dimensions approx 141 1 mm W K 85 1 mm H K 58 5 mm D Weight approx 460 g without battery pack lithium...

Page 72: ...Note ...

Page 73: ......

Page 74: ...MANUAL DE MANEJO BRUKSANVISNING MANUAL DE OPERAÇÃO OPERATION MANUAL VL NZ50S Impreso en Japón Tryckt i Japan Impresso no Japão Printed in Japan TINSLA002WJZZ 02P04 JKG SHARP CORPORATION ...

Reviews: