Sharp SJ-SRD450-HS2 User Manual Download Page 6

EN -4-

Disposal

•  All packaging and materials used are environmentally friendly and recyclable. Please dispose of any packaging 

in an environmentally friendly manner. Consult your local council for further details.

•  When the appliance is to be scrapped, cut off the electrical supply cable and destroy the plug and cable. Disable 

the door catch in order to prevent children becoming trapped inside.

•  A cut off plug inserted into a 16 amp socket is a serious safety (shock) hazard. Please ensure the cut off plug 

is disposed of safely.

Notes:

•  Please read the instruction manual carefully before installing and using your appliance.  We are not responsible 

for the damage occurred due to misuse.

•  Follow all instructions on your appliance and instruction manual, and keep this manual in a safe place to resolve 

the problems that may occur in the future.         

•  This appliance is produced to be used in homes and it can only be used in domestic environments and for the 

specified purposes.  It is not suitable for commercial or common use. Such use will cause the guarantee of the 

appliance to be cancelled and our company will not be responsible for the losses to be occurred. 

•  This appliance is produced to be used in houses and it is only suitable for cooling / storing foods. It is not 

suitable for commercial or common use and/or for storing substances except for food. Our company is not 

responsible for the losses to be occurred in the contrary case.

Safety warnings

•  Do not connect your Fridge to the mains electricity supply using an extension lead.

•  A damaged power cord / plug can cause fire or give you and electric shock. When damaged it must be 

replaced, this should only be dine by qualified personnel. 

•  Never bend the power cord excessively.

•  Never touch the power cord / plug with wet hands as this could cause a short circuit electric shock.

Disposal of your old appliance

This symbol on the product or package implies that the product should not be treated as domestic waste. 

Instead, it should be delivered to applicable waste collection places recycling electrical and electronic 

equipment. Recycling materials will help natural resources be preserved. For more detailed information 

regarding recycling of this product, please contact local authority, domestic waste disposal service or the 

shop you have purchased the product from.

Please ask your local authority about the disposal of the WEEE for the reuse, recycle and recovery 

purposes.

Installation Information

Before unpacking and manoeuvering your fridge please take some time to familiarise yourself with the following points.

•  Position away from direct sunlight and away from any heat source such as a radiator.

•  Your appliance should be at least 50 cm away from stoves, Gas ovens and heater cores, and should be at least 

5 cm away from electrical ovens.

•  Do not expose your fridge to moisture or rain.

•  Your fridge should be positioned at least 20mm away from another freezer.

•  Clearance of at least 150 mm is required at the top and back of your fridge. Do not place anything on top of 

your fridge.

•  For safe operation it is important that your fridge is safe and balanced. The adjustable feet are used to level your 

fridge. Make sure that your appliance is level before placing any foodstuffs inside it.

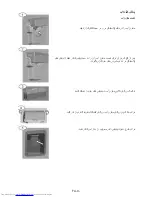
•  We recommend that you wipe all shelving and trays with a cloth soaked in warm water mixed 

with a teaspoon of bicarbonate of soda before use. After cleaning rinse with warm water and 

dry.

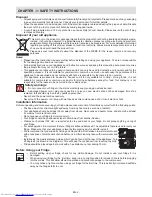
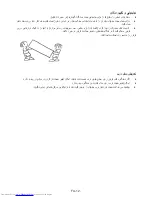
•  Install using the plastic distance guides, which can be found at the rear of the appliance. Turn 

90 degrees (as shown in the diagram). This will keep the condenser from touching the wall.

•  Fridge should be placed against a wall with a free distance not exceeding 75 mm.

CHAPTER -1: SAFETY INSTRUCTIONS

Before Using your Fridge

•  Before setting up your fridge, check for any visible damage. Do not install or use your fridge if it is 

damaged.

•  When using your fridge for the  first time, keep it in an upright position for at least 3 hours before plugging 

into the mains. This will allow efficient operation and prevents damage to the compressor. 

•  You may notice a light odor when using your fridge for the first time. This is perfectly normal and will fade 

away as the fridge starts to cool. 

Summary of Contents for SJ-SRD450-HS2

Page 1: ...Home Appliances Fridge For Life SJ SRD450 HS2 SJ SRD450 HW2 Single Door User Manual EN FA راهنما دفترچه ...

Page 2: ......

Page 3: ...using your fridge for the first time It contains important safety information on the installation safety use and maintenance of your Fridge Retain this manual for future use Contents CHAPTER 1 GENERAL WARNINGS 2 CHAPTER 2 YOUR FRIDGE 5 CHAPTER 3 USING YOUR FRIDGE 6 CHAPTER 4 FOOD STORAGE GUIDANCE 8 CHAPTER 5 DOOR REVERSAL 9 CHAPTER 6 TROUBLESHOOTING 9 CHAPTER 7 TIPS FOR SAVING ENERGY 10 ...

Page 4: ...ans or fire extinguisher refill cartridges in the vicinity of the fridge This appliance is intended to be used in household and similar applications such as staff kitchen areas in shops offices and other working environments farm houses and by clients in hotels motels and other residential type environments bed and breakfast type environments catering and similar non retail applications Your fridg...

Page 5: ...ning and user maintenance shall not be made by children without supervision A damaged power cord plug can cause fire or give you an electric shock When damaged it must be replaced this should only be done by qualified personnel This appliance is not intended for use at altitudes exceeding 2000 m ...

Page 6: ...ble waste collection places recycling electrical and electronic equipment Recycling materials will help natural resources be preserved For more detailed information regarding recycling of this product please contact local authority domestic waste disposal service or the shop you have purchased the product from Please ask your local authority about the disposal of the WEEE for the reuse recycle and...

Page 7: ...ver 15 Water tank 16 Gasket ring 17 Tap detail 18 Side Locking covers 7 Bottom crisper 8 Bottle shelf 9 Door shelves 10 Water Tank 11 Egg holder In some models This figure has been drawn for information purposes to show the various parts and accessories in the appliance Parts may vary according to the model of the appliance 19 20 21 22 Front water dispenser group 19 Top cover of the water dispense...

Page 8: ...OOLING Mode Initial temperature value for Cooler Setting Indicator is 4 C Press set button once When you first push this button the last value appears on the setting indicator of the cooler Whenever you press on this button lower temperature will be set 8 C 7C 6 C 5 C 4 C 3 C 2 C If you continue to press it will restart from 8 C The temperature value selected before Super Cool Mode or Economy Mode...

Page 9: ...n you press on mode button for 5 seconds If pressed on no button in 5 seconds when he mode is active lights of the control panel will go off If you press any button when lights of control panel are off the current settings will appear on the screen and then you can maket he adjustment as you want If you neither cancel screen saver mode nor press on any button in 5 seconds the control panel will go...

Page 10: ... turn your mains supply off and remove the plug from the socket Do not wash your fridge by pouring water on to it Use a warm soapy cloth or sponge to wipe the interior and exterior of your fridge Carefully remove all shelves and drawers by sliding upwards or outwards and clean with soapy water Do not wash in a washing machine or dishwasher Do not use solvents abrasive cleaners glass cleaners or al...

Page 11: ...hort time when it is activated Bubbling noise and splash This noise is caused by the flow of the refrigerant in the tubes of the system Air Blow Noise Normal fan noise This noise can be heard in fridge during normal operation of the system due to the circulation of air If humidity builds up inside the cooler Are all food packed properly Are the containers dried before placing them in the fridge Is...

Page 12: ...is prevents damage to the compressor You should delay plugging in 5 10 minutes after you regain power supply This will avoid damage to components The cooling unit of your refrigerator is hidden in the rear wall Therefore water droplets or ice may occur on the rear surface of your fridge due to the operation of the compressor in specified intervals This is normal There is no need to perform a defro...

Page 13: ... ﺑﻴﺮون ﺁب ﻣﺨﺰن ب درب داﺧﻞ ﺁب ﻣﺨﺰن 1 ﺁب ﮐﻨﻨﺪﻩ ﭘﺨﺶ ﻗﺴﻤﺖ ﺑﺎﻻﻳﯽ روﮐﺶ 2 ﺳﻮﭘﺎپ اهﺮم 6 ﺳﻴﻨﯽ ﺁب ﭼﮑﻪ 4 ﺁب ﮐﻨﻨﺪﻩ ﭘﺨﺶ ﻣﺤﻔﻈﻪ 5 ﻓﻴﻠﺘﺮ روﮐﺶ 6 ﺁب ﻣﺨﺰن ﺑﺎﻻﻳﯽ روﮐﺶ 7 ﻣﺨﺰن روﮐﺶ 8 ﺁب ﻣﺨﺰن 9 واﺷﺮ ﺣﻠﻘﻪ 10 ﺷﻴﺮ ﺑﻪ ﻣﺮﺑﻮط ﺟﺰﺋﻴﺎت 11 ﮐﻨﺎرﯼ ﺷﻮﻧﺪﻩ ﻗﻔﻞ روﮐﺸﻬﺎﯼ FA 17 ...

Page 14: ...ﺳﺘﮕﺎﻩ 1 ﺗﻮرﺑﻮ ﭘﻨﮑﻪ هﺎ ﻣﺪل از ﺑﻌﻀﯽ در 2 اﯼ ﺷﻴﺸﻪ هﺎﯼ ﻗﻔﺴﻪ ﺑﺎ اﺧﺘﻴﺎرﯼ اﯼ ﻣﻴﻠﻪ هﺎﯼ ﻗﻔﺴﻪ 3 ﺳﺒﺰﻳﺠﺎت ﻣﺤﻔﻈﻪ ﺑﺎﻻﯼ درﭘﻮش اﻳﻤﻨﯽ ﺷﻴﺸﻪ اﺧﺘﻴﺎرﯼ 4 ﺑﺎﻻ ﺳﺒﺰﻳﺠﺎت ﻧﮕﻬﺪارﯼ ﻣﺤﻔﻈﻪ اﺧﺘﻴﺎرﯼ 5 ﺳﺒﺰﻳﺠﺎت ﻣﺤﻔﻈﻪ ﭘﺎﻳﻴﻦ درﭘﻮش اﻳﻤﻨﯽ ﺷﻴﺸﻪ 6 ﭘﺎﻳﻴﻦ ﺳﺒﺰﻳﺠﺎت ﻧﮕﻬﺪارﯼ ﻣﺤﻔﻈﻪ 7 ﺳﻄﺢ ﺗﻨﻈﻴﻢ 8 ﺑﻄﺮﯼ ﻗﻔﺴﻪ 9 درب هﺎﯼ ﻗﻔﺴﻪ 10 ﺁب ﻣﺨﺰن 11 ﭘﻨﻴﺮ ﻗﻔﺴﻪ ﮐﺮ ﻩ 12 ﭘﻨﻴﺮ ﻗﻔﺴﻪ درﭘﻮش ﮐﺮﻩ هﺎ ﻣﺪل از ﺑﻌﻀﯽ در 13 ﻣﺮغ ﺗﺨﻢ ﺟﺎﯼ FA 16 ...

Page 15: ...ﻴﺮون ﻳﺎ ﺑﺮق ﻧﺎﮔﻬﺎﻧﯽ ﻗﻄﻊ از ﭘﺲ اﺳﺖ ﻣﻤﮑﻦ ﮐﻤﭙﺮﺳﻮر ﻣﺤﺎﻓﻆ ﺣﺮارﺗﯽ ز اﺳﺖ ﻧﺮﺳﻴﺪﻩ ﺛﺎﺑﺘﯽ ﺣﺎﻟﺖ ﺑﻪ هﻨﻮز ﮐﻨﻨﺪﻩ ﺧﻨﮏ ﺳﻴﺴﺘﻢ در ﻣﻮﺟﻮد ﮔﺎز از ﺑﻌﺪ ﺷﻤﺎ دﺳﺘﮕﺎﻩ 5 دﻟﻴﻠﯽ ﮐﻨﺪ ﻣﯽ ﮐﺎر ﺑﻪ ﺷﺮوع دﻗﻴﻘﻪ ﻧﺪارد وﺟﻮد ﻧﮕﺮاﻧﯽ ﺑﺮاﯼ ﺧ ﻳﺨﭽﺎل از اﮔﺮ ﮐﻨﻴﺪ ﻧﻤﯽ اﺳﺘﻔﺎدﻩ ﻃﻮﻻﻧﯽ زﻣﺎن ﻣﺪت ﺑﺮاﯼ ﻮد روﻳﺪ ﻣﯽ ﺗﺎﺑﺴﺘﺎن ﺗﻌﻄﻴﻼت ﺑﻪ ﮐﻪ زﻣﺎﻧﯽ ﻣﺎﻧﻨﺪ ﭘﺮﻳﺰ از را ﺁن ﮐﻨﻴﺪ ﺟﺪا ﺑﺨﺶ ﺑﻪ ﺗﻮﺟﻪ ﺑﺎ را ﻳﺨﭽﺎل ﻧﮕﻬﺪراﯼ و ﮐﺮدن ﺗﻤﻴﺰ ﺑﺪ ﺑﻮﯼ و رﻃﻮﺑﺖ اﻳﺠﺎد از ﺗﺎ ﺑﮕﺬارﻳﺪ ﺑﺎز را ...

Page 16: ... ﺑﺎ ﺗﻮاﻧﻴﺪ ﻣﯽ ﻧﺸﻮد ﻣﺤﻮ دﮐﻤﻪ دادن دهﺪ ﻣﯽ ﺻﺪا ﺣﺪ از ﺑﻴﺶ ﺷﻤﺎ ﻓﺮﻳﺰر اﮔﺮ ﮐﻤﭙﺮﺳﻮر ﺻﺪاﯼ ﻣﻮﺗﻮ ﻣﻌﻤﻮﻟﯽ ﺻﺪاﯼ ر ﮐﻨﺪ ﻣﯽ ﮐﺎر ﻣﻌﻤﻮﻟﯽ ﺻﻮرت ﺑﻪ ﮐﻤﭙﺮﺳﻮر ﮐﻪ ﻣﻌﻨﺎﺳﺖ ﺑﺪان ﺻﺪا اﻳﻦ ﺣﺎل در ﮐﻤﭙﺮﺳﻮر ﮐﻪ زﻣﺎﻧﯽ ﮐﻨﺪ ﺗﻮﻟﻴﺪ ﺑﻴﺸﺘﺮﯼ ﺻﺪاﯼ ﮐﻮﺗﺎهﯽ ﻣﺪت ﺑﺮاﯼ اﺳﺖ ﻣﻤﮑﻦ اﺳﺖ ﮐﺎرﮐﺮد ﺁب ﺷﺪن ﭘﺨﺶ و ﺣﺒﺎب اﻳﺠﺎد ﺻﺪاﯼ رﺳﺪ ﻣﯽ ﮔﻮش ﺑﻪ ﺳﻴﺴﺘﻢ هﺎﯼ ﻟﻮﻟﻪ در ﮐﻨﻨﺪﻩ ﺧﻨﮏ ﺟﺮﻳﺎن دﻟﻴﻞ ﺑﻪ ﺻﺪا اﻳﻦ ﺑﺎد وزش ﺻﺪاﯼ ﭘﻨﮑﻪ ﻣﻌﻤﻮﻟﯽ ﺻﺪاﯼ ﻣﯽ ﺷﻨﻴﺪﻩ هﻮا ﻳﺎﻓﺘﻦ ﺟﺮﻳﺎن دﻟﻴﻞ ﺑﻪ دﺳﺘﮕﺎ...

Page 17: ...ﭼﻨﺪ ﻳﺎ ﻳﮏ در اﺷﮑﺎﻟﯽ ﻳﺎ ﺷﻮد ﺧﺮاب اﻳﺠﺎد ﮐﻨﻨﺪﻩ ﺧﻨﮏ ﺳﻴﺴﺘﻢ ﺷﻮد ﺧﺪﻣﺎت ﻣﺮﮐﺰ ﺑﺎ ً ا ﻓﻮر ﺑﮕﻴﺮﻳﺪ ﺗﻤﺎس LC ﮐﻨﻨﺪﻩ ﺧﻨﮏ ﻣﺤﻔﻈﻪ دﻣﺎﯼ ﻧﻴﺴﺖ ﺧﻨﮏ ﮐﺎﻓﯽ اﻧﺪازﻩ ﺑﻪ ﻣﯽ ﻇﺎهﺮ وﻗﺘﯽ هﺸﺪار اﻳﻦ ﻗﻄﻊ زﻳﺎدﯼ ﻣﺪت ﺑﺮق ﺷﻮد ﺑﺮاﯼ ﻳﺨﭽﺎل ﻳﺎ و ﺷﻮد ﺷﻮد روﺷﻦ ﺑﺎر اوﻟﻴﻦ زﻣﺎن ً ﺎ ﻣﻮﻗﺘ را ﮐﻨﻨﺪﻩ ﺧﻨﮏ دﻣﺎﯼ ﮐﻨﻴﺪ زﻳﺎد دﻟﺨﻮاﻩ ﺳﻄﺢ ﺗﺎ ﻳﺦ ﺣﺎﻟﺖ در را ﻓﺮﻳﺰر ﻳﺎ ﺑﺪهﻴﺪ ﻗﺮار ﺳﺮﻳﻊ زدن LP وﻟﺘﺎژ ﮐﻢ ﺑﻪ ورودﯼ وﻟﺘﺎژ ﮐﻪ وﻗﺘﯽ از ﮐﻤﺘﺮ 170 اﻓﺖ وﻟﺖ ﺁﻣﺎدﻩ ﺣﺎﻟﺖ در ﻳﺨﭽﺎل ﮐﻨ...

Page 18: ...ارد ﺳﺎﻳﺮ و ﺳﺒﺰﻳﺠﺎت ﺳﺒﺪ ﺟﺎﻧﺒﯽ ﻟﻮازم هﺎ ﻗﻔﺴﻪ درون ﻧﻮارهﺎﻳﯽ ﮐﻤﮏ ﺑﺎ را ﺁﻧﻬﺎ ﻳﺎ ﻧﮑﻨﻨﺪ ﺑﺮﺧﻮرد ﻓﺮﻳﺰر ﺑﻪ ﻣﺤﻞ ﺗﻐﻴﻴﺮ و ﺟﺎﺑﺠﺎﻳﯽ هﻨﮕﺎم در ﺗﺎ ﮐﻨﻴﺪ ﻣﺤﮑﻢ ﻓﺮﻳﺰر ﮐﻨﻴﺪ ﺟﺎﺑﺠﺎ اﻳﺴﺘﺎدﻩ ﺻﻮرت ﺑﻪ را ﻓﺮﻳﺰر درب ﻣﺤﻞ ﺗﻌﻮﻳﺾ ﻧﺪارد وﺟﻮد ﻓﺮﻳﺰر درب ﮐﺮدن ﺑﺎز ﺟﻬﺖ ﺗﻐﻴﻴﺮ اﻣﮑﺎن ﺑﺎﺷﻨﺪ ﺷﺪﻩ ﻧﺼﺐ درب ﺟﻠﻮﯼ ﺳﻄﺢ روﯼ ﻓﺮﻳﺰر هﺎﯼ دﺳﺘﮕﻴﺮﻩ اﮔﺮ دارد وﺟﻮد دﺳﺘﮕﻴﺮﻩ ﺑﺪون هﺎﯼ ﻣﺪل روﯼ درب ﺟﻬﺖ ﺗﻐﻴﻴﺮ اﻣﮑﺎن ﻳﺨﭽﺎل درب ﺷﺪن ﺑﺎز ﺟﻬﺖ ﺧﻮاهﻴﺪ ﻣﯽ ﭼﻨﺎﻧﭽﻪ ﺑﮕﻴﺮﻳﺪ ﺗﻤﺎس ...

Page 19: ... ﺑﺮاﯼ اﺳﻴﺪ ﻳﺎ ﺑﻨﺰﻳﻦ ﺗﻴﻨﺮ ﻣﺜﻞ ﺧﻮرﻧﺪﻩ ﻳﺎ اﻧﻔﺠﺎر ﻗﺎﺑﻞ اﺣﺘﺮاق ﻗﺎﺑﻞ ﻣﻮاد از هﺮﮔﺰ ﻧﮑﻨﻴﺪ ﺑﺎﺷﺪ ﺷﺪﻩ ﺟﺪا ﺑﺮق از ﻓﺮﻳﺰر ﮐﻪ ﮐﻨﻴﺪ ﺣﺎﺻﻞ اﻃﻤﻴﻨﺎن ﮐﺮدن ﺗﻤﻴﺰ هﻨﮕﺎم در زداﻳﯽ ﻳﺦ ﺑﻪ زداﻳﯽ ﻳﺦ ﻃﻮر ﺑﻪ و ﺷﻮد ﻣﯽ ﺟﻤﻊ ﺗﺒﺨﻴﺮ ﺳﻴﻨﯽ ﺗﻮﺳﻂ زداﻳﯽ ﻳﺦ از ﺣﺎﺻﻞ ﺁب دﺳﺘﮕﺎﻩ ﮐﺎرﮐﺮد ﺣﻴﻦ در ﺧﻮدﮐﺎر ﻃﻮر ﺷﻮد ﻣﯽ ﺗﺒﺨﻴﺮ ﺧﻮدﮐﺎر ﺁب ﺷﺪن ﺟﻤﻊ از ﺗﺎ ﮐﻨﻴﺪ ﺗﻤﻴﺰ ً ﺎ ﻣﺮﺗﺒ ﺑﺎﻳﺪ را زداﻳﯽ ﻳﺦ ﺗﺨﻠﻴﻪ ﺷﻴﺮ هﻤﭽﻨﻴﻦ و زداﻳﯽ ﻳﺦ از ﺣﺎﺻﻞ ﺁب ﺗﺨﻠﻴﻪ ﺳﻮراخ و ﺗﺒﺨﻴﺮ ﺳﻴﻨﯽ ﻳﺎﻓﺘ ﺟ...

Page 20: ...ادﻩ ﻧﺸﺎن ﮐﻪ اﯼ ﮔﻮﻧﻪ ﺑﻪ را ﺁب ﻣﺨﺰن داﺷﺘﻪ ﻣﻄﺎﺑﻘﺖ ﻳﮑﺪﻳﮕﺮ ﺑﺎ ﻧﺼﺐ هﻨﮕﺎم در ﺳﻮراخ و ﭘﻴﭻ ﮔﺮﻓﺘﻦ ﻗﺮار ﻣﺤﻞ ﮐﻪ ﺑﺎﺷﻴﺪ ﻣﺮاﻗﺐ ﺑﺎﺷﺪ ﺷﻮد ﭘﺨﺶ ﺁب اﺳﺖ ﻣﻤﮑﻦ ﺑﺎﺷﺪ ﻧﮕﺮﻓﺘﻪ ﻗﺮار ﺧﻮد ﻣﺤﻞ در درﺳﺘﯽ ﺑﻪ ﻣﺨﺰن اﮔﺮ در درﺳﺘﯽ ﺑﻪ واﺷﺮهﺎ ﮐﻪ ﮐﻨﻴﺪ ﺑﺮرﺳﯽ هﻤﭽﻨﻴﻦ ﺑﺎﺷﻨﺪ ﮔﺮﻓﺘﻪ ﻗﺮار ﺧﻮد ﺟﺎﯼ اﯼ ﻗﻄﺮﻩ ﺳﻴﻨﯽ ﺷﻮد ﻣﯽ ﭘﺨﺶ اﯼ ﻗﻄﺮﻩ ﺳﻴﻨﯽ در ﻣﻮﺟﻮد اﯼ ﺷﻴﺸﻪ اﺳﺘﻮاﻧﻪ اﻃﺮاف ﺑﻪ ﺁب ﮐﻨﻨﺪﻩ ﭘﺨﺶ از اﺳﺘﻔﺎدﻩ ﺣﻴﻦ در ﺗﻤﻴﺰ ﺑﺮاﯼ ﺁن ﮐﺮدن ﺑﻴﺎورﻳﺪ ﺑﻴﺮون را ﺳﻴﻨﯽ ﺑﮕﺬارﻳﺪ ﺧﻮ...

Page 21: ...ﺎر ﭘﺎﻳﻴﻦ ﺳﻤﺖ ﺑﻪ را ﺁن ﺁب ﻣﺨﺰن ﻧﺼﺐ ﺑﺮاﯼ ﺁن ﮐﺮدن ﮐﺞ از ﭘﺲ هﺎﯼ ﺑﺨﺶ ﺎ ﺑﮕﻴﺮﻧﺪ ﻗﺮار ﺧﻮد ﺟﺎﯼ در درﺳﺘﯽ ﺑﻪ در ﭘﻼﺳﺘﻴﮑﯽ ﮐﻨﻴﺪ اﺿﺎﻓﻪ را ﺧﻮد هﺎﯼ ﻧﻮﺷﻴﺪﻧﯽ ﺁب ﻣﺨﺰن ﺑﺎﻻﻳﯽ روﮐﺶ ﮐﻤﮏ ﺑﺎ ﮐﻨﻴﺪ ﺑﺎز را ﮐﻨﺎرﯼ ﺷﻮﻧﺪﻩ ﻗﻔﻞ هﺎﯼ روﮐﺶ ﺁب ﻣﺨﺰن روﮐﺶ ﮐﺮدن ﺟﺪا ﺑﺮاﯼ دهﻴﺪ ﻓﺸﺎر ﺁراﻣﯽ ﺑﻪ را ﺳﻮﭘﺎپ اهﺮم ﻧﻮﺷﻴﺪﻧﯽ ﺷﺪن ﺧﺎرج ﺑﺮاﯼ FA 9 ...

Page 22: ... در ﻧﺪهﻴﺪ اﻧﺠﺎم را دﻳﮕﺮﯼ ﺗﻨﻈﻴﻢ ﺗﻨﻈﻴﻢ ﻳﮏ ﺗﮑﻤﻴﻞ از ﻗﺒﻞ ﺁن در ﻳﺨﭽﺎل ﮐﻪ ﻣﺤﻴﻄﯽ دﻣﺎﯼ و ﮐﻨﻴﺪ ﻣﯽ ﻧﮕﻬﺪارﯼ ﻳﺨﭽﺎل درون ﮐﻪ ﻏﺬاهﺎﻳﯽ ﮐﻴﻔﻴﺖ ﻳﺨﭽﺎل در ﺷﺪن ﺑﺎز ﻣﻴﺰان ﺑﻪ ﺗﻮﺟﻪ ﺑﺎ ﮐﻨﻴﺪ ﺗﻨﻈﻴﻢ را ﻳﺨﭽﺎل دﻣﺎﯼ ﺑﺎﻳﺪ اﺳﺖ ﮔﺮﻓﺘﻪ ﻗﺮار دوﺷﺎﺧﻪ ﺑﻪ اﺗﺼﺎل از ﭘﺲ ﺑﺎﻳﺪ اﻃﺮاف ﻣﺤﻴﻂ ﺑﻪ ﺗﻮﺟﻪ ﺑﺎ ﺷﻤﺎ دﺳﺘﮕﺎﻩ 24 ﺧﻨ ﮐﺎﻣﻞ ﻃﻮر ﺑﻪ ﺗﺎ ﮐﻨﺪ ﮐﺎر وﻗﻔﻪ ﺑﺪون ﺳﺎﻋﺖ ﺷﻮد ﮏ ﮐﻨﻴﺪ ﺧﻮددارﯼ ﻣﺪت اﻳﻦ ﻃﻮل در ﻏﺬا از زﻳﺎدﯼ ﺣﺠﻢ دادن ﻗﺮار و ﻓﺮﻳﺰر در ﻣﺪاوم ﮐﺮدن ﺑﺎز از رخ...

Page 23: ... ﻣﺪت ﺑﻪ را ﺣﺎﻟﺖ دﮐﻤﻪ ﮐﻪ ﺷﻮد ﻣﯽ ﻓﻌﺎل وﻗﺘﯽ ﺣﺎﻟﺖ اﻳﻦ 5 ﻓﺸﺎر ﺛﺎﻧﻴﻪ ﺑﺪهﻴﺪ ﻣﺪت ﺑﺮاﯼ اﯼ دﮐﻤﻪ هﻴﭻ ﺣﺎﻟﺖ ﺑﻮدن ﻓﻌﺎل هﻨﮕﺎم در اﮔﺮ 5 ﻓﺸﺮدﻩ ﺛﺎﻧﻴﻪ ﺷﻮد ﻣﯽ ﺧﺎﻣﻮش ﮐﻨﺘﺮل ﺻﻔﺤﻪ هﺎﯼ ﭼﺮاغ ﻧﺸﻮد هﺎﯼ ﭼﺮاغ ﺑﻮدن ﺧﺎﻣﻮش ﺣﺎﻟﺖ در اﯼ دﮐﻤﻪ هﺮ ﻓﺸﺮدن ﺻﻮرت در ﺗﻨﻈﻴﻤ ﮐﻨﺘﺮل ﺻﻔﺤﻪ و ﺷﻮد ﻣﯽ دادﻩ ﻧﻤﺎﻳﺶ ﺻﻔﺤﻪ روﯼ ﺑﺮ ﻓﻌﻠﯽ ﺎت دهﻴﺪ اﻧﺠﺎم را ﺧﻮد ﻧﻈﺮ ﻣﻮرد ﺗﻨﻈﻴﻤﺎت ﺗﻮاﻧﻴﺪ ﻣﯽ ﺳﭙﺲ ﻣﺪت ﺑﺮاﯼ ﻧﻴﺰ را اﯼ دﮐﻤﻪ هﻴﭻ و ﻧﮑﻨﻴﺪ ﻟﻐﻮ را ﺻﻔﺤﻪ ﻣﺤﺎﻓﻆ ﺣﺎﻟﺖ اﮔﺮ زﻣﺎن 5 ﺷ...

Page 24: ...ﻌﺎل ﻣﺎﻧﺪ ﻣﯽ ﺑﺎﻗﯽ ﺗﻐﻴﻴﺮ ﺑﺪون اﻧﺮژﯼ ﻣﺼﺮف دﻣﺎﯼ ﻣﻘﺪار اﻳﻦ ﺑﺎ دﺳﺘﮕﺎﻩ دهﺪ ﻣﯽ اداﻣﻪ ﺧﻮد ﮐﺎر ﺑﻪ ﺷﺪﻩ ﺗﻨﻈﻴﻢ ﻳﺨﭽﺎل ﺑﺮاﯼ ﺷﺪﻩ ﺗﻮﺻﻴﻪ دﻣﺎهﺎﯼ ﻣﻘﺪار ﺗ زﻣﺎن اﺳﺖ وﻗﺖ ﭼﻪ ﺁن ﻨﻈﻴﻢ داﺧﻠﯽ دﻣﺎﯼ ﮐﺮدن ﺧﻨﮏ ﻇﺮﻓﻴﺖ ﺣﺪاﻗﻞ ﺑﺮاﯼ 7o C 8o C ﻣﻌﻤﻮﻟﯽ ﺳﺎزﯼ ذﺧﻴﺮﻩ ﺣﺎﻟﺖ در 4o C 5o C 6o C ﮐﺮدن ﺧﻨﮏ ﻇﺮﻓﻴﺖ ﺣﺪاﮐﺜﺮ ﺑﺮاﯼ 2o C 3o C ﺧﻨﮏ اﻟﻌﺎدﻩ ﻓﻮق ﺣﺎﻟﺖ ﻏﺬاﻳﯽ ﻣﻮاد زﻳﺎدﯼ ﻣﻘﺪار ﮐﺮدن ﺧﻨﮏ ﺑﺮاﯼ ﻏﺬاﻳﯽ ﻣﻮاد ﺳﺮﻳﻊ ﮐﺮدن ﺧﻨﮏ ﺑﺮاﯼ اﺳﺘﻔﺎدﻩ ﻃﺮز دﮐﻤﻪ اﻳﻦ ﺣﺮوف ﺗﺎ ﺑ...

Page 25: ...ﻣﺎﯼ در ﺗﻮاﻧﺪ ﻣﯽ ﻳﺨﭽﺎل 8 7 6 5 4 3 2 ﻳﺎ ﮔﺮاد ﺳﺎﻧﺘﯽ درﺟﻪ SC ﺷﻮد ﺗﻨﻈﻴﻢ 2 هﺎ ﺣﺎﻟﺖ اﻧﺮژﯼ ﻣﺼﺮف در ﺟﻮﻳﯽ ﺻﺮﻓﻪ ﮐﻨﺪ ﻣﯽ ﻓﻌﺎل ﺗﻤﺎﻳﻞ ﺻﻮرت در را 3 اﺳﺖ ﻳﺨﭽﺎل درﺟﻪ ﺗﻨﻈﻴﻢ ﺑﻪ ﻣﺮﺑﻮط ﺻﻔﺤﻪ اﻳﻦ 4 اﺳﺖ ﺧﻨﮏ اﻟﻌﺎدﻩ ﻓﻮق ﺣﺎﻟﺖ دهﻨﺪﻩ ﻧﺸﺎن اﻳﻦ 5 ﻓ ﺣﺎﻟﺖ ﻧﻤﺎد اﻳﻦ اﺳﺖ ﺧﻨﮏ اﻟﻌﺎدﻩ ﻮق 6 اﺳﺖ ﮐﻮدﮎ ﻗﻔﻞ ﻧﻤﺎد اﻳﻦ 7 اﺳﺖ اﻧﺮژﯼ ﻣﺼﺮف در ﺟﻮﻳﯽ ﺻﺮﻓﻪ ﺣﺎﻟﺖ ﻧﻤﺎد اﻳﻦ 8 اﺳﺖ هﺸﺪار ﻧﻤﺎد FA 5 ...

Page 26: ...ﻳﺰر ﻳﮏ ﻧﺰدﻳﮑﯽ در را ﺧﻮد ﻓﺮﻳﺰر ﮐﻪ هﻨﮕﺎﻣﯽ 3 ﺳﺎﻧﺘﯽ ﺟﻠﻮﮔﻴﺮﯼ ﻳﮑﺪﻳﮕﺮ ﺧﺎرﺟﯽ ﺳﻄﺢ روﯼ ﺑﺮ رﻃﻮﺑﺖ اﻳﺠﺎد از ﺗﺎ ﺑﮕﺬارﻳﺪ ﻓﺎﺻﻠﻪ ﺁﻧﻬﺎ ﺑﻴﻦ ﻣﺘﺮ ﺷﻮد در ﻏﺬاﻳﯽ ﻣﺎدﻩ هﻴﭻ دهﻴﺪ ﻗﺮار ﻣﻨﺎﺳﺐ ﻣﮑﺎﻧﯽ در را ﻓﺮﻳﺰر و ﻧﺪهﻴﺪ ﻗﺮار ﻓﺮﻳﺰر ون ﺣﺪاﻗﻞ ﮐﻪ 15 ﺑﺎﺷﺪ داﺷﺘﻪ وﺟﻮد ﺧﺎﻟﯽ ﻓﻀﺎﯼ ﺁن ﺑﺎﻻﯼ از ﻣﺘﺮ ﺳﺎﻧﺘﯽ ﻓﺎﺻﻠﻪ ﻳﮏ اﻳﺪ دادﻩ ﻗﺮار ﺁﺷﭙﺰﺧﺎﻧﻪ هﺎﯼ ﮐﺎﺑﻴﻨﺖ ﻧﺰدﻳﮏ را ﻳﺨﭽﺎل ﭼﻨﺎﻧﭽﻪ 2 ﻣﺘﺮﯼ ﺳﺎﻧﺘﯽ ﺑﺪهﻴﺪ ﻗﺮار ﺁﻧﻬﺎ ﺑﻴﻦ ﻓﺎﺻﻠﻪ ﺗﻨﻈﻴﻢ ﭘﻼﺳﺘﻴﮏ ﭼﺮﺧﺎﻧﺪن ﺑﺎ دار ﺑﺨﺶ ﭘﺸ...

Page 27: ... اﺣﺘﻴﺎﻃﯽ ﻣﻮارد ﺑﺮوز از ﺟﻠﻮﮔﻴﺮﯼ ﺑﺮاﯼ ﻧﮑﻨﻴﺪ ﺟﺪا ﮐﻨﻴﺪ ﺧﻮددارﯼ ﻳﺨﭽﺎل در اﺷﺘﻌﺎل ﻗﺎﺑﻞ ﻳﺎ ﻣﻨﻔﺠﺮﻩ ﻣﻮاد دادن ﻗﺮار از ﺧﻮد اﻳﻤﻨﯽ ﺣﻔﻆ ﺑﺮاﯼ اﻟﮑ ﺣﺠﻢ ﮐﻪ را هﺎﻳﯽ ﻧﻮﺷﻴﺪﻧﯽ ﻗﺮار ﻓﺮﻳﺰر ﻗﺴﻤﺖ درون ﻋﻤﻮدﯼ ﺻﻮرت ﺑﻪ دارﻧﺪ ﺑﻴﺸﺘﺮﯼ ﻞ ﺑﺒﻨﺪﻳﺪ ﻣﺤﮑﻢ را ﺁﻧﻬﺎ ﺑﻄﺮﯼ درب و دهﻴﺪ ﺷﻮد اﻳﺠﺎد ﺧﻼء اﺳﺖ ﻣﻤﮑﻦ اﺳﺖ ﺑﺴﺘﻪ ﮐﻨﻨﺪﻩ ﺧﻨﮏ در ﮐﻪ هﻨﮕﺎﻣﯽ ﺣﺪود 1 ﮐﻨﻴﺪ ﺻﺒﺮ دﻗﻴﻘﻪ ﮐﻨﻴﺪ ﺑﺎز ً ا ﻣﺠﺪد را ﺁن ﺗﺎ راهﮑﺎر اﻳﻦ از ﺗﻮاﻧﻴﺪ ﻣﯽ دﺳﺘﮕﺎﻩ درب راﺣﺖ ﮐﺮدن ﺑﺎز ﺑﺮاﯼ ﮐﻨ...

Page 28: ...هﺎﯼ روش ﺳﺎﻳﺮ ﻳﺎ ﺑﺮﻗﯽ هﺎﯼ دﺳﺘﮕﺎﻩ از زداﻳﯽ ﻳﺦ ﺗﺴﺮﻳﻊ ﺑﺮاﯼ ﻧﮑﻨﻴﺪ اﺳﺘﻔﺎدﻩ ﮐﻨﻨﺪﻩ ﺧﻨﮏ در ﺑﺮﻗﯽ دﺳﺘﮕﺎهﻬﺎﯼ از ر ﺁن ﻳﺎ ﺑﺸﮑﻨﻴﺪ را دﺳﺘﮕﺎﻩ ﻗﻔﻞ اﻳﻤﻨﯽ ﺣﻔﻆ ﻣﻨﻈﻮر ﺑﻪ ﮐﻨﻴﺪ ﻗﻔﻞ داراﯼ ﻗﺪﻳﻤﯽ ﻳﺨﭽﺎل ﺟﺎﻳﮕﺰﻳﻦ را دﺳﺘﮕﺎﻩ اﻳﻦ ﺧﻮاهﻴﺪ ﻣﯽ اﮔﺮ ا ﮐﻨﻴﺪ ﺟﺪا ﺷﻮﻧﺪ اﻧﺪاﺧﺘﻪ دور ﺻﺤﻴﺢ ﻃﻮر ﺑﻪ ﺑﺎﻳﺪ ﮐﻪ هﺴﺘﻨﺪ ﮐﻨﻨﺪﻩ ﺧﻨﮏ و ﻋﺎﻳﻖ ﮔﺎزهﺎﯼ داراﯼ ﻗﺪﻳﻤﯽ ﻓﺮﻳﺰرهﺎﯼ و ﻳﺨﭽﺎل دور ﺑﺮاﯼ ﻳﺎ ﻣﺤﻠﯽ ﻣﻘﺎﻣﺎت ﺑﺎ ﭘﺮﺳﺶ هﺮﮔﻮﻧﻪ وﺟﻮد ﺻﻮرت در ﻳﺎ دهﻴﺪ ﺗﺤﻮﻳﻞ ﻣﺤﻠﯽ ﺑﺎزﻳﺎﻓﺖ ﻣﺮا...

Page 29: ...ﻟﻌﺎدﻩ ﻓﻮق ﺣﺎﻟﺖ 6 ﺧﻨﮏ اﻟﻌﺎدﻩ ﻓﻮق ﺣﺎﻟﺖ 6 اﻧﺮژﯼ ﻣﺼﺮف در ﺟﻮﻳﯽ ﺻﺮﻓﻪ ﺣﺎﻟﺖ 7 ﻧﻤﺎﻳﺸﮕﺮ ﺻﻔﺤﻪ ﻣﺤﺎﻓﻆ ﺣﺎﻟﺖ 7 ﮐﻮدﮎ ﻗﻔﻞ ﻋﻤﻠﮑﺮد 8 دﻣﺎ ﺗﻨﻈﻴﻢ درﺑﺎرﻩ هﺸﺪار 8 ﺁب ﮐﻨﻨﺪﻩ ﭘﺨﺶ 9 ﺁب ﻣﺨﺰن ﻧﺼﺐ 9 ﺁب ﻣﺨﺰن ﮐﺮدن ﺗﻤﻴﺰ 10 دﺳﺘﮕﺎﻩ از ﻧﮕﻬﺪارﯼ و ﮐﺮدن ﺗﻤﻴﺰ 11 زداﻳﯽ ﻳﺦ 11 ﺗﻐﻴﻴ و ﺟﺎﺑﺠﺎﻳﯽ ﻣﮑﺎن ﺮ 12 درب ﻣﺤﻞ ﺗﻌﻮﻳﺾ 12 ﺧﺪﻣﺎت ﺑﺎ ﺗﻤﺎس ﺑﺮﻗﺮارﯼ از ﻗﺒﻞ 13 دﺳﺘﮕﺎﻩ ﻣﺨﺘﻠﻒ هﺎﯼ ﻗﺴﻤﺖ و هﺎ ﺑﺨﺶ 16 ﺁب ﮐﻨﻨﺪﻩ ﭘﺨﺶ ﻣﺨﺘﻠﻒ هﺎﯼ ﺑﺨﺶ 17 اﻟﻒ درب ﺑﻴﺮون ﺁب ﻣﺨﺰن 17 ب د...

Page 30: ...ﺸﺎﺑﮫ آن را ﺗﻌﻮ ﯾ ﺾ ﮐﺮده ﺗﺎ از ﺑﺮوز ھﺮﮔﻮﻧﮫ ﺧﻄﺮ ی ﺟﻠﻮﮔ ﯿ ﺮ ی ﺷﻮد ا ﯾ ﻦ دﺳﺘﮕﺎه ﺑﺮا ی اﺳﺘﻔﺎده ﺗﻮﺳﻂ اﻓﺮاد ی ﮐﮫ دارا ی ﻧﺎﺗﻮاﻧ ﯽ ھﺎ ی ﻓ ﯿ ﺰ ﯾ ﮑ ﯽ ھﺴﺘﻨﺪ ﻧﺎﺗﻮاﻧ ﯽ ھﺎ ی ﺣﺴ ﯾ ﯽ ﺎ ذھﻨ ﯽ دارﻧﺪ ﯾ ﺎ از ﺗﺠﺮﺑﮫ و داﻧﺶ ﮐﺎﻓ ﯽ ﺑﺮﺧﻮردار ﻧ ﯿ ﺴﺘﻨﺪ از ﺟﻤﻠﮫ ﮐﻮدﮐﺎن ﻃﺮاﺣ ﯽ ﻧﺸﺪه اﺳﺖ ﻣﮕﺮ ا ﯾ ﻨﮑﮫ ﺗﺤﺖ ﻧﻈﺎرت ﮐﺎﻣﻞ ﺑﺎﺷﻨﺪ ﯾ ﺎ ا ﯾ ﻨﮑﮫ دﺳﺘﻮراﻟﻌﻤﻞ ھﺎ ی ﻻزم ﺑﺮا ی اﺳﺘﻔﺎده از دﺳﺘﮕﺎه ﺗﻮﺳﻂ ﯾ ﮏ ﻓﺮد ﻣﺴﺌﻮل ا ﯾ ﻤﻨ ﯽ آﻧﮭﺎ در اﺧﺘ ﯿ ﺎرﺷﺎن ﻗﺮار ﺑﮕ ...

Page 31: ......

Page 32: ...Service Support Visit our website www sharphomeappliances com Or contact us 52204231 ...

Reviews: