background image

8

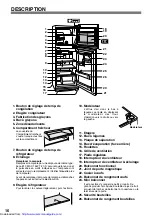
DESCRIPCION

1. Botón para control temp. congelador
2. Estante congelador
3. Dispositivo para hacer cubitos de hielo
4. Cubitera
5. Unidad de desodorización
6. Compartimiento de frescos

La cubierta del

Compartimiento de frescos

se abre al tirar del mismo.

7. Botón para control temp. frigorífico
8. Luz

Reemplazo de las bombilla eléctrica

Reemplace la bombilla eléctricas con otra del mismo

tipo : base E12, MAX 15 Vatios, T-20. Asegúrese que el

voltaje y vatiaje nominal de la bombilla eléctrica sea el

correcto cuando la reemplace. (Revise la etiqueta cerca

de la bombilla.)

10. Palanca

9. Estantería del frigorífico

Para retirar, tire de ella ligeramente y hálela hacía

afuera.

Al cambiar la bombilla, desenchufe primero el frigorífico

para evitar descargas eléctricas.

11. Estante

12. Gaveta para Vegetales
13. Placa del separador
14. Bandeja de evaporación (lado trasero)
15. Rolletes
16. Rejilla de ventilación
17. Pies ajustables
18. Interruptor del ventilador
19. Interruptor del ventilador & luz
20. Compartmiento de usos multiples
21. Cierre magnético de la puerta
22. Huevera
23. Bandeja huevera
24. Compartimiento pequeño

Se puede almacenar comida de dimensiones pequeñas

en estos compartimientos. Comidas de forma alargada

como botellas de vino o jugo pueden caerse del

compartimiento cuando la puerta se abra o se cierre.

25. Guarda para botellas
26. Botellero

El flujo de aire al gaveta para

Vegetales se puede controlar

moviendo a derecha o izquierda

la palanca de la ranura de

ventilación.

1

2
3
4

5

5

7

8

9

11

10

12

13

14

15

17

16

18

19

20

21

23

24

22

25

26

20

21

6

Palanca

Downloaded from: 

http://www.usersmanualguide.com/
Summary of Contents for SJ-43L-A2

Page 1: ... MIT TIEFKÜHLFACH KOELKAST VRIEZER OPERATION MANUAL 3 MANUAL DE MANEJO 7 MANUALE DI ISTRUZIONI 11 MODE D EMPLOI 15 FUNCIONAMENTO MANUAL 19 ECVEIQ DIO KEISOTQCIJ M ODGCI M 23 BEDIENUNGSAANLEITUNG 27 GEBRUIKSAANWIJZING 31 ENGLISH ESPAÑOL ITALIANO PORTUGUÊS NEDERLANDS DEUTSCH FRANÇAIS EKKGMIJA ENGLISH Downloaded from http www usersmanualguide com ...

Page 2: ...ration of these materials will be dangerous 9 Dust deposited on the power plug may cause fire Wipe it off carefully 10 When replacing the lamp bulb unplug the fridge freezer first to prevent electric shock 11 Do not attempt to change or modify this fridge freezer This may result in fire electric shock or injury 12 Information regarding disposal of the appliance Flammable insulation blowing gases s...

Page 3: ...e lamp bulb unplug the fridge freezer to prevent electric shock 11 Shelf 12 Vegetable crisper 13 Separator plate 14 Evaporating pan rear side 15 Casters 16 Ventilating grille 17 Adjustable feet 18 Fan switch 19 Fan light switch 20 Utility pocket 21 Magnetic door seal 22 Egg holder 23 Egg pocket 24 Small pocket Lever Small foods can be stored in these pockets Tall foods like a bottle of juice may f...

Page 4: ...ressor i e the less time the fridge freezer compressor operates during the winter season or you re away on holidays the longer the time between each defrost cycle DEODORIZING UNIT A built in unit which requires no manual operation because it automatically starts operating when the fridge freezer is powered on 7 MAX 4 MED 1 MIN For making ice rapidly or fast freezing When frozen food or ice cream i...

Page 5: ...water and dry 2 Clean the inside with a cloth soaked in warm soapy dishwashing water Then use cold water to wipe off soapy water 3 Wipe the exterior with a soft cloth each time it is soiled 4 Clean the Magnetic door seal with a toothbrush and warm soapy dishwashing water 5 Whenever the fridge freezer is moved to clean or repositioned the Evaporating pan should be re moved and cleaned Do not use po...

Page 6: ...rucciones de instalación 12 El sistema de refrigeración detrás y dentro del frigorífico contiene refrigerante Si este sistema se rompe puede resultar en daños serios a su frigorífico por lo tanto no permita que ningún objeto punzante entre en contacto con el sistema de refrigeración 13 Si el cordón de envío flexible se daña debe ser reemplazado por un agente de servicio aprobado por SHARP debido a...

Page 7: ...primero el frigorífico para evitar descargas eléctricas 11 Estante 12 Gaveta para Vegetales 13 Placa del separador 14 Bandejadeevaporación ladotrasero 15 Rolletes 16 Rejilla de ventilación 17 Pies ajustables 18 Interruptor del ventilador 19 Interruptor del ventilador luz 20 Compartmiento de usos multiples 21 Cierre magnético de la puerta 22 Huevera 23 Bandeja huevera 24 Compartimiento pequeño Se p...

Page 8: ... haya en la bandeja de evaporación localizada en el lado trasero 2 Cargue el frigorífico sosteníendolo por las manijas localizadas al frente y detrás 7 MAX 4 MED 1 MIN For making ice rapidly or fast freezing When frozen food or ice cream is not stored For normal freezing 7 MAX 4 MED 1 MIN For making ice rapidly or fast freezing When frozen food or ice cream is not stored For normal freezing Para h...

Page 9: ...ción a la seguridad ya que el compresor está muy caliente NOTAS Desconexión del refrigerador Si tiene que desconectar el refrigerador porque va a estar fuera de casa durante un largo tiempo vacíelo completamente de comida y limpie a fondo el interior Desenchufe el cable de alimentación de la toma de la pared y deje ambas puertas abiertas 1 Retire la estantería del frigorífico el cajetín desmontabl...

Page 10: ...ato per lo smaltimento di gas isolanti ed infiammabili compressi ATTENZIONE 1 Non toccate il compressore poiché esso puó raggiungere temperature elevate durante il funzionamento 2 Se l alimentazione dovesse casualmente essere interrotta attendete almeno 5 minuti prima di ricollegare alla rete elettrica il frigorifero dal momento che la pressione nel compressore potrebbe attivare il relé di sovracc...

Page 11: ... evitare scariche elettriche 11 Mensola 12 Vasca per verdura fresca 13 Pannello di separazione 14 Vasca di evaporazione Lato posteriore 15 Ruote orientabili 16 Mascherina di ventilazione 17 Piedini aggiustabili 18 Interruttore di ventilazione 19 Interruttore di ventilazione e luce 20 Vaschetta di servizio 21 Guarnizione magnetica della porta 22 Portauova 23 Vasca portauova 24 Vaschette piccole Lev...

Page 12: ... spaccarsi 1 Per assicurare che il frigorigero venga adeguatamente ventilato raccomandiamo di lasciare uno spazio di almeno 6cm sia lateralmente che sul lato posteriore e uno spazio di almeno 9cm al di sopra Qualora questi spazi venissero ridotti la capacità refrigerante diminuirebbe e il consumo energetico aumenterebbe inutilmente INSTALLAZIONE 2 Per mezzo dei due piedini sul bordo frontale aggiu...

Page 13: ...e l entrata e l uscita del circuito di circolazione dell aria fredda con alimenti o con contenitori altrimenti gli alimenti potrebbero non venire raffreddati bene ENTRATA USCITA Congelate piccole quantitá di cibo per volta al fine di congelarle rapidamente I cibi devono essere depositati o coperti appropriatamente e deve essere rimossa tutta l aria per garantire una chiusura ermetica Disponete i c...

Page 14: ... infirmes sans surveil lance Les jeunes enfants doivent être surveillés afin de s assurer qu ils ne jouent pas avec le réfrigérateur Vous venez de faire l acquisition d un produit SHARP et nous vous en remercions Avant d utiliser votre réfrigérateur SHARP veuillez s il vous plaît lire la notice d utilisation afin de pouvoir tirer le maximum d avantages de votre nouveau réfrigérateur Toute personne...

Page 15: ...r dans le bac à légumes se règle en déplaçant le modérateur des trous d aération vers la droite ou vers la gauche 9 Etagère réfrigérateur Pour la retirer la soulever légèrement puis l extraire 11 Etagère 12 Bac à légumes 13 Plaque de séparation 14 Bac d évaporation face arrière 15 Roulettes 16 Grille de ventilation 17 Pieds réglables 18 Interrupteur du ventilateur 19 Interrupteur de ventilateur éc...

Page 16: ...rvés soient congelés même si REFRIGERA TOR TEMP CONTROL le régulateur de température de réfrigérateur est en position 1 MIN 1 Pour garantir une ventilation adéquate de votre réfrigérateur il est recommandé de prévoir un espace de 6 cm des deux côtés et à l arrière et un espace de 9 cm au dessus du réfrigérateur Un espace insuffisant diminuera l efficacité de refroidissement entraînant une consomma...

Page 17: ...additionnée de produit de vaisselle Ensuite utilisez de l eau froide pour enlever l eau savonneuse 3 Essuyez l extérieur avec un chiffon doux à chaque fois que cela est nécessaire 4 Nettoyez le joint de porte magnétique à l aide d une brosse à dents mouillée dans une eau tiède additionnée de produit de vaisselle 5 A chaque fois que le réfrigérateur doit être déplacé pour le nettoyer ou le réinstal...

Page 18: ...amento Crianças pequenas devem ser supervisionadas para certificar se de que estas não brinquem com o frigorífico Estou lhe imensamente agradecido por ter comprado este produto SHARP Antes de começar a usar o seu frigorífico leia porém atentamente as instruções para se assegurar de que vai tirar o máximo de rendimento do seu novo frigorífico Ao usar a sua câmara todas as pessoas deverão estar bem ...

Page 19: ...desligue primeiramente a ficha do frigorífico da tomada da corrente para evitar choques eléctricos 10 Alavanca O fluxo de ar para a geveta para legumes pode ser controlado deslocando se a alavanca do orifício de ventilação para a direita ou para a esquerda 9 Prateleira do frigorífico Para retirar puxe a ligeiramente e em seguida retire a 11 Prateleira 12 Gaveta para legumes 13 Placa separadora 14 ...

Page 20: ...ando não tem alimentos para conservar ou gelados 7 Coldest 4 MED 1 MIN For keeping foods fresher tasting When the refrigerator does not provide sufficient cooling For normal operation When the refrigerator provides excessive cooling Para manter os alimentos frescos Quando o frigorífico não faz refrigeração suficiente Para funcionamento normal Quando o frigorífico faz demasiada refrigeração 7 Colde...

Page 21: ... pano embebido em água quente e detergente para a louça Então utilize água fria para remover o restante da água com detergente 3 Limpe a parte exterior com um pano macio sempre que seja necessário 4 Limpe o fecho magnético da porta com uma escova de dentes e água quente com detergente para a louça 5 Sempre que se move o frigoríco para limpar ou mudar de lugar retirar a bandeja de evaporação e limp...

Page 22: ... 3 4 E 15 E 4 16 E 4 4 17 E 4 C 4 18 C 3 3 3 4 4 3 1 E 3 b 2 D 3 4 5 34 3 4 3 C b 4 G H 4 34 4 4 I 3 34 w 4 E 4 3 3 4 5 E w 34 6 K 4 C 4 4 4 7 E 3 L 8 3 4 3 G 3 4 9 E 4 3 4 3 3 1 C w IMC KC CBNOPIL L QCKC GONRC C PSGEC C DL BCMTMC 2 4 4 4 4 3 E 4 3 I 4w b 4 U b 4 b U 4 5 C b 3 4 6 C 34 4 3 4 SHARP 7 C 4 3 4 3 4 3 G 3 8 C w 3 w b G 3 9 E 4 4 D 10 3 11 E G 4 4 3 3 3 12 0 1 1 12 3 3 4 4 B 3 3 3 3 4 D...

Page 23: ... MAX 15W T 20 A E 4 4 3 9 18 1 10 G 4 T 3 I 4 4 11 12 2 13 2 0 14 0 0 1 15 C 16 17 19 D 0 C 18 0 2 19 0 2 20 H 21 8 0 22 F2 18 23 Abcoh2jg 24 L 9 S 4 4 L 4 4 4 25 2 8 0 1 26 F2 0 1 1 2 3 4 5 5 7 8 9 11 10 12 13 14 15 17 16 18 19 20 21 23 24 22 25 26 20 21 6 Downloaded from http www usersmanualguide com ...

Page 24: ... 1 7 MAX 4 MED 1 MIN For making ice rapidly or fast freezing When frozen food or ice cream is not stored For normal freezing I 3 I 4 3 4 C C 3 FREEZER TEMP CONTROL R Q U 7 MAX S 2 4 4 4 18 1 C 3 REFRIGERATOR TEMP CONTROL R Q 7 Coldest G 4 4 RE FRIGERATOR TEMP CONTROL R Q 4 1 MIN 1 I 6 4 3 4 9 N 2 S R 3 4 3 3 3 E 4 w E 4 C 19 D 0 C 1 B T 4 4 2 E 4 4 1 E 4 4 3 3 2 3 3 3 9 8 7 8 N G 4 3 4 E4 4 3 3 3 ...

Page 25: ...4 4 A i 4 4 4 4 4 3 B 3 3 4 T B 4 3 E 34 3 U 4 A 4 4 1 A w B 2 U 4 4 E 3 U 4 U E 3 5 U 4 4 4 T L C 4 3 4 4 D 3 4 3 4 0 1 18 1 C 3 3 3 A 3 3 4 T U B 4 4 T N T 4 N 4 4 4 3 3 3 E 4 4 3 T U B 4 4 3 4 SHARP NX L R 1 0 2 N 4 4 w G w 3 4 4 E 4 4 4 4 3 3 w Downloaded from http www usersmanualguide com ...

Page 26: ...herheitshinweise lesen kann Dieser Kühlschrank muß mit einer Netzspannung von 220 240V der Nennspannung betrieben werden ACHTUNG 1 Berühren Sie nie die Kompressoreinheit da diese während des Betriebes sehr heiß werden kann 2 Wenn die Stromversorgung versehentlich unterbrochen wird warten Sie mindestens 5 Minuten bevor Sie den Kühlschrank wieder an das Stromnetz schließen da der Gegendruck im Kompr...

Page 27: ...Hebel 9 Kühlabteil Fachboden Um ihn zu entfernen heben Sie ihn leicht an und ziehen Sie ihn heraus 11 Fachboden 12 Gemüsefrischhaltefach 13 Trennboden 14 Verdunstungsbecken Rückseite 15 Rollfüße 16 Entlüftungsgitter 17 Verstellbare Füße 18 Gebläseschalter 19 Gebläse und Lichtschalter 20 Lebensmittelfach 21 Magnetische Türdichtung 22 Eiereinsatz 23 Eierfach 24 Kleines Ablagefach Hebel In diesen Fäc...

Page 28: ...d um so seltener wird abgetaut Eine eingebaute Einheit die keiner manuellen Bedienung bedarf da sie sich automatisch beim Einschalten des Kühlschranks in Betrieb setzt 1 Um eine ausreichende Belüftung für Ihren Kühlschrank sicherzustellen wird empfohlen an beiden Seiten und an der Rückseite 6cm sowie über dem Kühlschrank 9cm Freiraum zu lassen Ein unzureichender Freiraum verringert die Kühlleistun...

Page 29: ...n von Innenteilen auftritt ES IST NORMAL wenn sich dieAußenwand des Kühlschranks heiß anfühlt In den Wänden verlaufen heiße Röhren die die Bildung von Schwitzwasser verhindern Wenden Sie sich an eine von SHARP zugelassene Servicestelle WENN DAS PROBLEM NICHT ZU BEHEBEN IST Lassen Sie warme Speisen abkühlen bevor Sie sie in den Kühlschrank geben Warme Speisen im Kühlschrank erhöhen die Temperatur i...

Page 30: ...elkast is niet bedoeld om zonder toezicht door kinderen of personen met verminderde geestelijke capaciteit te worden gebruikt Let er tevens op dat kleine kinderen niet met de koelkast spelen Wij danken u voor het aanschaffen van dit SHARP prod uct Lees voordat u uw SHARP koelkast in gebruik neemt eerst deze handleiding om het meeste profijt uit uw nieuwe koelkast te halen Iedereen die de kast gebr...

Page 31: ...te la kan worden ingesteld door de hendel voor de ventilatie naar rechts of links te schuiven 9 Koelkastplank Om de plank te verwijderen trekt u deze een weinig omhoog en dan naar buiten 11 Plank 12 Groentela 13 Scheidingsplaat 14 Condenswaterbak achterkant 15 Zwenkwieltjes 16 Ventilatierooster 17 Stelvoetjes 18 Ventilatorschakelaar 19 Ventilator en lichtschakelaar 20 Opbergvak 21 Magnetische deur...

Page 32: ...van de koelkast te waarborgen moet er minimaal 6 cm vrije ruimte aan beide zijkanten en 9 cm aan de bovenkant van de koelkast zijn Bij onvoldoende ruimte neemt het koelrendement af waardoor er meer stroom wordt verbruikt 2 Gebruik de twee voorste stelvoetjes om de koelkast stevig en waterpas op de vloer te zetten INSTALLATIE N B Plaats de koelkast niet in het zonlicht Plaats de koelkast niet direc...

Page 33: ...weg te vegen 3 Maak de buitenkant schoon met een zachte doek als hij vuil is 4 Maak de magnetische deursluiting schoon met een tandenborstel en een warm sopje van afwasmiddel 5 Als de koelkast verplaatst wordt om hem schoon te maken of elders te plaatsen dient de condenswaterbak eruit gehaald en schoongemaakt te worden N B Gebruik geen schuurmiddelen benzine heet water etc Als een onverdund reinig...

Page 34: ...AKA JAPAN 1 MADE IN THAILAND FABRICADO EN THAILANDIA FABBRICATO IN THAILANDIA FABRIQUÉ EN THAILANDE FABRICADO NA THAILÂNDIA Baq cesai rsai aHk tdg HERGESTELLT IN THAILAND VERVAARDIGO IN THAILAND Downloaded from http www usersmanualguide com ...

Page 35: ... tv dvd and othes Manual users user manuals user guide manual owners manual instruction manual manual owner manual owner s manual guide manual operation operating manual user s manual operating instructions manual operators manual operator manual product documentation manual user maintenance brochure user reference pdf manual Downloaded from http www usersmanualguide com ...

Reviews: