background image

17

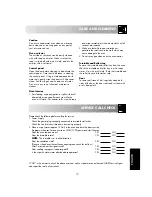
CARE AND CLEANING

ENGLISHENGLISH

Please check the following before calling for service.
1. Power Supply

Check the power plug is properly connected to a suitable wall outlet.
Check the line fuse/circuit breaker is functioning properly.

2. Place a cup of water (approx. 150 ml) in the oven and close the door securely.

Programme the oven for one minute on HIGH (100P) power and start the oven.
Does the oven lamp come on?

YES

NO

Does the turntable rotate?

YES

NO

NOTE: 

The turntable turns in either direction.

Does the ventilation work?

YES

NO

(Place your hand over the ventilation openings and check for air flow.)
After 1 minute does the signal sound?

YES

NO

Does cooking in progress indicator go off? 

YES

NO

Is the cup with water warm after the above operation?

YES

NO

If “NO” is the answer to any of the above questions, call your dealer or an authorised SHARP Service Agent 
and report the results of your check.

Caution

Do not use commercial oven cleaners, abrasive
harsh cleaners or scouring pads on any part of
your microwave oven.

Oven exterior

The outside of your oven can be easily cleaned
with mild soap and water.  Make sure that the
soap is wiped off with a moist cloth, and dry the
exterior with a soft towel.

Control panel

Open the door before cleaning to de-activate the
control panel.  Care should be taken in cleaning
the control panel.  Using a cloth dampened with
water only, gently wipe the panel until it becomes
clean.  Avoid using excessive amounts of water.
Do not use any sort of chemical or abrasive
cleaner.

Oven Interior

1. For cleaning, wipe any spatters or spills with a soft

damp cloth or sponge after each use while the
oven is still warm.  For heavier spills, use mild soap

and wipe several times with a damp cloth until all
residues are removed.

2. Make sure that mild soap or water do not

penetrate the small vents in the walls which may
cause damage to the oven.

3. Do not spray type cleaners on the oven interior.

Turntable and Roller stay

Remove the turntable and roller stay from the oven.
Wash the turntable and roller stay in mild soapy
water.  Dry with a soft cloth.  Both the turntable and
the roller stay are dishwasher safe.

Door

To remove all trace of dirt, regularly clean both
sides of the door, the door seals and surfaces with
a soft, damp cloth.  

SERVICE CALL CHECK 

Summary of Contents for R-332

Page 1: ...5 OPERATION MANUAL This operation manual contains important information which you should read carefully before using your microwave oven IMPORTANT There may be a serious risk to health if this operation manual is not followed or if the oven is modified so that it operates with the door open ...

Page 2: ...e quick and simple to prepare Be inspired by the recipes we have included and prepare your own favourite dishes in your microwave oven There are so many advantages to having a microwave oven which we are sure you will find exciting Food can be prepared directly in the serving dishes leaving less to wash up Shorter cooking times and the use of little water and fat ensure that many vitamins minerals...

Page 3: ...ATION 6 STOP BUTTON 7 SETTING THE CLOCK 7 MICROWAVE POWER LEVELS 8 MICROWAVE COOKING 8 9 OTHER CONVENIENT FUNCTIONS 10 11 AUTO COOK OPERATION 12 AUTO COOK CHARTS 13 15 RECIPES FOR AUTO COOK AC 8 16 CARE AND CLEANING 17 SERVICE CALL CHECK 17 SPECIFICATIONS 18 SERVICE ADDRESSES 18 22 1 CONTENTS ENGLISH ...
Page 4: ...he following accessories are provided 14 Turntable 15 Roller stay 16 Coupling Place the turntable support in the centre of the oven floor so that it can freely rotate around the coupling Place the turntable onto the turntable support so that it locates firmly into the coupling To avoid turntable damage ensure dishes or containers are lifted clear of the turntable rim when removing them from the ov...

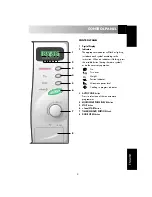
Page 5: ...icator is flashing press the suitable button having the same symbol or do the necessary operation Stir Turn over Weight Portion Indicator Microwave power level Cooking in progress indicator 3 AUTO COOK button Press to select one of the ten automatic programmes 4 MICROWAVE POWER LEVEL button 5 STOP button 6 1min START button 7 TIMER WEIGHT PORTION knob 8 DOOR OPEN button KG 1 2 3 4 5 6 7 8 ...

Page 6: ... insert any objects into the door lock openings or ventilation openings In the event of a spill turn off and unplug the oven immediately and call an authorised SHARP service agent To avoid the danger of fire The microwave oven should not be left unattended during operation Power levels that are too high or cooking times that are too long may overheat foods resulting in a fire In cases where the ov...

Page 7: ...foods as potatoes sausages and fruit before cooking or they may explode To avoid the possibility of burns Use pot holders or oven gloves when removing food from the oven to prevent burns Always open containers popcorn makers oven cooking bags etc away from the face and hands to avoid steam burns To avoid burns always test food temperature and stir before serving and pay special attention to the te...

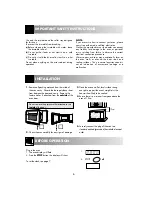
Page 8: ...n carefully for any signs of damage 0 2 3 1 4 5 8 9 10 11 12 13 14 15 20 25 30 7 6 IMPORTANT SAFETY INSTRUCTIONS NOTE If you are unsure how to connect your oven please consult an authorised qualified electrician Neither the manufacturer nor the dealer can accept any liability for damage to the oven or personal injury resulting from failure to observe the correct electrical connection procedure Wat...

Page 9: ...ated If this occurs during cooking the programme will be erased The time of day will also be erased 4 When you want to reset the time of day follow the above example again There are two setting modes 12 hour clock and 24 hour clock 1 To set the 12 hour clock hold the MICROWAVE POWER LEVEL button down for 3 seconds will appear in the display 2 To set the 24 hour clock press the MICROWAVE POWER LEVE...

Page 10: ...r desire level continue pressing the MICROWAVE POWER LEVEL button until you reach the level again 3 Press the 1min START button MEDIUM 50P output 450 W For dense foods which require a long cooking time when prepared conventionally eg beef dishes it is advisable to reduce the power setting and increase the cooking time In this way the meat will be more tender MEDIUM LOW 30P output 270 W Defrost set...

Page 11: ...process the cooking time on the digital display stops automatically The cooking time starts to count down again when the door is closed and the 1min START button is pressed 2 If you wish to know the power level during cooking press the MICROWAVE POWER LEVEL button As long as your finger is touching the MICROWAVE POWER LEVEL button the power level will be displayed 3 You can rotate the TIMER WEIGHT...

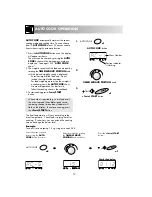
Page 12: ...ime by rotating TIMER WEIGHT PORTION knob clockwise x1 Choose the desired power level by pressing the MICROWAVE POWER LEVEL button once STAGE 2 Enter desired time by rotating TIMER WEIGHT PORTION knob clockwise x4 Choose the desired power level by pressing the MICROWAVE POWER LEVEL button four times Press the 1min START button once to begin cooking x1 The oven will begin to cook for 5 minutes and ...

Page 13: ... within 1 minute after preceding operation i e closing the door or pressing the STOP button b Extend the cooking time You can extend the cooking time for multiples of 1 minute if the button is pressed while the oven is in operation 3 TO CHECK THE POWER LEVEL To check the microwave power level during cooking press the MICROWAVE POWER LEVEL button As long as your finger is touching the MICROWAVE POW...

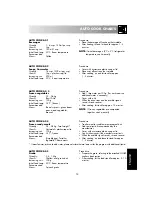
Page 14: ...t or quantity of the food can be input by rotating the TIMER WEIGHT PORTION knob until the desired weight quantity is displayed Enter the weight of the food only Do not include the weight of the container For food weighing more or less than weights quantities given in the AUTO COOK charts use manual operation For best results follow the cooking charts in the cookbook 3 To start cooking press 1min ...

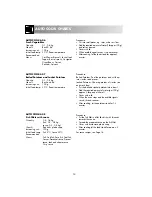
Page 15: ...ecessary Cover with a lid When the oven stops and the audible signals sound stir and re cover After cooking let stand for approx 1 2 minutes NOTE If frozen vegetables are compacted together cook manually AUTO COOK AC 4 Frozen ready meals Quantity 0 3 0 8 kg Total weight Utensils Casserole plastic wrap or lid Increasing unit 100 g Initial food temp 18 C Frozen Recommended Menus Stirrable type Torte...

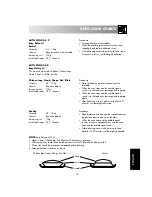
Page 16: ...toes and cut them into similar sized pieces Jacked Potatoes Choose potatoes of similar size and wash them Put the boiled or jacket potatoes into a bowl Add the required amount of water per 100 g approx 2 tbsp and a little salt Cover with a lid When the oven stops and the audible signals sound stir and re cover After cooking let the potatoes stand for 1 2 minutes AUTO COOK AC 8 Fish fillets with sa...

Page 17: ...This menu can be used to defrost Chicken legs Steak Chops Fish fillet Poultry Chicken legs Steak Chops Fish fillets Quantity 0 2 1 0 kg Utensils See note below Increasing unit 100 g Initial food temp 18 C frozen Procedure Place the food on a plate in the centre of the turntable When the oven stops and the audible signals sound turn the food over rearrange and separate When the oven stops and the a...

Page 18: ...1 tin 825 g canned tomatoes drain 1 tin 280 g corn 2 3 tsp chilli sauce 40 g onion finely chopped 3 tsp red wine vinegar 1 4 tsp mustard 1 spice thyme 1 spice cayenne pepper 800 g fish fillet e g rosefish Preparation 1 Mix ingredients for the sauce 2 Place fish fillet e g Rosefish fillet in a quiche dish and spread the sauce on fish fillet 3 Cook on AUTO COOK 8 Fish fillets with sauce Fishfillet w...

Page 19: ...he outside of your oven can be easily cleaned with mild soap and water Make sure that the soap is wiped off with a moist cloth and dry the exterior with a soft towel Control panel Open the door before cleaning to de activate the control panel Care should be taken in cleaning the control panel Using a cloth dampened with water only gently wipe the panel until it becomes clean Avoid using excessive ...

Page 20: ...u zich wenden tot uw dealer of naar onderstaand Sharp Service Centrum SHARP ELECTRONICS BENELUX BV Helpdesk Postbus 900 3990 DW Houten Telefoon 09 007427728 Fax 030 6359621 DEUTSCHLAND Bei einer Reklamation Ihrer SHARP Mikrowelle wenden Sie sich bitte an Ihren Fachhändler oder an eine der nachfolgend aufgeführten SHARP SERVICE Niederlassungen 01067 Dresden Gehado Service GmbH Webergasse 2 4 Tel 03...

Page 21: ...senstamm Heberer Electronic Goethestr 10 Tel 06104 923704 Fax 923705 63739 Aschaffenburg Reis Radio Fernsehen Maximilianstr 8 Tel 06021 15177 Fax 15199 65239 Hochheim Norbert Schwamb GmbH Eltvillerstr 14 Tel 06146 4085 Fax 4088 65627 Elbtal Rudi Wagner Am Ohlenrod 10 Tel Fax 06436 3444 65931 Frankfurt Norbert Schwamb nur telefonische Annahme 069 371525 66117 Saarbrücken Hans Krempl Haustechnik Zin...

Page 22: ...A BALEARES MENORCA ANOIA ELECTROVISIO 93 805 11 90 AV BALMES 12 08700 IGUALADA BARCELONA AUDIO VISION 385 78 08 CL MARE DEU MONTSERRAT 22 08922 STA COLOMA BARCELONA SAC 2 S C P 331 77 54 CL RIERA BLANCA 113 08028 BARCELONA BARCELONA FERMO 465 22 00 AV MORERA 5 08915 BADALONA BARCELONA ELEC SAFONT 821 30 03 CL GRAL MANSO SOLA 31 08600 BERGA BARCELONA SERVINTERS S C C L 389 44 60 PZ CASAGEMES 20 089...

Page 23: ... DE SAN JUAN CIUDAD REAL ELECTRONICA LARA 926 21 17 87 CL DE LA JARA 1 13002 CIUDAD REAL CIUDAD REAL MANUEL VAZQUEZ 926 42 09 93 CL ADUANA 3 13500 PUERTOLLANO CIUDAD REAL ELECTRODIAZ S L 926 32 23 24 CL BUENSUCESO 10 13300 VALDEPE AS CIUDAD REAL DUE AS CA AS TEODORO 957 26 35 06 CL HERMANO JUAN FDEZ 15 14014 CORDOBA CORDOBA ELECTRONICA SALES 957 66 09 04 CL ANDALUCIA 11 14920 AGUILAR FRONTERA CORD...

Page 24: ...VALLADOLID VALLADOLID ASIST TECNICA MARCOS 983 29 78 66 CL PIO DEL RIO HORTEGA 2 4 47014 VALLADOLID VALLADOLID ELECTRONICA VITELSON 983 80 43 56 PZ DEL MERCADO 9 47400 MEDINA DEL CAMPO VALLADOLID R T V BLANCO 980 51 14 41 CL EDUARDO JULIAN PEREZ 9 49018 ZAMORA ZAMORA SWITZERLAND FALCOMAT AG Allmendstrasse 134 4058 BASEL Tel 061601 1919 Fax 061601 5755 SWEDEN Vid förfrågningar angående din mikrovåg...

Page 25: ...ckt in Grossbritannien Imprimé au Royaume Uni Gedrukt in Groot Brittannie Stampato in Gran Bretagna Impreso en el Reino Unido TINS A129URR0 SHARP ELECTRONICS EUROPE GMBH Sonninstrasse 3 20097 Hamburg Germany ...

Reviews: