background image

21

04/6/8

QT-V5E_UK_3.fm

9HX80432100003

QT-V5E

2

3

4

5

6

7

8

1

D

V

D Oper

ation

- Us

e

ful ope

ra

ti

o

n

 -


"

To play the contents between the specified 
points repeatedly (A-B repeat)                     


You can play the desired portion repeatedly by specifying it during playback.

Notes:

!

A-B repeat play is disabled on some discs.

!

A-B repeat play for DVD is possible only within a title.

!

A-B repeat play for a SVCD, VCD and audio CD is possible only within a track.

!

Some scenes on DVD may not allow A-B repeat play.

"

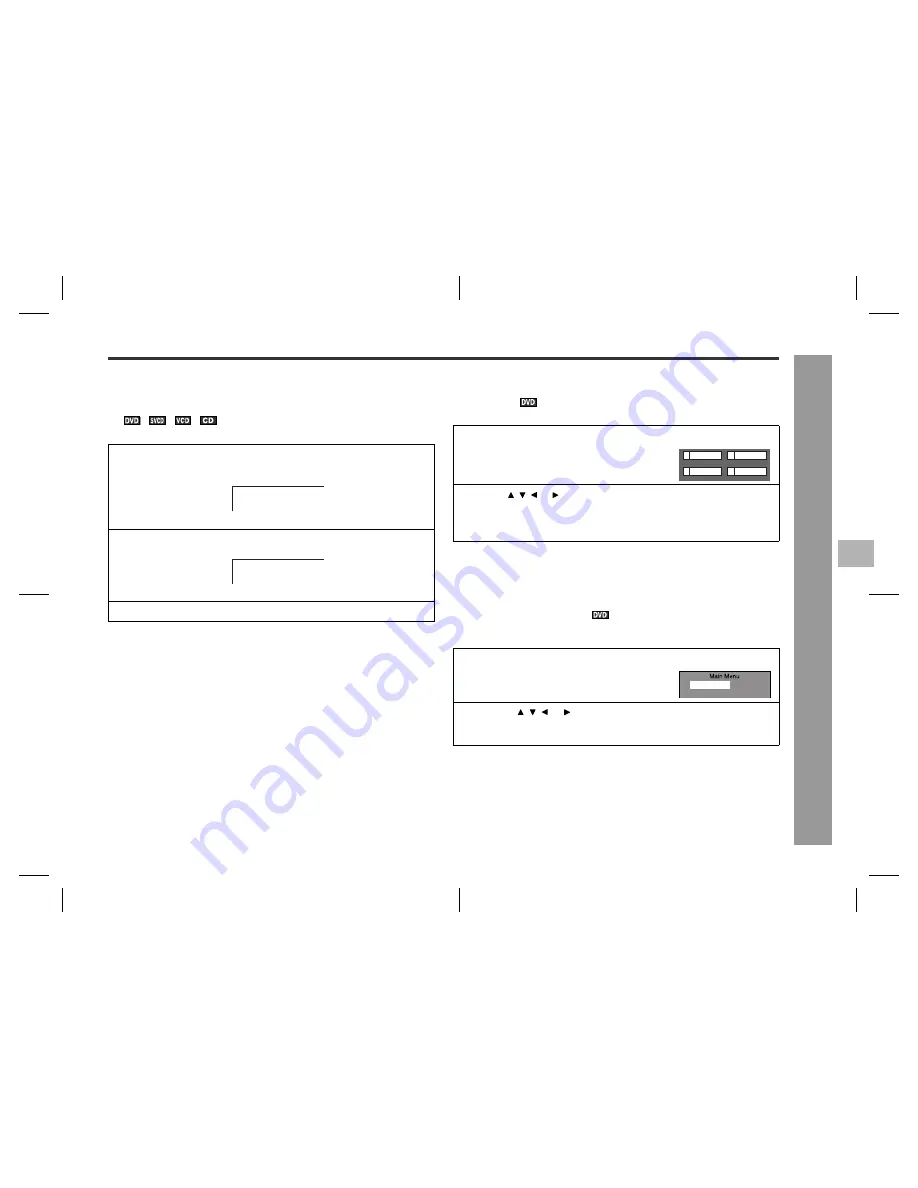
To select a title from the top menu of the 
disc     

On a DVD with multiple titles, you can select a title from the top menu.

Note:

The procedure shown here provides only general steps. The actual procedure for
using the title menu depends on the disc. See the disc jacket for details.

"

To select a subtitle or audio language from 
the disc menu     

You can select the desired subtitle or audio language (sound system) on your DVD if
it has a disc menu.

Note:

The procedure shown here provides only general steps. The actual procedure for
using the disc menu depends on the disc you are using. See the disc jacket for
details.

1

Whilst the disc is playing, press the A-B REPEAT button.

TV screen

The start point (A) is created.

2

Press the A-B REPEAT button again to enter the end point (B).

A-B repeat plays from the start point (A) to the end point (B).

3

Press the A-B REPEAT button to return to normal playback.

A  TO  B       SET  A

A  TO  B    REPEAT ON

1

In the stop or playback mode, press the
TOP MENU button to display the title
menu.

Example

2

Use the  ,  ,   or   button to select a title, and then press the EN-
TER button.

!

The selected title plays.

!

You can also use the direct number buttons for some discs.

1

In the playback mode, press the MENU but-
ton to display the disc menu.

Example

2

Press the  ,  ,   or   button to change the setting and press the
ENTER button.

You can also use the direct number buttons for some discs.

2

1 Drama

Action

4

3 SF

Comedy

1.Highlights
2.Start Movie

Summary of Contents for QT-V5E

Page 1: ...st per formance from this product please read this manual carefully It will guide you in operating your SHARP product If you require any advice or assistance regarding your Sharp product please visit our web site www sharp co uk customersupport Customers without Internet access may telephone 08705 274277 during office hours or 01 676 0648 if telephoning from Ireland 0301 ...

Page 2: ...e terminals in your plug proceed as follows The wire which is coloured blue must be connected to the plug terminal which is marked N or coloured black The wire which is coloured brown must be connected to the plug termi nal which is marked L or coloured red Ensure that neither the brown nor the blue wire is connected to the earth terminal in your three pin plug Before replacing the plug cover make...

Page 3: ...vent fire or shock hazard do not expose this appliance to dripping or splash ing No objects filled with liquids such as vases should be placed on the appara tus NOTE This equipment complies with the requirements of Directives 89 336 EEC and 73 23 EEC as amended by 93 68 EEC CAUTION This product is classified as a CLASS 1 LASER product Use of controls adjustments or performance of procedures other ...

Page 4: ...change the display on TV screen 23 Page Video CD and Super Video CD Operation Video CD and Super Video CD playback Video CD with P B C playback control 24 To start playback from the desired point direct play 25 CD CD R and CD RW Operation CD operation To play in the desired order programmed play 25 To play in random order random play 26 MP3 and JPEG disc operation MP3 and JPEG disc playback 26 Zoo...

Page 5: ...8 cm Video CD Audio and video movies 12 cm 8 cm Audio CD Audio 12 cm 8 cm Or CDV 2 CD R CD RW 3 Audio and picture 12 cm 8 cm Or CD R CD RW recorded in MP3 format 4 JPEG format 5 1 All discs including DVD R DVD RW may not be played back due to properties and scratches on the disc dirty optical pickup lens etc 2 Only the audio on the CDV can be played 3 The CD R CD RW may not be played back properly...

Page 6: ...noise Do not place anything on the unit Do not expose the unit to moisture to temperatures higher than 60 C 140 F or to extremely low temperatures If the unit does not work properly unplug and plug it in again Then turn on the unit In case of an electrical storm unplug the unit for safe ty Hold the AC power plug by the head when removing it from the wall socket as pulling the lead can damage inter...

Page 7: ...0 15 Memory Indicator 29 16 Track Indicator 16 17 Surround Indicator 15 18 Stereo Indicator 28 19 Sleep Indicator 35 20 Timer Indicator 34 21 Preset Equaliser Indicators 15 22 CD Indicator 16 23 MP3 Indicator 16 24 FM Telescopic Rod Aerial 28 25 SCART Output Socket 11 26 S video Output Socket 11 27 Video Output Socket 11 28 Audio Output Sockets 11 29 Headphone Socket 36 30 Optical Digital Audio Ou...

Page 8: ...Fast Forward Tuner Preset Up Buttons 18 27 29 16 Programme Button 25 29 17 Clock Button 14 18 Shift Button 20 23 27 19 Timer Sleep Button 34 35 20 Sound Mode Select Button 15 21 Tuner Band Button 28 22 Dimmer Button 15 23 23 Disc Tray Open Close Button 16 24 Direct Number Buttons 19 25 25 Menu Button 21 30 26 Enter Button 14 27 GOTO Button 19 25 28 Random Play Button 26 29 Still Frame Advance Butt...

Page 9: ... MPEG sound CD ROM DVD ROM SACD DVD RAM Discs recorded in special formats etc Title 1 Title 2 Chapter 1 Chapter 2 Chapter 3 Chapter 1 Chapter 2 Track 3 Track 2 Track 1 Track 5 Track 4 Folder 1 Folder 2 Track 1 Track 2 Track 3 Track 1 Track 2 MP3 disc JPEG disc Display Description Region number playable area number DVD discs are programmed with region num bers indicating countries in which they can...

Page 10: ...srael Italy Italian Republic Japan Japan Jordan Hashemite Kingdom of Jordan Kuwait State of Kuwait Common names Names of nations and areas Lebanon Republic of Lebanon Lesotho Kingdom of Lesotho Liechtenstein Principality of Liechtenstein Luxembourg Grand Duchy of Luxembourg Macedonia Republic of Macedonia Malta Republic of Malta Monaco Principality of Monaco Netherlands Kingdom of the Netherlands ...

Page 11: ...r noise When playing a disc in DTS mode no sound will be heard from the speakers To listen to the sound select another audio output in the To change the audio lan guage audio output on page 22 Magnetically shielded speakers The speakers are magnetically shielded Therefore they do not affect the display even you use them near the TV However some colour variation may occur depending on the type of T...

Page 12: ...dible Using with the AC power lead After checking all the connections connect the AC power lead to the AC power input socket then to the wall socket Before connecting the AC power lead remove the cardboard from the AC power plug Notes Unplug the AC power lead from the wall socket if the unit will not be used for a pro longed period of time Connecting the AC power lead to the unit disconnects the b...

Page 13: ...ensor on the unit to strong light may interfere with operation Change the lighting or the direction of the unit Keep the remote control away from moisture heat shock and vibrations Turning the power on To turn the power on 1 Set the ON STAND BY switch on the main unit to ON 2 When the ON STAND BY switch on the main unit is set to ON you can also turn the power on or put the unit in the stand by mo...

Page 14: ... unit 1 Press the ON STAND BY switch on the main unit to turn the power on 2 Press the CLOCK button 3 Within 5 seconds press the button to se lect the hour 4 Within 5 seconds press the or button to adjust the hour Press the or button once to advance the time by 1 hour Hold it down to advance continuously 5 Within 5 seconds press the button to se lect the minute 6 Within 5 seconds press the or butt...

Page 15: ...unit 1 Press the SOUND MODE button repeatedly to select XBS OFF 2 Within 5 seconds press the or button to select XBS ON Increase Unchanged To cancel select XBS OFF Brightened OFF Dimmed 00 01 31 32 1 Press the SOUND MODE button repeatedly to select SUR OFF 2 Within 5 seconds press the or button to select SUR ON To cancel the surround select SUR OFF 1 Press the SOUND MODE button repeatedly to selec...

Page 16: ...ut is selected on the TV If the initial setting screen is blurred press the NTSC PAL button repeatedly whilst holding down the SHIFT button to change the TV type see page 23 2 Press the OPEN CLOSE button to open the disc tray 3 Place the disc on the disc tray label side up Be sure to place 8 cm discs in the middle of the tray 4 Press the OPEN CLOSE button to close the disc tray Discs supporting au...

Page 17: ...ck stops there During an operation may appear indicating that the operation is disabled Resume play You can resume playback from the point where it was stopped To cancel the resume playback Press the STOP button twice Notes The resume play feature is disabled on some discs Depending on the disc playback may resume slightly before the position where it was stopped DVD mode operation indicators The ...

Page 18: ...itles On MP3 discs the search is not possible across tracks Sound output and the appearance of subtitles differ depending on the disc When search is performed during the DVD playback pictures may not be for warded or reversed in the search speed specified in this manual depending on the disc or the scene being played Whilst a disc is playing press the or button You can also use the or button on th...

Page 19: ...e or chapter by pressing the or button and enter the title or chapter number using the direct number buttons If the track number is 2 digits or more press 10 and enter the number Example To select chapter 12 press 10 and 2 To select chapter 22 press 10 10 and 2 3 Within 10 seconds press the ENTER button 1 In the playback mode press the GOTO button twice If the _ _ _ _ _ _ is not highlighted press ...

Page 20: ...tinuously Notes On some discs the repeat play function is disabled During random play operation repeat play is not possible When operating SVCD VCD with the P B C function set the P B C to off see page 24 When is displayed in the upper right cor ner of the TV screen press the ANGLE button repeatedly to select the desired angle number 1 During playback press the ZOOM button whilst holding down the ...

Page 21: ...audio language sound system on your DVD if it has a disc menu Note The procedure shown here provides only general steps The actual procedure for using the disc menu depends on the disc you are using See the disc jacket for details 1 Whilst the disc is playing press the A B REPEAT button TV screen The start point A is created 2 Press the A B REPEAT button again to enter the end point B A B repeat p...

Page 22: ...efer to the manual of the disc This unit does not play sound when playing DTS discs Change the audio lan guage to listen to the sound through the speakers Only the 2 channel sound can be reproduced even if you select other audio languages Dolby Digital 5 1 channel or Dolby Digital 2 channel etc Alternatively connect to a DTS digital audio decoder etc to produce the sound from the speakers see page...

Page 23: ...TITLE REMAIN 00 45 00 CHAPTER ELAPSED 00 01 23 CHAPTER REMAIN 00 03 03 SINGLE ELAPSED 00 01 16 TOTAL REMAIN 00 48 54 CHAPTER ELAPSED 00 05 21 CHAPTER REMAIN 00 02 35 SINGLE REMAIN 00 03 21 TOTAL ELAPSED 00 12 40 Total number of chapters Current chapter number Current title number Total number of titles Remaining playback time for the current title Elapsed playback time for the current title Elapse...

Page 24: ...o use the STOP button on the main unit To stop the current operation and return to the menu Press the RETURN button To scroll the menu screen menu screen with more than 1 page Press the or button You can also use the or button on the main unit Notes Subtitles and sounds on the super video CD can be switched see page 22 The menu screen cannot be scrolled on some discs Switching P B C function When ...

Page 25: ...med When playing SVCD or VCD cancel the P B C playback control see page 24 To change the programmed contents Repeat the above procedures from step 1 Programmed contents are cleared when you perform the following operations Open the disc tray Set the unit to the stand by mode Notes Programming is not possible in the pause or playback mode Sequential programming does not work if the disc disables pr...

Page 26: ... convert MP3 data to audio CD data to record on a CD R RW play it as an audio CD The MP3 operation cannot be performed Note Up to 18 characters can be displayed for a folder name and a track name Underlines asterisks and spaces may not be displayed Repeat play on the MP3 menu screen 1 Whilst stopped press the RANDOM button TV screen Unit display 2 Press the PLAY PAUSE button RANDOM ON 1 Load a dis...

Page 27: ...te control 1 Whilst holding down the SHIFT button during playback press the ZOOM button 2 Press the or button Each press of the or button cycles through the zoom setting as follows 3 To shift the view and display the desired part of a zoomed image press the or button repeatedly ZOOM 025 PCT ZOOM 050 PCT ZOOM 100 PCT ZOOM 150 PCT ZOOM 200 PCT Press the button Press the button Press the button Press...

Page 28: ...ode is selected FM AM 1 Press the ON STAND BY switch on the main unit to turn the power on 2 Press the TUNER BAND button repeatedly to select the desired frequency band FM or AM FM stereo mode FM monaural mode AM mode 3 Press the or button to tune in to the desired station Manual tuning Press the TUNING or or button as many times as required to tune in to the desired station Auto tuning When the T...

Page 29: ... desired station 1 Perform steps 1 3 in Tuning on page 28 2 Press the PROGRAM button for 0 5 seconds or more to enter the preset tuning saving mode 3 Within 10 seconds press the TUNER PRESET or button to se lect the preset channel number Store the stations in memory in order starting with preset channel 1 4 Within 10 seconds press the PROGRAM button to store that sta tion in memory If the MEMORY a...

Page 30: ... or button to select a menu and press the ENTER button See the list on page 31 for setup menu 3 Press the or button to change the setting and press the ENTER button See the list on page 31 for the selectable param eters Select MAIN PAGE and press the ENTER but ton to return to the main page 4 Press the MENU button The new setting is memorised To change other settings begin from step 2 SETUP MENU M...

Page 31: ...NAMIC FULL Dynamic range is fully compressed 7 8 1 8 Dynamic range is partially compressed OFF No compression to dynamic range PREFERENCES TV DISPLAY NORMAL PS NORMAL LB WIDE The screen mode should be set according to the connected TV type for details see page 32 TV TYPE MULTI SYSTEM NTSC PAL Selects the correct TV system for details see page 32 AUDIO ENGLISH FRENCH SPANISH CHINESE JAPANESE Select...

Page 32: ...ci Thank you English French Merci Thank you ACTEURS PERSONNEL CAST STAFF English French Indicator Setting NORMAL PS When playing a wide image 16 9 disc the left and right sides of the image are cut pan scan to display a natural look ing 4 3 size image A wide image disc without pan scan is played back in 4 3 letterbox A 4 3 disc is played in 4 3 NORMAL LB When playing a wide image 16 9 disc black b...

Page 33: ...a 4 digit password using the direct number buttons and press the ENTER button If this is the first time enter 0000 Indicator Setting 1 Only DVD software intended for children can be played back 2 to 7 Only DVD software intended for general use and children can be played back 8 DVD software of any grade adult general children can be played back 1 Enter the old password using the direct number butto...

Page 34: ...LOCK button to check that the clock is set to the correct time 2 Load a disc to be played 1 Press the ON STAND BY switch on the main unit to turn the power on 2 Press the STOP or TUNER BAND button to select the desired function When you select the TUNER tune into the desired station 3 Adjust the volume using the VOLUME buttons Do not turn the volume up too high 4 Press the TIMER SLEEP button repea...

Page 35: ...wer stand by mode A timer setting remains once you have created it Set the unit to the stand by mode with the ON STAND BY button on the remote control You can start the timer at the set time every day 11When the preset time is reached playback will start The volume is the same as before you enter the timer stand by mode During timer play the timer set indicator flashes 12The unit will enter the st...

Page 36: ...making this connection Selecting a sound signal type When connecting other equipment to the digital audio output adjust the audio output setting accordingly see page 31 SPDIF RAW Choose this when connecting the unit to a Dolby Digital 5 1ch decoder or DTS 5 1ch decoder When playing a DVD recorded in Dolby Digital or DTS bitstream out put allows you to enjoy the 5 1ch surround sound SPDIF PCM Choos...

Page 37: ...s displayed Is the disc loaded upside down Is the disc very dirty Playback sounds are skipped Does the disc satisfy the standards Is the unit located near excessive vi brations Has condensation formed inside the unit P 38 The control buttons do not function Music or video play back is interrupted Is the disc very dirty Does the disc satisfy the standards Is the unit located near excessive vi brati...

Page 38: ...t be recalled Did you remove the plug from the wall socket or did a power failure occur P 29 Set the channel again Are the memory batteries low P 12 Symptom Possible cause Reference page The remote control does not operate properly Are the batteries inserted correctly P 13 Are the batteries dead Is the distance or angle incorrect P 13 Are there any obstructions in front of the unit Is the remote c...

Page 39: ...P reserves the right to make design and specification changes for product improvement without prior notice The performance specification figures indicated are nominal values of production units There may be some deviations from these values in individual units TV screen Meaning The region number of the DVD is not 2 or ALL Periodically wipe the cabinet with a soft cloth and a diluted soap solution ...

Page 40: ...pply if the product is used in the course of a business trade or profession To benefit from this guarantee any fault which occurs must be notified to Sharp or its appointed Service Facility within one year from the date this product was purchased Proof of purchase must be provided The guarantee does not cover carriage costs audio tapes compact discs or batteries In the unlikely event of this produ...

Reviews: