


E-24
Operation
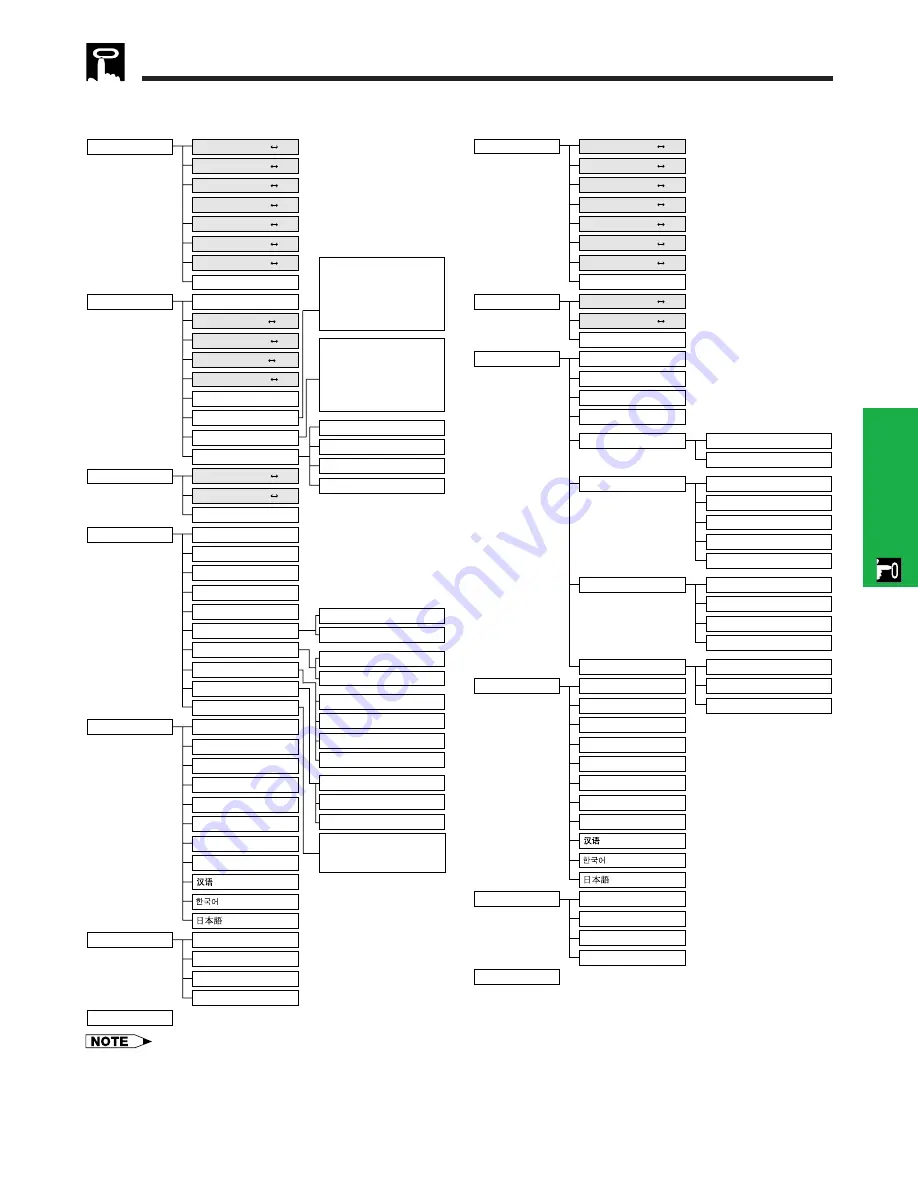
Items on the INPUT1 or INPUT2 Mode Menu Bar
Using the GUI (Graphical User Interface) Menu Screens
Items on the VIDEO Mode Menu Bar
Main menu
Sub menu
Main menu
Sub menu
Contrast
Picture
Audio
30
30
I/P Conversion
Options
Video System
Language
English
PRJ Mode
Status
Ceiling
Front
Ceiling
Rear
Deutsch
Español
Nederlands
Français
Italiano
Svenska
Português
Front
Rear
Background
Startup Image
Interlaced
Progressive
Auto
PAL (50 /60Hz)
SECAM
NTSC4.43
NTSC3.58
Sharp
Custom
Blue
None
Auto Power Off
Sharp
Custom
None
Lamp Timer
BLK SCRN Disp
OSD Display
[ON/OFF]
[ON/OFF]
[ON/OFF]
Bright
30
30
Color
30
30
Tint
30
30
Sharp
30
30
Red
30
30
Blue
30
30
Treble
30
30
Bass
30
30
Reset
Reset
1152
864
1024
864
1152
882
1152
870
Tint
Auto Sync
Fine Sync
Audio
30
30
Color
30
30
Clock
150
150
150
150
Bass
Options
Lamp Timer
Language
English
PRJ Mode
Status
Ceiling
Front
Ceiling
Rear
Deutsch
Español
Nederlands
Français
Italiano
Svenska
Português
Front
Rear
Auto Sync Disp
BLK SCRN Disp
OSD Display
[ON/OFF]
[ON/OFF]
[ON/OFF]
[ON/OFF]
[ON/OFF]
Signal Type
Background
Sharp
Startup Image
Signal Info
Sharp
Custom
Custom
I/P Conversion
Interlaced
Progressive
Blue
None
Computer/RGB
Component
None
30
30
Treble
30
30
Reset
Phase
60
60
H-Pos
V-Pos
Reset
Save Setting
Select Setting
1
2
•
•
7
Resolution
800
600
640
480
Vert Freq
75 Hz
72 Hz
Special Modes
60
60
Sharp
30
30
Contrast
Picture
30
30
Bright
30
30
Red
30
30
Blue
Reset
30
30
1
2
•
•
7
Resolution
800
600
640
480
Vert Freq
75 Hz
72 Hz
Resolution
Hor Freq
Vert Freq
640
480
37.5 kHz
72 Hz
Auto Power Off
• The resolution, vertical frequency and horizontal frequency figures displayed above are for example purposes only.
• “Color”, “Tint”, and “Sharp” appear only when Component input is selected in INPUT 1 mode.
• Only the items highlighted in the tree charts above can be adjusted.
• To adjust the items under the sub menu, press
©
after selecting the sub menu.
• The signal is set to COMPUTER/RGB, when inputting DIGITAL signal.
• The items displayed in gray cannot be adjusted.


