background image

32

(Continued)

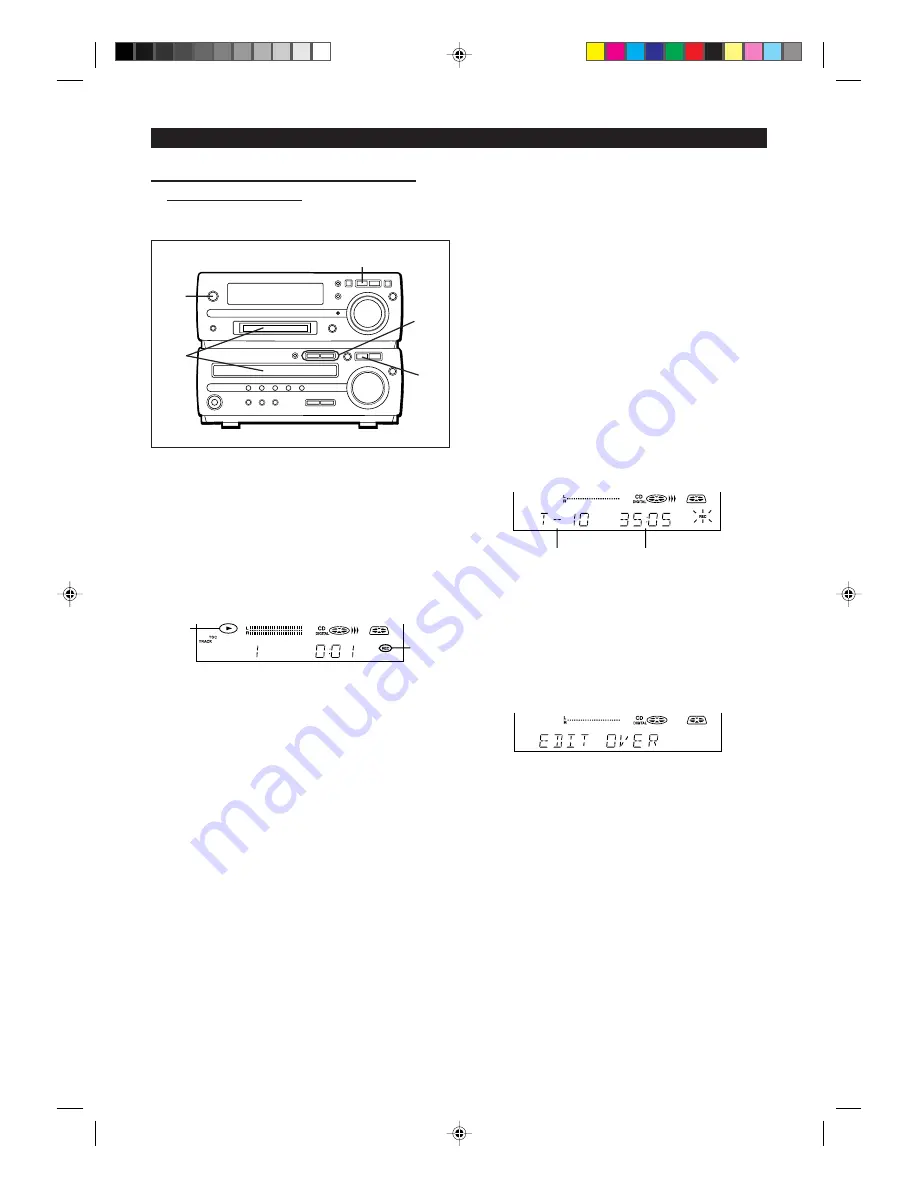
Recording from a CD onto a MiniDisc

(One-Touch Editing)

A CD can be recorded to a MiniDisc, starting from the first
track, with one-touch operation.

Before pressing the CD 

0

 MD EDIT (HIGH or NORMAL)

button, press the CD 

 button.

To stop recording:

Press the MD 

 button.

Playback and recording will stop and the track numbers
will be written on the MiniDisc.

Caution:

When a recording is made at high speed, the playback
sound will not be heard.

Check whether recording is performed or not with the level
meters.

You cannot adjust the sound volume. "VOL HOLD" appears
when you adjust the sound volume whilst recording at high
speed.

When a damaged CD is recorded at high speed, the unit
may stop whilst recording, or some noise or a drop out
may be recorded. In this case, record the CD at normal
speed.

Notes:

When the CD playing time is longer than the available
MiniDisc recording time, the recording process will not start
even when the CD 

0

 MD EDIT button is pressed.

Total number of 
recordable tracks
(from the first track)

Available record-
ing time

To record as many tracks as are available, press the CD 

0

MD EDIT button again.
Then, when the CD 

0

 MD EDIT button is pressed again,

recording will start. However, when the MiniDisc runs out
of space, "DISC FULL" will be displayed and the CD and
MiniDisc will stop.
However, if the available recording time on the MiniDisc is
less than the length of the first track on the CD, recording
will not be performed.

1

Press the ON/STAND-BY button to turn the power on.

2

Press the CD 

 button.

3

Load a CD and a recordable MiniDisc.

The total number of tracks and the total playing time on
the CD will be displayed.

4

Press the CD 

0

0

0

0

0

 MD EDIT (HIGH or NORMAL) button.

Press the NORMAL button for actual speed, HIGH for high-
speed recording.

   0

REC

Recording will begin, starting from the first track of CD.

After recording (all of the tracks that can be recorded), the
unit will stop automatically.

To check the remaining time available for record-
ing:

1

Press the MD 

 button.

2

Load a MiniDisc.

3

Press the DISPLAY button to find the time followed by
hyphen.

The total number of tracks previously recorded and the
available remaining time will be displayed, the unit will re-
turn to the original display 4 seconds later.

To cancel the operation:

4

1

2

3

MD 

H

H

H

H

H

*31-35

00.1.13, 0:01 PM

32

Summary of Contents for MD-MX20H

Page 1: ...PERATION 42 43 USING EXTERNAL UNITS 44 45 WHAT IS A MINIDISC 46 MINIDISC SYSTEM LIMITATIONS 47 TROUBLESHOOTING 47 48 RESETTING THE MICROCOMPUTER 48 ERROR MESSAGES 49 MAINTENANCE 50 SPECIFICATIONS 50 TERMS OF GUARANTEE Back cover CONTENTS Thank you for purchasing this SHARP product To obtain the best performance from this product please read this manual carefully It will guide you in operating your...

Page 2: ...r supplier from whom it was pur chased Where this is not possible please contact the tel ephone number listed below You will then be given details of how to obtain service 0345 125387 Please note all calls will be charged at local rate Certain replacement parts and accessories may be obtained from our main parts distributor WILLOW VALE ELECTRONICS LTD MANCHESTER 0161 682 1415 READING 01189 876444 ...

Page 3: ... than which is specified is dangerous and may result in a fire or other type of accident causing damage SHARP will not be held responsible for any damage resulting from use of this unit with a voltage other than that which is specified Care of compact discs Compact discs are fairly resistant to damage however mistracking can occur due to an accumulation of dirt on the disc surface Follow the guide...

Page 4: ...ton 16 CD 0 0 0 0 0 MD Normal Speed Edit Button 17 CD 0 0 0 0 0 MD High Speed Edit Button 18 CD Open Close Button 19 CD Stop Button 11 MD Eject Button 12 Jog Dial 13 Memory Enter Button 20 CD Play Pause Button 21 Headphone Socket 22 Surround Button 23 Preset Equalizer Button 24 Extra Bass Button 25 Tuner Band Button 26 Auxiliary Button 27 Volume Control 28 Volume Select Button 29 Programme Type Tr...

Page 5: ...dicator 13 Radio Text Indicator 14 Traffic Programme Indicator 15 Traffic Announcement Indicator 16 Dynamic PTY Indicator 17 EON Indicator 18 Programme Type Indicator 19 Traffic Information Indicator 20 Sleep Indicator 21 Disc Indicator 22 Track Indicator 23 Memory Indicator 24 Random Play Indicator 25 Total Time Indicator 26 Remaining Time Indicator 27 Character Information Display 28 AM PM Indic...

Page 6: ... Button 11 MD Track Down Review Button 12 MD Track Up Cue Button 13 Track Edit Button 14 Record Button 15 On Stand by Button 16 Dimmer Button 17 Tuner Preset Up Down Buttons 18 Extra Bass Button 19 Volume Select Button 20 Display Button 21 Clear Button 22 Play Mode Button 23 Time Button 24 CD Play Pause Button 25 CD Stop Button 26 CD Track Up Cue Button 27 CD Track Down Review Button 28 Tuner Band...

Page 7: ...ix the right channel and left channel wiring when connecting the speakers to the unit Do not let bare speaker wires touch each other as this may damage the amplifier and or speakers Supplied FM aerial Connect the FM aerial wire to the FM 75 OHMS socket and position the FM aerial wire in the direction where the strongest signal can be received Supplied AM loop aerial Connect the AM loop aerial wire...

Page 8: ...ration mode press the DISPLAY DEMO button The demonstration mode will be cancelled and the unit will be in the low power consumption mode Note When the unit is in the low power consumption mode the display will disappear 1 Remove the lower part of the speaker grille first 2 Remove the upper part of the speaker grille Caution When the speaker grilles are removed the speaker dia phragms are exposed ...

Page 9: ...to the direction indicated in the battery compartment Replace all old batteries with new ones at the same time Do not mix old and new batteries Remove the batteries if they are weak or if the unit will not be used for long periods of time This will prevent potential damage due to battery leakage Caution Do not use rechargeable batteries nickel cadmium battery etc Notes concerning use Replace the b...

Page 10: ... the MEMORY ENTER button 8 Adjust the minutes by turning the jog dial When the jog dial is turned one click clockwise the time will increase by 1 minute When it is turned one click anti clockwise the time will decrease by 1 minute Keep turning the jog dial to change the time continuously The hour setting will not advance even if minutes advance from 59 to 00 9 Press the MEMORY ENTER button The clo...

Page 11: ...s the X BASS button to emphasise the bass region of the frequency spectrum X BASS ON will appear Press the X BASS button again to cancel the extra bass mode X BASS OFF will appear Surround Pre programmed equalizer When the EQUALIZER button is pressed the current mode setting will be displayed To change to a different mode press the EQUALIZER button repeatedly FLAT The sound is not modified HEAVY B...

Page 12: ...ove the CD Press the 7 7 7 7 7 button After use Press the ON STAND BY button to enter the stand by mode Caution Do not carry the unit with a CD left in the disc tray The disc may come loose inside the unit and it may be dam aged or cause damage to the unit This may also cause malfunctions Do not push the disc tray whilst it is moving If the power fails whilst the tray is open wait until the power ...

Page 13: ...s the MD 06 button 6 will appear Press the MD 06 button again to resume playback from the same point To stop playback Press the MD button To remove a MiniDisc Press the 7 button Caution Do not carry the unit with a MiniDisc left in the MD compartment The disc may come loose inside the unit and it may be damaged or cause damage to the unit This may also cause malfunctions If TV or radio interferenc...

Page 14: ...r finger the unit will re enter the pause mode To listen again to the track being played Main unit operation Turn the jog dial anti clockwise during playback Remote control operation Press the CD 5 5 5 5 5 or MD 5 5 5 5 5 button for less than 0 5 sec onds during playback To move to the beginning of the next track Main unit operation Turn the jog dial clockwise during playback Remote control operat...

Page 15: ...ncelled To check which tracks are programmed Whilst the unit is stopped in the APMS mode turn the jog dial or press the CD 5 4 or MD 5 4 button Playback order Track number Adding tracks to the programme If a programme has been previously stored the MEMORY indicator will be displayed Then follow steps 2 6 to add ad ditional tracks The new tracks will be stored after the last track of the original p...

Page 16: ...t or random play Press the P MODE button until the R or RANDOM dis play disappears To repeat playback of selected tracks Enter the programme for the tracks you want and start repeat play You can programme a single track and play it repeatedly refer to page 14 Notes If you press the CD 4 or MD 4 button during random play you can move to the next track On the other hand the CD 5 or MD 5 button does ...

Page 17: ...s and the remaining record ing time will be displayed 1 The elapsed playing time for current track will be dis played No display TRACK 2 The remaining playing time for the current track will be displayed REMAIN 3 The total remaining playing time for the disc from the point being played at that time will be displayed TOTAL REMAIN Notes During random play the total remaining playing time can not be ...

Page 18: ...e station will be skipped To stop the auto tuning press the TUNING X or W but ton again When an RDS Radio Data System station is tuned in the frequency will be displayed first and then the RDS indica tor will light Finally the station name will appear 5 To receive an FM stereo transmission press the TUNER BAND button so that the ST indicator on the display lights up ST j will appear when an FM bro...

Page 19: ... will flash and the programmed stations will be tuned in sequentially for 5 seconds each 2 Press the PRESET X X X X X or W W W W W button again to stop the memory scan at the desired station Note When the preset memory does not have any stations stored in it the preset memory scan will not function To erase the memorised station 1 Recall the memorised station to erase by turning the jog dial or pr...

Page 20: ...appear whilst the Radio text data is being broadcast Note When the TP and TA appear at the same time an announce ment is being made When only the TA appears an announcement is not being made see page 30 Information provided by RDS With this unit you can display five types of RDS service To show them in the display press the DISPLAY MODE but ton Each time you press the DISPLAY MODE button the displ...

Page 21: ...ive is to educate SOCIAL Programmes about people and things that in fluence them individually or in groups Includes sociology history geography psychology and society RELIGION Any aspect of beliefs and faiths involving a God or Gods the nature of existence and ethics PHONE IN Involving members of the public expressing their views either by phone or at a public forum TRAVEL Features and programmes ...

Page 22: ... stations The stations that have already been stored in memory will be kept there To erase all of the contents of preset memory The unit is in the stand by mode Hold down the TUNER BAND button and the MD button and then press the ON STAND BY button PRESET CLR will appear After performing this operation all of the preset memory information will be erased Notes Only RDS stations will be stored in me...

Page 23: ...led To cancel the station select operation Press the STATION button whilst STATION and SELECT appear alternately To specify station names and select stations manually station select You can select a desired station by specifying the station name BBC R1 BBC R2 etc from among the stations that have been stored in memory ASPM is convenient for storing stations in memory Before starting this operation...

Page 24: ...name from the presets the same station name may be encoun tered more than once In a certain area or during certain time periods the station names selected using the station select function may tem porarily be different from the name of the station you are actually receiving Continued 1 Press the STATION button 2 Within 6 seconds turn the jog dial or press the PRE SET X X X X X or W W W W W button ...

Page 25: ...ashing The unit will look for the next station Note If no station of the programme type you want can be found NOT FOUND will appear for 4 seconds If you have selected the traffic programme If you select traffic programme TP as the programme type in step 5 to receive only radio stations which broadcast traf fic programmes the TP will appear However this does not necessarily mean that you will hear ...

Page 26: ...lected In this mode PTY names will be displayed automatically in the local language where an RDS station is located Eight languages including English are available If you want to display PTY names in English only switch to the next mode PTY English Notes If you tune into an RDS station which is not broadcasting any data determining the PTY language the PTY name will be displayed in English not a l...

Page 27: ...at has been set according to the RDS time will be displayed Press the CLOCK button to check whether the internal clock is displaying the same time as the RDS clock Notes When the CLOCK button is pressed whilst the RDS time is being displayed the RDS clock and the internal clock can be displayed alternately which allows you to compare the time shown If you have not yet set the clock display mode CL...

Page 28: ... will be displayed If you are not receiving CT data even though you are tuned into an RDS station CT will be displayed The CT data is sent at the top of each minute If an RDS station signal is extremely weak or the reception is noisy the clock time may be displayed as hyphens or it may not be displayed correctly If you still have not selected the internal clock display mode the RDS clock display w...

Page 29: ...TY Indicator will appear whilst the Dynamic PTY station is being received Dynamic PTY indicates that the PTY for the station tuned in or the PTY referenced in the EON data is assessed when ever the programme changes and may be changed When PTYI appears if you press the DISPLAY MODE button to display the programme type you can check the type of programme you are actually receiving PTYI Lights up Go...

Page 30: ...TI 6 When the traffic announcement is over the unit will automatically return to the original station you were tuned to If the EON button is pressed when EON is not displayed NO EON will appear for 5 seconds to indicate that the unit cannot enter the EON stand by mode Checking the stand by mode setting When in the EON stand by mode press the EON button TI WAITING To cancel the EON stand by mode Wh...

Page 31: ...ork station It returns to the original station When the unit switches automatically to other network station if there is any problem with this station or the station cannot be received properly WEAK SIG will appear and the unit will return to the original station Even if the unit switches from the station you are listening to directly to one other network station which is in the preset memory if t...

Page 32: ... Do NOT unplug the power lead whilst the TOC is being re corded TOC is flashing and do NOT impart shock to the unit Otherwise TOC will not be correctly recorded and con sequently proper playback may not be possible Area for TOC recording track numbers track names etc Area for recording the sound CD MiniDisc First trac Second trac Third track Track A Track B Track C First track Second track Third t...

Page 33: ...ord as many tracks as are available press the CD 0 MD EDIT button again Then when the CD 0 MD EDIT button is pressed again recording will start However when the MiniDisc runs out of space DISC FULL will be displayed and the CD and MiniDisc will stop However if the available recording time on the MiniDisc is less than the length of the first track on the CD recording will not be performed 1 Press t...

Page 34: ...track record ing will stop automatically Note When repeat play has been set if you press the CD 0 MD EDIT HIGH or NORMAL button the repeat mode will be cancelled automatically and track editing will start To stop recording Press the MD button Playback and recording will stop and the track numbers will be written on the MiniDisc 1 Press the ON STAND BY button to turn the power on 2 Press the CD but...

Page 35: ...ess the CD 0 MD EDIT HIGH or NORMAL button the repeat mode will be cancelled automatically and APMS recording will start To stop recording Press the MD button Playback and recording will stop and the track numbers will be written on the MiniDisc To record without using One Touch Editing 1 Load a CD and a recordable MiniDisc 2 Press the REC button The unit will enter the recording stand by mode 3 P...

Page 36: ...in most clearly During recording you cannot change the station 5 Press the MD 06 06 06 06 06 button Continued 5 4 3 2 4 3 5 MD MD To stop recording Press the MD button The recording will stop and the track number will be written on the MiniDisc To record the track number whilst recording The recording is performed as a single track To identify different sections of a recording you can increase the...

Page 37: ...te disc or track names Playback only MiniDiscs cannot be edited Tracks up to 255 tracks per disc can be named Since track names are displayed when the beginning of each track is located or during playback you can quickly check the name of each track A B C D E F G H I J K L M N O P Q R S T U V W X Y Z 1 2 3 4 5 6 7 8 9 0 _ characters Characters Symbols Capital letters Type of Symbols Type of charac...

Page 38: ...ck name will be recorded The unit will return to normal playback To create a track name To erase a track name After performing steps 1 to 2 1Press the TIMER DELETE button for 2 seconds or more NAME CLEAR will flash 2Press the MEMORY ENTER button Notes Up to 40 characters can be entered This function cannot be used in the random play mode and APMS play mode If you create a track name whilst recordi...

Page 39: ...mes created on other equipment if they are over 40 characters In this case erase the name and then enter a new name To delete a character Example To change BESUT to BEST 1 To change disc names perform steps 1 3 on page 36 To change track names perform steps 1 2 on page 37 2 Press the 3 3 3 3 3 or 2 2 2 2 2 button to flash the character to erase DISC To cancel the operation press the MD button 3 Pr...

Page 40: ...cent tracks you want to combine using the jog dial Or start playing the second of the two tracks you want to combine and then press the MD 06 06 06 06 06 button 2 Press the NAME TOC EDIT button and within 10 sec onds select COMBINE using the jog dial 3 Within 10 seconds press the MEMORY ENTER button To cancel the operation press the MD button 4 Press the MEMORY ENTER button again The two tracks ar...

Page 41: ...in the random play mode and APMS play mode Continued To combine two non contiguous tracks Example the first and third tracks Move the third track to the second track using the MOVE func tion Then combine the first and second tracks using the COM BINE function Notes Tracks recorded from analogue inputs cannot be combined with tracks recorded from CDs or MiniDiscs using the dig ital inputs Tracks re...

Page 42: ...t ERASE using the jog dial 3 Within 10 seconds press the MEMORY ENTER button To cancel the operation press the MD button 4 Press the MEMORY ENTER button again The track is erased and the unit is stopped at the begin ning of the next track Notes When a track is erased the numbers assigned to the tracks following the erased track will be automatically decreased by one When a track is erased the trac...

Page 43: ...the end playback will stop before the stop time If you wish to play to the stop time set repeat play for the CD or MiniDisc Timer playback and timer recording cannot be set at the same time using the timer I Before setting the timer make sure that the clock setting is correct page 9 1 10 Jog dial 3 2 MD H H H H H 9 2 CD H H H H H 2 TUNER BAND MEMORY ENTER TIMER 2 AUX Before timer operation the fol...

Page 44: ...lay the desired sound source 2 Press the SLEEP button SLEEP If you do not need to change the time the unit will enter the sleep mode automatically 3 Press the SLEEP button to select the time Maximum 2 hours Minimum 30 minutes The amount of sleep time can also be changed during the sleep operation 2 hours 30 minutes 30 minute intervals SLEEP 4 The unit will enter the stand by mode automatically aft...

Page 45: ...tes Before plugging in or unplugging the headphones make sure the volume level is reduced Be sure your headphones have a 3 5mm 1 8 diameter plug and are between 16 ohms and 50 ohms impedance The recommended impedance is 32 ohms When headphones are connected the speakers are disabled automatically Adjust the VOLUME control for the desired volume USING EXTERNAL UNITS Before connecting external units...

Page 46: ...ng level so that the OVER indicator does not light at the maximum level OVER 2 0 4 4 Adjust the sound level using the VOLUME buttons on the remote control or the VOLUME control on this main unit 1 Press the ON STAND BY button to turn the power on 2 Load a recordable MiniDisc 3 Press the AUX button 4 Press the I I I I I REC button 5 Start playback on the external unit 6 Adjust the recording level u...

Page 47: ...ding ATRAC The ATRAC Adaptive TRansform Acoustic Coding is a new technology that is designed to eliminate the information in sounds which you can not hear and to compress the remain ing sound data so that the recording uses about 1 5 of the original sound information Sound data is analysed and filtered to take advantage of psycho acousticmasking The acoustic quality of the sound is not impaired Ty...

Page 48: ... several times TOC information will fill up even though the number of tracks has not reached the limit 255 tracks and further recording will be impossible If you use the all erase function this MiniDisc can be used from the beginning If there is any flaw on the MiniDisc that part is automatically excluded from the space available for recording Therefore the recording time be comes shorter When the...

Page 49: ... Remedy Insert properly Replace the batteries Operate it within a range of 0 2 m 8 to 6 m 20 and within an angle of 15 to either side of centre Connect the AC power lead Remote control Symptom Radios make unusual noise con secutively The preset channel cannot be re called Possible cause The unit is placed near the TV or computer The aerial direction is not placed properly Did you erase the program...

Page 50: ...ther disc Erase the disc and try recording again Replace it with another recordable disc Replace it with another recordable disc Erase the needless characters Replace it with another disc Meaning Nothing is recorded Neither music nor disc name is recorded You tried to record from a copy prohibited CD The disc is damaged TOC information cannot be read MiniDisc not specified A track cannot be edited...

Page 51: ...Solomon Code Quantization 20 bit linear A D converter Coding ATRAC Adaptive Transform Acoustic Coding Sampling frequency 44 1 kHz Recording method Magnetic modulation overwrite method Frequency response 20 20 000 Hz D A converter 1 bit D A converter Wow and flutter Unmeasurable less than 0 001 W peak Signal noise ratio 95 dB 1 kHz Dynamic range 90 dB 1 kHz Audio channel Stereo 2 channels Monaural ...

Page 52: ...t was purchased Proof of purchase must be provided 4 The guarantee does not cover carriage costs jewelled styli audio tapes compact discs or batteries 5 In the unlikely event of this product requiring repair please contact the supplier from whom it was purchased Where this is not possible please contact the Sharp Customer Information Centre on the telephone number given below 6 No person has any a...

Reviews: