background image


25

Press 

MENU

 and the MENU screen displays.

1

Press 

c

/

d

 to select “Setup”.

Press 

a

/

b

 to select “Programme Setup”, and 

then press 

ENTER

. If you have already set the 

password, enter it here.

•  See page 28 for setting a password.

2

3

Press 

a

/

b

 to select “Sort”, and then press 

ENTER

.

5

Press 

c

/

d

 to select “Yes”, and then press 

ENTER

.

6

Repeat the steps 6 and 7 until all desired 
channels are sorted.

9

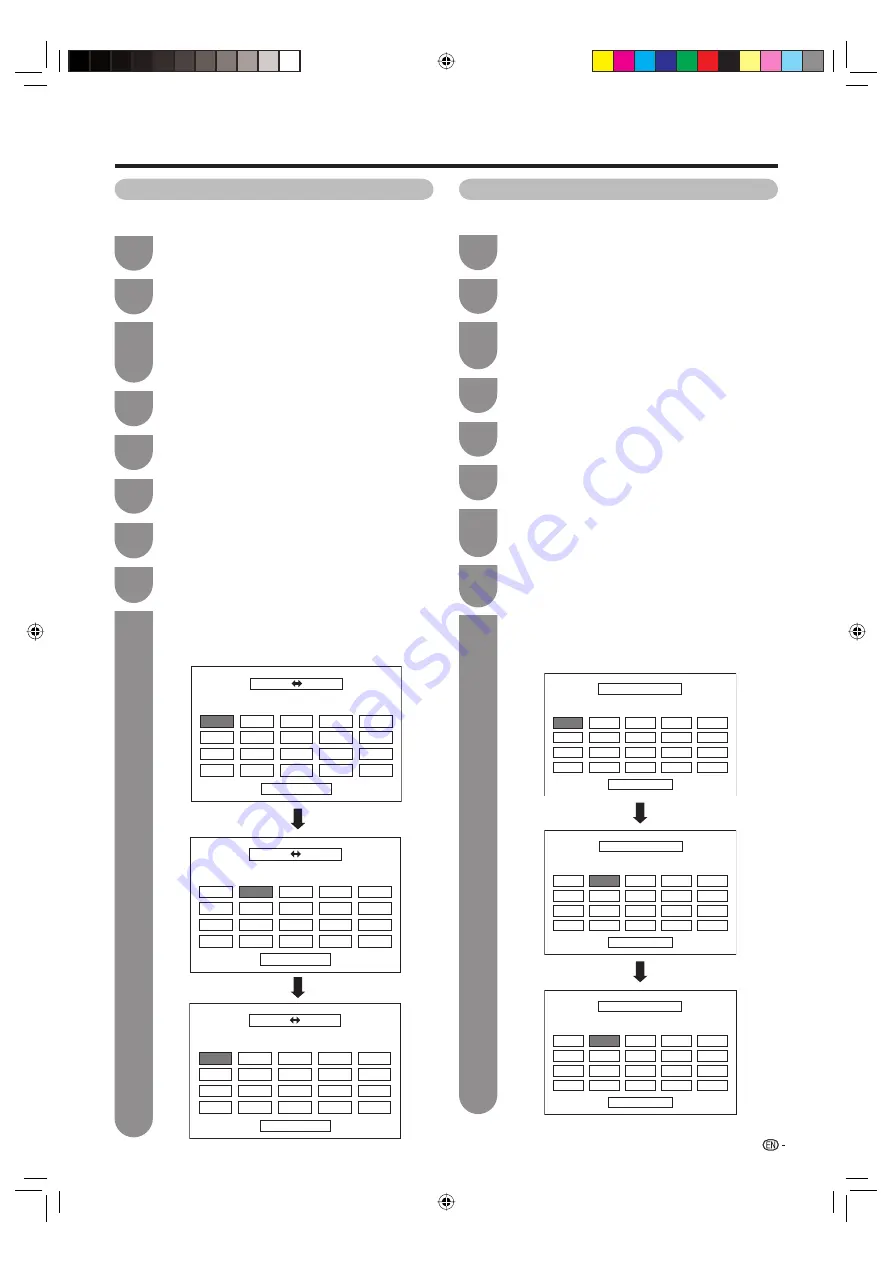
Sorting programmes

Channel positions can be sorted freely.

Press 

a

/

b

/

c

/

d

 to select the channel you 

want to move, and then press 

ENTER

.

7

Move it to the desired position by pressing 

a

/

b

/

c

/

d

, and then press 

ENTER

.

8

Watching TV

01

06

SAT.1

KABEL

01 SAT.1

02

03

04

05

Next

Sort menus

01 SAT.1

02 KABEL

Next

01 SAT.1

KABEL

02

01 KABEL

Next

01 KABEL

SAT.1

02

Press 

MENU

 and the MENU screen displays.

1

Press 

c

/

d

 to select “Setup”.

Press 

a

/

b

 to select “Programme Setup”, and 

then press 

ENTER

.

•  See page 28 for setting a password.

2

3

Press 

a

/

b

 to select “Erase Programme”, and 

then press 

ENTER

.

5

Press 

c

/

d

 to select “Yes”, and then press 

ENTER

.

6

Erasing programmes

The individual programme can be erased.

Press 

a

/

b

/

c

/

d

 to select the channel you 

want to erase, and then press 

ENTER

.

•  A message screen pops up.

7

Press 

c

/

to select “Yes”, and then press 

ENTER

 to erase the selected programme. All 

the subsequent programmes move up.

8

Repeat the steps 6 and 7 until all desired 
channels are erased.

9

Erase programme menus

01

06

07

08

09

10

11

12

13

14

15

16

17

18

19

20

SAT.1

01 SAT.1

Pro7

02

KABEL

03

04

05

Next

02 Pro7

Next

01 SAT.1

03 KABEL

Pro7

02

06

07

08

09

10

11

12

13

14

15

16

17

18

19

20

04

05

Next

01 SAT.1

02 KABEL

06

07

08

09

10

11

12

13

14

15

16

17

18

19

20

02 KABEL

03

04

05

Press 

a

/

b

 to select “Analogue Setting”, and 

then press 

ENTER

.

4

Press 

a

/

b

 to select “Analogue Setting”, and 

then press 

ENTER

.

4

D63X_en_c.indd   25

D63X_en_c.indd   25

2007/08/30   17:40:14

2007/08/30   17:40:14

Summary of Contents for LC-42D63X

Page 1: ...MODEL LC 42D63X LC 46D63X LCD COLOUR TELEVISION OPERATION MANUAL Cover_D63X indd 1 Cover_D63X indd 1 2007 08 30 17 39 09 2007 08 30 17 39 09 ...

Page 2: ...Cover2_D63X indd 1 Cover2_D63X indd 1 2007 08 30 17 47 28 2007 08 30 17 47 28 ...

Page 3: ...serting the batteries 15 Using the remote control unit 15 Cautions regarding the remote control unit 15 Turning the TV on off 16 Turning on the power 16 Turning off the power 16 About Menu operations 17 What is Menu 17 Basic Menu operations 17 About the Guide Display 17 Menu items TV INPUT1 3 18 Menu items HDMI RGB 19 Watching TV Setting channels automatically 20 Selecting programmes 21 Adjusting ...

Page 4: ...ng EPG 44 Basic Operation 44 Selecting a programme 44 Timer recording using EPG 46 Cancelling the timer recording 46 Settings when using external devices Settings when using HDMI output devices 47 Selecting the input source and signal type 49 Selecting input source 49 Selecting input signal type 49 Selecting the size of the picture for recording 49 Labelling input sources 50 Skipping HDMI RGB inpu...

Page 5: ...guage setting 63 Displaying Subpages 63 Time display 63 Displaying Subtitles 64 Switching subtitle languages DVB Subtitle 64 Appendix Troubleshooting 65 Troubleshooting Digital broadcasting 65 Reset 66 Information 66 Message List 66 Receiver Report 66 Identification 66 Specifications 67 Optional accessory 67 Dimensional drawings 68 Mounting the TV on the wall 69 Removing the stand 69 Handling and pr...

Page 6: ...lace the product in an enclosed place such as a bookcase or rack unless proper ventilation is provided or the manufacturer s instructions are followed The LCD panel used in this product is made of glass Therefore it can break when the product is struck forcefully or with a sharp object If the LCD panel is broken be careful not to be injured by broken glass Heat sources Keep the product away from h...

Page 7: ...technology is incorporated under license from SRS Labs Inc The DVB logo is the registered trademark of the Digital Video Broadcasting DVB project HDMI the HDMI logo and High Definition Multimedia Interface are trademarks or registered trademarks of HDMI Licensing LLC Stand post Stand post Hex key Cloth Put all parts of the stand unit together and then attach it to the TV Manufactured under license ...

Page 8: ...ten the 4 short screws into the 4 holes on the rear of the TV Hex key Short screw Soft cushion NOTE To detach the stand perform the steps in reverse order 2 Hex key Long screw Attach the supporting post for the stand unit onto the base as shown below Confirm the 8 screws supplied with the TV Short screws g4 used in step 3 Long screws g4 used in step 2 LC 42D63X LC 46D63X Hex key Long screw LC 42D63...

Page 9: ...indicator TV VIDEO button OPC sensor Remote control sensor POWER indicator The illustrations and on screen displays in this operation manual are for explanation purposes and may vary slightly from the actual operations The Illustrations used throughout this manual are based on LC 42D63X TV Front Side SLEEP timer indicator D63X_en_b indd 7 D63X_en_b indd 7 2007 08 30 17 39 49 2007 08 30 17 39 49 ...

Page 10: ...ume when headphones are plugged in The Audio menu cannot be operated when headphones are plugged in You can set the volume to different levels for each input source Volume display when headphones are plugged in 20 Headphone jack INPUT 5 HDMI terminal INPUT 6 HDMI terminal INPUT 3 terminal MONITOR OUTPUT terminal DIGITAL AUDIO OUTPUT terminal SERVICE ONLY terminal Usually do not connect anything to...

Page 11: ...page 63 v Top Bottom Full TELETEXT mode Set the area of magnification See page 62 14 TV VIDEO INPUT SOURCE Select an input source TV INPUT 1 INPUT 2 INPUT 3 INPUT 4 INPUT 5 INPUT6 INPUT7 PC See pages 13 47 50 and 56 15 FAV Display the favourite channel setting See page 41 16 RADIO Press to access RADIO mode See page 42 17 DISPLAY Displays the channel or input information DTV mode Displays the time ...

Page 12: ...e TV close to the AC outlet and keep the power plug within reach Disconnect the AC cord from the AC outlet if the TV will not be used for a long period of time TV rear view Connecting the antenna cable To enjoy a clearer picture use an outdoor antenna The following is a brief explanation of the types of connections that are used for coaxial cable Standard DIN45325 plug IEC169 2 75 ohm coaxial cabl...

Page 13: ...s not appear The auto installation function allows you to execute the installation again from the Setup menu Page 20 The initial auto installation wizard will go off if you leave the TV unattended for 30 minutes before searching for channels in step 5 Supplying electric power to the antenna When you set up the DTV antenna for the first time or connect the antenna to a community antenna you need to ...

Page 14: ...trength Signal Strength Supply Voltage Channel Strength Signal Strength Quality Current Max 0 CH No 21 0 Current Max 0 0 w Checking channel strength Press a b to select Channel strength and then press ENTER Signal Strength Supply Voltage Channel Strength Signal Strength Quality Current Max 0 CH No 21 0 Current Max 0 0 2 6 5 2 MHz Position and align the antenna so that the maximum possible values f...

Page 15: ...quipment When using HDMI cable commercially available When using component cable commercially available NOTE When using a DVI HDMI conversion adaptor input the Audio Signal from the AUDIO terminal of INPUT 6 See page 47 R AUDIO L Y PB CB PR CR When using component cable commercially available R AUDIO L Y PB CB PR CR Connecting external devices You can connect many types of external equipment to yo...

Page 16: ... a DVI HDMI conversion adaptor input the Audio Signal from the AUDIO terminal of INPUT 6 See page 47 When using HDMI cable commercially available When using component cable commercially available R AUDIO L Y PB CB PR CR STB Set Top Box STB Set Top Box Connecting a PC You can use the INPUT 7 PC terminal when connecting to a PC ANALOGUE RGB AUDIO L R PC D63X_en_b indd 14 D63X_en_b indd 14 2007 08 30...

Page 17: ...ert the two supplied AAA size batteries 3 Close the battery cover 5 m Use the remote control unit by pointing it towards the remote sensor window Objects between the remote control unit and sensor window may prevent proper operation Cautions regarding the remote control unit Do not subject the remote control unit to shock In addition do not soak the remote control unit with liquids or place it in ...

Page 18: ...sure to remove the AC cord from the AC outlet Minor power is consumed when the unit is in standby mode Turning the TV on off Press POWER on the remote control The TV enters standby mode and the image on the screen disappears The POWER indicator on the TV changes from green to red Press POWER on the TV The POWER indicator on the TV turns off When the TV is turned off by POWER on the TV you cannot t...

Page 19: ...e bar will change in accordance with each menu setting screen What is Menu You need to bring up the On Screen Display to perform settings for the TV The On Screen Display for the settings is called Menu The Menu enables various settings and adjustments See pages 18 and 19 The Menu can be operated with the remote control unit Press MENU and the MENU screen displays Press c d to select the desired m...

Page 20: ...age 31 4 3 Mode Page 31 Standby Mode Page 30 Language Page 21 Text Language Page 63 Identification Page 66 Reset Page 66 Option AQUOS LINK Setup Page 52 DNR Page 36 Input Select Page 49 Output Volume Select Page 38 Auto Volume Page 39 Clear Voice Page 39 Digital Audio Output Page 39 Audio Only Page 26 Programme Title Display Page 29 Time Display Page 37 Game Play Time Page 36 Colour System Page 50 ...

Page 21: ...e 58 Input Label Page 50 Position Page 36 Fine Sync Page 58 HDMI Auto View Page 47 Standby Mode Page 30 Language Page 21 Reset Page 66 Option NOTE Some menu items may not be displayed depending on the selected input source AQUOS LINK Setup Page 52 DNR Page 36 HDMI Audio Select Page 48 Output Volume Select Page 38 Auto Volume Page 39 Clear Voice Page 39 Audio Only Page 26 Time Display Page 37 Game ...

Page 22: ...est Europe Language Text Language On WSS If you have already set the password enter it here See page 28 for setting a password 4 6 Press a b to select the desired language listed on the screen and then press ENTER You do not need to do anything during the auto search Press MENU to exit Press c d to select Yes and then press ENTER 5 Watching TV Setting channels automatically You can run auto instal...

Page 23: ...he volume press VOLk To decrease the volume press VOLl NOTE TV INPUT1 INPUT2 INPUT3 INPUT4 INPUT5 INPUT6 and INPUT7 PC modes can store volume adjustment values separately Menu language settings You can also select a language from setup menu Select from among 4 languages English Simplified Chinese Traditional Chinese and Arabic Press MENU and the MENU screen displays 1 Press c d to select Setup 2 Pr...

Page 24: ...select the desired menu item and then press ENTER 5 Press a b to select Digital Setting and then press ENTER 4 Buttons for Manual Adjust operation Menu items Remote control buttons Description Lock R When the service is locked you must enter your password whenever you tune to the service CH Skip G Services with a mark are passed over when pressing P r s in the TV remote control unit EPG Skip Y Ser...

Page 25: ...revious screen The search result will not be stored 3 Fine tuning Press a b c d to select the channel you want to edit and then press ENTER The selected channel information displays 1 Press a b to select Fine and then press ENTER 2 Press c d to adjust the frequency and then press ENTER Adjust while checking the background picture as a reference 3 Fine Colour sys Sound sys Label Skip Lock 179 25 Se...

Page 26: ... 1 Press a b to select Skip and then press ENTER Skip menu displays 2 Skip menu Manual setting for each channel continued Setting the child lock You can block the viewing of any channel Press a b c d to select the channel you want to edit and then press ENTER The selected channel information will be displayed 1 Press a b to set Lock to On and then press ENTER 3 Fine Search Colour sys Sound sys Lab...

Page 27: ...ect Programme Setup and then press ENTER See page 28 for setting a password 2 3 Press a b to select Erase Programme and then press ENTER 5 Press c d to select Yes and then press ENTER 6 Erasing programmes The individual programme can be erased Press a b c d to select the channel you want to erase and then press ENTER A message screen pops up 7 Press c d to select Yes and then press ENTER to erase ...

Page 28: ...s the volume level returns to the previous setting Outputting only audio When listening to music from a music programme you can set the display off and enjoy audio only Press MENU and the MENU screen displays 1 Press c d to select Option 2 Press a b to select Audio Only and then press ENTER 3 Press c d to select On and then press ENTER 4 NOTE When you make operations that change the picture on the...

Page 29: ...you press MPX the mode switches among CH A CH B and CH AB Stereo mode B G STEREO 01 BBC1 B G MONO PAL NICAM PAL 01 ATV ATV BBC1 Bilingual mode B G CH A 01 BBC1 B G CH B PAL NICAM PAL NICAM 01 ATV ATV BBC1 B G MONO 01 BBC1 B G CH AB PAL PAL NICAM 01 ATV ATV BBC1 Monaural mode B G MONO 01 BBC1 B G MONO PAL NICAM PAL 01 ATV ATV BBC1 Stereo mode B G STEREO 01 BBC1 B G MONO PAL PAL 01 ATV ATV BBC1 Bili...

Page 30: ...the password enter it here 4 Press a b to select Change password and then press ENTER 5 Change password Clear password Parental rating New Password Reconfirm Enter the 4 digit number as a password using 0 9 6 Clearing the password Allows you to clear your password NOTE As a precautionary measure make a note of your password and keep it in a familiar place If you lose or forget your password initia...

Page 31: ...tons on the remote control Button Control Lock Lock the buttons except the power switch on the TV NOTE You cannot set both RC Control Lock and Button Control Lock at the same time w Cancelling the lock Press the MENU on the TV and set to Off to cancel the RC Control Lock Press the MENU on the remote control and set to Off to cancel the Button Control Lock Refer to page 17 for menu operation using ...

Page 32: ... are no operations performed You can set the TV to automatically power off when no TV operation is performed for more than 3 hours NOTE Disable is the factory preset value When a TV programme finishes this function may not operate Auto power off after the end of broadcast You can set the TV to automatically power off in about 15 minutes after the TV goes into a state of receiving no programme sign...

Page 33: ...nformation the function will not work even if enabled Selecting the Wide Screen Signalling WSS picture size manually The WSS signal has 4 3 auto switching that allows you to select between Panorama and Normal Press MENU and the MENU screen displays 1 Press c d to select Setup 2 Press a b to select 4 3 Mode and then press ENTER 3 Press c d to select Panorama or Normal and then press ENTER 4 WSS sig...

Page 34: ...DE menu displays The menu lists the wide mode options selectable for the type of video signal currently received 1 Press WIDE or a b while the WIDE MODE menu displays on the screen As you toggle down the options each mode is immediately reflected on the TV 2 WIDE MODE Normal Zoom 14 9 Panorama Full Cinema 16 9 Cinema 14 9 4 3 Mode set to Panorama 4 3 Mode set to Normal Auto Selection If you set WS...

Page 35: ...vYcc AV MODE DYNAMIC Fixed AV MODE USER Selected item Description STANDARD For a highly defined image in a normally bright room MOVIE For a movie GAME Lowers image brightness for easier viewing PC For PC Available only when inputting an HDMI or RGB signal xvYCC Produce realistic colour on the TV screen unlike any other signal USER Allows the user to customise settings as desired You can set the mod...

Page 36: ...t You can adjust the picture to your preference Follow the steps to adjust the picture Watching TV MENU Picture Picture Audio Contrast OPC DYNAMIC Off Brightness Colour Tint Sharpness Advanced Reset 30 0 0 0 0 Backlight 14 Manual picture settings Selected item cbutton dbutton OPC Sets whether or not the screen brightness is automatically adjusted according to the lighting condition in the room OPC...

Page 37: ...gh Middle Mid Low Low w 3D Y C Provides high quality images with minimal dot crawl and cross colour noise Selected item Description Standard Normal adjustment Fast Set the optimum image quality for fast moving images Slow Set the optimum image quality for slow moving images Off No detecting NOTE 3D Y C is not selectable depending on the input signal type 3D Y C may not operate depending on the inp...

Page 38: ...ctory preset values press a b to select Reset and then press ENTER Adjustments are stored separately according to input source Selected item Description H Pos Centres the image by moving it to the left or right V Pos Centres the image by moving it up or down Game Play Time This function displays the elapsed game time so you do not lose track of the time To display the elapsed time select GAME unde...

Page 39: ... 24HR or AM PM for the clock time Press MENU and the MENU screen displays 1 Press c d to select Option 2 Press a b to select Time Display and then press ENTER 3 Press a b to select Time Format and then press ENTER 4 Press c d to select the desired time format and then press ENTER 5 Selected item Description On Display the clock time On half hourly Display the clock time in 30 minutes increments Of...

Page 40: ...om the right speaker Decrease audio from the left speaker Selected item Description On Makes it possible to enjoy natural realistic surround sound Off Outputs the normal sound Repeat steps 1 to 2 in Audio adjustment 1 Press c d to select Surround and then press ENTER 2 Press c d to select On 3 Press c d to select Option Press MENU and the MENU screen displays 1 2 Press c d to select Fixed or Varia...

Page 41: ... desired output system and then press ENTER Press a b to select Digital Audio Output and then press ENTER 3 4 MENU Option DigitaI Audio Output Option AQUOS LINK Setup DNR Input Select HDMI Audio Select Output Volume Select Auto Volume Clear Voice Digital Audio Output Audio Only Off Auto Digital Fixed On Off Off PCM Selected item Description PCM The optical output format is normally in PCM Dolby Di...

Page 42: ...s and view detailed information about current events Press GUIDE to display the programme guide list 1 Press a b to display your desired programme and then press ENTER When you press ENTER the TV jumps to the channel 2 Info While watching DTV you can check the extended programme information on the screen using INFO on the remote control Age Optic REC OK Audio STEREO Video Input info If there is mo...

Page 43: ... 4 Deleting a favourite channel Press FAV and the favourite channel screen displays Press a b to select 1 Data Clear and then press ENTER To delete all the favourite channels select All Data Clear and then skip to step 4 1 2 Press FAV 2 Press a b to select Register and then press ENTER 3 Press a b c d to select the position in the category and then press ENTER to register 3 Press c d to select Yes...

Page 44: ...st time When the TV powers on for the first time after purchase perform the auto installation ATV Analogue TV You can run the auto installation to set channels automatically To watch the analogue TV select Auto Installation from Setup menu See page 20 1 DTV When the TV accesses to DTV mode for the first time you need to run the auto search To scan all available services in your area follow the proce...

Page 45: ... the TV set is in standby mode After setting to Yes it may take some time to turn off the power using the remote control due to the process of the data capture NOTE If the TV main power is switched off the EPG data will not capture MENU Digital Setup EPG Setup Digital Setup Information REC Picture Size EPG Setup Subtitle w Display Range Setup The Display range setup allows you to select three type...

Page 46: ...a Ba ABC Arr Naked Scien Catal Parliament Qu The The Pla Ba Arr Naked Scien Catal Parliament Qu The The Stat T W Se Play S G ENTER Select Enter RETURN Back EPG Exit Programme Info Search By Genre Search By Date Timer List R G Y B 6 19 Tue 9 28 Today Tue 20 Wed 21 Thu 22 Fri 23 Sat 24 Sun 25 Mon 26 2 1 3 4 5 Programme Information EPG DTV TV 002 9 23 9 29 ABC TV Sydney Trotro 9 10 11 12 13 14 TEN Di...

Page 47: ...ent Affairs Education Information Comedy Information Drama Today AM Search By Genre Today PM Tue 20 AM Tue 20 PM ABC TV Sydney 002 Global Grover Mon 19 06 10 50 11 05 ABC HDTV 020 Global Grover Mon 19 06 10 50 11 10 ABC TV 022 Global Grover Mon 19 06 11 05 11 20 Next B EPG DTV TV 9 10 11 12 13 14 TEN Digital ABC TV Sydney SBS FTV Guide TEN Digital TEN Guide TEN HD ABC HDTV ABC 2 002 007 010 012 03...

Page 48: ...the TV returns to the EPG screen w Selecting Watch in the timer setup screen This setting allows you to switch to a programme at a set time 1 Press c d to select Watch and then press ENTER 2 Press c d to select Yes and then press ENTER The selected TV programme is marked with an icon w Selecting Record in the timer setup screen This setting allows you to record a programme at a set time 1 Press c ...

Page 49: ...finition Multimedia Interface Auto View Press c d to select the desired item and then press ENTER 5 Connecting an HDMI output device Settings when using external devices HDMI terminals can carry audio and visual signals to the TV with an HDMI certified cable When you want to output the audio and picture from an HDMI output device on the TV select INPUT4 INPUT5 or INPUT6 by switching the input source...

Page 50: ...selected only when INPUT6 is selected 3 MENU Option HDMI Audio Select Option AQUOS LINK DNR Input Select HDMI Audio Select Output Volume Select Off Auto Digital Fixed w HDMI Audio Select 1 Press c d to select the desired setting and then press ENTER 4 Selectable items Description Digital Analogue Select Digital for audio signal via the HDMI terminal Select Analogue for audio signal via the AUDIO j...

Page 51: ... external equipment for the signal type When the signal type is set to Auto the input terminal where a cable is connected is automatically selected When the signal type is set to Auto and multiple video signal cables are connected the signal type is selected in the following prioritised order INPUT 1 INPUT 2 COMPONENTs VIDEO INPUT 3 S VIDEOs VIDEO Input source Selectable item INPUT 1 Auto COMPONEN...

Page 52: ...Example Press MENU and the MENU screen displays 1 Press c d to select Option 2 Press a b to select Colour System and then press ENTER 3 Press a b to select a compatible video signal system of your equipment and then press ENTER 4 Auto PAL SECAM NTSC 3 58 NTSC 4 43 PAL 60 You can change the colour system to one that is compatible with the image on the screen NOTE Factory preset value is Auto If Aut...

Page 53: ...wn Timer list page 43 you can also call up the external player s Top menu or AQUOS BD Player s AQUOS Recorder s Title list provided that the devices support AQUOS LINK Multiple control of HDMI devices You can select which HDMI device to operate using OPTION Controlling the AQUOS AUDIO speaker system You can adjust the volume and select the sound mode of the AQUOS AUDIO speaker system NOTE Point th...

Page 54: ...onnecting an AQUOS BD Player AQUOS Recorder via the AQUOS Audio speaker system Connecting an AQUOS BD Player AQUOS Recorder only Optical AUDIO cable HDMI cable HDMI cable HDMI cable AQUOS BD Player AQUOS Recorder AQUOS Audio speaker system AQUOS BD Player AQUOS Recorder AQUOS LINK Setup Press MENU and the MENU screen displays 1 Press c d to select Option 2 Press a b to select AQUOS LINK Setup and ...

Page 55: ...ound mode depending on the genre information included in the digital broadcast Operating an AQUOS LINK device AQUOS LINK allows you to operate the HDMI connected device with one remote control Press PLAY I to start playback of a title See page 54 section Playback of titles using AQUOS LINK if you want to start playback using the list of the titles of the AQUOS BD Player AQUOS Recorder 1 Press FWD ...

Page 56: ...tion manual of the AQUOS audio speaker system for details 3 Select the appropriate external input 1 Press OPTION and the AQUOS LINK menu screen displays 2 Press a b to select Top Menu Title List and then press ENTER 3 Playback of titles using AQUOS LINK This section explains how to play back a title in the AQUOS BD Player AQUOS Recorder Select the title with a b c d and then press PLAY I to start ...

Page 57: ...DVD etc has enough capacity for recording a programme Select the equipment for recording in Model select AQUOS LINK NOTE One Touch Recording cannot be performed unless the device you select in Model select is AQUOS LINK compatible Press OPTION and the AQUOS LINK menu screen displays 1 Press a b to select Model select and then press ENTER The HDMI device changes every time you press ENTER 2 HDMI de...

Page 58: ...VD CSYNC GND Ground SCL Analogue Connection PC PC PC PC HDMI cable Commercially available DVI HDMI conversion cable Commercially available Ø 3 5 mm stereo minijack cable Commercially available INPUT 4 or 5 INPUT 6 INPUT 7 INPUT 7 Ø 3 5 mm stereo minijack cable Commercially available Ø 3 5 mm stereo minijack cable Commercially available RGB DVI conversion cable Commercially available RGB cable Comm...

Page 59: ... Detects the resolution of the signal and displays an image with the same number of pixels on the screen Input Signal Full Dot by Dot An image fully fills the screen Detects the resolution of the signal and displays an image with the same number of pixels on the screen 1360g768 You can select the picture size as illustrated below NOTE Connect the PC before making adjustments Selectable screen size ...

Page 60: ...lock Phase 39 90 20 Press c d to adjust the item to your desired position 5 NOTE For resetting all adjustment items to the factory preset values press a b to select Reset and then press ENTER Clock and Phase in the Fine Sync menu can be adjusted only when inputting analogue signals Press MENU and the MENU screen displays 1 Press c d to select Setup 2 This function enables the screen to be automati...

Page 61: ...play when the same signal resolution is input again 1024 x 768 1360 x 768 NOTE You can only select the Input Signal on the Setup menu when receiving one of the 2 input signals listed above Press MENU and the MENU screen displays 1 Press c d to select Setup 2 1024 x 768 1360 x 768 Press a b to select Input Signal and then press ENTER 3 Press a b to select the desired input signal on the display 4 E...

Page 62: ...the RS 232C connector The TV operates according to the received command and sends a response message to the PC Do not send multiple commands at the same time Wait until the PC receives the OK response before sending the next command Command format Parameter Input the parameter values aligning left and fill with space s for the remainder Be sure that four values are input for the parameter When the ...

Page 63: ... F F F F E E C L O O O O C S D D D D D D D D D D D D T T T S S S H T T T T T T X X P M S S S S K E E E E E E E E E E E E E E E E U U U A M M M M M M T T G 0 1 2 3 4 5 6 7 8 9 1 1 0 1 2 0 1 2 _ 0 1 2 3 4 5 0 1 _ _ _ _ _ _ _ _ _ _ 0 1 _ _ _ _ _ _ _ _ _ _ _ _ _ _ _ _ _ _ _ _ _ _ _ _ _ _ _ _ _ _ _ _ _ _ _ _ _ _ _ _ _ _ _ _ _ _ _ _ _ _ _ _ _ _ _ _ _ _ _ _ _ _ _ _ _ _ _ _ _ _ _ _ _ _ _ _ _ _ CONTROL ITE...

Page 64: ...nd normal image on the left screen Each time you press m the screen switches as shown to the upper right If you select a programme with no Teletext signal No Teletext available is displayed The same message displays during other modes if no Teletext signal is available TELETEXT TELETEXT When viewing the Teletext information Press CHr to increase the page number Press CHs to decrease the page numbe...

Page 65: ...nd then press ENTER Teletext language setting If Teletext information does not display correctly perform the procedure below Select from among 4 kinds of language tables West Europe East Europe Greek Turkish Cyrillic Each table is compatible with the Teletext languages listed below Press a b to select receivable teletext broadcasting language in your country NOTE Teletext can display only when it ...

Page 66: ...age and then press ENTER 2 Press MENU and the MENU screen displays Press c d to select Digital Setup 4 Press a b to select Subtitle and then press ENTER Press a b to select For hearing impaired and then press ENTER 1 3 5 Press c d to select Yes and then press ENTER Set For hearing impaired to Yes For hearing impaired 1st Language 2nd Language Off Set For hearing impaired to No 1st Language 2nd Lan...

Page 67: ...nal temperature has increased Remove any objects blocking the vent or clean Check the power control setting See page 30 Is the sleep timer set See page 30 Is the connection to external equipment correct See pages 13 and 14 Has the input signal setup been performed correctly after connection See page 59 Is the correct input selected See page 50 Is the picture adjustment correct See pages 34 to 36 I...

Page 68: ...the MENU screen displays 1 Press c d to select Setup 2 Press c d to select Yes and then press ENTER Now initialising displays on the screen and blinks After the reset has completed the power shuts off and then comes back on The screen will have returned to its original settings 6 Now initialising Reset Reciever Report If you have already set the password enter it here Return to factory pre setting...

Page 69: ... 1080P 24Hz AUDIO in 15 pin mini D sub AUDIO in Ø 3 5 mm jack STEREO BILINGUAL NICAM B G I D K A2 stereo B G Number of dots 6 220 800 dots 1920 g 1080 g 3 dots As a part of policy of continuous improvement SHARP reserves the right to make design and specification changes for product improvement without prior notice The performance specification figures indicated are nominal values of production units...

Page 70: ... 114 95 305 1004 409 708 646 62 Dimensional drawings Unit mm Appendix LC 42D63X 550 400 400 1023 4 1101 575 6 62 434 124 95 325 175 760 698 LC 46D63X 68 D63X_en_h indd 68 D63X_en_h indd 68 2007 08 30 17 42 15 2007 08 30 17 42 15 ...

Page 71: ... the optional AN 52AG4 bracket For details refer to the instructions supplied with the optional bracket CAUTION This TV should be mounted on the wall only with the AN 52AG4 SHARP wall mount bracket The use of other wall mount brackets may result in an unstable installation and may cause serious injuries Installing the Liquid Crystal Television requires special skill that should only be performed b...

Page 72: ...s MENU to display the MENU screen and then press c d to select Setup 3 Press and hold both CHr and VOLk on the TV simultaneously until the message appears on the screen The Password is NOTE As a precautionary measure make a note of your password above remove it from this manual and keep it in a familiar place CLEARING THE PASSWORD D63X_en_h indd 70 D63X_en_h indd 70 2007 08 30 17 42 16 2007 08 30 ...

Page 73: ... GNU General Public License hereafter GPL a GNU Lesser General Public License hereafter LGPL or other license agreement Obtaining source code Some of the open source software licensors require the distributor to provide the source code with the executable software components GPL and LGPL include similar requirements For information on obtaining the source code for the open source software and for ...

Page 74: ...Memo D63X_en_h indd 72 D63X_en_h indd 72 2007 08 30 17 42 16 2007 08 30 17 42 16 ...

Page 75: ...Cover2_D63X indd 2 Cover2_D63X indd 2 2007 08 30 17 48 01 2007 08 30 17 48 01 ...

Page 76: ...Printed in Malaysia TINS D449WJZZ 07P08 MA NG Printed on post consumer recycled paper Cover_D63X indd 2 Cover_D63X indd 2 2007 09 21 9 38 08 2007 09 21 9 38 08 ...

Reviews:

Related manuals for LC-42D63X