background image

English

   - 8 -

Viewing the TV 

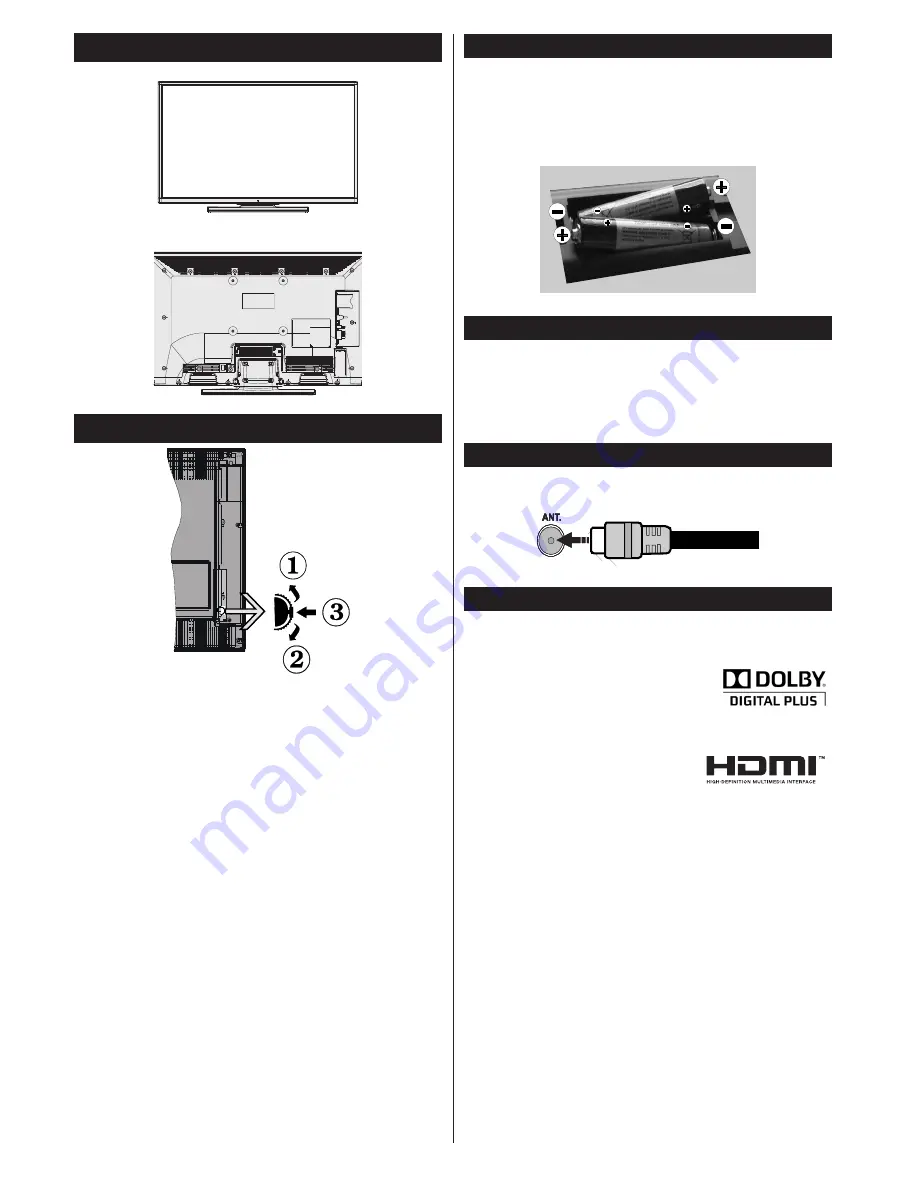
TV Control button & Operation

1. 

Up direction

2.

 Down direction

3.

 Programme/Volume / AV / Standby-On selection 

switch

The Control button allows you to control the Volume/ 

Programme/ Source and Standby-On functions of 

the TV.

To change volume:

 Increase the volume by pushing 

the button up.  Decrease the volume by pushing the 

button down.

To change channel:

 Press the middle of the button, 

the channel information banner  will appear on screen. 

Scroll through the stored channels by pushing the 

button up or down

To change source:

 Press the middle of the button 

twice, the source list will appear on screen.  Scroll 

through the available sources by pushing the button 

up or down.

To turn the TV off:

 Press the middle of the button 

down and hold it down for a few seconds, the TV will 

turn into standby mode.

Inserting the Batteries into the Remote

Insert batteries in the remote before operating your TV.
Lift the cover on the back of the remote upward gently. 

Install two 

AAA

 batteries. Make sure to match the + 

and - ends of the batteries in the battery compartment 

(observe the correct polarity) Replace the cover.

Connect Power 

IMPORTANT

: The TV set is designed to operate on 

220-240V AC, 50 Hz

 socket. After unpacking, allow 

the TV set to reach the ambient room temperature 

before you connect the set to the mains. Plug the 

power cable to the mains socket outlet.

Antenna/Cable Connection

Connect the “aerial” or “cable TV” plug to the AERIAL 

INPUT (ANT) socket located on the back of the TV.

Notification

Manufactured under license from Dolby Laboratories.

TRADEMARK ACKNOWLEDGMENT

“Dolby” and the double-D symbol are 

trademarks of Dolby Laboratories. 

“HDMI, the HDMI logo and High-Definition Multimedia 

Interface are trademarks or 

registered trademarks of HDMI 

Licensing LLC.” 

Summary of Contents for LC-39LD145V

Page 1: ...LC 39LD145V LCD COLOUR TELEVISION OPERATION MANUAL ENGLISH BAREVNÝ LCD TELEVIZOR NÁVOD K POUŽITÍ CZECH LCD SZÍNES TELEVÍZIÓ HASZNÁLATI ÚTMUTATÓ MAGYAR EΛΛΗVΙΚ ΕΓΧΡΩΜΗ ΤΗΛΕΟΡΑΣΗ LCD ΕΓΧΕΙΡΙΔΙΟ ΧΡΗΣΗΣ ...

Page 2: ...Playback via USB Input 12 Recording a Programme 12 Timeshift Recording 13 Instant Recording 13 Watching Recorded Programmes 13 Recording Configuration 13 Media Browser Menu 13 Quick Menu 13 TV Menu Features and Functions 14 General TV Operation 16 Using the Channel List 16 Configuring Parental Settings 16 Electronic Programme Guide EPG 16 Software Upgrade 17 Troubleshooting Tips 17 PC Input Typica...

Page 3: ... as a serious electric shock may occur To fit an appropriate plug to the mains lead follow the instructions below IMPORTANT The wires in the mains lead are coloured in accordance with the following code Blue Neutral Brown Live As the colours of the wires in the mains lead of this product may not correspond with the coloured markings identifying the terminals in your plug proceed as follows The wir...

Page 4: ...afety precautions carefully before using this product Introduction Please read the corresponding instructions of this handbook prior to the first usage of the device even when the usage of electronic devices is familiar to you Please take notice of the chapter SAFETY PRECAUTIONS Carefully keep the handbook as future reference When selling the device or giving it away provide these direction for us...

Page 5: ...openings This product is not designed for built in installation do not place the product in an enclosed place such as a bookcase or rack unless proper ventilation is provided or the manufacturer s instructions are followed The LCD panel used in this product is made of glass Therefore it can break when the product is dropped or impact applied If the LCD panel is broken be careful not to be injured ...

Page 6: ...lame sources such as lighted candles are placed on top of the TV Batteries should not be exposed to excessive heat such as sunshine fire or the like Lightning In case of storm and lightning or when going on holiday disconnect the power cord from the wall outlet Replacement Parts When replacement parts are required make sure that the service technician has used replacement parts which are specified...

Page 7: ... Standby Off On button doesn t separate this device completely from mains Moreover the device consumes power in the standby operation In order to separate the device completely from mains the mains plug has to be pulled from the mains socket Because of that the device should be set up in a way that an unobstructed access to mains socket is guaranteed so that in case of emergency the mains plug can...

Page 8: ...re Mode will be automatically set to Dynamic except the Mode is set to Game or Sports When the TV is not in use please switch off or disconnect the TV from the mains plug This will also reduce energy consumption Disconnect power when going away for longer time It is highly recommended to activate Power Save Mode setting to reduce your annual power consumption And also it is recommended to disconne...

Page 9: ...TV will turn into standby mode Inserting the Batteries into the Remote Insert batteries in the remote before operating your TV Lift the cover on the back of the remote upward gently Install two AAA batteries Make sure to match the and ends of the batteries in the battery compartment observe the correct polarity Replace the cover Connect Power IMPORTANT The TV set is designed to operate on 220 240V...

Page 10: ...y Specification TV Broadcasting PAL B G D K I I SECAM D K Receiving Channels VHF BAND I III UHF BAND U HYPERBAND Number of Preset Channels 1000 Channel Indicator On Screen Display RF Aerial Input 75 Ohm unbalanced Operating Voltage 220 240V AC 50Hz Audio German Nicam Stereo Audio Output Power WRMS 10 THD 2 x 6w Power Consumption 100w Weight 9 50 kg TV Dimensions DxLxH with foot 220 x 893 x 570 mm ...

Page 11: ... selected MY BUTTON is now associated with the selected function Using My Button 2 Press MYBUTTON 2 for five seconds when on a desired source channel or link until the MY BUTTON IS SET message is displayed on the screen This confirms that the selected MY BUTTON is now associated with the selected function 1 Standby On 2 TV AV TV Channel list 3 Volume up down 4 Menu on off 5 OK Confirm Hold in TXT ...

Page 12: ...not be available via the scart socket When using the wall mounting kit available from third party in the market we recommend that you plug all your cables into the back of the TV before mounting on the wall Insert or remove the CI module only when the TV is SWITCHED OFF You should refer to the module instruction manual for details of the settings Connector Type Cables Device Scart Connection back ...

Page 13: ...nue please select YES and press OK To cancel operation select NO and press OK You can select frequency ranges from this screen Enter the frequency range manually by using the numeric button Note Searching duration will change depending on the selected search step Media Playback via USB Input You can connect a 2 5 and 3 5 inch hdd with external power supply external hard disk drives or USB memory s...

Page 14: ...ons if previously recorded Press the OK button to view the Play Options Select an option then press OK button Note Viewing main menu and menu items will not be available during the playback Press the STOP button to stop a playback and return to the Recordings Library Slow Forward If you press PAUSE button while watching recorded programmes the slow forward feature will be available You can use but...

Page 15: ...rue Black While watching from HDMI source this feature will be visible in the Picture Settings menu You can use this feature to enhance blackness in the picture Film Mode Films are recorded at a different number of frames per second to normal television programmes Turn this feature on when you are watching films to see the fast motion scenes clearly Skin Tone Skin tone can be changed between 5 and...

Page 16: ...B Record Recording Configuration Displays the recording configuration menu Usb connection required Date Time Sets date and time Sources Enables or disables selected source options Other Settings Displays other setting options of the TV set Menu Timeout Changes timeout duration for menu screens Scan Encrypted Channels When this setting is on the search process will locate the encrypted channels as ...

Page 17: ... EPG menu Red button Prev Day Displays the programmes of previous day Green button Next day Displays the programmes of the next day Yellow button Zoom Expands programme information Blue button Filter Views filtering options SUBTTL Press button to view Select Genre menu Using this feature you can search the programme guide database in accordance with the genre Info available in the programme guide ...

Page 18: ... user interface Simply navigate on your main menu Choose Settings and select Other Settings menu In Other Settings menu navigate on to the Software for Upgrade item and press OK button to check for a new software upgrade In Upgrade Options menu select Scan for upgrade and press OK button If a new upgrade is found it starts to download the upgrade A progress bar indicates the remaining download pro...

Page 19: ...f not Check the AV cables and connections if you have tried to connect a device Recording unavailable To record a programme you should first connect a USB disk to your TV while the TV is switched off You should then switch on the TV to enable recording feature If you cannot record try switching off the TV and then re inserting the USB device USB is too slow If a USB is too slow message is displaye...

Page 20: ...modes Your TV may not support all resolutions Your TV supports up to 1920x1080 Index Resolution Frequency 1 1024x768 60 Hz 2 1280x768 60 Hz 3 1360x768 60 Hz 4 800x600 56 Hz 5 800x600 60 Hz 6 1024x768 66 Hz 7 1280x1024 60 Hz 8 1280x960 60 Hz 9 1400x1050 60 Hz 10 1600x1200 60 Hz 11 1920x1080 60 Hz Supported File Formats for USB Mode Media File Extension Format Remarks Video Audio Maximum resolution ...

Page 21: ...English 20 Dimensional Drawings Note The unit of the measurements is mm ...

Page 22: ... be returned free of charge to the dealer even if you don t purchase a new product Further collection facilities are listed on the homepage of www swico ch or www sens ch B Information on Disposal for Business Users 1 In the European Union If the product is used for business purposes and you want to discard it Please contact your SHARP dealer who will inform you about the take back of the product ...

Page 23: ...the Stand TV is unplugged from its power source Place the Sharp Television on a soft stable and flat surface facing down Place the Stand on the stand mounting pattern on the rear side of the TV Ensure the Stand is placed correctly and that you can see the screw holes Insert the four screws provided and tighten them gently until the stand is properly fitted ...

Page 24: ...ision Uninstalling the Stand Before detaching the stand ensure that the TV is unplugged from its power source Place the Sharp Television on a soft stable and flat surface facing down Unscrew gently the four screws that attach the foot assembly and remove the screws when they are completely unscrewed Remove the stand gently from the panel ...

Page 25: ...ng Screw length A B Screw Cabinet Wall mount angle MODEL VESA TO THE PRODUCT MIN MAX SCREW LENGTH A LENGTH LC 32LD145E LC 32LD145K LC 32LD145V 200 x 100 W x H M4 X 6 M4 X 10 LC 39LD145E LC 39LD145K LC 39LD145V 200 x 200 W x H M6 X 10 M6 X 14 ...

Page 26: ...50251135 ...

Reviews: