background image


12

Preparation 

CAUTION

Improper use of batteries can result in chemical leakage or explosion. Be sure to follow the instructions below.

•  Do not mix batteries of different types. Different types of batteries have different characteristics.

•  Do not mix old and new batteries. Mixing old and new batteries can shorten the life of new batteries or cause chemical 

leakage in old batteries.

•  Remove batteries as soon as they have worn out. Chemicals that leak from batteries can cause a rash. If you find any 

chemical leakage, wipe thoroughly with a cloth.

•  The batteries supplied with this product may have a shorter life expectancy due to storage conditions.

•  If you will not be using the remote control unit for an extended period of time, remove the batteries from it.

•  Batteries shall not be exposed to excessive heat such as sunshine, fire or the like.

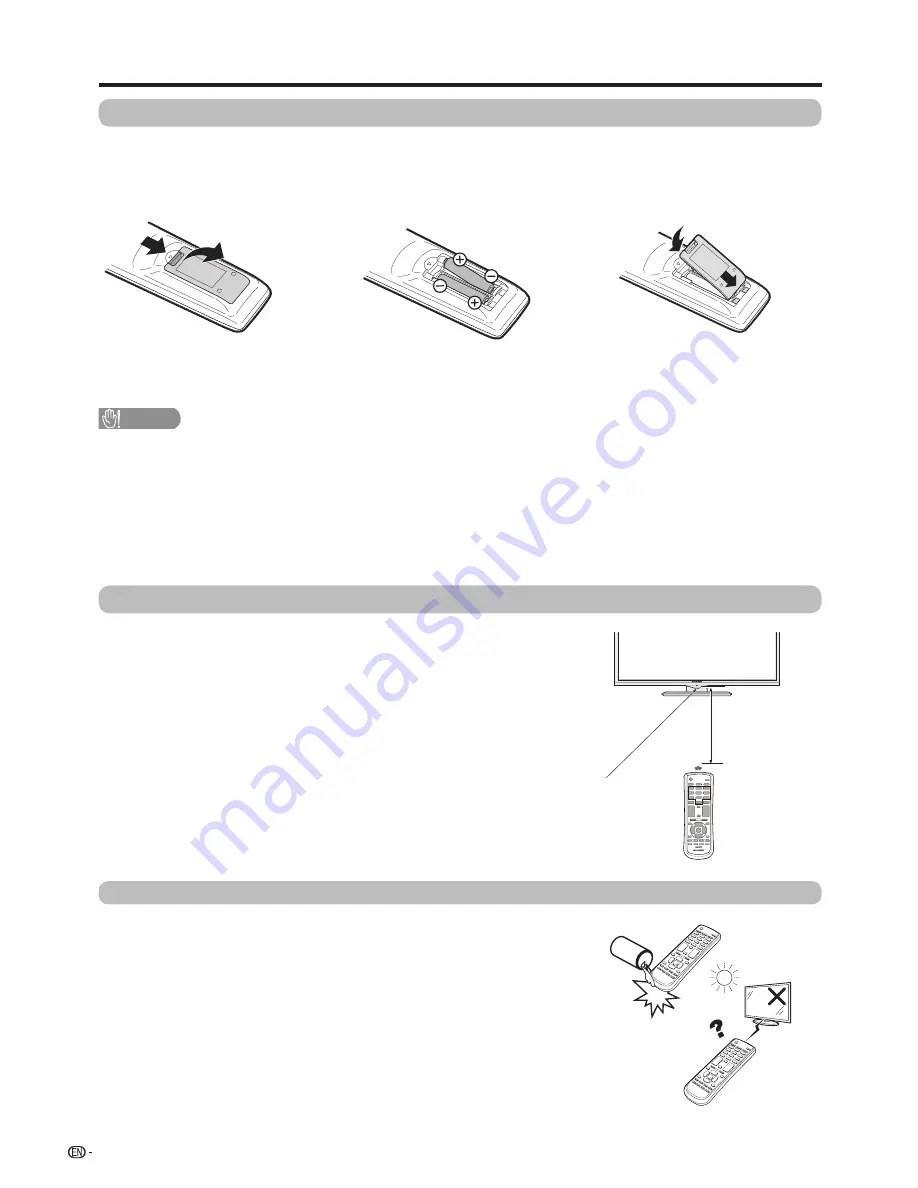
Remote control sensor

Open the battery cover.

•  Place batteries with their terminals 

corresponding to the (

e

) and (

f

indications in the battery compartment.

2

 Insert the two supplied “AAA” size 

carbon batteries.

3

 Close the battery cover.

Use the remote control unit by pointing it towards the 

remote sensor window.

Objects between the remote control unit and sensor 

window may prevent proper operation.

Cautions regarding the remote control unit

•  Do not subject the remote control unit to shock.

  In addition, do not soak the remote control unit with liquids or place it in 

an area with high humidity.

•  Do not install or place the remote control unit under direct sunlight. 

The heat may cause deformation of the unit.

•  The  remote  control  unit  may  not  work  properly  if  the  remote  sensor 

window  of  the  TV  is  under  direct  sunlight  or  strong  lighting.  In  such 

cases,  change  the  angle  of  the  lighting  or  TV,  or  operate  the  remote 

control unit closer to the remote sensor window.

Inserting the batteries

Before using the TV for the first time, insert two “AAA” size batteries (supplied).  When the batteries become 

depleted and the remote control fails to operate, replace the batteries with new “AAA” size alkaline batteries.

Using the remote control unit

5m

Summary of Contents for LC-32M3H

Page 1: ...ing and precautions with the wall mounted TV 7 Part names 8 TV Front Rear 8 Remote control unit 9 Before turning on the power 10 Connecting external devices 11 Inserting the batteries 12 Using the remote control unit 12 Cautions regarding the remote control unit 12 Turning the TV on off 13 Turning on the power 13 Turning off the power 13 Initial auto installation 13 Set up the DTV antenna 14 Watch...

Page 2: ...uction for R C buttons 22 FREEZE COLOUR ADJ 22 A Flash Back 22 e Mute 23 MPX 23 SLEEP 23 INFO 23 GUIDE 23 Connecting a USB memory device Connecting a USB memory device 24 Playing back files on a USB memory device 24 Buttons for USB media operation 25 List of file formats compatible with USB mode 26 Appendix Troubleshooting 27 Dimensional drawings 28 Specifications 29 ...

Page 3: ...omes into contact with some substances Therefore keep it away from volatile substances such as insecticide In addition do not let it come into contact with objects made of rubber resin etc for a long time Maintenance of the LCD panel Before cleaning the LCD panel be sure to turn off the TV set and unplug the power cord from the outlet When cleaning the LCD panel use a dry and soft cloth made of co...

Page 4: ...ss Heat sources Keep the product away from heat sources such as radiators heaters stoves and other heat generating products including amplifiers To prevent fire never place any type of candle or naked flames on the top or near the TV set To prevent fire or shock hazard do not place the AC power cord under the TV set or other heavy items Do not place heavy objects on this product or stand on it Doi...

Page 5: ...ion Multimedia Interface and the HDMI Logo are trademarks or registered trademarks of HDMI Licensing LLC in the United States and other countries Manufactured under license from Dolby Laboratories Dolby and the double D symbol are trademarks of Dolby Laboratories The illustrations and on screen displays in this operation manual are for explanation purposes and may vary slightly from the actual ope...

Page 6: ... installation of the stand may result in the TV falling over 2 Soft cushion Attaching the stand unit NOTE To detach the stand unit perform the steps in reverse order The angle of the stand is not adjustable A screwdriver is not supplied with this product During installation please be careful to avoid getting your hand trapped between the TV bottom and the floor 1 Confirm that there are screws with...

Page 7: ...equires special skills that should only be performed by qualified service personnel Customers should not attempt to do the work themselves SHARP bears no responsibility for improper mounting or mounting that results in accident or injury Using a SHARP recommended bracket to mount the TV You can ask a qualified service professional about using a SHARP recommended bracket to mount the TV to the wall...

Page 8: ...RVICE L AUDIO R USB terminal FOR SERVICE HDMI 1 terminal INPUT2 COMPONENT VIDEO IN AUDIO IN L R terminal ANTENNA terminal VOL k l Volume up down buttons CHs Channel down button POWER On Off button Press INPUT button for several seconds to display SOURCE list CH r Channel up INPUT INPUT SOURCE button ...

Page 9: ... setting screen ENTER Execute a command 11 EXIT Turn off the On Screen Display 12 Colour Buttons R G Y B The coloured buttons are used to select correspondingly to the coloured items on the screen 13 EPG DTV only To display EPG Electronic Programme Guide screen See page 22 14 GUIDE Display the channel list of DTV and ATV See page 23 15 DISPLAY Displays the channel or input information 16 MPX Selec...

Page 10: ...AC cord in to the AC outlet Place the TV close to the AC outlet and keep the power plug within reach Disconnect the AC cord from the AC outlet if the TV will not be used for a long period of time TV rear view Connecting the antenna cable To enjoy a clearer picture use an outdoor antenna The following is a brief explanation of the types of connections that are used for coaxial cable Standard DIN453...

Page 11: ...Box STB and PC To view external source images select the input source from b on the remote control unit or INPUT on the TV When using component cable commercially available When using composite cable commercially available Digital TV STB VCR Game Console Camcorder DVD Player Digital TV STB VCR Game Console Camcorder DVD Player When using HDMI cable commercially available Digital TV STB VCR Game co...

Page 12: ...ding to the e and f indications in the battery compartment 2 Insert the two supplied AAA size carbon batteries 3 Close the battery cover Use the remote control unit by pointing it towards the remote sensor window Objects between the remote control unit and sensor window may prevent proper operation Cautions regarding the remote control unit Do not subject the remote control unit to shock In additi...

Page 13: ...uto installation function allows you to execute the auto installation again from the Programme setup menu See page 15 NOTE If you are not going to use this TV for a long period of time be sure to remove the AC cord from the AC outlet A small amount of electric poweris still consumed even the TV is in standby mode or switch off by pressing POWER on the TV If TV loses power in special circumstances ...

Page 14: ...ct Digital setting and then press ENTER Position and align the antenna so that the maximum possible values for Signal strength and Signal quality are obtained 4 NOTE The values of Signal strength and Signal quality indicate when to check the appropriate alignment of the antenna w Signal information Show the current program of CH No Signal strength and Signal quality and other information CH No 40 ...

Page 15: ...menu to add new ATV services automatically after auto installation has been completed Press MENU and the MENU screen displays 1 Press a b to select the desired menu item and then press ENTER 4 Press a b to select Analogue setting and then press ENTER 3 2 Press c d to select Programme setup Programme setup Auto installation Digital setting Analogue setting Programme edit Watching TV w Manual adjust...

Page 16: ...tup w Erase Channels can be erased individually Press 1 to erase the selected channel w Sort Channel positions can be sorted freely Press 2 to select the channel you want to move Press a b to move it to the desired position and then press 2 again or ENTER to save w Skip Channels with Skip set to On are passed over when using CHr s even if selected while watching the image from the TV Press 3 to sk...

Page 17: ...put mode For example select STANDARD for ATV input and DYNAMIC for VIDEO input Press MENU and the MENU screen displays 1 Press c d to select Picture Press a b to select the desired menu item 4 Press a b or c d to adjust the item 5 Picture adjust You can adjust the picture to your preference 2 Press a b to select Picture adjust and then press ENTER 3 w Adjustment items Selected item cbutton dbutton...

Page 18: ...ely stretched toward each side of the screen Full For 16 9 squeeze pictures Cinema 16 9 For 16 9 letterbox pictures Bars may appear on the top and bottom with some programmes Cinema 14 9 For 14 9 letterbox pictures Bars may appear on the top and bottom with some programmes Dot by Dot Display an image with the same number of pixels on the screen only when receiving 1080i 1080p signal and applied to...

Page 19: ...s to the factory preset values Press MENU and the MENU screen displays 1 Press c d to select Audio Press a b to select Yes and then press ENTER 4 2 Press a b to select Reset and then press ENTER 3 ECO No signal off You can set the TV to automatically power off in about 15 minutes after the TV goes into a state of receiving no programme signals such as the end of a broadcast day Press MENU and the ...

Page 20: ... select Digital audio language and then press ENTER 1 2 Press a b to select 1st language or 2nd language 3 Press c d to select the desired language w Subtitle Each time you press SUB T on the remote control the subtitle switches when the broadcast contains subtitle information NOTE If subtitles for the selected language are not included in a received broadcast subtitles will not be shown for that ...

Page 21: ... press ENTER 4 Press c d to select Option 3 This function allows you to transform to the latest software via a USB device 5 Press a b to select Yes to update the system and then press ENTER The TV restarts automatically and the software updating will be completed This operation may take a while NOTE If the software is not compatible with the system an error message appears on the screen Repeat ste...

Page 22: ... information sent by the TV station The added instruction for R C buttons FREEZE COLOUR ADJ Press FREEZE COLOUR ADJ A still image is displayed on screen meanwhile it also shows the colour adjustment menu The still image is captured from active image when you press FREEZE COLOUR ADJ 1 After finish colour adjustment you can press FREEZE COLOUR ADJ to exit the still image 3 Press a b c d to adjust co...

Page 23: ...s MPX the mode switches as follows In the NICAM TV broadcasts In the TV mode of A2 TV broadcasts Signal Mode switch When receiving a stereo signal STEREO MONO When receiving a bilingual signal CH A CH B CH AB When receiving a monaural signal MONO 1 2 Press SLEEP Remaining time displays when sleep timer has been set Each time you press SLEEP the remaining time switches as shown below 0 hr 30 min 1 ...

Page 24: ...B memory device Connecting a USB memory device Playing back files on a USB memory device You can connect the TV to a USB memory device to enjoy viewing pictures listening to music and watching videos Connect a commercially available USB to the USB port of the TV Select USB using b INPUT SOURCE on the remote control unit or on the TV 1 Press c d to select the drive where you want to find your files...

Page 25: ...ckground music The background music should be saved in the same folder with the photo 3 Playlist Select a file from the playlist to start playback 3 3 3 Display file information 3 3 3 Slow forward Each time you press ENTER the speed will change 3 Step Each time you press ENTER the picture will change to the next still picture 3 Go to time Set a start point of playing 3 3 Rotate the photo by 90 deg...

Page 26: ... codec RV 8 9 10 1280 720 Real Audio 30 10 ts trp tp TS H 264 1920 1080 MP3 Dolby Digital 30 20 MPEG2 1920 1080 30 20 dat DAT MPEG2 1920 1080 MP3 Dolby Digital 30 8 MPEG1 1920 1080 30 8 NOTE Progressive format jpeg files are not supported USB 1 1 devices may not be played properly Operation using USB hubs is not guaranteed Some file formats in the above list may not be played back correctly includ...

Page 27: ...olour system setting See pages 15 Power is suddenly turned off The unit s internal temperature has increased Remove any objects blocking the vent or clean Is the sleep timer no signal off set See pages 19 and 23 No picture Is the connection to external equipment correct See pages 11 and 24 Is the correct input selected See pages 9 11 and 24 Is the picture adjustment correct See pages 17 and 18 Is ...

Page 28: ...28 Dimensional drawings Appendix Unit mm 1 Active area 2 Thinnest part LC 32M3H LC 40M3H ...

Page 29: ...0 mm x 2 Terminals USB USB 2 0 HDMI 1 HDMI HDMI input 480i 576i 480p 576p 720p 50Hz 720p 60Hz 1080i 50Hz 1080i 60Hz 1080p 50Hz 1080p 60Hz 1080p 24Hz INPUT2 COMPONENT in 480i 576i 480p 576p 720p 50Hz 720p 60Hz 1080i 50Hz 1080i 60Hz AUDIO in VIDEO in AUDIO in Analogue Digital antenna UHF VHF 75 q Din type SERVICE For service only OSD language English Simplified Chinese Traditional Chinese Power requ...

Reviews: