background image

10

Wall mounting

IMPORTANT - Before drilling any holes in the wall ensure you are not drilling where there 

could be any electrical wires, water or gas pipes.

1) Remove the four screws located at the back of the TV set.

2) The wall mount can now be easily attached to the mounting holes, located 
on the back of the TV, using the same four screws removed. 

For VESA wall mounting information please refer to the Technical 
Specifi cation page.

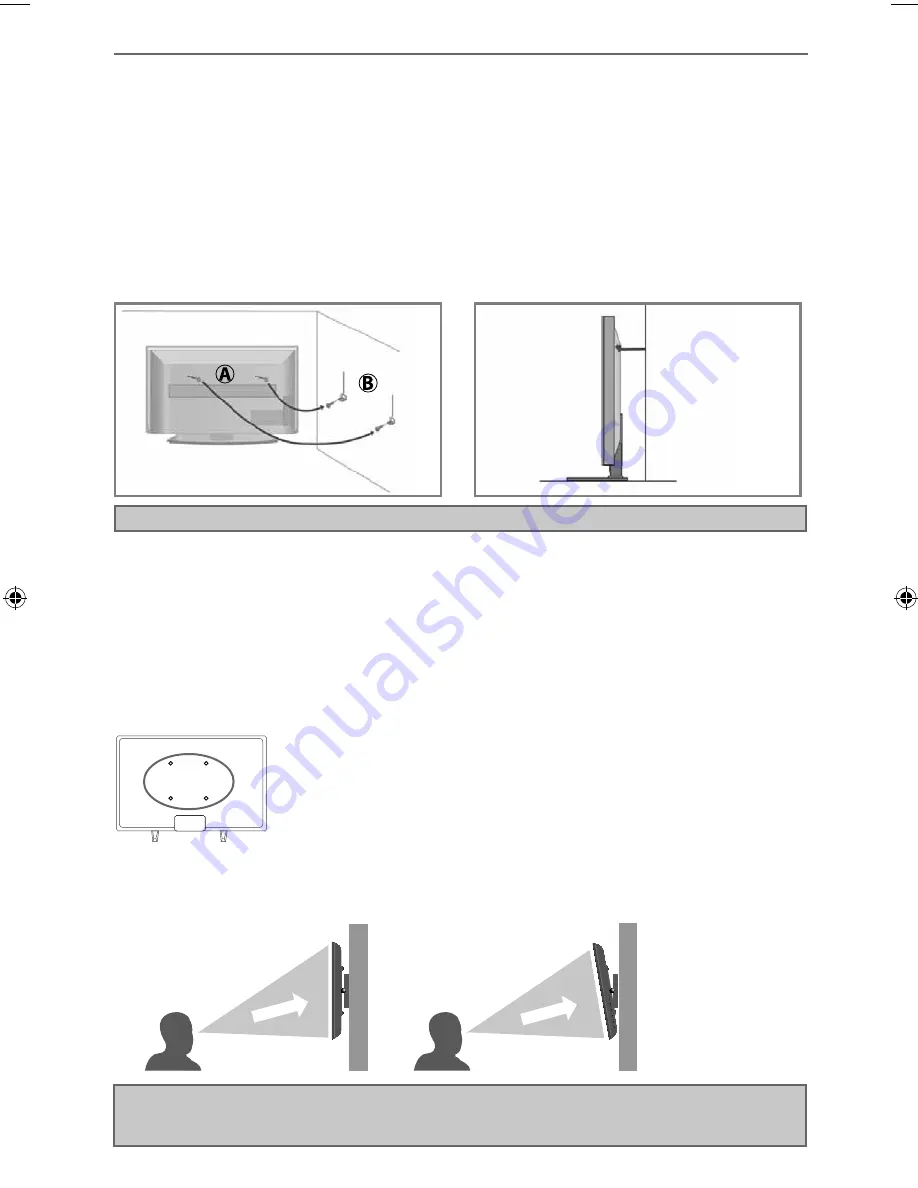
For optimum viewing, if wall mounting the TV higher than eye level, the TV should be tilted downwards 
so that the TV’s screen is ‘face on’. See fi g 1 and 2.

Important – If wall mounting this TV, only use the screws already provided either in the wall mounting 
holes located at the back of the TV or the in accessory pack. Please do not use other screws which are 
longer, as they could cause irreparable damage to internal parts.

Securing the TV to a wall/wall mounting

SECURING THE TV TO A WALL


Note - Please ensure that children do not climb on the TV set.

Securing the TV to a wall with anti-tip straps

For maximum security in the home, when using a TV with its stand, anti-tip straps should be fi tted. These 
are available from supermarket websites and other websites and are an easy, inexpensive and effective 
way of ensuring your TV stays safely upright. Straps are designed to be attached to the rear of the TV and 
then tethered to the wall or the furniture the TV is stood on, these are fi tted as follows.

The Royal Society for the Prevention of Accidents is urging people to take care with fl at-screen televisions. 

RoSPA stated in 2010 that “Toddlers are particularly at risk of pulling fl at-screen televisions on to 
themselves. They are unsteady on their feet and are attracted by colourful television images.”

The risk is increased as televisions become lighter.

A)

 Using one or both of the top wall-mounting 

holes and screws fasten one end of the fastening 
cord/s to the TV. (the screws are already supplied in 
the wall mounting holes)

B)

 Secure the other end of the fastening cord/s to 

your wall. (you will need screws/fi xings suitable 
for your wall type - available separately from most 
DIY stores).

fig 1

fig 2

TV

TV

Viewing angle

Viewing angle

INCORRECT

CORRECT

User Guide - SHA-MAN-0104 - SmartTV - 60 models.indd   Sec1:10

User Guide - SHA-MAN-0104 - SmartTV - 60 models.indd   Sec1:10

10/03/2016   12:22:53

10/03/2016   12:22:53

Summary of Contents for LC-32CFF6001K

Page 1: ...Model No User Guide LC 32CFF6001K LC 40CFF6001K LC 43CFF6001K LC 48CFF6001K LC 49CFF6001K LED SMART TV with Freeview HD Saorview USB PVR ...

Page 2: ...tions such as Use cabinets or stands recommended by the manufacturer of the television set Only use furniture that can safely support the television set Ensure the television set is not overhanging the edge of the supporting furniture Do not place the television set on tall furniture for example cupboards or bookcases without anchoring both the furniture and the television set to a suitable suppor...

Page 3: ...ower off when not in use Examples of images that are more likely to cause screen burn are as follows this is not an exhaustive list TV channel logos e g shopping channel logos and pricing displays especially if they are bright and stationary Moving or low contrast graphics are less likely to cause ageing of the screen Time displays Teletext Do not view a stationary page for a long period of time T...

Page 4: ...d the double D symbol are trademarks of Dolby Laboratories The CI plus Logo is a trademark of CI Plus LLP YouTube YouTube and the YouTube logo are trademarks of Google Inc Wi Fi The Wi Fi CERTIFIED Logo is a certification mark of the Wi Fi Alliance Miracast Wi Fi CERTIFIED Miracast and Miracast are trademarks of Wi Fi Alliance Intel WiDi Intel and the Intel WiDi logo are trademarks of Intel Corpor...

Page 5: ...e menu 22 23 Sound menu 24 25 Channel menu 26 Lock menu 27 Time menu 28 Network configuration 29 Settings menu 30 Applications menu 31 33 7 day TV guide and channel list 34 USB record Freeview Saorview 35 General information 36 43 Frequently asked questions 36 37 Technical specifications 38 43 For DTS patents see http patents dts com Manufactured under license from DTS Licensing Limited DTS the Symb...

Page 6: ...es User guide Quick start guide 1 x RF cable Accessories Included with this TV are the following accessories 1 x Stand installation pack Screw quantity will vary see below Included with LC 48CFF6001K and LC 49CFF6001K models only Included with LC 32CFF6001K LC 40CFF6001K and LC 43CFF6001K models only 1 x Mini composite AV cable Included with LC 43CFF6001K LC 48CFF6001K LC 49CFF6001K models only 1 ...

Page 7: ... of the TV set using the screws provided Attaching the stand To complete the stand feet installation you will require a cross head screw driver Detaching the stand Remove the screws highlighted then remove the stand feet from the underside of the TV set TV panel must be facing downwards TV panel must be facing downwards TV panel must be facing downwards For LC 48CFF6001K LC 49CFF6001K models only ...

Page 8: ... the TV to a wall with anti tip straps For maximum security in the home when using a TV with its stand anti tip straps should be fitted These are available from supermarket websites and other websites and are an easy inexpensive and effective way of ensuring your TV stays safely upright Straps are designed to be attached to the rear of the TV and then tethered to the wall or the furniture the TV is...

Page 9: ... twice for information about the current programme SLEEP Press repeatedly to cycle through the sleep options AUDIO To change the audio language if available SUBTITLE To switch the dialogue at the bottom of the screen on off TEXT To enter exit Text TEXT HOLD Teletext mode Holds current page which is displayed Analogue TV TEXT ZOOM Zoom function for Teletext and DVD DISPLAY To switch off the screen ...

Page 10: ...V buttons may vary by model Choosing Mode Input Source Use the source menu to switch between input connections A Using the buttons on the remote control 1 Press SOURCE The source menu will appear 2 Press or to select the input you require 3 Press OK B Using the buttons on the Television 1 Press SOURCE 2 Scroll up down using CH CH buttons to the input source you require 3 Press Vol to change input ...

Page 11: ...t Digital audio Digital optical audio output HDMI 3 HDMI input USB USB port CI card in Common interface module A I L B J M N C D E F G H K E AR P HONE Y Pb Pr VG A P C Audio in VG A P C IN VIDE O R L Digital Audio Output US B C I C A R D IN The LAN Ethernet port is used for Freeview HD services and smart functions R L Audio shared for Video Composite and component YPbPr R L Input Outputs for the L...

Page 12: ...nput USB x 2 USB port VGA PC audio in 3 5mm PC audio input AV in Audio video input CI card in Common interface module YPbPr HD input Ypbpr Earphones Earphone input A I L B J M N C D E F G H K The LAN Ethernet port is used for Freeview HD services and smart functions VG A P C IN Digital Audio Output E A R P HO NE US B C I C A R D IN V G A P C A udio in AV IN Y Pb Pr Connections Input Outputs for th...

Page 13: ...ut RF in RF TV aerial input Earphones Earphone input HDMI 3 HDMI input YPbPr HD input Ypbpr AV in Audio video input CI card in Common interface module USB USB port A I N L B J M C D E F G K VG A P C Audio in VG A P C IN Digital Audio Output E A R P HO NE AV IN US B C I C A R D IN Y Pb Pr The LAN Ethernet port is used for Freeview HD services and smart functions Input Outputs for the LC 48CFF6001K ...

Page 14: ...source should be set to Composite AV Note Connecting cables are shown for example only and may not be included Please check What Is Included In The Box page Scart L white R red Video yellow Connecting to a device with Component YPbPr output If you are supplied with a cable from the device which has red green blue red white connectors you must connect via Component for picture and by phono cable fo...

Page 15: ...nt YPbPr Mini AV in Mini YPbPr Y green PB blue PR red Video yellow is not connected R red L white Mini AV in L white R red Video yellow Connecting to a device with SCART output TV source should be set to SCART Scart Scart Connection options for LC 43CFF6001K model only Note Connecting cables are shown for example only and may not be included Please check What Is Included In The Box page Connecting...

Page 16: ...Mini AV in L white R red Video yellow Connecting to a device with SCART output using SCART to AV cable TV source should be set to Composite AV Scart Mini AV in Connecting to a device with Component YPbPr output If you are supplied with a cable from the device which has red green blue red white connectors you must connect via Component for picture and by phono cable for sound TV source should be se...

Page 17: ...source should be set to VGA PC VGA PC in VGA PC out VGA PC audio in Audio out Connecting an Ethernet Network cable The LAN Ethernet port is used for Freeview HD services and smart functions Ethernet port Ethernet port Connecting to a device with HDMI output A HDMI cable can output both video and audio and enables you to enjoy digital quality video and audio with minimal loss of quality TV source s...

Page 18: ...example below scroll down and select Wi fi Config fig 2 4 Within the Wi Fi config options highlight and select Wi Fi Auto Search 5 The TV will then automatically search for networks 6 Select the preferred type of network connection then enter the network password 7 The TV will then establish a connection Note An icon will appear in the top right hand side of the Application menu to show you if the TV ...

Page 19: ...g adjustments in Personal mode Contrast Switch the balance between black and white Brightness Increase or decrease the brightness of the picture Colour Increases the colour from black and white Tint Lets you increase or decrease the level of tint within the picture only available for NTSC input signal Sharpness Increase or decrease the sharpness of the picture To access this menu press MENU button...

Page 20: ...t Ratio Within the UK the picture format varies depending on the channel broadcast There are a number of different options to best meet your needs Choose from the following settings To access this menu press MENU button on the remote control To select a sub menu press OK If you wish to make changes to any of the default settings use the scroll buttons To confirm any settings press OK button To exit...

Page 21: ...to stay at a constant level regardless of TV programme and advertisements DTS TruSurround Choose from the following presets Off Off On On TruSurround creates an immersive feature rich surround sound experience from two speakers complete with rich bass high frequency detail and clear dialog To access this menu press MENU button on the remote control To select a sub menu press OK If you wish to make...

Page 22: ...e This allows the user to increase and decrease the AD Audio Description volume level Audio Track Change the audio language not all languages will be available on all channels Audio Delay Enables the user to adjust setting to sync picture and audio SPDIF Delay Enables the user to adjust sound setting to sync picture and audio for external speakers connected via digital audio output To access this ...

Page 23: ... you switch your TV to Satellite in the source menu Auto Tuning Allows you to retune the television for all digital channels digital radio stations and analogue devices Analogue Manual Tuning Allows you to manually tune your analogue signal Freeview Saorview Manual Tuning Allows you to manually tune your digital signal Channel Edit Allows you to delete move skip and select favourite channels Impor...

Page 24: ...sword is 0000 Change Password Allows you to change the password Channel Lock Allows you to lock certain channels manually Parental Guidance Allows you to set the rating to block certain content based on age information TV Button Lock Allows you to lock the buttons on the side of the TV set Default Source Allows the user to set the default source The default source is the source the TV starts on wh...

Page 25: ...lly switches off after a set amount of time Off 10min 20min 30min 60min 90min 120min 180min 240min OSD Timer Lets you adjust the amount of time the On Screen Menu stays on the screen before disappearing Auto standby Set Auto Standby to OFF 3 hours 4 hours or 5 hours Time Zone Change your current time zone To access this menu press MENU button on the remote control and scroll right To select a sub ...

Page 26: ...nge the IP Netmask Gateway and DNS information WIFI Config If WIFI is selected during the first time installation process Wi Fi Configuratrion Wireless network connection settings Wi Fi Auto Search Automatically searches for available wireless networks Select the desired Wi Fi network and then enter the network password if network is password protected Once the password is accepted you will not be as...

Page 27: ... to the USB input of the TV The software will be downloaded on to the blank USB memory stick and then complete the update process Reset TV This resets the menus to factory settings and clears all the TV channels from the television HDMI CEC Consumer Electronic Control Allows HDMI devices to control each other and allows the user to operate multiple devices with one remote control only available wi...

Page 28: ...e some key apps for easy and quick access Aquos Net Aquos Net is a portal to a variety of apps and multimedia which the TV acesses via the internet To enter Aquos Net you will be prompted to enter a language and acccept terms and conditons once the relevant information has been entered you will be able to use a range of features such as MUZU TV Viewster and Dailymotion Content is updated and manag...

Page 29: ...layback files from your laptop PC tablets and smart phones When accessing the USB media or media server features the below menu screen will appear The content will be divided into Photo Music Movie and All Tip If you experience a playback issue please ensure the files being used are the correct format example the picture plays but no sound See technical specification page for compatible file types Not...

Page 30: ... upload photos and videos Wireless display The Wireless Display feature allows you to connect to a compatible external device such as a laptop tablet and or smart phone with WiDi and Miracast technology Once connected your device will mirror all its content on to the TV this allows you to view photos emails and unlimited apps on the big screen Miracast Allows you to wirelessly mirror the content d...

Page 31: ... Tim wonnacott and the teams are in Norfolk in search of great buys to take to auction Expertise comes from Catherine Southon and Jonathan Pratt and Tim visits Ham House Lifestyle 12 00 Bargain Hunt Daily Politics The Blue Planet Let s Do Christmas with Gino and Mel Come Dine with Me Coronation Street Three Wise Women You ve Been Framed Royal This is BBC Three This is BBC Four Come Dine with Me Co...

Page 32: ...d Speed 80 MB s Mega Byte Per Second Write Speed 40 MB s Mega Byte Per Second If you wish to use a USB portable hard drive larger than 32GB please refer to the FAQ section at the rear of this user guide Tip When you switch the TV to standby or change channel the time shift memory is wiped To restart time shift you must press play pause button Pause live TV time shift Pausing Live TV is very simple...

Page 33: ...ave connected the TV to my VCR or DVD Recorder via SCART but it is not recording In addition to connecting via SCART you should connect the aerial cable from the wall socket to your VCR DVD Recorder and another aerial cable from the VCR DVD Recorder to the TV Game Consoles I have connected my Playstation Xbox to the TV via HDMI but I am not receiving any pictures or sound on my TV 1 Ensure the TVs...

Page 34: ...o show you if the TV is connected to the internet Smart I cannot access content through the Media Server settings Check your TV is connected to your local network and there is suitable signal strength Check the server devices you are trying to connect with are also on the Network and are set to share content Smart I cannot access content through the Wireless Connection settings Ensure the device y...

Page 35: ... on how the television is used 2 When the TV is turned off with the remote control standby button and no function is active Product fiche Additional technical information RF 75 ohm Antenna Analog DVB Inputs 3 x HDMI 1 x VGA PC 1 x USB 1 x RJ45 Ethernet 1 x 3 5mm jack for PC audio input 1 x Mini Component YPbPr 1 x Composite Video 1 x L R Audio shared for Composite Video Component YPbPr Sound Outpu...

Page 36: ...nd on how the television is used 2 When the TV is turned off with the remote control standby button and no function is active Product fiche Additional technical information RF 75 ohm Antenna Analog DVB Inputs 3 x HDMI 1 x VGA PC 1 x USB 1 x RJ45 Ethernet 1 x 3 5mm jack for PC audio input 1 x Mini Component YPbPr 1 x Composite Video 1 x L R Audio shared for Composite Video Component YPbPr Sound Out...

Page 37: ...ow the television is used 2 When the TV is turned off with the remote control standby button and no function is active Product fiche Additional technical information RF 75 ohm Antenna Analog DVB Inputs 3 x HDMI 1 x SCART 1 x VGA PC 2 x USB 1 x RJ45 Ethernet 1 x 3 5mm jack for PC audio input 1 x Mini Component YPbPr 1 x Mini Composite Video L R Audio shared for Composite Video Component YPbPr Sound...

Page 38: ...on how the television is used 2 When the TV is turned off with the remote control standby button and no function is active Product fiche Additional technical information RF 75 ohm Antenna Analog DVB Inputs 3 x HDMI 1 x VGA PC 1 x USB 1 x RJ45 Ethernet 1 x 3 5mm jack for PC audio input 1 x Mini Component YPbPr 1 x Mini Composite Video L R Audio shared for Composite Video Component YPbPr Sound Outpu...

Page 39: ...n how the television is used 2 When the TV is turned off with the remote control standby button and no function is active Product fiche Additional technical information RF 75 ohm Antenna Analog DVB Inputs 3 x HDMI 1 x VGA PC 1 x USB 1 x RJ45 Ethernet 1 x 3 5mm jack for PC audio input 1 x Mini Component YPbPr 1 x Mini Composite Video L R Audio shared for Composite Video Component YPbPr Sound Output...

Page 40: ... Data Rate 10 Mbps asf wmv VC1 Max Solution 1920 1080 Max Data Rate 40 Mbps flv swf H 264 AVC Sorenson H 263 Music mp3 MPEG1 2 Layer1 Layer2 Layer3 Sample Rate 16KHz 48KHz BitRate 32K 448Kbps wma asf WMA BitRate 128Kbps 320Kbps Sampling rate 8KHz 48KHz WMA pro BitRate 768Kbps Sampling rate 96KHz ogg OGG Sample Rate 48KHz m4a aac AAC HEAAC Sample Rate 8K 48KHz Bit Rate 24K 384Kbps Photo jpg jpeg Pr...

Page 41: ...SHA MAN 0104 www sharp eu UMC Poland sp z o o Ostaszewo 57B 87 148 Łysomice Poland Assembled in Europe ...

Reviews: