background image

22

Appendix

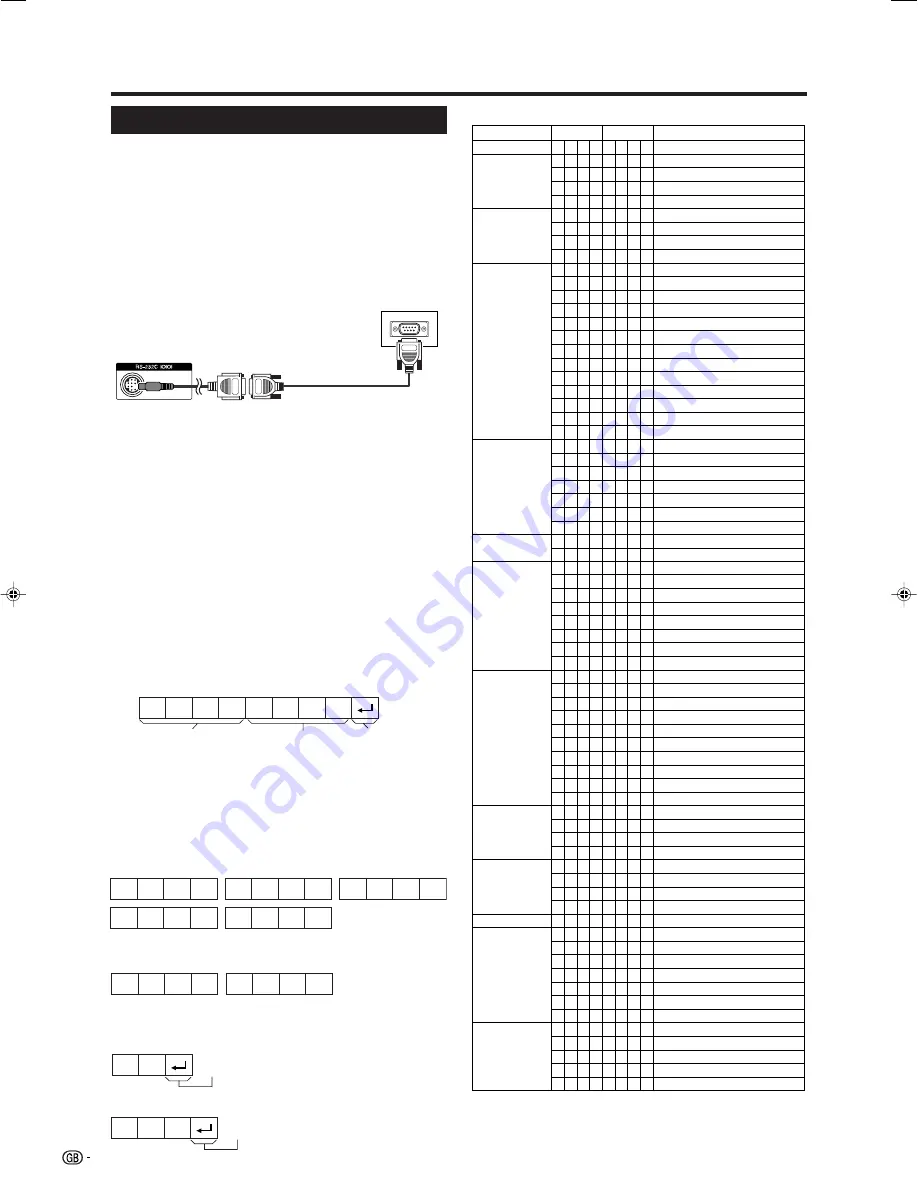
RS-232C port specifications

PC Control of the TV

When a program is set, the TV can be controlled from the PC
using the RS-232C terminal. The input signal (PC/video) can
be selected, the volume can be adjusted and various other
adjustments and settings can be made, enabling automatic
programmed playing. Attach an RS-232C cable cross-type
(commercially available) to a 9 pin D-sub/MINI-DIN (optional:
AN-A1RS) for the connections.

NOTE

• This operation system should be used by a person who is

accustomed to using PCs.

Communication conditions

Set the RS-232C communications settings on the PC to match
the TV’s communications conditions. The TV’s communications
settings are as follows:

RS-232C serial control cable

(cross type, commercially available)

9 pin D-sub/MINI-DIN
conversion cable
(optional: AN-A1RS)

Communication procedure

Send the control commands from the PC via the RS-232C
connector.
The TV operates according to the received command and sends
a response message to the PC.
Do not send multiple commands at the same time. Wait until
the PC receives the OK response before sending the next
command.

Return code

Command 4-digits

Parameter 4-digits

Command format

Eight ASCII codes 

e

 CR

Command 4-digits: Command. The text of four characters.
Parameter 4-digits: Parameter 0 – 9, 

g

, blank, ?

C1 C2 C3 C4 P1  P2  P3  P4

Parameter

Input the parameter values, aligning left, and fill with blank(s)
for the remainder. (Be sure that four values are input for the
parameter.)
When the input parameter is not within an adjustable range,
“ERR” returns. (Refer to “Response code format”.)

0

0

0

9

0

1

0

0

3

0

0

0

5

5

NOTE

• If an underbar (_) appears in the parameter column, enter a

space.

• If an asterisk (*) appears, enter a value in the range indicated in

brackets under CONTROL CONTENTS.

When “?” is input for some commands, the present setting value
responds.

• Baud rate: 9,600 bps
• Data length: 8 bits
• Parity bit: None

?

?

?

?

?

Response code format

Normal response

O

K

• Stop bit: 1 bit
• Flow control: None

Problem response (communication error or incorrect command)

E

R

R

Commands

Return code (0DH)

Return code (0DH)

P

I

I

I

I

D

D

C

C

I

I

I

I

I

I

I

I

I

I

I

I

I

A

A

A

A

A

A

A

V

V

H

H

V

V

C

C

P

P

W

W

W

W

W

W

W

W

W

W

M

M

M

M

A

A

A

A

A

O

O

O

O

O

O

O

T

T

T

D

D

POWER OFF

INPUT SWITCHING (Toggle)

TV (CHANNEL FIXED)

EXT1 – 5 (1 – 5)

1 to 5, ERR (TV)

TV DIRECT CHANNEL (1 – 99)

1 to 99

CHANNEL UP

CHANNEL DOWN

EXT1 (Y/C)

EXT1 (CVBS)

EXT1 (RGB)

0 to 2

EXT2 (Y/C)

EXT2 (CVBS)

EXT2 (RGB)

0 to 2

EXT3 

EXT4 (RGB)

EXT4 (COMPONENT)

0 to 1

EXT5 (HDMI)

AV MODE SELECTION (Toggle)

STANDARD

SOFT

ECO

USER

DYNAMIC

1 to 5

VOLUME (0 – 60)

0 to 60

H-POSITION AV (

10 – 

10)

AV (

10 – 

10)

V-POSITION AV (

20 – 

20)

AV (

20 – 

20)

CLOCK (0 – 180)

0 to 180

PHASE (0 – 40)

0 to 40

WIDE MODE (Toggle)

NORMAL (AV)

ZOOM 14:9 (AV)

PANORAMA (AV)

FULL (AV)

CINEMA 16:9 (AV)

CINEMA 14:9 (AV)

NORMAL (PC)

FULL (PC)

1 to 10

MUTE (Toggle)

MUTE ON

MUTE OFF

1 to 2

SURROUND (Toggle)

SURROUND ON

SURROUND OFF

1 to 2

SOUND SELECT (ST/Bilingual/mono)

OFF

30 m

1 h 00 m

1 h 30 m

2 h 00 m 

2 h 30 m

0 to 150

TEXT OFF

TEXT CHANGE (Toggle)

0 to 1

DIRECT PAGE JUMP (100 – 899)

100 to 899

POWER SETTING

INPUT SELECTION A

CHANNEL

INPUT SELECTION B

AV MODE
SELECTION

VOLUME

O

T

T

A

A

C

C

H

H

N

N

N

N

N

N

N

N

N

N

N

N

N

V

V

V

V

V

V

V

O

O

P

P

P

P

L

L

H

H

I

I

I

I

I

I

I

I

I

I

U

U

U

U

C

C

C

C

C

F

F

F

F

F

F

F

E

E

E

C

C

W

G

V

V

V

C

C

U

D

P

P

P

P

P

P

P

P

P

P

P

P

P

M

M

M

M

M

M

M

L

L

O

O

O

O

C

C

S

S

D

D

D

D

D

D

D

D

D

D

T

T

T

T

D

D

D

D

H

T

T

T

T

T

T

T

X

X

X

P

P

R

D

D

D

D

H

H

P

W

1

1

1

1

2

2

2

2

3

4

4

4

5

D

D

D

D

D

D

D

M

M

S

S

S

S

K

K

E

E

E

E

E

E

E

E

E

E

E

E

E

E

E

E

V

V

V

V

A

M

M

M

M

M

M

M

T

T

T

G

G

0

_

_

*

?

*

?

_

_

0

1

2

?

0

1

2

?

0

0

1

?

0

0

1

2

3

4

5

?

*

?

*

?

*

?

*

?

*

?

0

1

2

3

4

5

6

9

1

?

0

1

2

?

0

1

2

?

_

0

1

2

3

4

5

?

0

1

?

*

?

_

_

_

_

?

*

?

_

_

_

_

_

?

_

_

_

?

_

_

_

?

_

_

_

_

_

_

_

?

*

?

*

?

*

?

*

?

*

?

_

_

_

_

_

_

_

_

0

?

_

_

_

?

_

_

_

?

_

_

_

_

_

_

_

?

_

_

?

*

?

_

_

_

_

?

_

?

_

_

_

_

_

?

_

_

_

?

_

_

_

?

_

_

_

_

_

_

_

?

_

?

*

?

*

?

*

?

_

?

_

_

_

_

_

_

_

_

_

?

_

_

_

?

_

_

_

?

_

_

_

_

_

_

_

?

_

_

?

*

?

_

_

_

_

?

_

?

_

_

_

_

_

?

_

_

_

?

_

_

_

?

_

_

_

_

_

_

_

?

_

?

_

?

_

?

_

?

_

?

_

_

_

_

_

_

_

_

_

?

_

_

_

?

_

_

_

?

_

_

_

_

_

_

_

?

_

_

?

_

?

CONTROL ITEM

COMMAND

PARAMETER

CONTROL CONTENTS

WIDE MODE

POSITION

SURROUND

MUTE

AUDIO CHANGE

SLEEP TIMER

TEXT

LC-32SA1E_GB_c

06.7.25, 11:36 AM

22

Summary of Contents for LC-26SA1E

Page 1: ...D OPERATION MANUAL BEDIENUNGSANLEITUNG MODE D EMPLOI MANUALE DI ISTRUZIONI GEBRUIKSAANWIJZING MANUAL DE MANEJO LC 26SA1E LC 26SV1E LC 32SA1E LC 32SV1E OPERATION MANUAL BEDIENUNGSANLEITUNG MODE D EMPLOI MANUALE DI ISTRUZIONI GEBRUIKSAANWIJZING MANUAL DE MANEJO LC 26SA1E LC 26SV1E LC 32SA1E LC 32SV1E C612WJZZ 1 ENGLISH FRANÇAIS DEUTSCH ITALIANO NEDERLANDS ESPAÑOL ...

Page 2: ...a serious electric shock may occur To fit an appropriate plug to the mains lead follow the instructions below IMPORTANT The wires in the mains lead are coloured in accordance with the following code Blue Neutral Brown Live As the colours of the wires in the mains lead of this product may not correspond with the coloured markings identifying the terminals in your plug proceed as follows The wire wh...

Page 3: ... Broadcasting system 15 Label 15 Skip 15 Decoder 15 Lock 15 Sort 15 Erase Programme 15 Child Lock 16 Input Label 16 Fine Sync 16 Position 17 WSS Wide Screen Signalling 17 4 3 Mode 17 Language 17 Option menu 17 Audio Only 17 DNR Digital Noise Reduction 18 HDMI Setup 18 Input Select 18 Colour System 18 Demo 18 Useful features 19 WIDE MODE 19 Still image 20 Teletext function 20 Appendix 21 Troublesho...

Page 4: ... This product is not designed for built in installation do not place the product in an enclosed place such as a bookcase or rack unless proper ventilation is provided or the manufacturer s instructions are followed The LCD panel used in this product is made of glass Therefore it can break when the product is dropped or impact applied If the LCD panel is broken be careful not to be injured by broke...

Page 5: ...69 2 75 ohm coaxial cable Setting the TV on the wall This TV should be mounted on the wall only with the wall mount bracket available from SHARP See page 23 The use of other wall mount brackets may result in an unstable installation and may cause serious injuries Installing the LCD Colour TV requires special skill that should only be performed by qualified service personnel Customers should not at...

Page 6: ...ing to the e and f indications in the battery compartment 3 Insert the smaller tab of the battery cover into the opening 1 and press down on the cover until it clicks in place 2 Inserting the batteries Before using the TV for the first time insert two AA size batteries supplied When the batteries become depleted and the remote control unit fails to operate replace the batteries with new AA size ba...

Page 7: ...SURROUND Switch the surround effects on and off 1 Subpage See page 20 SLEEP Set the sleep timer on in units of 30 min up to max 2 hr 30 min and off k Reveal hidden Teletext See page 20 p Display information See page 20 RETURN Return to the previous menu screen e Mute Switch the sound on and off b INPUT SOURCE Select an input source TV EXT1 EXT2 EXT3 EXT4 EXT5 See page 8 f WIDE MODE Select the wide...

Page 8: ...or OPC indicator a Power button b Input button i l k Volume buttons P s r Programme channel buttons SLEEP indicator EXT 2 RGB terminal EXT 3 terminals Headphone jack EXT 1 RGB terminal EXT 5 HDMI AUDIO terminals Antenna input terminal OUTPUT Audio terminals EXT 4 terminals RS 232C terminal For LC 26SA1E LC 26SV1E ...

Page 9: ...the auto search NOTE The initial auto installation functions only once If the initial auto installation is not completed ex When menu screen disappeared by not operating for a few minutes when the power shut down etc try Auto Installation from the Setup menu See page 14 The initial auto installation stops by pressing RETURN Standby mode Press B on the remote control unit The TV enters standby mode...

Page 10: ...er Supplied VCR Decoder SCART cable SCART cable EXT 1 or 2 VIDEO S VIDEO L AUDIO R AV OUTPUT Connecting a DVD player You can use the EXT 2 3 4 or 5 HDMI terminals when connecting to a DVD player and other audiovisual equipment DVD player AUDIO cable EXT 3 Composite video cable DVD player HDMI cable When using an HDMI DVI conversion adapter cable input the Audio signal here EXT 5 or DVD player S vi...

Page 11: ...he EXT 2 terminal NOTE Refer to operation manuals of each external equipment for the details Only works when the audiovisual equipment is connected to the EXT 2 terminal on the TV with AV Link via a fully wired SCART The use of the AV Link function is only possible if the TV set has enforced a complete auto installation with the connected audiovisual equipment page 7 Initial auto installation The ...

Page 12: ...for various reasons NOTE Menu options differ in the selected input modes but the operating procedures are the same The screens in the operation manual are for explanation purposes some are enlarged others cropped and may vary slightly from the actual screens Menu operation buttons Use the following buttons on the remote control unit to operate the menu MENU Press to open or close the menu screen a...

Page 13: ... 1 Press MENU and the MENU screen displays 2 Press c d to select the desired menu 3 Press a b to select the desired menu item and then press OK Example AV Mode OPC etc Select Reset to reset all adjustment items to the factory preset values 4 Press a b c d to select the desired item and then press OK Menu operations Common operations Menu Operation A Menu Operation C 1 Press MENU and the MENU scree...

Page 14: ...ing high contrast for sports viewing AV Mode Menu Operation A page 11 AV Mode gives you five viewing options to choose from to best match the system environment which can vary due to factors like room brightness type of programme watched or the type of image input from external equipment Advanced Menu Operation C page 11 This TV provides various advanced functions for optimising the picture qualit...

Page 15: ...ENU Audio Audio Power Control Treble Bass Balance Surround Reset Off Auto Vol Off Clear Voice Off 0 0 15 L 15 0 15 15 R AV Mode STANDARD Surround Menu Operation A page 11 Surround function allows you to enjoy realistic live sound NOTE You can also choose surround effects by pressing SURROUND on the remote control unit AV Mode Menu Operation A page 11 This option links to AV Mode in the Picture men...

Page 16: ... Press a b to select Auto Search Manual Adjust Sort or Erase Programme and then press OK Auto Search Manual Adjust Sort Erase Programme No Yes Power Control menu No Signal Off Menu Operation A page 11 When set to Enable the TV will automatically enter the standby mode if there is no signal input for 15 minutes Five minutes before the TV enters standby mode the remaining time displays every minute ...

Page 17: ...tching the image from the TV Decoder When connecting a decoder to the unit you need to select EXT1 NOTE Off is factory preset value Lock You can block the viewing of any channel NOTE See page 16 for setting PIN When Lock is set to On for a channel Child lock has been activated displays and the image and sound of the channel are blocked When pressing OK while Child lock has been activated displays ...

Page 18: ...t reach See page 21 for resetting the current PIN to the factory preset 1234 if you lose or forget your PIN Menu operations Input Label You can assign each input source a label you like 1 Press b to select the desired input source 2 Press MENU and the MENU screen displays 3 Press c d to select Setup 4 Press a b to select Input Label and then press OK 5 Press a b c d to select each character of the...

Page 19: ...lish Finnish French German Greek Italian Polish Portuguese Russian Spanish Swedish Turkish NOTE HDMI Setup is displayed only when EXT5 is selected from the INPUT SOURCE menu Off Both screen images and audio are output On Audio is output without screen image TV AV only Item Item WSS Wide Screen Signalling Menu Operation A Page 11 WSS allows a television to switch automatically among the different s...

Page 20: ...age on the screen AUTO PAL SECAM NTSC3 58 NTSC4 43 PAL 60 NOTE Factory preset value is AUTO If AUTO is selected colour system for each channel is automatically set If an image does not display clearly select another colour system e g PAL SECAM NTSC3 58 NTSC4 43 and PAL 60 cannot be selected in TV tuner mode Input Select Menu Operation A page 11 For setting the signal type of external equipment NOT...

Page 21: ...Selectable picture size may vary with input signal type EXAMPLE Normal Keeps the original aspect ratio in a full screen display Full An image fully fills the screen Normal Full TV AV only PC only 4 3 Mode set to Normal NOTE If the signal contains no WSS information Auto Selection will not function even when the WSS option is enabled 4 3 Mode set to Panorama Manual Selection 1 Press f The WIDE MODE...

Page 22: ...hen you change the TV channel you can display the time information with steps 2 and 3 above NOTE The time display cannot be stored once the power is turned off When you turn on the power perform steps 1 to 4 again If acquired successfully the time information will appear in the upper right corner of the screen by pressing MENU Still image You can freeze a motion picture on the screen 1 Press 3 2 P...

Page 23: ...put source selected See page 8 Is non compatible signal being input See page 23 Is picture adjustment correct See pages 12 and 13 Is the antenna connected properly See page 3 Is On selected in Audio Only See page 17 Is the volume too low See pages 5 and 6 Make sure that headphones are not connected See page 6 Check if you pressed e on the remote control unit See page 5 Troubleshooting Appendix IMP...

Page 24: ...rmal response O K Stop bit 1 bit Flow control None Problem response communication error or incorrect command E R R Commands Return code 0DH Return code 0DH P I I I I D D C C I I I I I I I I I I I I I A A A A A A A V V H H V V C C P P W W W W W W W W W W M M M M A A A A A O O O O O O O T T T D D POWER OFF INPUT SWITCHING Toggle TV CHANNEL FIXED EXT1 5 1 5 1 to 5 ERR TV TV DIRECT CHANNEL 1 99 1 to 9...

Page 25: ...x 26o LCD COLOUR TV Model LC 26SA1E LC 26SV1E 26o Advanced Super View BLACK TFT LCD 32o LCD COLOUR TV Model LC 32SA1E LC 32SV1E 32o Advanced Super View BLACK TFT LCD 13 0 kg Display only 15 2 kg Display with stand 17 9 kg Display only 20 1 kg Display with stand 102 W 0 9 W Standby Method IEC60107 125 W 0 9 W Standby Method IEC60107 OUTPUT RCA pin Audio Headphones Ø 3 5 mm jack Audio output EXT 1 S...

Page 26: ...ich could otherwise arise due to inappropriate waste handling 2 In other Countries outside the EU If you wish to discard this product please contact your local authorities and ask for the correct method of disposal For Switzerland Used electrical or electronic equipment can be returned free of charge to the dealer even if you don t purchase a new product Further collection facilities are listed on...

Page 27: ...577 0 560 0 636 0 560 0 636 0 325 3 394 6 325 3 394 6 200 0 200 0 115 0 115 0 100 0 100 0 100 0 100 0 522 2 522 2 59 0 59 0 200 0 200 0 75 5 75 5 194 3 194 3 LC 26SA1E LC 26SV1E LC 32SA1E LC 32SV1E LC 26SA1E LC 26SV1E LC 32SA1E LC 32SV1E LC 26SA1E LC 26SV1E LC 32SA1E LC 32SV1E LC 26SA1E LC 26SV1E LC 32SA1E LC 32SV1E ...

Page 28: ...n Hungría TINS C612WJZZ OPERATION MANUAL BEDIENUNGSANLEITUNG MODE D EMPLOI MANUALE DI ISTRUZIONI GEBRUIKSAANWIJZING MANUAL DE MANEJO C612WJZZ 1 06P08 HU NG PIN Printed on environmentally friendly paper Auf ökologischem Papier gedruckt Imprimé sur papier écologique Stampato su carta ecologica Afgedrukt op ecologisch papier Impreso en papel ecológico ...

Reviews: