background image

English

   - 23 -

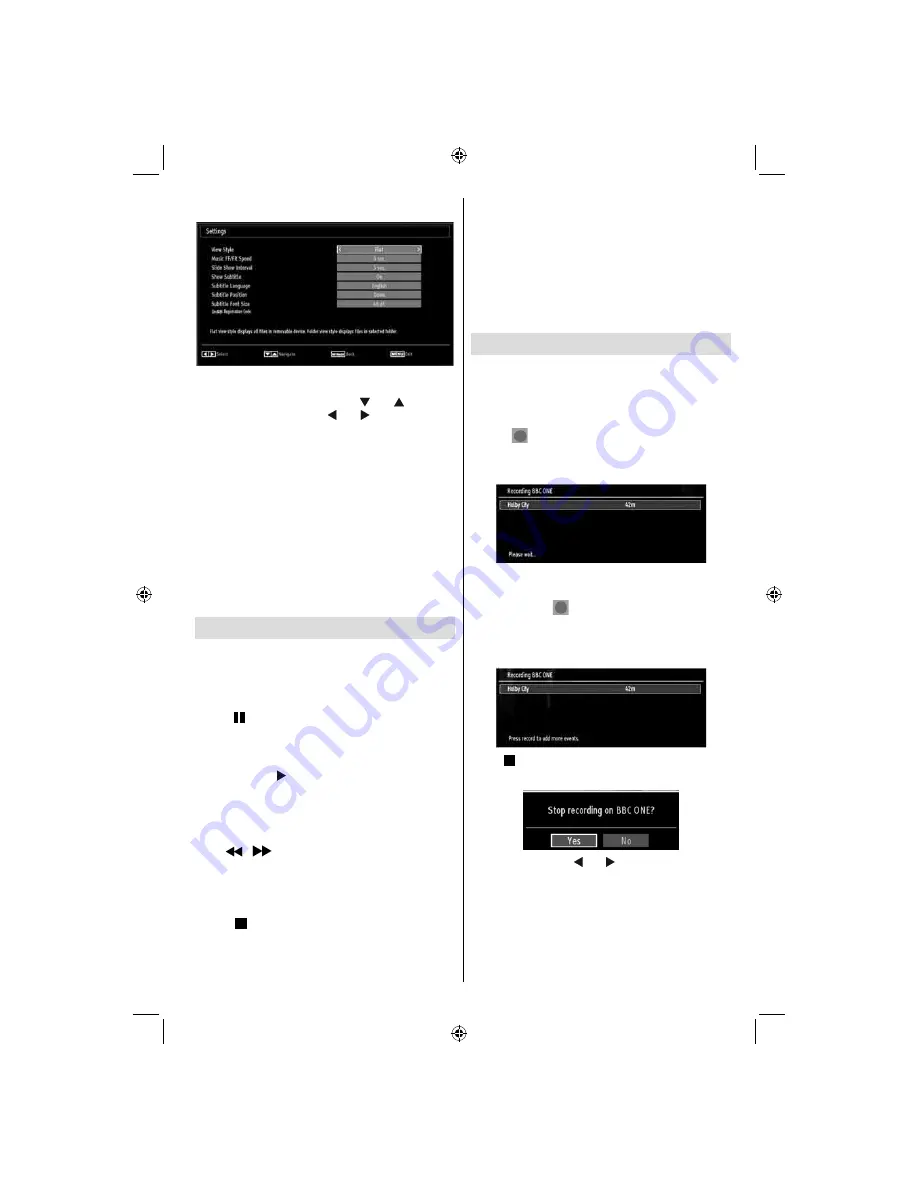
Media Browser Settings

You can set your Media Browser preferences by 
using the Settings dialog. Press “

” or “

” button to 

highlight an item and use “ ” or “ ” button to set.

View Style

:


Sets default browsing mode.

Music FF/FR Speed

: Sets forwarding/advancing 

speed.

Slide Show Interval

:


Sets slide show interval time.

Show Subtitle

:


Sets subtitle enabling preference.

Subtitle Position

:


Sets subtitle position as up or 

down.

Subtitle Font Size

: Sets subtitle font size (max. 

54pt).

DivX® Registration Code:

 Some DivX® Video-On-

Demand fi les require registration code, this code can 
be used for this purpose.

Timeshift Recording 

IMPORTANT: To record a programme, you should 
fi rst connect a USB disk to your TV while the TV is 
switched off. You should then switch on the TV to 
enable recording feature. Otherwise, recording feature 
will not be available.

Press 

• 


(PAUSE) button while watching a broadcast 

for switching to timeshifting mode. 

In timeshifting mode, the programme is paused and 

• 

simultaneously recorded to the connected USB 
disk (*). Press   (PLAY) button again to watch the 
paused programme from the stopped moment. 

This playback is performed in x1 playback speed. 

• 

You will see the timeshift gap between the real and 
the timeshifted programme in the info bar. 

Use 

• 


 (PREVIOUS/NEXT) buttons to move 

forward or backward on timeshift playback. When 
the timeshift is reached, timeshifting mode will be 
quitted and you will switch back to watching normal 
broadcast.

Press 

• 

 (STOP) button to quit timeshifting mode. 

(*) 

Continuous time shift recording’s

 duration depends 

on your connected USB disk’s fi le size and defi ned 
Max. Timeshift in the Recordings Confi guration menu. 

See the section, “Recordings” for more information on 
setting Max. Timeshift.

Note: Switching to a different broadcast or source; 
and viewing main menu are not available during the 
timeshifting.

Lip Sync delay may occur during the timeshifting.

Standby button is ignored during the timeshifting. 
The TV will not switch to standby mode during the 
timeshifting.

Instant Recording

IMPORTANT: To record a programme, you should 
fi rst connect a USB disk to your TV while the TV is 
switched off. You should then switch on the TV to 
enable recording feature. Otherwise, recording feature 
will not be available.

Press 

• 

 (RECORD) button to start recording an 

event instantly while watching a programme. The 
following OSD appears on the screen:

Record OSD will then be displayed for a short time 

• 

and the current event will be recorded.

You can press  

• 

 (RECORD) button on the remote 

control again to record the next event on the EPG. In 
this case, OSD will display the programmed events 
for recording.

Press 

 (STOP) button to cancel instant recording. 

The following OSD will be displayed:

Select Yes by using “ ” or “ ” / 

OK

 buttons to cancel 

instant recording.

Note: Switching to a different broadcast or source; 
and viewing Media Browser are not available during 
the recording.

A01_MB62_[GB]_1910UK_IDTV_TC_PVR_BRONZE19_22942LED_ROCKER_ZIGGO_10075676_50200616.indd   23

A01_MB62_[GB]_1910UK_IDTV_TC_PVR_BRONZE19_22942LED_ROCKER_ZIGGO_10075676_50200616.indd   23

15.03.2012   17:31:51

15.03.2012   17:31:51

Summary of Contents for LC-22LE240E

Page 1: ...LCD COLOUR TELEVISION OPERATION MANUAL ENGLISH 50200616 SHARP ELECTRONICS Europe GmbH Sonninstraße 3 D 20097 Hamburg SHARP CORPORATION http www sharp eu com LC 22LE240E ...

Page 2: ...tations Sorting Channel List 20 On Screen Information 20 Media Playback Using Media Browser 20 Timeshift Recording 23 Instant Recording 23 Watching Recorded Programmes 24 Changing Image Size Picture Formats 24 Configuring Picture Settings 25 Operating Picture Settings Menu Items 25 Picture Settings Menu Items 25 PC Picture Settings 26 Configuring Sound Settings 26 Operating Sound Settings Menu Ite...

Page 3: ...elow IMPORTANT The wires in the mains lead are coloured in accordance with the following code Blue Neutral Brown Live As the colours of the wires in the mains lead of this product may not correspond with the coloured markings identifying the terminals in your plug proceed as follows The wire which is coloured blue must be connected to the plug terminal which is marked N or coloured black The wire ...

Page 4: ...or to the first usage of the device even when the usage of electronic devices is familiar to you Notice especially the chapter SAFETY PRECAUTIONS Carefully keep the handbook as future reference When selling the device or giving it away absolutely give these direction for use Thank you for choosing this product This manual will guide you for the proper operation of your TV Before operating the TV p...

Page 5: ... such as a bookcase or rack unless proper ventilation is provided or the manufacturer s instructions are followed The LCD panel used in this product is made of glass Therefore it can break when the product is dropped or impact applied If the LCD panel is broken be careful not to be injured by broken glass Heat sources Keep the product away from heat sources such as radiators heaters stoves and oth...

Page 6: ... heat such as sunshine fire or the like Lightning In case of storm and lightning or when going on holiday disconnect the power cord from the wall outlet Replacement Parts When replacement parts are required make sure that the service technician has used replacement parts which are specified by the manufacturer or have the same specifications as the original one Unauthorized substitutions may resul...

Page 7: ...rated from the mains socket prior to a longer period of non usage i e during vacations HDMI the HDMI logo and High Definition Multimedia Interface are trademarks or registered trademarks of HDMI Licensing LLC Manufactured under license from Dolby Laboratories The HD TV 1080p Logo is a trademark of EICTA The DVB logo is the registered trademark of the Digital Video Broadcasting DVB project Electric...

Page 8: ...will be decreased to optimum level Note that some picture settings will be unavailable to be changed when the TV is in Power Save Mode When the TV is not used please switch off at the rear rocker switch to further reduce power consumption Disconnect the TV from the mains socket when it will not be used for prolonged periods When the TV is left in stand by it consumes a small amount of power switch...

Page 9: ...owser Loop Shuffle in Media Browser Picture mode selection Changes picture mode 21 in Media Browser video mode No function 22 Teletext Mix in TXT mode 23 Subtitle on off in DVB channels 24 Previous programme 25 AV Source selection 26 Menu on off 27 Okay Confirm Hold in TXT mode Edit 28 Channel List Exit Return Index page in TXT mode 29 No function 30 Info Reveal in TXT mode 31 Volume Up Down 32 No...

Page 10: ...n accept either 720p or 1080i signals No sound connection is needed for an HDMI to HDMI connection RF Input 2 connects to an aerial antenna system or a cable Note that if you use a decoder or a media recorder you should connect the aerial cable through the device to the television with an appropriate antenna cable as shown in the illustration in the following pages SCART 3 input or output for exte...

Page 11: ...ral side of the supplied AV connection cable Colours of the connected jacks should match To enable audio connection you must use RED and WHITE inputs of the side AV connection cable Afterwards insert your device s audio cable s connectors into the RED and WHITE jack of the supplied side AV connection cable Colours of the connected jacks should match Note You should use audio inputs of side AV conn...

Page 12: ...FAT32 SIDE VIEW USB MEMORY 5Vdc Max 500mA USB CAUTION Quickly plugging and unplugging USB devices is a very hazardous operation Especially do not repeatedly quickly plug and unplug the drive This may cause physical damage to the USB player and especially the USB device itself Do not pull out USB module while playing or recording a file Programme Recording To record a programme you should first con...

Page 13: ... use USB hard disk drives for recording HD programmes Do not plug out the USB HDD during the recording This may harm the connected USB HDD Multipartiton support is available Maximum two different partitions are supported If the disk have more than two partitions crash may occur First partition of the usb disk is used for PVR ready features It also must be formatted as primary partition to be used ...

Page 14: ...ery cover located on the back of the handset by gently pulling backwards from the indicated part Insert two AAA R3 or equivalent type batteries inside Observe the correct polarity when inserting batteries and replace the battery cover Note Remove the battery from remote control handset when it is not to be used for a long period Otherwise it can be damaged due to any leakage of batteries Remote ra...

Page 15: ...nnel You can move the switch upward to select the next programme or move it downward to select the previous programme Viewing Main Menu The Main Menu screen cannot be displayed by using the control switch on the TV AV Mode Press the control switch consecutively until the source OSD is displayed on the screen Operation with the Remote Control The remote control of your TV is designed to control all...

Page 16: ... directly via numeric buttons OK Options views records or sets timer for future programs Text button Filter Views filtering options INFO Details Displays the programmes in detail RECORD the TV will start to record the selected progamme You can press again to stop the recording Red button Prev Day Displays the programmes of previous day Green button Next day Displays the programmes of the next day ...

Page 17: ...e Timer option The timer will be cancelled Note It is not possible to record or set timer for two or more individual events at the same time interval First Time Installation IMPORTANT Ensure that the aerial or cable is connected before switching on the TV for the first time installation When the TV is operated for the first time installation wizard will guide you through the process First language...

Page 18: ...accordingly When finished press OK button to start automatic search If you select AERIAL option from the Search Type screen the television will search for digital terrestrial TV broadcasts Note You can press MENU button to cancel After all the available stations are stored Channel List will be displayed on the screen If you like the sort channels according to the LCN please select Yes and than pre...

Page 19: ...Band and then you can enter the multiplex or frequency number using the numeric buttons and press OK button to search Band Options D_Band VHF 9 24 S_Band VHF 12 20 UHF 21 41 K_Band VHF 5 12 UHF 21 69 Digital Cable Manual Search In cable manual scan you can enter frequency modulation symbol rate and network channel scan options After selecting search type as Digital Cable you can set the desired op...

Page 20: ...rol If there is a previously stored channel on that number a warning screen will be displayed Select Yes if you want to move the channel and press OK Press OK button to process Selected channel is now moved Deleting a Channel You can press GREEN button to tag untag all channels YELLOW button to tag untag channel Select the channel that you want to delete and select Delete option Press OK button to...

Page 21: ... of the channel is displayed along with its channel list number Hint Not all channels broadcast the programme data If the name and time of the programme are not available then information banner will be displayed with blanks If you have searched and stored Ziggo channels BER value of the cable channels will be displayed in the info banner If there are more than one videos available on a Ziggo chan...

Page 22: ...back Rewind button Goes backward Forward button Goes forward Subtitle Audio LANG button Sets subtitle Audio Jump GREEN button Jumps to time Use numeric buttons to type the desired time and press GREEN button again to proceed Yellow Opens subtitle time correction menu Press SWAP button to switch back to previous menu Viewing Photos via USB When you select Photos from the main options available imag...

Page 23: ...mly and the random playback will continue 0 9 Numeric buttons The TV will jump to the file starting with the letter you input via the numeric buttons on your remote control Play This OK button Plays the selected file Previous Next Left Right buttons Jumps to previous or next file to play YELLOW Toggles viewing style BLUE Changes media type Recordings Library IMPORTANT To view recordings library yo...

Page 24: ...P button to quit timeshifting mode Continuous time shift recording s duration depends on your connected USB disk s file size and defined Max Timeshift in the Recordings Configuration menu See the section Recordings for more information on setting Max Timeshift Note Switching to a different broadcast or source and viewing main menu are not available during the timeshifting Lip Sync delay may occur ...

Page 25: ...rward Pressing button consecutively will change slow forwarding speed Changing Image Size Picture Formats You can change the aspect ratio image size of the TV for viewing the picture in different zoom modes Press SCREEN button repeatedly to change the image size Available zoom modes are listed below Auto WhenAUTO is selected the aspect ratio of the screen is adjusted by the information provided by...

Page 26: ...cture Settings menu Operating Picture Settings Menu Items Press or button to highlight a menu item Use or button to set an item Press MENU button to exit Picture Settings Menu Items Mode For your viewing requirements you can set various screen modes The Picture mode can be set to one of these options Cinema Game Dynamic and Natural Contrast Sets the lightness and darkness values of the screen Brig...

Page 27: ... PC mode PC Picture Settings For adjusting PC picture items do the following Press or button to select Picture icon Picture menu appears on the screen Contrast Brightness Colour Colour Temp and Picture Zoom settings in this menu are identical to settings defined in TV picture menu under Main Menu System Sound Settings and Source settings are identical to the settings explained in main menu system ...

Page 28: ...hones to the TV set this option as Headphone Dynamic Bass Dynamic Bass is used to increase bass effect of the TV set Digital Out Sets digital out audio type Configuring Your TV s Settings Detailed settings can be configured to suit your personal preferences Press MENU button and select Settings ikon by using or button Press OK button to view Settings menu Operating Settings Menu Items Press or but...

Page 29: ...view Settings menu Use or button to highlight Conditional Access and press OK to view menu items Configuring Language Preferences You can operate the TV s language settings using this menu Press MENU button and select the fifth icon by using or button Press OK button to view Settings menu Use or button to highlight Language and press OK to continue Use or button to set an item Settings are stored ...

Page 30: ...ntal Settings Menu Operation Select an item by using or button Use or button to set an item Press OK button to view more options Menu Lock Menu lock setting enables or disables the menu access You can disable access to the installation menu or the whole menu system Maturity Lock optional When set this option gets the maturity information from the broadcast and if this maturity level is disabled di...

Page 31: ...ith editing press GREEN button to save You can press MENU button to cancel Deleting a Timer Select the timer you want to delete by pressing or button Press RED button Select YES by using or buttons to delete the timer Select NO to cancel Recording Configuration Select Recording Configuration item in the Settings menu to configure recording settings The following menu is displayed for recording con...

Page 32: ...s select Time Zone Use or buttons to change the Time Zone between GMT 12 or GMT 12 Date Time on the top of the menu list will then change according to the selected Time Zone If you have selected Country option in the First Time Installation as Netherlands Date Time Settings will not be available to be changed Changes are automatically stored Press MENU to exit Configuring Source Settings You can e...

Page 33: ...channels for this type have been found message will be displayed on the screen Standby Search optional Use or button to select Standby Search and then press or button to set this setting as On or Off If you change Standby Search to Off this function will be unavailable To use Standby search please make sure that you select Standby Search as On If the Standby Search is set to On when the TV is in s...

Page 34: ...s your TV set or house aerial located too close to a non earthed audio equipment or neon lights etc Mountains or high buildings can cause double pictures or ghost images Sometimes you can improve the picture quality by changing the direction of the aerial Is the picture or teletext unrecognisable Check if you have entered the correct frequency Please retune the channels The picture quality may deg...

Page 35: ... 1920x1080 60 HzA 21 1920x1080 60 HzB Appendix B AV and HDMI Signal Compatibility Input Signal Types Source Supported Signals Available EXT SCART PAL 50 60 O NTSC 60 O RGB 50 O RGB 60 O Side AV PAL 50 60 O NTSC 60 O YPbPr 480I 60Hz O 480P 60Hz O 576I 50Hz O 576P 50Hz O 720P 50Hz O 720P 60Hz O 1080I 50Hz O 1080I 60Hz O 1080P 50Hz O 1080P 60Hz O HDMI 480I 60Hz O 480P 60Hz O 576I 50Hz O 576P 50Hz O 7...

Page 36: ...1152x870 75Hz 8 1280x768 60 HzA 9 1280x768 60 HzB 10 1280x768 75Hz 11 1280x960 60Hz 75Hz 12 1280x1024 60Hz 75Hz 13 1360x768 60 Hz 14 1400x1050 60 HzA 15 1400x1050 60 HzB 16 1400x1050 75Hz 17 1400x900 65Hz 75Hz 18 1600x1200 60 Hz 19 1680x1050 60 Hz 20 1920x1080 60 HzA 21 1920x1080 60 HzB 22 1920x1200 60HzA 23 1920x1200 60Hz 24 480i 480p 60Hz 25 576i 576p 50Hz A01_MB62_ GB _1910UK_IDTV_TC_PVR_BRONZE...

Page 37: ...a1 2 H 264 PCM avi dvix optional Divx 3 11 Divx 4 Divx 5 Divx 6 PCM MP3 AC 3 MAX 1920x1080 30P 20Mbit sec HD DivX is not supported Music mp3 MPEG 1 Layer 1 2 MP3 32Kbps 320Kbps Bit rate 32KHz 48KHz Sampling rate Photo jpg jpeg Baseline JPEG max WxH 15360x8640 4147200bytes Progressive JPEG max WxH 1024x768 6291456bytes bmp max WxH 9600x6400 3840000bytes Subtitle sub srt Note It is not guaranteed th...

Page 38: ...ration Reboot is the last step in software upgrade operation if download of new software is finished successfully During reboot TV makes final initializations In reboot sequence panel power is closed and front led indicates the activity with blinking Around 5 minutes later TV restarts with new software activated If your TV fails to restart in 10 minutes unplug power for 10 minutes and re plug agai...

Page 39: ...R601 format CVBS analogue output iii AUDIO All MPEG1 Layer 1 and 2 modes Sampling frequencies supported are 32 44 1 48 kHz Specifications TV BROADCASTING PAL SECAM B G D K K I I L L RECEIVING CHANNELS VHF BAND I III UHF BAND U HYPERBAND NUMBER OF PRESET CHANNELS 1000 CHANNEL INDICATOR On Screen Display RF AERIAL INPUT 75 Ohm unbalanced OPERATING VOLTAGE 220 240V AC 50Hz AUDIO German Nicam Stereo A...

Page 40: ...awings A01_MB62_ GB _1910UK_IDTV_TC_PVR_BRONZE19_22942LED_ROCKER_ZIGGO_10075676_50200616 indd 39 A01_MB62_ GB _1910UK_IDTV_TC_PVR_BRONZE19_22942LED_ROCKER_ZIGGO_10075676_50200616 indd 39 15 03 2012 17 31 57 15 03 2012 17 31 57 ...

Page 41: ...sposal A01_MB62_ GB _1910UK_IDTV_TC_PVR_BRONZE19_22942LED_ROCKER_ZIGGO_10075676_50200616 indd 40 A01_MB62_ GB _1910UK_IDTV_TC_PVR_BRONZE19_22942LED_ROCKER_ZIGGO_10075676_50200616 indd 40 15 03 2012 17 32 02 15 03 2012 17 32 02 ...

Page 42: ...Ensure the Stand 3 is placed correctly and that you can see the screw holes on the back of the Sharp Television Place the Stand Cover 2 on the Stand 3 Ensure the Stand Cover 3 is placed correctly and that you can see the screw holes on the back of the Sharp Television DO NOT insert the screws before placing the plastic molding Insert the four screws provided and tighten them gently until the stand...

Page 43: ...Sharp Television on a soft stable and flat surface facing down Unscrew gently the four screws that attach the foot assembly and remove the screws when they are completely unscrewed Remove the stand and plastic moulding gently from the panel A01_MB62_ GB _1910UK_IDTV_TC_PVR_BRONZE19_22942LED_ROCKER_ZIGGO_10075676_50200616 indd 42 A01_MB62_ GB _1910UK_IDTV_TC_PVR_BRONZE19_22942LED_ROCKER_ZIGGO_10075...

Page 44: ...C 22LE240E Ø4 30 4 75 x 75 W x H To the wall M4 18 4 To the product A01_MB62_ GB _1910UK_IDTV_TC_PVR_BRONZE19_22942LED_ROCKER_ZIGGO_10075676_50200616 indd 43 A01_MB62_ GB _1910UK_IDTV_TC_PVR_BRONZE19_22942LED_ROCKER_ZIGGO_10075676_50200616 indd 43 15 03 2012 17 32 13 15 03 2012 17 32 13 ...

Reviews: