


11
12
Feature menu
Feature menu (Continued)
Audio menu
DNR
M.P. IN
Audio Only
Wide Mode
Blue Back
HDMI Audio
Power Save
AV Mode
Programme
Digital
Off
Off
4:3
Off
Off
Movie
Off
MENU[Feature]
Picture
Audio
Setup
Feature
1
Press
MENU
and the MENU screen displays.
2
Press
c
/
d
to select “Feature”.
3
Press
a
/
b
to select the desired menu item.
4
Press
c
/
d
to select the desired item.
5
Press
MENU
or
EXIT
to exit menu screen.
H
AV Mode
You can select the appropriate picture and sound
setting for the video and audio performance.
NOTE
• You can also select AV Mode options by pressing
AV
MODE
button on the remote control unit.
• Not available for PC input.
H
DNR (Digital Noise Reduction)
Reduce noise on the screen and produces a clearer
video image.
H
M.P. IN
• When external mobile player is connected with
provided
φ
3.5mm stereo cable and plugged into
M.P. IN jack, you may listen to the sound source
from TV speaker.
When M.P. IN is set to “On”, “M.P. IN” will appears
on the screen.
• Press
M.P. IN
button on the TV set to select “On”
or “Off”.
• If external mobile player is not plugged into M.P. IN
jack,
M.P. IN
button will not function.
NOTE
• During M.P. IN mode, AV Mode function for audio is not
available.
H
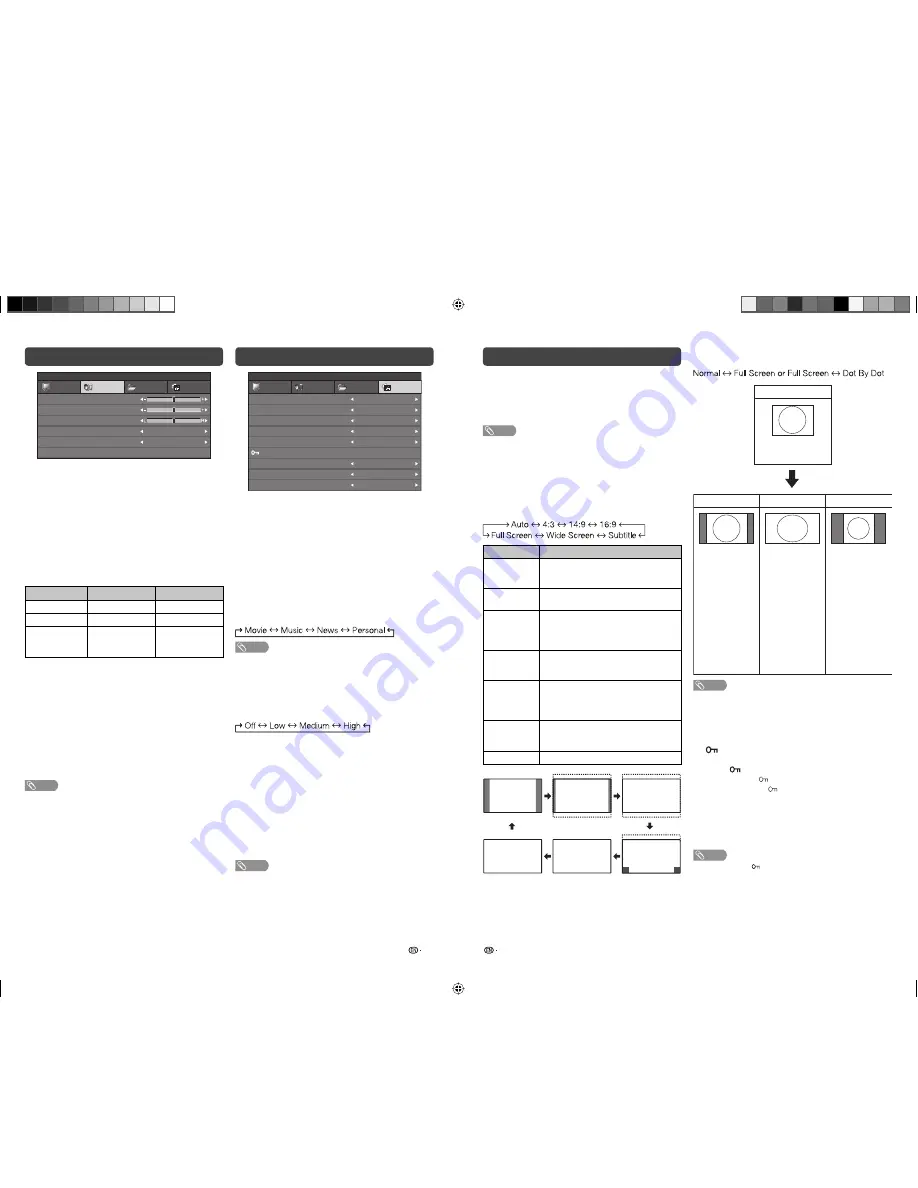
Wide Mode (PC input mode only)
The Wide Mode changes as shown below.
NOTE
• Some picture sizes may not be displayable depending on
the input signal.
• Selectable picture size may vary with input signal type.
• You can also select Wide Mode options by pressing
WIDE
button on the remote control unit.
H
Programme (TV programme input mode
only)
Activate
• On: To activate
Programme.
• Off: To deactivate
Programme.
Password
Enter 4 digits Password using
0 – 9
.
(For example: 0000)
After completing the above setting, please switch the
power off to activate.
NOTE
• When “Activate
” is “On” and Password is set, “Setup”
menu item cannot be selected.
Please enter the correct Password.
Input Signal
1024
g
768
1280
g
1024
Normal
Keeps the
original aspect
ratio in a full
screen display.
Full Screen
An image fully
fi lls the screen.
Dot by Dot
Detects the
resolution of
the signal and
displays an image
with the same
number of pixels
on the screen
(only when
receiving a XGA/
WXGA signal).
H
Audio Only
When listening to music from a music programme,
you can set the display off and enjoy audio only.
• On: Audio is output without screen image.
• Off: Both screen images and audio are output.
NOTE
• When you make operations that change the picture on the
TV such as by changing the input source, the Audio Only
function is set to “Off”.
• You can turn off Audio Only function by pressing any key
on the remote control unit except
VOL
k
/VOL
l
,
e
(Mute)
and
POWER
button.
H
Wide Mode
The Wide Mode changes as shown below.
Selected item
Description
Auto
Automatically set to suitable Wide Mode
depending on the input signal containing
the WSS information.
4:3
For 4:3 “standard” pictures. A side bar
appears on each side.
14:9
For 14:9 letterbox pictures. A thin side
bar appears on each side, and you may
also see bars on the top and bottom with
some programmes.
16:9
For 16:9 letterbox pictures. Bars may
appear on the top and bottom with some
programmes.
Subtitle
As 16:9 but shifted up to show subtitles.
Part of the picture (top) is cropped. Part
of the bottom black bar is cropped.
Aspect ratio corrected.
Wide Screen
For 4:3 “standard” pictures. In this mode
the picture is progressively stretched
toward each side of the screen.
Full Screen
For 16:9 squeeze pictures.
Good morning. How are you?
4:3
14:9
16:9
Full Screen
Wide Screen
Subtitle
Treble
Bass
Balance
Surround
On
VMD
On
Movie
[ 0 ]
[ 0 ]
[ 0 ]
MENU[Audio]
Picture
Audio
Setup
Feature
Reset
1
Press
MENU
and the MENU screen displays.
2
Press
c
/
d
to select “Audio”.
3
Press
a
/
b
to select the desired menu item.
4
Press
c
/
d
to adjust the item to the desired
level.
5
Press
MENU
or
EXIT
to exit menu screen.
H
Audio adjustments
Selected item
c
button
d
button
Treble
For weaker treble
For stronger treble
Bass
For weaker bass
For stronger bass
Balance
Decrease audio
from the right
speaker
Decrease audio
from the left
speaker
H
Surround
When you set to “On”, you can enjoy surround
sound, the same as if you were in a movie theatre.
• On: Makes it possible to enjoy natural, realistic surround
sound.
• Off: Outputs the normal sound.
H
VMD (Voice Music Detection)
This function automatically detects whether the
sound is voice or music and then adjusts the sound
quality so it is comfortable for your ears.
NOTE
• For resetting all adjustment items to the factory preset
values, press
a
/
b
to select “Reset”, and then press
c
/
d
to select “On”.
LC22L50M-L50M_EN.indd 6
LC22L50M-L50M_EN.indd 6
9/14/09 2:44:55 PM
9/14/09 2:44:55 PM


