background image

9

EN

C

ONNECTION

CONNECTION

ENGLISH

Basic Connection

This section describes how to connect the unit to an antenna, cable box, etc.

Note:

  •  Be sure your antenna or other device is connected properly before plugging in the power cord.

[Antenna Cable Connection]

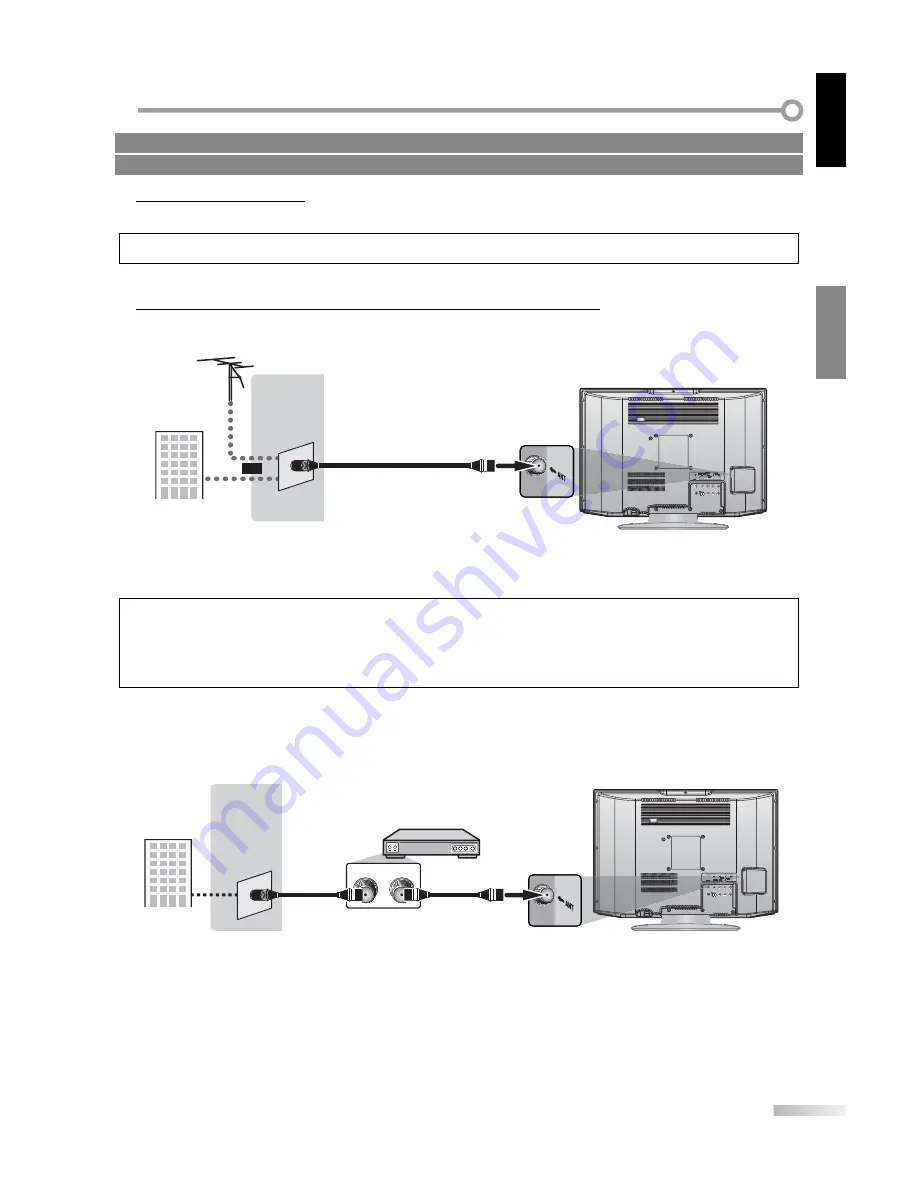
When connecting the unit to an antenna or cable TV company (without cable box)
Connect the RF coaxial cable on your home outlet to the antenna input jack of this unit.

INPUT 2

AUDIO

COMPONENT

INPUT 1

AUDIO

L

R

L

VIDEO

S-VIDEO

COAXIAL

P

R

P

B

Y

R

rear of this unit

RF coaxial cable

VHF / UHF

antenna

e.g.)

cable TV

company

or

* Once connections are completed, turn on the unit and begin initial setup.

Channel scanning is necessary for the unit to memorize all available channels in your area. 
(Refer to “Initial Setup” on page 12.)

Note:

  •  For your safety and to avoid damage to device, please unplug the RF coaxial cable from the antenna input jack before moving the unit.
  •  If you use an antenna to receive analog TV, it should also work for DTV reception. Outdoor or attic antennas will be more effective than set-

top versions.

  • To easily switch your reception source between antenna and cable, install an antenna selector.
  •  If you connect to the cable system directly, contact the CATV installer.

[Connection to Cable Box]

Connect the RF coaxial cable on your home outlet to the input jack of the cable box.
Use another RF coaxial cable to connect the antenna input jack of the unit to the output jack of the cable box.

INPUT 2

AUDIO

COMPONENT

INPUT 1

AUDIO

L

R

L

VIDEO

S-VIDEO

COAXIAL

P

R

P

B

Y

R

rear of this unit

cable box

e.g.)

cable TV

company

RF OUT

ANT. IN

 RF coaxial cable

 RF coaxial cable

* Required cables and connecting methods differ depending on the cable box.

For more information, please contact your cable provider.

5

Cables not included.

Please purchase the necessary cables at your local store.

Summary of Contents for LC-20SH7U - 20" LCD TV

Page 1: ...ENGLISH ESPAÑOL FRANÇAIS LC 20SH7U LIQUID CRYSTAL TELEVISION TÉLÉVISEUR ACL TELEVISOR CON PANTALLA DE CRISTAL LÍQUIDO OPERATION MANUAL MODE D EMPLOI MANUAL DE OPERACIÓN POWER ...

Page 2: ......

Page 3: ...No Serial No LIQUID CRYSTAL TELEVISION ENGLISH INTRODUCTION CAUTION TO REDUCE THE RISK OF ELECTRIC SHOCK DO NOT REMOVE COVER OR BACK NO USER SERVICEABLE PARTS INSIDE REFER SERVICING TO QUALIFIED SERVICE PERSONNEL CAUTION RISK OF ELECTRIC SHOCK DO NOT OPEN THIS SYMBOL INDICATES THAT DANGEROUS VOLTAGE CONSTITUTING A RISK OF ELECTRIC SHOCK IS PRESENT WITHIN THIS UNIT THIS SYMBOL INDICATES THAT THERE ...

Page 4: ...exit from the appliance 13 OUTDOOR ANTENNA GROUNDING If an outside antenna or cable system is connected to the TV be sure the antenna or cable system is grounded so as to provide some protection against voltage surges and built up static charges Article 810 of the National Electrical Code ANSI NFPA No 70 provides information with respect to proper grounding of the mast and supporting structure gro...

Page 5: ... energy Changes or modifications to this equipment may cause harmful interference unless the modifications are expressly approved in the manual The user could lose the authority to operate this equipment if an unauthorized change or modification is made RADIO TV INTERFERENCE This equipment has been tested and found to comply with the limits for a Class B digital device pursuant to Part 15 of the F...

Page 6: ...gged easily from the AC outlet The Liquid Crystal panel is a very high technology product with 921 600 thin film transistors giving you fine picture details Occasionally a few non active pixels may appear on the screen as a fixed point of blue green or red Please note that this does not affect the performance of your product The Liquid Crystal panel used in this product is made of glass Therefore ...

Page 7: ...n digital conventional analog standard definition and high definition formats Also cable subscribers can access their cable TV channels Program Information Display DTV only You can display the title contents and other information of the current DTV program on the TV screen Auto Channel Scan This unit automatically scans and memorizes channels available in your area eliminating difficult setup proc...

Page 8: ... not try to recharge batteries they can overheat and rupture Supplied Accessories 5 operation manual remote control batteries AA size 2 If you need to replace these accessories please call our customer support line found on the warranty pages in this manual Depending on your antenna system you may need different types of combiners mixers or separators splitters Contact your local electronics store...

Page 9: ...the main menu is displayed 6 AUDIO button p16 Digital Mode DTV Press to select the audio language Analog Mode TV Press to select the audio mode 7 DISPLAY button p17 Digital Mode DTV Press to display the channel number and the program information Analog Mode TV Press to display the channel number External Input Mode Press to display the currently selected 8 INPUT button p16 Press to access connecte...

Page 10: ...tening 3 COMPONENT and AUDIO input jacks p10 Component video cable connection for an external device Use component video and audio output jacks of an external device 4 AUDIO input jacks p10 RCA audio cable connection for an external device 5 VIDEO input jack p11 RCA video cable connection for an external device 6 S VIDEO input jack p10 S video cable connection for an external device 7 COAXIAL digi...

Page 11: ...device please unplug the RF coaxial cable from the antenna input jack before moving the unit If you use an antenna to receive analog TV it should also work for DTV reception Outdoor or attic antennas will be more effective than set top versions To easily switch your reception source between antenna and cable install an antenna selector If you connect to the cable system directly contact the CATV i...

Page 12: ...cepts 480i 480p video signals If the external device enables 480p video signal to send to this unit you can select the display mode either 4 3 normal or wide Refer to TV Screen Display Mode on page 18 S video Cable Connection S video connection offers good picture quality for video devices connected to the unit Use an S video cable to connect the unit to external video devices equipped with S vide...

Page 13: ... AUDIO L R L VIDEO S VIDEO COAXIAL PR PB Y R RCA audio cable RCA video cable rear of this unit Note If you connect to the S video jack and the video jack at the same time the S video connection will have priority Digital Audio Output Connection If you connect this unit to an external digital audio device you can enjoy multi channel audio like 5 1ch digital broadcasting sound DIGITAL AUDIO COAXIAL ...

Page 14: ...PRESET CH CATV SELECT K L SET ENTER Scanning and memorizing the channels automatically start 25 AUTO PRESET CH TV DTV When the scanning and memorizing are completed the lowest memorized channel in the broadcasting will be displayed 5 Note If you connect the cable system directly contact the CATV installer If you press POWER or MENU during AUTO PRESET CH this setting will be canceled The initial au...

Page 15: ...5 Auto Channel Scan If you switch cable signal source e g between antenna and CATV or if you move theTV to a different area after the initial setting or if you restore the DTV channel you deleted you will need to perform auto channel scan Beforeyoubegin Make sure if the unit is connected to antenna or cable 1 Press MENU to display the main menu MENU 2 Use Cursor K L to select CHANNEL SETUP then pr...

Page 16: ...GLISH Press MENU to remove the main menu With regard only to the digital channel even after the scanning is complete if you unplug the AC power cord before turning off the unit by pressing POWER the channel setting may be lost Language Selection You can choose English Spanish or French as your on screen language 1 Press MENU to display the main menu MENU 2 Use Cursor K L to select LANGUAGE then pr...

Page 17: ...than one program per major channel since digital broadcasting technology distinguishes between multiple channels broadcast by a single network CH4 CH4 high definition TV 18 00 18 30 19 00 19 30 20 00 20 30 CH4 1 CH4 CH4 No signal No signal No signal CH4 2 ATSC digital mode CH4 NTSC analog mode Air Time No signal CH4 1 CH4 CH4 2 change automatically major channel minor channel change manually by us...

Page 18: ...n the analog mode and how to switch the audio language in the digital mode TV While receiving an MTS broadcast press AUDIO repeatedly to cycle through the available audio channel AUDIO MAIN SAP MONO MAIN Outputs main audio SAP Outputs second audio program MONO Outputs mono audio The information display will automatically disappear in 10 seconds DTV 1 Press AUDIO to display the currently selected l...

Page 19: ...er to Switching Audio Mode on page 16 KABC CH 95 03 A Day of Memories ENGLISH 1 3 2 3 4 1 Program Guide The program guide added to broadcasting information is displayed KABC CH 95 03 A Day of Memories ENGLISH 1 3 Next Push L Key Back Push K Key A quarter century ago which may now qualify as the good old days of newsp apering run of paper sales accounted for 80 percent of the industry s adverti sin...

Page 20: ...layed on the TV screen INPUT 2 480P Select WIDE accordingly if your DVD video is recorded as anamorphic widescreen WIDE 4 3 5 Sleep Timer The sleep timer can be set to automatically turn off the unit after an incremental period of time 1 Press SLEEP to set the sleep timer SLEEP SLEEP OFF Sleep timer display appears on the TV screen 2 Press SLEEP repeatedly to change the amount of time until shut o...

Page 21: ...TV DTV AUTO PRESET CH CATV D CATV AUTO PRESET WILL RESCAN ALL CHANNELS THIS MAY TAKE A WHILE TO COMPLETE SELECT K L SET ENTER 4 Select the channel you want to add or delete Refer to Channel Selection on page 15 e g digital TV mode ADD DELETE DTV ADD DELETE B D25 5 Press Cursor to add the desired channel or press Cursor B to delete the desired channel or To add or delete another channels repeat ste...

Page 22: ...tomatically disappear in 10 seconds 5 Closed Caption TV You can view closed captioning cc forTV programs movies and news Closed caption refer to text of dialogue or descriptions displayed on screen for the hearing impaired 1 Press MENU to display the main menu MENU 2 Use Cursor K L to select CAPTION then press ENTER repeatedly to change the setting e g digital TV mode or ENTER TV SETUP PICTURE CHA...

Page 23: ...bile ignition noise Electric motor noise Weak signal reception Multiplex signal reception ghosts or screen flutter The unit retains the closed caption setting if the power fails DTV Closed Caption DTV In addition to the basic closed caption described on page 20 DTV has its own closed caption called DTVCC Use this menu to change the settings for DTVCC 1 Press MENU to display the main menu MENU 2 Us...

Page 24: ...E FORE OPACITY SOLID FORE COLOR WHITE BACK OPACITY SOLID BACK COLOR BLACK SELECT K L SET ENTER 5 CAPTION SIZE Closed captioning font size can be changed as below FONT STYLE Font style of the displayed caption can be switched as below CHARACTER EDGE Edge type of the displayed caption can be switched as below FORE COLOR BACK COLOR Font and background color of the displayed caption can be switched as...

Page 25: ...MAL DARK 3 Press MENU to exit MENU 5 Blue Screen When there is no signal input theTV screen changes to blue back screen 1 Press MENU to display the main menu MENU 2 Use Cursor K L to select OPTION then press ENTER e g digital TV mode or ENTER TV SETUP PICTURE CHANNEL SETUP V CHIP SETUP LANGUAGE ENGLISH CAPTION OFF BACK LIGHT BRIGHT COLOR TEMP COOL OPTION DTVCC SELECT K L SET ENTER 3 Use Cursor K L...

Page 26: ...r ENTER OPTION SETUP BLUE SCREEN OFF NO SIGNAL OFF OFF NO OPERATION OFF OFF SELECT K L SET ENTER OFF ON 4 Press MENU to exit MENU 5 No Operation Off You can set the unit to turn itself off automatically when there is no operation for 180 minutes 1 Press MENU to display the main menu MENU 2 Use Cursor K L to select OPTION then press ENTER e g digital TV mode or ENTER TV SETUP PICTURE CHANNEL SETUP ...

Page 27: ...nter the 4 digit numbers for your password 1 2 3 4 5 6 7 8 9 0 PASSWORD When you have not set up your password enter 0000 When the password is correct the following V CHIP SETUP menu is displayed See the following description for setting each item e g analog TV mode A A TV Rating D page 26 B B MPAA Rating D page 27 C C Change Password D page 27 V CHIP SETUP TV RATING MPAA RATING CHANGE PASSWORD SE...

Page 28: ...e sub ratings to block specific elements of programming To set the sub ratings follow the steps below 1 Use Cursor K L to select the desired main rating then press ENTER twice to show its sub ratings or ENTER TV Y VIEW TV Y7 DLSV VIEW TV G VIEW TV PG DLSV BLOCK TV 14 DLSV BLOCK TV MA DLSV BLOCK SELECT K L SET ENTER 2 Use Cursor K L then press ENTER repeatedly to change the setting e g TV PG or ENT...

Page 29: ...ure audience only 6 Press MENU to exit MENU C Change Password C Change Password Although the default code 0000 is supplied with the unit you can set your own password 4 Use Cursor K L to select CHANGE PASSWORD then press ENTER e g analog TV mode or ENTER V CHIP SETUP TV RATING MPAA RATING CHANGE PASSWORD SELECT K L SET ENTER 5 Press the Number buttons on the remote control to enter the new 4 digit...

Page 30: ...affect picture quality View other TV channels The problem might be limited to the broadcasting station Picture blurred When the outside antenna is used check the wire condition and connection View other TV channels The problem might be limited to the broadcasting station Ghosts in picture Check the antenna or cable connection to the main unit When the outside antenna is used check the wire conditi...

Page 31: ...d the dialogue Captions that are delayed a few seconds behind the actual dialogue are common for live broadcasts Most captioning production companies can display a dialogue to a maximum of 220 words per minute If a dialogue exceeds that rate selective editing is used to insure that the captions remain up to date with the current TV screen dialogue Captions are displayed as a white box No caption i...

Page 32: ... 25 M 26 N 27 O 28 P 29 Q 30 R 31 S 32 T 33 U 34 V 35 W 36 W 1 37 38 W 2 W 3 39 W 4 40 W 5 41 W 6 42 W 7 43 W 8 44 W 9 45 W 10 46 W 11 47 W 12 48 W 13 49 W 14 50 W 15 51 W 16 52 W 17 53 W 18 54 W 19 55 W 20 56 W 21 57 W 22 58 W 23 59 W 24 60 W 25 61 W 26 62 W 27 63 W 28 64 W 29 65 W 30 66 W 31 67 W 32 68 W 33 69 W 34 70 W 35 71 W 36 72 W 37 73 W 38 74 W 39 75 W 40 76 W 41 77 W 42 78 W 43 79 W 44 8...

Page 33: ...n on behalf of Sharp The warranties described herein shall be the sole and exclusive warranties granted by Sharp and shall be the sole and exclusive remedy available to the purchaser Correction of defects in the manner and for the period of time described herein shall constitute complete fulfillment of all liabilities and responsibilities of Sharp to the purchaser with respect to the Product and s...

Page 34: ...32 EN ...

Page 35: ...ch mm POWER INPUT 2 AUDIO COMPONENT INPUT 1 AUDIO L R L VIDEO S VIDEO COAXIAL PR PB Y R 215 16 540 1210 16 320 17 3 16 435 15 11 16 397 9 11 16 245 1 13 16 45 4 100 12 3 16 308 163 16 409 611 16 168 28 16 62 814 16 225 46 16 110 5 ...

Page 36: ...SHARP ELECTRONICS CORPORATION Sharp Plaza Mahwah New Jersey 07430 2135 SHARP CORPORATION Printed in China Imprimé en Chine Impreso en China 9HS1EMN22181 A7145UH 1EMN22181 ...

Reviews: