Sharp LC-15M4U Operation Manual Download Page 15

14

SELECTING THE MENU ITEMS

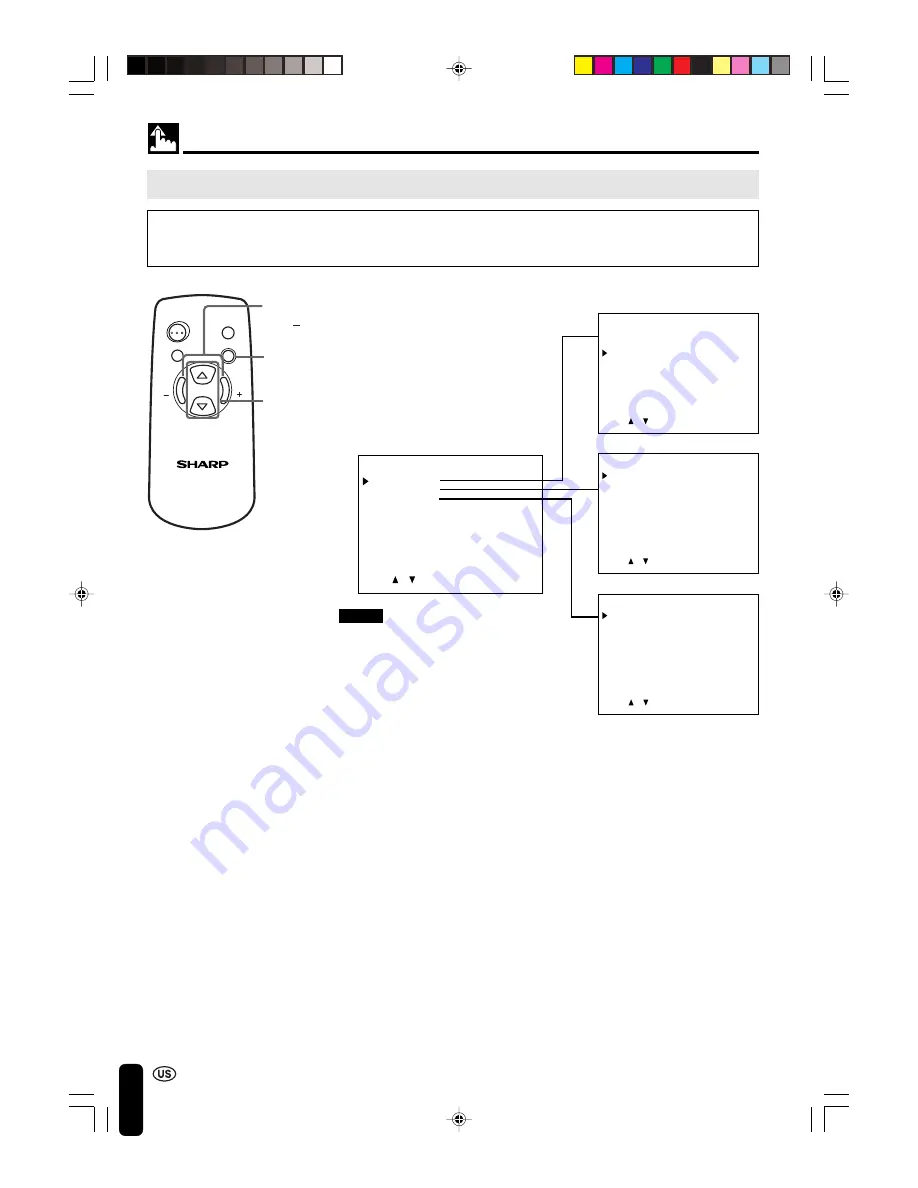
• This LCD monitor set allows you to adjust the picture, sound, and other features using the On-screen

Display. Select the desired menu item by following the steps below and then refer to the indicated page
for details.

1

Press 

MENU

 to display the MENU

screen.

2

Press 

SELECT (

]

)/(

[

)

 to select

the desired menu item.

• The cursor moves up or down.
• The cursor indicates the selected

menu item.

3

Press 

VOL


(+)/(–)

 to enter.

4

Press 

MENU

 again to exit.

Selecting the Menu Items

Notes:

The displayed items differ depending
on the setting conditions.

The selected item is highlighted in
yellow.

Items in purple cannot be selected.

The original screen is restored by
pressing 

MENU

 on the menu screen

or any of the adjustment screens.
The original screen is also restored
when no buttons have been pressed
for about a period of 30 seconds.
The adjustment values and settings
that were changed before the screen
is restored are saved as is in the
memory.

LCD MONITOR

SELECT

SELECT

VOL

VOL

MENU

MUTE

AV INPUT

ON/OFF

MENU

SELECT
(

]

)/(

[

)

VOL
(+)/(  )

* The screen indications shown above are larger than actual size for easy reading.

MENU
   PICTURE
   SET  UP
   LANGUAGE   

ENTER: –VOL+

SELECT:    

EXIT: MENU

PICTURE(AV1)
   CONTRAST
   TINT
   COLOR
   BLACK LEVEL
   SHARPNESS
   RED-BLUE
   GREEN
   COLOR SYSTEM
   RESET

 
[         30]
[           0]
[           0]
[           0]
[           0]
[           0]
[           0]
[    AUTO]

ENTER: –VOL+

SELECT:    

EXIT: MENU

ADJUST: –VOL+

SELECT:    

EXIT: MENU

SET  UP
   BRIGHTNESS
   UPSIDE
   RIGHT/LEFT
   BLUE SCREEN
   AV1
   AV2 IN/OUT
   SLEEP TIMER

 
[BRIGHT  ]
[NORMAL]
[NORMAL]
[OFF        ]
[NORMAL]
[IN           ]
[ – – –   REMAIN]

(Pages 18 and 19)

(Pages 16 and 17)

LANGUAGE     

SELECT:    

EXIT: MENU

ENGLISH     
ESPAÑOL      
FRANÇAIS     

(Page 15)

LC-15M4U(09-14)Eng.p65

01.7.24, 5:21 PM

14

Summary of Contents for LC-15M4U

Page 1: ...u papier recyclé FRANÇAIS MONITEUR AV À CRISTAUX LIQUIDES MONITOR AV LCD MANUAL DE MANEJO LC 15M4U ESPAÑOL Impreso en Japón Impresso no Japão TINS 7526CEZZ Impreso en papel reciclado Impresso em papel reciclado pós utilização PORTUGUÊS MONITOR AV DE TELA DE CRISTAL LÍQUIDO MANUAL DE OPERAÇÃO OPERATION MANUAL MODE D EMPLOI 15M4UCover 01 07 24 ...

Page 2: ...LC 15M4U LCD AV MONITOR OPERATION MANUAL ENGLISH ENGLISH LC 15M4U 01 08 Eng p65 01 7 24 5 21 PM 1 ...

Page 3: ...ceived including interference that may cause undesired operation Responsible Party SHARP ELECTRONICS CORPORATION Sharp Plaza Mahwah New Jersey 07430 TEL 1 800 BE SHARP 1 800 237 4277 U S A ONLY CAUTION Use the supplied AC cord as it is Do not remove the core part from the AC cord and do not change the way of winding cables around the core part INFORMATION This equipment has been tested and found t...

Page 4: ...t utilizes tin lead solder and fluorescent lamp containing a small amount of mercury Disposal of these materials may be regulated due to environmental considerations For disposal or recycling information please contact your local authorities or the Electronic Industries Alliance www eia org LC 15M4U 01 08 Eng p65 01 7 24 5 21 PM 3 ...

Page 5: ...art 10 Ventilation The vents and other openings in the cabinet are designed for ventilation Do not cover or block these vents and openings since insufficient ventilation can cause overheating and or shorten the life of the product Do not place the product on a bed sofa rug or other similar surface since they can block ventilation openings This product is not designed for built in installation do n...

Page 6: ...h the same characteris tics and performance as the original parts Use of unauthorized parts can result in fire electric shock and or other danger 21 Safety checks Upon completion of service or repair work request the service technician to perform safety checks to ensure that the product is in proper operating condition 22 Wall or ceiling mounting When mounting the product on a wall or ceiling be s...

Page 7: ...NU ITEMS 14 ADJUSTMENT 15 Adjusting the LANGUAGE Settings 15 Adjusting the PICTURE Settings 16 Adjusting the SET UP Settings 18 Adjusting the SLEEP TIMER Settings 19 CONNECTING TO EXTERNAL DEVICES 20 Connecting to a VCR a DVD player etc AV 1 2 IN 20 Connecting to a DVD player COMPONENT terminal 21 Outputting video and audio video output 22 Listening with Headphones 22 Watching TV 23 EXAMPLE OF APP...

Page 8: ...S 7526CEZZ Printed on post consumer recycled paper Imprimé sur du papier recyclé FRANÇAIS Printed in Japan OPERATION MANUAL MODE D EMPLOI LCD AV MONITOR MONITEUR AV Á CRISTAUX LIQUIDES Fixed Screw for Set Stand 1 Product shape varies in some countries Wall Mount Bracket 1 Wall Mount Anchor and Screw 4 TINS 7526CEZZ RRMCG1459CESA UADP 0228CEPZ QACCD3097CEPZ UBATU0026GEZZ LANGU9041CESA LC 15M4U 01 0...

Page 9: ...e batteries with their terminals corresponding to the and indications Different types of batteries have different characteristics Do not mix batteries of different types Do not mix old and new batteries Mixing old and new batteries can shorten the life of new batteries and or cause old batteries to leak chemicals Remove batteries as soon as they are non operable Chemicals that leak from batteries ...

Page 10: ...ton VOL buttons SELECT buttons MENU button The six buttons shown at the left have the same functions as those on the remote control When this manual describes button functions it is referring to the buttons on the remote control Side control section MENU SELECT VOL ON OFF MAIN POWER AV INPUT LC 15M4U 09 14 Eng p65 01 7 24 5 20 PM 9 ...

Page 11: ...ear terminal section Can also be used as video output terminals AUDIO Y PB PR COMPONENT R L AV 1 IN VIDEO POWER INPUT DC12V AUDIO VIDEO AV 2 IN OUT R L HEAD PHONE AUDIO VIDEO COMPONENT AUDIO VIDEO HEADPHONE POWER INPUT DC12V AV 1 IN AV 2 IN OUT LC 15M4U 09 14 Eng p65 01 7 24 5 20 PM 10 ...

Page 12: ...o provided with the AV INPUT SELECT VOL and MENU buttons When this manual describes button functions it is referring to the buttons on the remote control Side control section of main unit SELECT SELECT VOL VOL MENU MUTE AV INPUT ON OFF SELECT VOL VOL MENU MUTE AV INPUT ON OFF SELECT SELECT VOL VOL MENU AV INPUT MENU SELECT VOL MAIN POWER ON OFF AV INPUT The main power switch is not provided on the...

Page 13: ...he upper right corner each time AV INPUT is pressed Note The AV input mode indication remains for five seconds AV1 Video equipment connected to the AV1 input terminals The display of the AV1 mode indicates either AV1 or COMPONENT depend ing on the adjustment of the SET UP settings AV1 is displayed when AV1 is set to NORMAL in the SET UP settings and COMPONENT is displayed when AV1 is set to COMPON...

Page 14: ...se the sound volume The indicator segment decreases To mute the sound Press MUTE to temporarily turn off the sound The MUTE mark is displayed Press MUTE or VOL to turn the sound back to the previous level The MUTE mark disappears Note MUTE is automatically cleared when the following button is pressed ON OFF VOL or MUTE To turn off the LCD monitor Press ON OFF The power indicator turns red To turn ...

Page 15: ... screen or any of the adjustment screens The original screen is also restored when no buttons have been pressed for about a period of 30 seconds The adjustment values and settings that were changed before the screen is restored are saved as is in the memory LCD MONITOR SELECT SELECT VOL VOL MENU MUTE AV INPUT ON OFF MENU SELECT VOL The screen indications shown above are larger than actual size for...

Page 16: ...ENU to display the MENU screen 2 Press SELECT to move the cursor to LANGUAGE and then press VOL to display the LANGUAGE screen 3 Press SELECT to select the language you want to display 4 Press MENU again to exit LANGUAGE SELECT EXIT MENU ENGLISH ESPAÑOL FRANÇAIS LCD MONITOR SELECT SELECT VOL VOL MENU MUTE AV INPUT ON OFF MENU SELECT VOL LC 15M4U 15 19 Eng p65 01 7 24 5 18 PM 15 ...

Page 17: ... in the table on the next page 4 Press VOL to display the screen for the selected adjustment item 5 Press VOL to make the adjustment 6 Press MENU again to exit MENU PICTURE SET UP LANGUAGE ENTER VOL SELECT EXIT MENU LCD MONITOR SELECT SELECT VOL VOL MENU MUTE AV INPUT ON OFF MENU SELECT VOL PICTURE AV1 CONTRAST TINT COLOR BLACK LEVEL SHARPNESS RED BLUE GREEN COLOR SYSTEM RESET 30 0 0 0 0 0 0 AUTO ...

Page 18: ...reen COLOR SYSTEM Press VOL to select COLOR SYSTEM Note TINT is displayed only when N358 or N443 is selected Switching the COLOR SYSTEM Set the system to AUTO for normal reception The AUTO mode automatically detects the receiving signal system and changes the reception system of the set When the picture or sound is not stable switching to an appropriate system may improve the picture or sound qual...

Page 19: ...hen viewing in dim areas DOWN Inverted image To display images upside down for special uses MIRROR Mirror image To display mirror images for special uses ON The screen is turned blue when there is no signal COMPONENT OUT Line Output is selected Output volume is fixed Speaker output is available OUT Line Output is selected Output volume is variable Speaker output is Mute The setting can be specifie...

Page 20: ... minutes The setting can be specified in increments of 30 minutes and in a range between 30 and 120 minutes The setting is turned off when is displayed 4 Press MENU again to exit Note If the monitor s power is turned off and then turned back on again after the SLEEP TIMER has been set the setting will be canceled MENU PICTURE SET UP LANGUAGE ENTER VOL SELECT EXIT MENU ADJUST VOL SELECT EXIT MENU S...

Page 21: ... AUX 2 SURROUND ON OFF TUNER BAND DVD AUX 1 AUX 3 AUX 2 SURROUND ON OFF Video Audio R Audio L Video Audio R Audio L VCR Laser disc player etc DVD Player etc To AUDIO input terminal Audio cord To audio output terminal To AUDIO input terminal To audio output terminal To VIDEO input terminal To video output terminal To VIDEO input terminal To video output terminal Audio cord Video cord BNC TYPE Video...

Page 22: ...o R To COMPONENT terminal To COMPONENT terminal Video cord BNC TYPE Y DVD Player Audio L PR PB AUDIO Y PB PR COMPONENT R L AV 1 IN VIDEO POWER INPUT DC12V AUDIO VIDEO AV 2 IN OUT R L Note To view the image from the component connected to the terminals for AV 1 IN set AV1 to COMPONENT with the SET UP setting see page 18 Connecting to a DVD player COMPONENT terminal LC 15M4U 20 28 Eng p65 01 7 24 5 ...

Page 23: ...ersa When using COMPONENT there is no video output can be made to the AV output terminal but there is audio output for connecting to external audio systems Plug the headphone mini plug into the headphone jack located on the rear side of the set AV 2 IN OUT POWER INPUT DC12V R L VIDEO AUDIO S VIDEO HEAD PHONE HEADPHONE jack Mini plug Headphones Listening with Headphones Notes The headphones are not...

Page 24: ...T TOP BOX MONITOR TERMINAL TV BROADCAST ON AIR VIDEO AUDIO R L VIDEO OUT BNC TYPE TV ANT RF IN VCR VIDEO AUDIO R L BNC TYPE TV TUNER RF IN TV ANT VIDEO OUT VIDEO AUDIO R L VIDEO OUT BNC TYPE CABLE RF IN SET TOP BOX VIDEO AUDIO R L VIDEO OUT BNC TYPE SATELLITE SATELLITE TUNER RF IN VIDEO AUDIO R L TEL LINE VIDEO OUT Web SET TOP BOX TV ANT RF IN BNC TYPE PAY TV SATELLITE TV WEB TV LC 15M4U 20 28 Eng...

Page 25: ...n place using the anchor screws Tighten the anchor screws securely CAUTION The wall mount bracket must be installed with four anchor screws Be sure to thighten so that it will not fall down under a pulling force of at least 44 lbs 20 Kg The anchors are designed for plaster boards with a thickness of 0 5 in 12 5 mm For a 0 4 in 9 5 mm thickness board or a wooden wall find similar anchors or screws ...

Page 26: ...ents Make sure that the VCR connection cord is correctly connected to the COMPONENT terminal Image is displayed but no sound from speakers Make sure that the cables are properly connected to rear terminal section of LCD monitor Check the volume adjustment Make sure that the sound is not muted Make sure that the headphones are not connected Image is too dark Check to see if BRIGHTNESS is set to DAR...

Page 27: ...E Exterior color Silver Outside dimensions 14 1 W 12 2 H 2 5 D in 357 0 W 309 2 H 62 5 D mm Net weight 7 5 lbs 3 4 kg incl stand excl accessories ACCESSORIES Operation manual Language English French Spanish Portuguese Remote control Infrared wireless type Wall mount parts Wallmount Bracket 1 pc Fixed Screw 1 pc Wallmount Anchor and Screw 4 pc AC adapter Auto wide type 1 pc DC cable 6 5 ft 2 m DC p...

Page 28: ...2V AUDIO MENU VOL ON OFF MAIN POWER AVINPUT SELECT R L R L Y PB PR VIDEO AUDIO VIDEO COMPONENT HEAD PHONE AV 1 IN AV 2 IN OUT POWER 14 1 357 5 4 136 7 12 2 309 2 3 4 87 9 0 6 7 169 1 2 31 0 6 16 1 4 36 6 2 5 62 5 LC 15M4U 20 28 Eng p65 01 7 24 5 17 PM 27 ...

Page 29: ... any warranties beyond the time period described herein on behalf of Sharp The warranties described herein shall be the sole and exclusive warranties granted by Sharp and shall be the sole and exclusive remedy available to the purchaser Correction of defects in the manner and for the period of time described herein shall constitute complete fulfillment of all liabilities and responsibilities of Sh...

Reviews: